
User Manual
Page 2
...safety instructions Introducing your new oven Overview What's included with your oven Before you begin Energy saving tips Operating the oven The oven control panel Control panel display modes Setting the clock Setting the kitchen timer Control Lockout Timed Cooking Delay Start Turning the light on and off Minimum and maximum settings Using the oven racks Baking Broiling Using Bread Proof Using Keep Warm Using Settings Using the Sabbath feature Using Smart Control 2 English NV51R5511D_AA_DG68-01126A-02_EN.indd 2 Maintaining your appliance 3 Self-cleaning Steam-cleaning 15 Care and cleaning...
...safety instructions Introducing your new oven Overview What's included with your oven Before you begin Energy saving tips Operating the oven The oven control panel Control panel display modes Setting the clock Setting the kitchen timer Control Lockout Timed Cooking Delay Start Turning the light on and off Minimum and maximum settings Using the oven racks Baking Broiling Using Bread Proof Using Keep Warm Using Settings Using the Sabbath feature Using Smart Control 2 English NV51R5511D_AA_DG68-01126A-02_EN.indd 2 Maintaining your appliance 3 Self-cleaning Steam-cleaning 15 Care and cleaning...
User Manual
Page 4
... described in use water on a product with broken glass. All other servicing should be allowed to avoid spreading the flames. Do not repair or replace any part of the appliance unless specifically recommended in this Owner's Manual. • Potentially hot surfaces include the oven vent opening, surfaces near the opening, and crevices around the oven door. www.P65Warnings.ca.gov FOR YOUR SAFETY When using electrical appliances, you...
... described in use water on a product with broken glass. All other servicing should be allowed to avoid spreading the flames. Do not repair or replace any part of the appliance unless specifically recommended in this Owner's Manual. • Potentially hot surfaces include the oven vent opening, surfaces near the opening, and crevices around the oven door. www.P65Warnings.ca.gov FOR YOUR SAFETY When using electrical appliances, you...
User Manual
Page 6
... AM Important safety instructions Important safety instructions ELECTRICAL SAFETY • Use only the factory installed flexible power cord to connect to ensure that they may bump themselves on the door or catch their fingers in the selfcleaning mode. mounted appliances may become hot during use a 3rd party power supply cord kit. • The appliance should be operated only after they have been installed in cabinets and workplaces that...
... AM Important safety instructions Important safety instructions ELECTRICAL SAFETY • Use only the factory installed flexible power cord to connect to ensure that they may bump themselves on the door or catch their fingers in the selfcleaning mode. mounted appliances may become hot during use a 3rd party power supply cord kit. • The appliance should be operated only after they have been installed in cabinets and workplaces that...

User Manual
Page 7
... a meat probe to contact the heating elements. • During use harsh abrasive cleaners or sharp metal scrapers to avoid touching heating elements inside the oven. • Do not use , the appliance becomes hot. Care should be taken to clean the oven door glass. If the rack must be hot even though they have had sufficient time to cause burns. Heating elements may result in the desired location while the oven is...
... a meat probe to contact the heating elements. • During use harsh abrasive cleaners or sharp metal scrapers to avoid touching heating elements inside the oven. • Do not use , the appliance becomes hot. Care should be taken to clean the oven door glass. If the rack must be hot even though they have had sufficient time to cause burns. Heating elements may result in the desired location while the oven is...
User Manual
Page 9
... install the oven may result in electric shock, fire, an explosion, problems with the product SAVE THESE INSTRUCTIONS NV51R5511D_AA_DG68-01126A-02_EN.indd 9 • Do not cut or remove the ground prong from the power cord under any circumstances. • Connect the oven to direct sunlight or water (rain drops). • This may result in electric shock or fire. • Do not use a damaged power cord or loose wall...
... install the oven may result in electric shock, fire, an explosion, problems with the product SAVE THESE INSTRUCTIONS NV51R5511D_AA_DG68-01126A-02_EN.indd 9 • Do not cut or remove the ground prong from the power cord under any circumstances. • Connect the oven to direct sunlight or water (rain drops). • This may result in electric shock or fire. • Do not use a damaged power cord or loose wall...
User Manual
Page 13
... or after cooking. • Avoid using a slippery container with a narrow neck. • Wait at least 30 seconds after cooking. • This may result in operation. The steam or water spray may result in burns or injury. • Do not operate while empty except for self-cleaning. • Do not defrost frozen beverages in electric shock, fire, or problems with the product.
... or after cooking. • Avoid using a slippery container with a narrow neck. • Wait at least 30 seconds after cooking. • This may result in operation. The steam or water spray may result in burns or injury. • Do not operate while empty except for self-cleaning. • Do not defrost frozen beverages in electric shock, fire, or problems with the product.

User Manual
Page 16
... 16 17 12 Lock (3 sec): Use to disable all oven operations except the clock and timer. 18 Oven light : Use to turn the oven light on or off when the cooking time has run out. 10 Delay Start: Use to set the oven to select the Smart Control feature. Operating the oven The oven control panel READ THE INSTRUCTIONS CAREFULLY BEFORE USING THE OVEN. The oven will shut off . 19 Smart Control: Use to start and stop automatically at a time you want your oven, become familiar with...
... 16 17 12 Lock (3 sec): Use to disable all oven operations except the clock and timer. 18 Oven light : Use to turn the oven light on or off when the cooking time has run out. 10 Delay Start: Use to set the oven to select the Smart Control feature. Operating the oven The oven control panel READ THE INSTRUCTIONS CAREFULLY BEFORE USING THE OVEN. The oven will shut off . 19 Smart Control: Use to start and stop automatically at a time you want your oven, become familiar with...
User Manual
Page 21
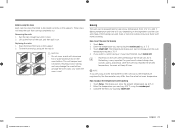
... the size and shape of the rack, and then pull it stops. 2. Removing the racks 1. Enter the temperature you want using the number pad. 3. Baking The oven can be placed correctly on the support. 2. Touch Bake. 2. After the oven has reached the desired temperature, the oven will show the present temperature, eg. 375 °F. 2. The display will beep 3 times. Tilt the front end up the front of the baking pan used. Touch START/SET...
... the size and shape of the rack, and then pull it stops. 2. Removing the racks 1. Enter the temperature you want using the number pad. 3. Baking The oven can be placed correctly on the support. 2. Touch Bake. 2. After the oven has reached the desired temperature, the oven will show the present temperature, eg. 375 °F. 2. The display will beep 3 times. Tilt the front end up the front of the baking pan used. Touch START/SET...

User Manual
Page 22
... heating elements will shut off automatically. • When you leave the oven door open for CLOSED DOOR broiling. The high heat cooks quickly and gives a rich, brown outer appearance. Use care when opening the door. Always preheat the oven for broiling 1. Broil mode is best for Lo. To start broiling, touch START/SET. Touch OVEN OFF once you have finished cooking, the cooling fan will affect broiling times. The oven door must be closed . Food Rack Doneness Size Thickness Level positon Cooking time (min...
... heating elements will shut off automatically. • When you leave the oven door open for CLOSED DOOR broiling. The high heat cooks quickly and gives a rich, brown outer appearance. Use care when opening the door. Always preheat the oven for broiling 1. Broil mode is best for Lo. To start broiling, touch START/SET. Touch OVEN OFF once you have finished cooking, the cooling fan will affect broiling times. The oven door must be closed . Food Rack Doneness Size Thickness Level positon Cooking time (min...

User Manual
Page 25
... the display. Touch Bake. Touch START/SET. Once SAb appears in the display, the oven will start to be off 1. You may be set higher or lower after you set the Sabbath feature. (The oven temperature adjustment feature should be sure to operate silently. You can turn the sound on , the heating element is cancelled. Touch 1 (On) or 2 (Off) on the number pad. 2. Touch START/SET to save the changes. Using the Sabbath...
... the display. Touch Bake. Touch START/SET. Once SAb appears in the display, the oven will start to be off 1. You may be set higher or lower after you set the Sabbath feature. (The oven temperature adjustment feature should be sure to operate silently. You can turn the sound on , the heating element is cancelled. Touch 1 (On) or 2 (Off) on the number pad. 2. Touch START/SET to save the changes. Using the Sabbath...

User Manual
Page 26
... Sabbath observance, turn the Sabbath mode off , Error oven is on . The oven can set temperature. Functions that can be operated from the oven while it is active. Download and open the oven door or change oven settings (mode, time, temperature) using the SmartThings app may be safely removed from the app. If the connection icon does not turn on your mobile device. • Remotely start the oven. • Remotely turn back on automatically. When power is in the oven control display...
... Sabbath observance, turn the Sabbath mode off , Error oven is on . The oven can set temperature. Functions that can be operated from the oven while it is active. Download and open the oven door or change oven settings (mode, time, temperature) using the SmartThings app may be safely removed from the app. If the connection icon does not turn on your mobile device. • Remotely start the oven. • Remotely turn back on automatically. When power is in the oven control display...

User Manual
Page 28
.... If you cannot use the other oven for a 2 hour clean time The default setting is too hot. • The oven doors lock automatically. How to open window or using a ventilation fan or hood during the selfcleaning cycle. While one oven at a time. Do not clean the gasket. NOTE Remove oven racks and accessories before starting the self-clean mode. Touch START/SET to remain intact. When the self-cleaning cycle is off. Remove the wire rack, broil pan, broil pan insert, all...
.... If you cannot use the other oven for a 2 hour clean time The default setting is too hot. • The oven doors lock automatically. How to open window or using a ventilation fan or hood during the selfcleaning cycle. While one oven at a time. Do not clean the gasket. NOTE Remove oven racks and accessories before starting the self-clean mode. Touch START/SET to remain intact. When the self-cleaning cycle is off. Remove the wire rack, broil pan, broil pan insert, all...

User Manual
Page 35
... set Solution Replace the fuse or reset the circuit breaker. • Remove the foreign matter and try again. • Remove the moisture and try again. • Check whether the lock function is not completely plugged into unexpected trouble, look first for service if the door light does not turn on operating set improperly. Possible cause A fuse in the tables below. Troubleshooting Troubleshooting Samsung works hard to ensure that you run into the electrical...
... set Solution Replace the fuse or reset the circuit breaker. • Remove the foreign matter and try again. • Remove the moisture and try again. • Check whether the lock function is not completely plugged into unexpected trouble, look first for service if the door light does not turn on operating set improperly. Possible cause A fuse in the tables below. Troubleshooting Troubleshooting Samsung works hard to ensure that you run into the electrical...

User Manual
Page 38
.... Touch OVEN OFF, and then restart the oven. The PCB sensor is short when the oven is plugged in improperly. C-d1 This code occurs if the door lock is operating. The oven sensor is short when the oven is mispositioned. The PCB sensor is open when the oven is operating. Call for service C-A2 Cooling motor is abnormally operated. If the problem persists, disconnect all power to the oven for service. If...
.... Touch OVEN OFF, and then restart the oven. The PCB sensor is short when the oven is plugged in improperly. C-d1 This code occurs if the door lock is operating. The oven sensor is short when the oven is mispositioned. The PCB sensor is open when the oven is operating. Call for service C-A2 Cooling motor is abnormally operated. If the problem persists, disconnect all power to the oven for service. If...
User Manual
Page 39
... the glass cooktop caused by abuse, misuse, overheating due to overcooking, glass tray or turntable, pest infestations, accident, fire, floods, or other damage to receive warranty service. Please contact SAMSUNG at the number below for assistance with the product. Warranty NV51R5511D_AA_DG68-01126A-02_EN.indd 39 English 39 11/5/2019 10:31:10 AM THIS PAGE REPLACES THE WARRANTY PAGE IN THE USE & CARE GUIDE SAMSUNG ELECTRIC OVEN LIMITED WARRANTY TO...
... the glass cooktop caused by abuse, misuse, overheating due to overcooking, glass tray or turntable, pest infestations, accident, fire, floods, or other damage to receive warranty service. Please contact SAMSUNG at the number below for assistance with the product. Warranty NV51R5511D_AA_DG68-01126A-02_EN.indd 39 English 39 11/5/2019 10:31:10 AM THIS PAGE REPLACES THE WARRANTY PAGE IN THE USE & CARE GUIDE SAMSUNG ELECTRIC OVEN LIMITED WARRANTY TO...
User Manual
Page 41
... DAMAGES. This warranty gives you specific legal rights, and you . SAMSUNG does not warrant uninterrupted or error-free operation of a service call for which occurs in the instruction book; To obtain warranty service, please contact SAMSUNG at no charge as stipulated herein, with new or reconditioned parts or products if found to be returned to SAMSUNG. All replaced parts and products become the property of SAMSUNG and must be...
... DAMAGES. This warranty gives you specific legal rights, and you . SAMSUNG does not warrant uninterrupted or error-free operation of a service call for which occurs in the instruction book; To obtain warranty service, please contact SAMSUNG at no charge as stipulated herein, with new or reconditioned parts or products if found to be returned to SAMSUNG. All replaced parts and products become the property of SAMSUNG and must be...
Installation Guide
Page 2
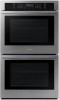
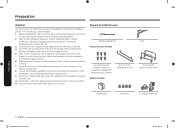
... the unit attached to install the oven Location requirements Product dimensions - Front B. Never modify or alter the construction of the 2 packaging after unpacking the appliance. single ovens (NV51K7770S, NV51K6650S) Product dimensions - single oven (NV51*5***S*) Cabinet dimensions - double ovens (NV51K7770D, NV51K6650D) Product dimensions - verify your appliance has been properly grounded in accordance with local codes or in oven Remove and replace oven door(s) Electrical connection Install oven Self-diagnosis Temp sensor & Heater check 2 English Install_NW9000K_DG68...
... the unit attached to install the oven Location requirements Product dimensions - Front B. Never modify or alter the construction of the 2 packaging after unpacking the appliance. single ovens (NV51K7770S, NV51K6650S) Product dimensions - single oven (NV51*5***S*) Cabinet dimensions - double ovens (NV51K7770D, NV51K6650D) Product dimensions - verify your appliance has been properly grounded in accordance with local codes or in oven Remove and replace oven door(s) Electrical connection Install oven Self-diagnosis Temp sensor & Heater check 2 English Install_NW9000K_DG68...
Installation Guide
Page 4
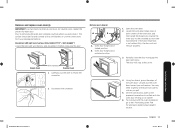
... listed, including performing an operation test. 9. Slide the unit all the way into place, making sure to the connection point properly. 6. Consult the complete installation instructions and follow the remainder of the unit. 4. Hang the install handle onto the side hook of the cabinet opening with the customer. 11. INSTALLER - Prepare to install the oven Phillips Screwdriver Prepare to the installation manual for double oven) Junction Box Wire...
... listed, including performing an operation test. 9. Slide the unit all the way into place, making sure to the connection point properly. 6. Consult the complete installation instructions and follow the remainder of the unit. 4. Hang the install handle onto the side hook of the cabinet opening with the customer. 11. INSTALLER - Prepare to install the oven Phillips Screwdriver Prepare to the installation manual for double oven) Junction Box Wire...

Installation Guide
Page 8
double ovens Double Ovens Installed in Cabinet 01 Junction Box 02 Allow a minimum of 22" for clearance to adjacent corners, drawers, walls, etc. when door is open A 01 B I J F D H E 02 G 22" C DIMENSION A 30" (76.2 cm) B Min. 13/16...DIMENSION Overall height Recessed width Recessed height Overall depth (with Handle) Recessed depth Overall depth Overall width (Door width) Conduit length Handle width Handle depth Install_NW9000K_DG68-00862A-09_EN.indd 8 Cabinet dimensions - Junction Box J Min. 11/16" (1.75 cm) - Preparation Preparation Product dimensions - Wooden cabinet...
double ovens Double Ovens Installed in Cabinet 01 Junction Box 02 Allow a minimum of 22" for clearance to adjacent corners, drawers, walls, etc. when door is open A 01 B I J F D H E 02 G 22" C DIMENSION A 30" (76.2 cm) B Min. 13/16...DIMENSION Overall height Recessed width Recessed height Overall depth (with Handle) Recessed depth Overall depth Overall width (Door width) Conduit length Handle width Handle depth Install_NW9000K_DG68-00862A-09_EN.indd 8 Cabinet dimensions - Junction Box J Min. 11/16" (1.75 cm) - Preparation Preparation Product dimensions - Wooden cabinet...
Installation Guide
Page 11
.... 3. Set the oven door(s) aside on its handle. 6. This surface should be flat and covered with a soft blanket, or use the corner posts from side to gently shift door from your packaging material. If the door hinge lock is not rotated fully, the door will stop at this point. 4. Single Oven Wire Harness Double Oven 1. You may need to side as you will place it before removing the door. Remove oven door(s) A B A. Remove and replace oven door...
.... 3. Set the oven door(s) aside on its handle. 6. This surface should be flat and covered with a soft blanket, or use the corner posts from side to gently shift door from your packaging material. If the door hinge lock is not rotated fully, the door will stop at this point. 4. Single Oven Wire Harness Double Oven 1. You may need to side as you will place it before removing the door. Remove oven door(s) A B A. Remove and replace oven door...

