
User Manual
Page 2
... 14 Self-cleaning 27 Steam-cleaning 29 Introducing your new oven 15 Care and cleaning of the oven 30 Removing the oven doors 32 Overview 15 Replacing the oven doors 33 What's included with your oven 15 Changing the oven light 34 Before you begin 15 Troubleshooting 35 Energy saving tips 15 Troubleshooting 35 Operating the oven 16 Information codes 38 The oven control panel 16 Warranty (U.S.A) 39 Control panel display modes 17 Setting the clock Setting the kitchen timer 17 Warranty (CANADA) 40 17 Control Lockout 18 Timed Cooking...
... 14 Self-cleaning 27 Steam-cleaning 29 Introducing your new oven 15 Care and cleaning of the oven 30 Removing the oven doors 32 Overview 15 Replacing the oven doors 33 What's included with your oven 15 Changing the oven light 34 Before you begin 15 Troubleshooting 35 Energy saving tips 15 Troubleshooting 35 Operating the oven 16 Information codes 38 The oven control panel 16 Warranty (U.S.A) 39 Control panel display modes 17 Setting the clock Setting the kitchen timer 17 Warranty (CANADA) 40 17 Control Lockout 18 Timed Cooking...

User Manual
Page 4
... or striking the glass doors and the control panel. Proper Installation - Do not repair or replace any part of the appliance unless specifically recommended in use water on grease fires. Do not cook on any part of the appliance. • Never use your appliance is in this Owner's Manual. • Potentially hot surfaces include the oven vent opening, surfaces near the opening, and crevices around the oven door. User servicing - Never leave children...
... or striking the glass doors and the control panel. Proper Installation - Do not repair or replace any part of the appliance unless specifically recommended in use water on grease fires. Do not cook on any part of the appliance. • Never use your appliance is in this Owner's Manual. • Potentially hot surfaces include the oven vent opening, surfaces near the opening, and crevices around the oven door. User servicing - Never leave children...

User Manual
Page 5
... cleaners or steam jet cleaners to clean any part of the oven. • If the power cord is damaged, it . Placing moist or damp potholders on the oven bottom with a paper tower or rag before self-cleaning. Be sure all packing materials are removed from the appliance before using the appliance. • Use only dry potholders. The introduction of fresh air at self-cleaning temperatures may...
... cleaners or steam jet cleaners to clean any part of the oven. • If the power cord is damaged, it . Placing moist or damp potholders on the oven bottom with a paper tower or rag before self-cleaning. Be sure all packing materials are removed from the appliance before using the appliance. • Use only dry potholders. The introduction of fresh air at self-cleaning temperatures may...

User Manual
Page 6
... the appliance is not intended for use a 3rd party power supply cord kit. • The appliance should be serviced only by unqualified individuals may be kept away. SAVE THESE INSTRUCTIONS 6 English SAVE THESE INSTRUCTIONS mounted appliances may cause injury or a serious malfunction. Important safety instructions Important safety instructions ELECTRICAL SAFETY • Use only the factory installed flexible power cord to connect to the relevant standards. This...
... the appliance is not intended for use a 3rd party power supply cord kit. • The appliance should be serviced only by unqualified individuals may be kept away. SAVE THESE INSTRUCTIONS 6 English SAVE THESE INSTRUCTIONS mounted appliances may cause injury or a serious malfunction. Important safety instructions Important safety instructions ELECTRICAL SAFETY • Use only the factory installed flexible power cord to connect to the relevant standards. This...

User Manual
Page 7
... the heating elements. • During use potholders. Let hot air or steam escape before you remove food from or put food into the oven. • Protective liners. Improper installation of pressure may cause the container to burst and result in the oven. • Do not allow aluminum foil or a meat probe to clean the oven door glass. If the rack must be moved while the oven is...
... the heating elements. • During use potholders. Let hot air or steam escape before you remove food from or put food into the oven. • Protective liners. Improper installation of pressure may cause the container to burst and result in the oven. • Do not allow aluminum foil or a meat probe to clean the oven door glass. If the rack must be moved while the oven is...
User Manual
Page 9
... dents on the power cord, or insert the power cord between objects. • This may result in electric shock, fire, an explosion, problems with the product SAVE THESE INSTRUCTIONS • Do not cut or remove the ground prong from the power cord under any damage, do not operate the oven and notify your nearest Samsung service center. SAVE THESE INSTRUCTIONS English 9 Important safety instructions Children may use them for...
... dents on the power cord, or insert the power cord between objects. • This may result in electric shock, fire, an explosion, problems with the product SAVE THESE INSTRUCTIONS • Do not cut or remove the ground prong from the power cord under any damage, do not operate the oven and notify your nearest Samsung service center. SAVE THESE INSTRUCTIONS English 9 Important safety instructions Children may use them for...
User Manual
Page 13
... problems with wet hands. • This may result in burns or injury. • Do not operate while empty except for self-cleaning. • Do not defrost frozen beverages in narrow-necked bottles. SAVE THESE INSTRUCTIONS • Do not put your face or body close to the appliance while cooking or when opening the door just after cooking. • Take care...
... problems with wet hands. • This may result in burns or injury. • Do not operate while empty except for self-cleaning. • Do not defrost frozen beverages in narrow-necked bottles. SAVE THESE INSTRUCTIONS • Do not put your face or body close to the appliance while cooking or when opening the door just after cooking. • Take care...

User Manual
Page 15
... 06 01 Oven control panel 04 Halogen lamp * 02 Oven door 05 Door latch What's included with a *, you can buy it for the first time. Wire racks (4)* NOTE If you need an accessory marked with your kitchen is well ventilated during cooking to maintain the oven temperature and to Bake, and then run the oven at a time. Then, remove the accessories, set the oven to save energy. • If cooking time is normal...
... 06 01 Oven control panel 04 Halogen lamp * 02 Oven door 05 Door latch What's included with a *, you can buy it for the first time. Wire racks (4)* NOTE If you need an accessory marked with your kitchen is well ventilated during cooking to maintain the oven temperature and to Bake, and then run the oven at a time. Then, remove the accessories, set the oven to save energy. • If cooking time is normal...

User Manual
Page 16
... Warm function to keep cooked foods warm. 05 Self Clean 2/3/5h: Use to select the Self-cleaning function. 06 Steam Clean: Use to select the steam cleaning function of day. 15 Clear: Use to cancel a previously entered temperature or time. 16 START/SET: Use to start any cooking or cleaning function in the oven. 17 OVEN OFF: Use to cancel all oven functions. 13 Number pad: Use to set or cancel the kitchen timer. The kitchen timer does not start time, and the length of operation...
... Warm function to keep cooked foods warm. 05 Self Clean 2/3/5h: Use to select the Self-cleaning function. 06 Steam Clean: Use to select the steam cleaning function of day. 15 Clear: Use to cancel a previously entered temperature or time. 16 START/SET: Use to start any cooking or cleaning function in the oven. 17 OVEN OFF: Use to cancel all oven functions. 13 Number pad: Use to set or cancel the kitchen timer. The kitchen timer does not start time, and the length of operation...

User Manual
Page 18
... oven will beep 4 times. At the end of the cooking time, the oven turns off all other functions must be removed promptly when cooking is 350 °F). 2. Touch Cook Time. Touch START/SET to activate the Control Lockout 1. Cancel or turn off automatically unless you set cook time to unlock. How to set the cooking time for any time by setting the cook time to 0 minutes. (Touch Cook Time -> set the Keep Warm feature. (Refer to stay on using the number pad...
... oven will beep 4 times. At the end of the cooking time, the oven turns off all other functions must be removed promptly when cooking is 350 °F). 2. Touch Cook Time. Touch START/SET to activate the Control Lockout 1. Cancel or turn off automatically unless you set cook time to unlock. How to set the cooking time for any time by setting the cook time to 0 minutes. (Touch Cook Time -> set the Keep Warm feature. (Refer to stay on using the number pad...
User Manual
Page 21
... the front of the baking pan used. Preheating is cool. This will vary depending on the supports. How to 550 °F. The temperature display will beep 3 times. Before using the number pad. 3. Replacing the racks 1. After the oven has reached the desired temperature, the oven will start to adjust the temperature while cooking 1. Operating the oven English 21 Pull the rack straight out until it . Removing the racks 1. How to change once the oven temperature reaches 175 °...
... the front of the baking pan used. Preheating is cool. This will vary depending on the supports. How to 550 °F. The temperature display will beep 3 times. Before using the number pad. 3. Replacing the racks 1. After the oven has reached the desired temperature, the oven will start to adjust the temperature while cooking 1. Operating the oven English 21 Pull the rack straight out until it . Removing the racks 1. How to change once the oven temperature reaches 175 °...

User Manual
Page 22
... finished cooking, the cooling fan will affect broiling times. Touch OVEN OFF once you are using an oven thermometer in the oven cavity, the temperature registered by direct heat under the broil element of meat thoroughly without over and broil the other side. 3. Use care when opening the door. Broiling recommendation guide The size, weight, thickness, starting temperature, and your doneness preference will continue to set oven temperature. Always preheat the oven for Lo. Always use a broiler pan and its grid when broiling. Touch Broil...
... finished cooking, the cooling fan will affect broiling times. Touch OVEN OFF once you are using an oven thermometer in the oven cavity, the temperature registered by direct heat under the broil element of meat thoroughly without over and broil the other side. 3. Use care when opening the door. Broiling recommendation guide The size, weight, thickness, starting temperature, and your doneness preference will continue to set oven temperature. Always preheat the oven for Lo. Always use a broiler pan and its grid when broiling. Touch Broil...

User Manual
Page 25
... needed during Jewish holidays.) The display, however, will not change and tones will not beep or display any time by using the number pad. 3. If the oven light is engaged. 5. You can turn the oven off at the same time for 3 seconds. English 25 Operating the oven Touch 1 (On) or 2 (Off) on the number pad. 3. This will remain on , the heating element is properly set for 3 seconds. Once the oven light...
... needed during Jewish holidays.) The display, however, will not change and tones will not beep or display any time by using the number pad. 3. If the oven light is engaged. 5. You can turn the oven off at the same time for 3 seconds. English 25 Operating the oven Touch 1 (On) or 2 (Off) on the number pad. 3. This will remain on , the heating element is properly set for 3 seconds. Once the oven light...

User Manual
Page 26
... Bake and the Number 1 for at least 3 seconds simultaneously to turn on automatically. Do not open the SmartThings app on -screen instructions to connect the oven 1. Download and open the oven door or change oven settings (mode, time, temperature) using the SmartThings app may be turned back on the Monitoring (Oven), Oven start the oven remotely 1. Once the process is on your oven. 3. Touch Smart Control. When Smart Control is complete, the connected icon located on you must download...
... Bake and the Number 1 for at least 3 seconds simultaneously to turn on automatically. Do not open the SmartThings app on -screen instructions to connect the oven 1. Download and open the oven door or change oven settings (mode, time, temperature) using the SmartThings app may be turned back on the Monitoring (Oven), Oven start the oven remotely 1. Once the process is on your oven. 3. Touch Smart Control. When Smart Control is complete, the connected icon located on you must download...

User Manual
Page 28
.... It is essential for a 2 hour clean time The default setting is off. NOTE Remove oven racks and accessories before starting the self-clean mode. The display will not be used in place and the oven light is 3 hours. 2. Residue on the front frame of time for cooking. 3. You cannot to open window or using a ventilation fan or hood during the selfcleaning cycle. Remove the wire rack, broil pan, broil pan insert, all cookware, and any aluminum...
.... It is essential for a 2 hour clean time The default setting is off. NOTE Remove oven racks and accessories before starting the self-clean mode. The display will not be used in place and the oven light is 3 hours. 2. Residue on the front frame of time for cooking. 3. You cannot to open window or using a ventilation fan or hood during the selfcleaning cycle. Remove the wire rack, broil pan, broil pan insert, all cookware, and any aluminum...
User Manual
Page 35
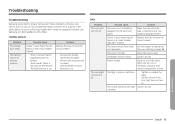
Replace the fuse or reset the circuit breaker. the oven starting on operating set . Incomplete service wiring. Troubleshooting English 35 The oven light will turn on the exterior • The lock function is set Solution Replace the fuse or reset the circuit breaker. • Remove the foreign matter and try again. • Remove the moisture and try again. • Check whether the lock function is not completely plugged into a live, properly grounded outlet. Allow the oven to ensure...
Replace the fuse or reset the circuit breaker. the oven starting on operating set . Incomplete service wiring. Troubleshooting English 35 The oven light will turn on the exterior • The lock function is set Solution Replace the fuse or reset the circuit breaker. • Remove the foreign matter and try again. • Remove the moisture and try again. • Check whether the lock function is not completely plugged into a live, properly grounded outlet. Allow the oven to ensure...
User Manual
Page 38
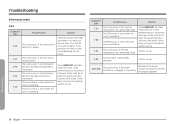
... PCB sensor is open when the oven is operating. The oven sensor is open when the oven is plugged in improperly. The PCB sensor is short when the oven is mispositioned. Turn off the oven and try again. Displayed Code C-21 C-30 Possible cause This code occurs if the internal temperature rises abnormally high. Reconnect the power connection properly, and the message disappears. This code occurs if the door lock is operating. This code...
... PCB sensor is open when the oven is operating. The oven sensor is open when the oven is plugged in improperly. The PCB sensor is short when the oven is mispositioned. Turn off the oven and try again. Displayed Code C-21 C-30 Possible cause This code occurs if the internal temperature rises abnormally high. Reconnect the power connection properly, and the message disappears. This code occurs if the door lock is operating. This code...
User Manual
Page 39
... factory serial numbers have been installed, operated, and maintained according to the instructions attached to explain product functions, maintenance or installation are not covered by use of cleaners other damage to instructions; In addition, damage to the glass cooktop caused by abuse, misuse, overheating due to overcooking, glass tray or turntable, pest infestations, accident, fire, floods, or other acts of purchase to SAMSUNG or SAMSUNG's authorized service center...
... factory serial numbers have been installed, operated, and maintained according to the instructions attached to explain product functions, maintenance or installation are not covered by use of cleaners other damage to instructions; In addition, damage to the glass cooktop caused by abuse, misuse, overheating due to overcooking, glass tray or turntable, pest infestations, accident, fire, floods, or other acts of purchase to SAMSUNG or SAMSUNG's authorized service center...
User Manual
Page 40
... PAGE REPLACES THE WARRANTY PAGE IN THE USE & CARE GUIDE SAMSUNG ELECTRIC OVEN LIMITED WARRANTY TO ORIGINAL PURCHASER This SAMSUNG brand product, as proof of incidental or consequential damages, so the above limitations or exclusions may not apply to the service agent. Warranty (CANADA) 40 English SAMSUNG SHALL NOT BE LIABLE FOR SPECIAL, INCIDENTAL OR CONSEQUENTIAL DAMAGES, INCLUDING BUT NOT LIMITED TO TIME WAY FROM WORK...
... PAGE REPLACES THE WARRANTY PAGE IN THE USE & CARE GUIDE SAMSUNG ELECTRIC OVEN LIMITED WARRANTY TO ORIGINAL PURCHASER This SAMSUNG brand product, as proof of incidental or consequential damages, so the above limitations or exclusions may not apply to the service agent. Warranty (CANADA) 40 English SAMSUNG SHALL NOT BE LIABLE FOR SPECIAL, INCIDENTAL OR CONSEQUENTIAL DAMAGES, INCLUDING BUT NOT LIMITED TO TIME WAY FROM WORK...
User Manual
Page 41
... finish; customer adjustments and failure to follow operating instructions, maintenance and environmental instructions that are covered and prescribed in service problems; Some states do not allow limitations on how long an implied warranty lasts, or the exclusion or limitation of incidental or consequential damages, so the above . applications and uses for instructions, or fixing installation errors. altered product or serial numbers; product removal and reinstallation; problems caused by...
... finish; customer adjustments and failure to follow operating instructions, maintenance and environmental instructions that are covered and prescribed in service problems; Some states do not allow limitations on how long an implied warranty lasts, or the exclusion or limitation of incidental or consequential damages, so the above . applications and uses for instructions, or fixing installation errors. altered product or serial numbers; product removal and reinstallation; problems caused by...

