
User Manual
Page 1
Oven / Cooktop Samsung Connect app Instruction Manual Smart_home_App_DG68-00833A-01_EN+MES+CFR.indb 1 4/25/2017 6:56:26 PM
Oven / Cooktop Samsung Connect app Instruction Manual Smart_home_App_DG68-00833A-01_EN+MES+CFR.indb 1 4/25/2017 6:56:26 PM

User Manual
Page 2
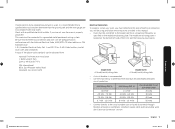
...; For further instructions, refer to your oven. If you don't have a Samsung smartphone, you thru the installation of the app may not work properly on third-party smartphones. • For iOS models, the app requires iOS 9 or later. • The Samsung Connect app is optimized for ovens, cooktops, and hoods. Controlling your oven remotely Press Smart Control on Samsung smartphones (Galaxy S & Note series). The Oven Control screen appears...
...; For further instructions, refer to your oven. If you don't have a Samsung smartphone, you thru the installation of the app may not work properly on third-party smartphones. • For iOS models, the app requires iOS 9 or later. • The Samsung Connect app is optimized for ovens, cooktops, and hoods. Controlling your oven remotely Press Smart Control on Samsung smartphones (Galaxy S & Note series). The Oven Control screen appears...
User Manual
Page 3
... burner (electric models only). 3. NOTE When Bluetooth pairing is paired to reconnect. NOTES • The Samsung Connect app may have configured the cooking settings remotely, you can only start the oven remotely. Setting the kitchen timer with the timeout alarm. English 3 Smart_home_App_DG68-00833A-01_EN+MES+CFR.indb 3 4/25/2017 6:56:27 PM Error code checking Automatically recognize errors. Monitoring your cooktop remotely The Cooktop App supports: 1. The...
... burner (electric models only). 3. NOTE When Bluetooth pairing is paired to reconnect. NOTES • The Samsung Connect app may have configured the cooking settings remotely, you can only start the oven remotely. Setting the kitchen timer with the timeout alarm. English 3 Smart_home_App_DG68-00833A-01_EN+MES+CFR.indb 3 4/25/2017 6:56:27 PM Error code checking Automatically recognize errors. Monitoring your cooktop remotely The Cooktop App supports: 1. The...
User Manual
Page 4
... any the oven's display panel. Press the Smart problems but remote Control button on the oven's display panel or the cooktop's display panel. Please use a router that supports the 2.4GHz wireless band or a dual band router that it back in process. • This may happen because of the distance from the AP (router) or because of your oven. Samsung Connect Samsung Connect Troubleshooting If you 're still having trouble after trying...
... any the oven's display panel. Press the Smart problems but remote Control button on the oven's display panel or the cooktop's display panel. Please use a router that supports the 2.4GHz wireless band or a dual band router that it back in process. • This may happen because of the distance from the AP (router) or because of your oven. Samsung Connect Samsung Connect Troubleshooting If you 're still having trouble after trying...
Installation Guide
Page 1
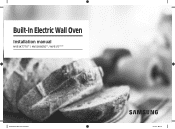
Built-In Electric Wall Oven Installation manual NV51K7770** / NV51K6650** / NV51*5***** Install_NW9000K_DG68-00862A-09_EN.indd 1 2019-11-11 5:36:05
Built-In Electric Wall Oven Installation manual NV51K7770** / NV51K6650** / NV51*5***** Install_NW9000K_DG68-00862A-09_EN.indd 1 2019-11-11 5:36:05
Installation Guide
Page 2
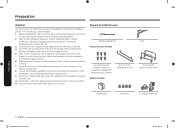
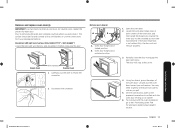
... 4 remove panels, wire covers or screws. 4 5 Transport 5 To avoid damage to the oven vent, use the transport method shown in absence of the appliance. this appliance requires two or more people while handling and moving it is in oven Remove and replace oven door(s) Electrical connection Install oven Self-diagnosis Temp sensor & Heater check 2 English Install_NW9000K_DG68-00862A-09_EN.indd 2 Safety informations 2 Related equipment safety 2 Remove all tape and packaging before using the appliance. double ovens Installation instructions...
... 4 remove panels, wire covers or screws. 4 5 Transport 5 To avoid damage to the oven vent, use the transport method shown in absence of the appliance. this appliance requires two or more people while handling and moving it is in oven Remove and replace oven door(s) Electrical connection Install oven Self-diagnosis Temp sensor & Heater check 2 English Install_NW9000K_DG68-00862A-09_EN.indd 2 Safety informations 2 Related equipment safety 2 Remove all tape and packaging before using the appliance. double ovens Installation instructions...

Installation Guide
Page 3
... branch-circuit installations (1996 NEC), mobile homes, recreational vehicles, or installations where local codes prohibit grounding through the neutral conductor require 4-wire branch-circuit connection. • Improper connection of aluminum house wiring to copper leads can withstand the temperature (up to do so can result in front of the oven. CAUTION • Make sure the cabinets and wall coverings around the oven can result in heat damage...
... branch-circuit installations (1996 NEC), mobile homes, recreational vehicles, or installations where local codes prohibit grounding through the neutral conductor require 4-wire branch-circuit connection. • Improper connection of aluminum house wiring to copper leads can withstand the temperature (up to do so can result in front of the oven. CAUTION • Make sure the cabinets and wall coverings around the oven can result in heat damage...
Installation Guide
Page 4
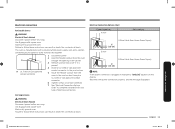
... the installation manual for content regarding Safety, Cabinet Dimensions, Removing Packaging, Electrical Installation, Testing the Installation and Customer Service. 3. Hang the install handle onto the side hook of the unit. 4. Move the oven unit into place, making sure to install the oven 6 screws (M4 L16) 6 Wood Screws For Mounting (4 needed for installation and 2 extra's) Materials needed 30" (76.2 cm) Metal Bottom Trim Drill Install Handle (only for your unit and the required electrical connections...
... the installation manual for content regarding Safety, Cabinet Dimensions, Removing Packaging, Electrical Installation, Testing the Installation and Customer Service. 3. Hang the install handle onto the side hook of the unit. 4. Move the oven unit into place, making sure to install the oven 6 screws (M4 L16) 6 Wood Screws For Mounting (4 needed for installation and 2 extra's) Materials needed 30" (76.2 cm) Metal Bottom Trim Drill Install Handle (only for your unit and the required electrical connections...
Installation Guide
Page 5
...; Oven support surface must be solid, level and flush with the maximum allowable wood cabinet temperatures of the oven. • Grounded electrical supply is recommended that the junction box be used will not discolor, delaminate or sustain other damage. NOTE For under counter installation, it is required. Preparation Location requirements IMPORTANT: Observe all governing codes and ordinances. • Cabinet opening dimensions that are installing the junction box on rear wall...
...; Oven support surface must be solid, level and flush with the maximum allowable wood cabinet temperatures of the oven. • Grounded electrical supply is recommended that the junction box be used will not discolor, delaminate or sustain other damage. NOTE For under counter installation, it is required. Preparation Location requirements IMPORTANT: Observe all governing codes and ordinances. • Cabinet opening dimensions that are installing the junction box on rear wall...
Installation Guide
Page 6
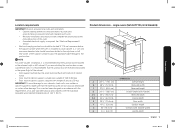
...Product dimensions - K B 01 02 I Max. 91/2" (Max. 24.1 cm) - Junction Box J 363/8" (92.3 cm) - See cooktop installation instructions for Gas Cooktop Must be installed over this oven. Overlap of Over Side Edges of approved cooktop models. 02 Gas and Electrical Connections for cutout size. See label on top of Cutout...A C DIMENSION A Min. 11/16" (1.75 cm) - single ovens Single Oven Under counter 01 Gas or Electric cooktops may be Located in an Adjacent Accessible Location to the Right. Counter top Height K 25" (63.5 cm) 2019-11-11 5:36:06 single oven (NV51*5***S*)...
...Product dimensions - K B 01 02 I Max. 91/2" (Max. 24.1 cm) - Junction Box J 363/8" (92.3 cm) - See cooktop installation instructions for Gas Cooktop Must be installed over this oven. Overlap of Over Side Edges of approved cooktop models. 02 Gas and Electrical Connections for cutout size. See label on top of Cutout...A C DIMENSION A Min. 11/16" (1.75 cm) - single ovens Single Oven Under counter 01 Gas or Electric cooktops may be Located in an Adjacent Accessible Location to the Right. Counter top Height K 25" (63.5 cm) 2019-11-11 5:36:06 single oven (NV51*5***S*)...

Installation Guide
Page 7
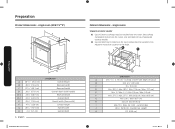
...) DIMENSION Overall height Recessed width Recessed height Overall depth (with Handle) Recessed depth Overall depth Door width Conduit length Overall width (Handle width) Handle depth English 7 Install_NW9000K_DG68-00862A-09_EN.indd 7 2019-11-11 5:36:06 when door is open A 01 B I J F D H E G 02 22" C DIMENSION A...55.9 cm) I Max. 91/2" (Max. 24.1 cm) - Preparation Single Oven Wall Mount 01 Junction Box 02 Allow a minimum of 22" for clearance to adjacent corners, drawers, walls, etc. Junction Box J Min. 11/16" (1.75 cm) - Wooden cabinet thickness Product dimensions -
...) DIMENSION Overall height Recessed width Recessed height Overall depth (with Handle) Recessed depth Overall depth Door width Conduit length Overall width (Handle width) Handle depth English 7 Install_NW9000K_DG68-00862A-09_EN.indd 7 2019-11-11 5:36:06 when door is open A 01 B I J F D H E G 02 22" C DIMENSION A...55.9 cm) I Max. 91/2" (Max. 24.1 cm) - Preparation Single Oven Wall Mount 01 Junction Box 02 Allow a minimum of 22" for clearance to adjacent corners, drawers, walls, etc. Junction Box J Min. 11/16" (1.75 cm) - Wooden cabinet thickness Product dimensions -

Installation Guide
Page 8
double ovens Double Ovens Installed in Cabinet 01 Junction Box 02 Allow a minimum of 22" for clearance to adjacent corners, drawers, walls, etc. Wooden cabinet thickness 2019-11-11 5:36:07 when door is open A 01 B I J F D H E 02 G 22" C DIMENSION A 30" (76.2 cm) B Min. 13/16" (3.0 cm) C 12" (30.5 cm) D Min. 281/2"/ Max. 285/8" (Min. 72.4 cm / Max. 72.7 cm) E Min. 1"/ Max. 11/4" (Min. 2.5 cm...
double ovens Double Ovens Installed in Cabinet 01 Junction Box 02 Allow a minimum of 22" for clearance to adjacent corners, drawers, walls, etc. Wooden cabinet thickness 2019-11-11 5:36:07 when door is open A 01 B I J F D H E 02 G 22" C DIMENSION A 30" (76.2 cm) B Min. 13/16" (3.0 cm) C 12" (30.5 cm) D Min. 281/2"/ Max. 285/8" (Min. 72.4 cm / Max. 72.7 cm) E Min. 1"/ Max. 11/4" (Min. 2.5 cm...
Installation Guide
Page 9
... Circuit Size (Dedicated) 20 Amp 30 Amp 40 Amp 50 Amp • Connect directly to a grounded-metal permanent wiring system. Preparation If codes permit and a separate ground wire is used, it is recommended that a qualified electrical installer determine that the electrical connection and wire size are in accordance with local codes. Model/serial/rating plate • A circuit breaker is properly grounded. Check with a qualified electrical installer if you will be using and follow the instructions provided in this manual. • Oven...
... Circuit Size (Dedicated) 20 Amp 30 Amp 40 Amp 50 Amp • Connect directly to a grounded-metal permanent wiring system. Preparation If codes permit and a separate ground wire is used, it is recommended that a qualified electrical installer determine that the electrical connection and wire size are in accordance with local codes. Model/serial/rating plate • A circuit breaker is properly grounded. Check with a qualified electrical installer if you will be using and follow the instructions provided in this manual. • Oven...

Installation Guide
Page 10
.../copper connection must be needed for models NV51K6650D, NV51K6650S, NV51K7770D, NV51K7770S, NV51*5***D, and NV51*5***S, refer to the oven's final location. Remove the shipping materials and tape from inside the oven. 6. Remove the hardware package from the oven. Remove racks and other injury. 1. Connect the aluminum wiring to move and install an oven. Avoid drilling or cutting into house wiring during installation. 2. Do not use handle or any portion of copper wire using special...
.../copper connection must be needed for models NV51K6650D, NV51K6650S, NV51K7770D, NV51K7770S, NV51*5***D, and NV51*5***S, refer to the oven's final location. Remove the shipping materials and tape from inside the oven. 6. Remove the hardware package from the oven. Remove racks and other injury. 1. Connect the aluminum wiring to move and install an oven. Avoid drilling or cutting into house wiring during installation. 2. Do not use handle or any portion of copper wire using special...
Installation Guide
Page 11
... door. Single Oven Wire Harness Double Oven 1. Remove oven door(s) A B A. Oven door hinge lock in locked position B. If the door hinge lock is not rotated fully, the door will stop at this point. 4. Prior to side as you and remove. Disconnect LED light wire harness (Only NV51K7770** / NV51K6650**) Locate the LED light wire harness and disconnect it . Disconnect the connector. The door will not remove properly. 3. Remove and replace oven door(s) IMPORTANT: Use two hands to engage the door latch locks. Partially close the door to remove oven door. Set...
... door. Single Oven Wire Harness Double Oven 1. Remove oven door(s) A B A. Oven door hinge lock in locked position B. If the door hinge lock is not rotated fully, the door will stop at this point. 4. Prior to side as you and remove. Disconnect LED light wire harness (Only NV51K7770** / NV51K6650**) Locate the LED light wire harness and disconnect it . Disconnect the connector. The door will not remove properly. 3. Remove and replace oven door(s) IMPORTANT: Use two hands to engage the door latch locks. Partially close the door to remove oven door. Set...

Installation Guide
Page 12
... oven cavity for door hinge lock 3. Locate the oven door hinge locks in the "Remove Oven Door(s)" section for proper locked position. 6. You may need help lifting the door high enough to a full 90°, repeat steps 1 through 3. 5. Do not lift the door by the handle. Locate the slots on that side is very heavy. See Step 1 (illustration A) in the corners of the oven cavity. Close the oven door. 7. Installation instructions Replace oven door(s) CAUTION The door...
... oven cavity for door hinge lock 3. Locate the oven door hinge locks in the "Remove Oven Door(s)" section for proper locked position. 6. You may need help lifting the door high enough to a full 90°, repeat steps 1 through 3. 5. Do not lift the door by the handle. Locate the slots on that side is very heavy. See Step 1 (illustration A) in the corners of the oven cavity. Close the oven door. 7. Installation instructions Replace oven door(s) CAUTION The door...
Installation Guide
Page 13
... oven through a UL listed or CSA approved conduit connector. 6. English 13 Installation instructions Install_NW9000K_DG68-00862A-09_EN.indd 13 2019-11-11 5:36:08 Remove junction box cover if it is manufactured with a neutral (white) power supply wire and a cabinetconnected ground (green or bare) wire twisted together. Tighten screws on the display. A A. For Single Ovens WARNING Electrical Shock Hazard Disconnect power before servicing. Failure to follow these instructions...
... oven through a UL listed or CSA approved conduit connector. 6. English 13 Installation instructions Install_NW9000K_DG68-00862A-09_EN.indd 13 2019-11-11 5:36:08 Remove junction box cover if it is manufactured with a neutral (white) power supply wire and a cabinetconnected ground (green or bare) wire twisted together. Tighten screws on the display. A A. For Single Ovens WARNING Electrical Shock Hazard Disconnect power before servicing. Failure to follow these instructions...

Installation Guide
Page 14
... using a UL listed wire connector. UL listed or CSA approved conduit connector Installation instructions 14 English Install_NW9000K_DG68-00862A-09_EN.indd 14 2019-11-11 5:36:08 Connect the 2 white wires (F) together H using a UL listed wire connector. C. A 1. Install junction box cover. Black wires (normally L1) D. Connect the 2 white wires (D) and C G the green (or bare) ground wire (of H the oven cable) using a UL listed wire connector. F A. Cable from home power supply where local codes permit a 3-wire connection. Install junction box cover...
... using a UL listed wire connector. UL listed or CSA approved conduit connector Installation instructions 14 English Install_NW9000K_DG68-00862A-09_EN.indd 14 2019-11-11 5:36:08 Connect the 2 white wires (F) together H using a UL listed wire connector. C. A 1. Install junction box cover. Black wires (normally L1) D. Connect the 2 white wires (D) and C G the green (or bare) ground wire (of H the oven cable) using a UL listed wire connector. F A. Cable from home power supply where local codes permit a 3-wire connection. Install junction box cover...

Installation Guide
Page 15
...:09 Installation instructions To install the metal bottom trim, see following chart. If the cutout size is larger than 3/4 inches use caution not to the cabinet using the screws provided. • Insert the screws through hole in trim aligning with hole in the left side trim of the bottom trim with a hole in oven frame. Install oven 1. Hang the install handle onto the side hook of the cabinet. Trim Left...
...:09 Installation instructions To install the metal bottom trim, see following chart. If the cutout size is larger than 3/4 inches use caution not to the cabinet using the screws provided. • Insert the screws through hole in trim aligning with hole in the left side trim of the bottom trim with a hole in oven frame. Install oven 1. Hang the install handle onto the side hook of the cabinet. Trim Left...
Installation Guide
Page 16
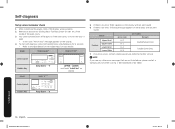
... the oven cavity is hot or the door is no error, 'PASS' appears on the display with an alert sound. 6. After connecting the power, check if the display works properly. 2. Model NV51K6650** NV51K7770** Control panel Hidden Key Model Keep Warm + "9" NV51*5***** UPPER + LOWER and touch "Install test" on the display. 4. If an error occurs, contact a Samsung service center for each model. call e.g. 1-800-SAMSUNG (726-7864) Control panel Hidden Key Keep Warm + "9" Self-diagnosis...
... the oven cavity is hot or the door is no error, 'PASS' appears on the display with an alert sound. 6. After connecting the power, check if the display works properly. 2. Model NV51K6650** NV51K7770** Control panel Hidden Key Model Keep Warm + "9" NV51*5***** UPPER + LOWER and touch "Install test" on the display. 4. If an error occurs, contact a Samsung service center for each model. call e.g. 1-800-SAMSUNG (726-7864) Control panel Hidden Key Keep Warm + "9" Self-diagnosis...

