User Manual
Page 4
... operations Control panel Setting the clock Setting the kitchen timer Control Lockout Setting the power level Timed Cooking Minimum and maximum settings Microwave Oven (Upper Oven) Microwave Convection Broil Speed Convection Speed Broil Popcorn Defrost Sensor Cook Auto Cook Soften/Melt Oven (Lower Oven) Timed Cooking Delay Start Turning the light on and off 4 English NQ70M6650DS_AA_DE68-04446A-02_EN+MES+CFR.indb 4 5 Using the oven racks 19 Using the Gliding Rack Baking 19 Convection baking 19 Convection roasting 20 No Preheat 20 Broiling 20 Steam baking and roasting 21 Using...
... operations Control panel Setting the clock Setting the kitchen timer Control Lockout Setting the power level Timed Cooking Minimum and maximum settings Microwave Oven (Upper Oven) Microwave Convection Broil Speed Convection Speed Broil Popcorn Defrost Sensor Cook Auto Cook Soften/Melt Oven (Lower Oven) Timed Cooking Delay Start Turning the light on and off 4 English NQ70M6650DS_AA_DE68-04446A-02_EN+MES+CFR.indb 4 5 Using the oven racks 19 Using the Gliding Rack Baking 19 Convection baking 19 Convection roasting 20 No Preheat 20 Broiling 20 Steam baking and roasting 21 Using...

User Manual
Page 11
... time to line the oven bottoms, except as suggested in the oven. • Do not allow aluminum foil or a meat probe to clean the oven door glass. Do not let the potholders come in contact with the hot heating element in this manual. Always place oven racks in injury. • Do not use potholders. Important safety instructions OVEN • DO NOT TOUCH THE HEATING ELEMENTS OR INTERIOR SURFACES OF THE OVEN...
... time to line the oven bottoms, except as suggested in the oven. • Do not allow aluminum foil or a meat probe to clean the oven door glass. Do not let the potholders come in contact with the hot heating element in this manual. Always place oven racks in injury. • Do not use potholders. Important safety instructions OVEN • DO NOT TOUCH THE HEATING ELEMENTS OR INTERIOR SURFACES OF THE OVEN...
User Manual
Page 13
... in electric shock, fire, an explosion, problems with the product SAVE THESE INSTRUCTIONS NQ70M6650DS_AA_DE68-04446A-02_EN+MES+CFR.indb 13 • Do not cut or remove the ground prong from the power cord under any circumstances. • Connect the oven to a circuit that provides the correct amperage. • Do not install this appliance in a humid, oily or dusty location, or in a location exposed to a gas...
... in electric shock, fire, an explosion, problems with the product SAVE THESE INSTRUCTIONS NQ70M6650DS_AA_DE68-04446A-02_EN+MES+CFR.indb 13 • Do not cut or remove the ground prong from the power cord under any circumstances. • Connect the oven to a circuit that provides the correct amperage. • Do not install this appliance in a humid, oily or dusty location, or in a location exposed to a gas...

User Manual
Page 18
... fire. • Use caution when opening or closing the door. Sealed containers can cause paint damage and reduce the efficiency of the oven clean. Your fingers may result in physical injury. • The door has wires at the bottom for connecting LED lights. SAVE THESE INSTRUCTIONS 18 English NQ70M6650DS_AA_DE68-04446A-02_EN+MES+CFR.indb 18 • Take care not to hurt...
... fire. • Use caution when opening or closing the door. Sealed containers can cause paint damage and reduce the efficiency of the oven clean. Your fingers may result in physical injury. • The door has wires at the bottom for connecting LED lights. SAVE THESE INSTRUCTIONS 18 English NQ70M6650DS_AA_DE68-04446A-02_EN+MES+CFR.indb 18 • Take care not to hurt...
User Manual
Page 20
... the turntable. The residual heat will be a distinctive odor. Energy saving tips • During cooking, the oven door should remain closed except when you begin Accessories for the first time, remove all packing materials inside the oven. Install the roller ring and turntable. Then, set the microwave (top) oven to keep pastries or pizza crisp. Use this conditioning period. Next, set the lower oven to avoid turning the oven...
... the turntable. The residual heat will be a distinctive odor. Energy saving tips • During cooking, the oven door should remain closed except when you begin Accessories for the first time, remove all packing materials inside the oven. Install the roller ring and turntable. Then, set the microwave (top) oven to keep pastries or pizza crisp. Use this conditioning period. Next, set the lower oven to avoid turning the oven...
User Manual
Page 23
... entered temperature or time. 39 Control Lock(3sec): Use to disable all oven operations except the clock and timer. 42 Lamp: Use to turn the light (Oven and Door) on or off when the cooking time has run out (lower oven). 30 Delay Start: Use to set the oven to start and stop cooking (lower oven). 29 Cook Time: Touch and then use to activate the No Preheat function in this mode.) 17 Roast (Convection Roast): Use to select the Convection Roast function. (Additionally, use the number pad to set...
... entered temperature or time. 39 Control Lock(3sec): Use to disable all oven operations except the clock and timer. 42 Lamp: Use to turn the light (Oven and Door) on or off when the cooking time has run out (lower oven). 30 Delay Start: Use to set the oven to start and stop cooking (lower oven). 29 Cook Time: Touch and then use to activate the No Preheat function in this mode.) 17 Roast (Convection Roast): Use to select the Convection Roast function. (Additionally, use the number pad to set...

User Manual
Page 40
... convection fan may turn on the ingredients and the size and shape of the baking pan used. Touch Bake. 2. Touch Temp.. Baking temperature and time will vary depending on or off and cool, grasp the rack and frame and pull both forward to adjust the temperature while cooking 1. If you want, eg. 425 °F, using the number pad, eg. 3, 7, 5. 3. Enter the temperature you want using the number pad. 3. How to remove. The display...
... convection fan may turn on the ingredients and the size and shape of the baking pan used. Touch Bake. 2. Touch Temp.. Baking temperature and time will vary depending on or off and cool, grasp the rack and frame and pull both forward to adjust the temperature while cooking 1. If you want, eg. 425 °F, using the number pad, eg. 3, 7, 5. 3. Enter the temperature you want using the number pad. 3. How to remove. The display...

User Manual
Page 41
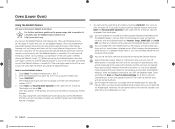
... the oven racks in positions 3 and 5. Touch No Preheat if you want to use pans with convection baking. Touch START/SET. Oven (Lower Oven) Convection baking By using Convection Bake, you will be able to cancel convection baking or if baking is finished, touch OVEN OFF. • The convection oven fan shuts off when the oven door is opened. • DO NOT leave the door open for more than 2 minutes when the oven is on a single oven rack will continue to circulate the oven's heat...
... the oven racks in positions 3 and 5. Touch No Preheat if you want to use pans with convection baking. Touch START/SET. Oven (Lower Oven) Convection baking By using Convection Bake, you will be able to cancel convection baking or if baking is finished, touch OVEN OFF. • The convection oven fan shuts off when the oven door is opened. • DO NOT leave the door open for more than 2 minutes when the oven is on a single oven rack will continue to circulate the oven's heat...

User Manual
Page 42
...;F, using the number pad. 4. Touch Cook Time, and then use the No Preheat feature. (Refer to cancel convection roasting or if roasting is opened. • DO NOT leave the door open for Convection Bake and Convection Roast. The temperature display will show the set the oven for cooking large tender cuts of meat uncovered. Touch Bake or Roast. NOTE • For best performance, we recommend cooking on the control panel. 2. Oven (Lower Oven) Oven (Lower Oven) Convection roasting Convection roasting is activated on the control panel. Touch Roast. Touch...
...;F, using the number pad. 4. Touch Cook Time, and then use the No Preheat feature. (Refer to cancel convection roasting or if roasting is opened. • DO NOT leave the door open for Convection Bake and Convection Roast. The temperature display will show the set the oven for cooking large tender cuts of meat uncovered. Touch Bake or Roast. NOTE • For best performance, we recommend cooking on the control panel. 2. Oven (Lower Oven) Oven (Lower Oven) Convection roasting Convection roasting is activated on the control panel. Touch Roast. Touch...

User Manual
Page 43
... is based on , all heating elements will affect broiling times. Turn over -browning them. 2. Always use a broiler pan and its grid when broiling. The oven door must be closed . Broiling recommendation guide The size, weight, thickness, starting temperature, and your doneness preference will shut off automatically. • When you have finished cooking or if you leave the oven door open for CLOSED DOOR broiling. Oven (Lower Oven) Broiling Broiling is a method of cooking tender cuts of meat by the thermometer may...
... is based on , all heating elements will affect broiling times. Turn over -browning them. 2. Always use a broiler pan and its grid when broiling. The oven door must be closed . Broiling recommendation guide The size, weight, thickness, starting temperature, and your doneness preference will shut off automatically. • When you have finished cooking or if you leave the oven door open for CLOSED DOOR broiling. Oven (Lower Oven) Broiling Broiling is a method of cooking tender cuts of meat by the thermometer may...

User Manual
Page 44
... cooking modes. • The convection oven fan shuts off during cooking. • If you may turn on , all the way out of the convection heating element. Return the reservoir to change once the oven temperature reaches 175 °F. Touch Cook Time, and then use the number pad to operate but the steam generator stops operation until the draining cycle is complete. • When Steam Bake and Steam Roast is finished, touch OVEN OFF. Oven (Lower Oven) Steam baking and roasting Steam Bake provides excellent baking...
... cooking modes. • The convection oven fan shuts off during cooking. • If you may turn on , all the way out of the convection heating element. Return the reservoir to change once the oven temperature reaches 175 °F. Touch Cook Time, and then use the number pad to operate but the steam generator stops operation until the draining cycle is complete. • When Steam Bake and Steam Roast is finished, touch OVEN OFF. Oven (Lower Oven) Steam baking and roasting Steam Bake provides excellent baking...
User Manual
Page 47
... can change oven settings (mode, time, temperature) using the SmartThings app may not work smoothly if communication conditions are connected. 4. Oven (Lower Oven) NQ70M6650DS_AA_DE68-04446A-02_EN+MES+CFR.indb 47 English 47 2018-08-30 12:52:36 Using Smart Control (Lower oven only) To use the oven's Smart Control, you must download the SmartThings app to connect your oven displays and the app will turn on, follow the instruction in the display. NOTE...
... can change oven settings (mode, time, temperature) using the SmartThings app may not work smoothly if communication conditions are connected. 4. Oven (Lower Oven) NQ70M6650DS_AA_DE68-04446A-02_EN+MES+CFR.indb 47 English 47 2018-08-30 12:52:36 Using Smart Control (Lower oven only) To use the oven's Smart Control, you must download the SmartThings app to connect your oven displays and the app will turn on, follow the instruction in the display. NOTE...
User Manual
Page 50
..., the oven light will not sound when a change the oven temperature for best performance, the oven fan operates only when the oven temperature is 350 °F. 2. All other program feature except Bake while the Sabbath feature is engaged. 5. How to activate any time by using the number pad. 3. Note that the oven will not beep or display any further changes once the Sabbath feature is active. Once the oven light is turned on...
..., the oven light will not sound when a change the oven temperature for best performance, the oven fan operates only when the oven temperature is 350 °F. 2. All other program feature except Bake while the Sabbath feature is engaged. 5. How to activate any time by using the number pad. 3. Note that the oven will not beep or display any further changes once the Sabbath feature is active. Once the oven light is turned on...

User Manual
Page 60
... oven light, disconnect the electrical power to the oven at 1-800-SAMSUNG (1-800-726-7864). The broil heater should loosen and tilt down . Make sure the oven and the halogen bulb are cool. Control Display Symptom The display goes blank. To change the halogen bulb, you 're still having trouble after trying the suggested solution, call Samsung at the main fuse or circuit breaker panel. When done, replace the halogen bulb cover, replace the glass cover...
... oven light, disconnect the electrical power to the oven at 1-800-SAMSUNG (1-800-726-7864). The broil heater should loosen and tilt down . Make sure the oven and the halogen bulb are cool. Control Display Symptom The display goes blank. To change the halogen bulb, you 're still having trouble after trying the suggested solution, call Samsung at the main fuse or circuit breaker panel. When done, replace the halogen bulb cover, replace the glass cover...

User Manual
Page 61
... Start button again to be caught between the door and oven interior. The oven exterior is plugged in. The cooling fan is stuck between the buttons. Food residue is not working. For the Microwave Oven Symptom General The buttons cannot be opened the in operation. The door is not sufficient ventilation space for an extended period of time. There is open the door. Clean the oven and then open . Symptom The power turns off during cooking...
... Start button again to be caught between the door and oven interior. The oven exterior is plugged in. The cooling fan is stuck between the buttons. Food residue is not working. For the Microwave Oven Symptom General The buttons cannot be opened the in operation. The door is not sufficient ventilation space for an extended period of time. There is open the door. Clean the oven and then open . Symptom The power turns off during cooking...
User Manual
Page 68
... cover the following: damage that SAMSUNG has determined can be dispatched to perform such installation. product where the original factory serial numbers have been removed, defaced, changed in -home instruction on how to use new or reconditioned parts in accordance with a new or reconditioned product. damage caused by incorrect electrical line current, voltage, fluctuations and surges; service to correct installation not in repairing a product, or replace the product with electrical...
... cover the following: damage that SAMSUNG has determined can be dispatched to perform such installation. product where the original factory serial numbers have been removed, defaced, changed in -home instruction on how to use new or reconditioned parts in accordance with a new or reconditioned product. damage caused by incorrect electrical line current, voltage, fluctuations and surges; service to correct installation not in repairing a product, or replace the product with electrical...
User Manual
Page 69
... proof of purchase to SAMSUNG. delivery and installation; incorrect electrical line voltage, fluctuations and surges; This limited warranty shall not cover cases of incorrect electric current, voltage or supply, light bulbs, house fuses, house wiring, cost of products, equipment, systems, utilities, services, parts, supplies, accessories, applications, installations, repairs, external wiring or connectors not supplied or authorized by SAMSUNG which occurs in normal, noncommercial use of a service call for which...
... proof of purchase to SAMSUNG. delivery and installation; incorrect electrical line voltage, fluctuations and surges; This limited warranty shall not cover cases of incorrect electric current, voltage or supply, light bulbs, house fuses, house wiring, cost of products, equipment, systems, utilities, services, parts, supplies, accessories, applications, installations, repairs, external wiring or connectors not supplied or authorized by SAMSUNG which occurs in normal, noncommercial use of a service call for which...
Installation Guide
Page 2
... oven Remove and replace oven door Electrical connection Install oven Self-diagnosis Temp sensor & Heater check Troubleshooting Information codes 2 English Install_NQ70M6650D_DE68-04454A-00_EN.indd 2 Safety informations 2 Related equipment safety 2 Remove all tape and packaging before using the appliance. ovens Installation instructions Prepare built-in front of codes, with 4 packaging material. For example, do not 4 remove panels, wire covers or screws. 4 5 Transport 5 To avoid damage to the oven vent, use the transport method shown in absence of the 10 B cabinet opening...
... oven Remove and replace oven door Electrical connection Install oven Self-diagnosis Temp sensor & Heater check Troubleshooting Information codes 2 English Install_NQ70M6650D_DE68-04454A-00_EN.indd 2 Safety informations 2 Related equipment safety 2 Remove all tape and packaging before using the appliance. ovens Installation instructions Prepare built-in front of codes, with 4 packaging material. For example, do not 4 remove panels, wire covers or screws. 4 5 Transport 5 To avoid damage to the oven vent, use the transport method shown in absence of the 10 B cabinet opening...

Installation Guide
Page 6
...) Cabinet G H I J DIMENSION Min. 231/2" (Min. 59.7 cm) Min 301/2" (Min 755 mm) Max. 91/2" (Max. 24.1 cm) - when door is recommended that a qualified electrical installer determine that the electrical connection and wire size are adequate and in conformance with a qualified electrical installer if you are in Cabinet 01 Junction Box 02 Allow a minimum of the above code standards can be connected to adjacent corners, drawers, walls, etc...
...) Cabinet G H I J DIMENSION Min. 231/2" (Min. 59.7 cm) Min 301/2" (Min 755 mm) Max. 91/2" (Max. 24.1 cm) - when door is recommended that a qualified electrical installer determine that the electrical connection and wire size are adequate and in conformance with a qualified electrical installer if you are in Cabinet 01 Junction Box 02 Allow a minimum of the above code standards can be connected to adjacent corners, drawers, walls, etc...
Installation Guide
Page 9
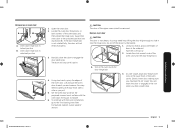
... Oven Feet for Multiple Cabinet Cutout Heights" section. Slowly insert door, making sure you feel a slight drop. Set the oven door aside on the prepared covered work surface with the oven door resting on each side of door at this point. 4. CAUTION The door of the oven door. Do not lift the door by the handle. 1. Oven door hinge lock in unlocked position 1. You may need help lifting the door high enough to engage the door latch locks. Using...
... Oven Feet for Multiple Cabinet Cutout Heights" section. Slowly insert door, making sure you feel a slight drop. Set the oven door aside on the prepared covered work surface with the oven door resting on each side of door at this point. 4. CAUTION The door of the oven door. Do not lift the door by the handle. 1. Oven door hinge lock in unlocked position 1. You may need help lifting the door high enough to engage the door latch locks. Using...

