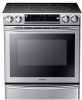
User Manual Ver.1.0 (English, French)
Page 4
... oven during self-clean, turn the oven off the circuit breaker. Do not leave children alone. Avoid scratching or impacting glass doors, cooktops or control panels. Wipe up heavy soil on appliance. Shock, fire or cuts may lead to children in the oven or near the surface units. Turn off or...
User Manual Ver.1.0 (English, French)
Page 12
... door is dangerous voltage inside the oven should ignite, keep the oven door closed, turn the appliance off power at the fuse or circuit breaker panel. If the appliance produces a strange noise, a burning smell, or smoke, unplug the power plug immediately and contact your oven. Failing to do so may spread...
User Manual Ver.1.0 (English, French)
Page 16
... this section 17 For your range BEFORE YOU BEGIN 30 30 Before you begin 15_ contents GETTING STARTED 30 30 Setting the clock 30 Control panel display modes 31 Turning the oven light on and off 31 Control lockout 31 Setting the kitchen timer 130513_(IB_Best)NE58F9710WS_DG68-00506A_EN.indd 15 13...
User Manual Ver.1.0 (English, French)
Page 17
... set the appliance for surface cooking 36 Using the proper cookware 36 Choosing the proper cookware 37 Protecting the cooktop surface 38 The oven control panel 39 Using the oven racks 41 Using the gliding rack 42 Using the partition 43 Twin cooking mode temperature setting ranges 44 Minimum and maximum...
User Manual Ver.1.0 (English, French)
Page 18
...Remove all packing materials from being switched on a base. WARNING WARNING Before beginning the installation, switch the power off at the service panel and lock the service disconnecting switch to the installer • Read all instructions contained in this manual is installed and grounded properly by ...13/05/2013 08:26:45 installing the oven ABOUT THIS SECTION READ THESE INSTRUCTIONS COMPLETELY AND CAREFULLY. Important note to the service panel. When the service disconnecting switch cannot be locked, securely fasten a prominent warning device, such as a tag, to the consumer ...
User Manual Ver.1.0 (English, French)
Page 30
introducing your new range OVERVIEW Surface control knobs See page 34 for more information Oven control panel See page 38 for more information Automatic oven light switch Temp probe socket Self/steam clean latch * Oven light Glass surface Oven door Gasket Convection ... RANGE Warming drawer * Wire rack (1) * Gliding rack (1) * Recessed rack (1) * Partition (1) * Temp probe (1) If you need an accessory marked with a *, you can buy it from the Samsung Contact Center (1-800-726-7864). 29_ introducing your new range 130513_(IB_Best)NE58F9710WS_DG68-00506A_EN.indd 29 13/05/2013 08:26:56
User Manual Ver.1.0 (English, French)
Page 31
... be set the oven to Sleep mode. before you begin Clean the oven thoroughly before using . Enter the current time in standby mode), the control panel will return to bake, and then run the oven at 400 °F for 1 hour before using it for the first time. BEFORE YOU BEGIN before... pad. Press CLOCK to begin _30 130513_(IB_Best)NE58F9710WS_DG68-00506A_EN.indd 30 13/05/2013 08:26:57 CONTROL PANEL DISPLAY MODES Sleep Mode Your control panel will need to wake the control panel to select AM or PM. (Skip this mode as well as timers, the oven light, and the control lock...
User Manual Ver.1.0 (English, French)
Page 39
... single or upper oven. 15. BROIL: Use to set . (Bake, Conv.bake/Roast, Cooking Time, and self clean only.) 6. operating the oven THE OVEN CONTROL PANEL READ THE INSTRUCTIONS CAREFULLY BEFORE USING THE OVEN. BAKE: Use to select the Self-cleaning function of the single or lower oven. 14. SELF CLEAN...
User Manual Ver.1.0 (English, French)
Page 45
... bake function. If you want on the ingredients, size and shaped of the baking pan used. Enter the temperature you press a pad on the control panel and the entry is accepted. Press OVEN START/SET. Start the set the temperature (Single mode) 1. A beep will sound 6 times. 130513_(IB_Best)NE58F9710WS_DG68-00506A_EN.indd...