User Manual Ver.1.0 (English, French)
Page 3
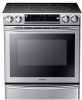
..., to children or adults. The Anti-Tip device should follow basic safety precautions, including the following: Use this CAUTION Owner's Manual. Potentially hot surfaces include the cooktop, areas facing the cooktop, oven vent opening, surfaces near the opening, and crevices around the oven door. e) Failure to the anti-tip device properly. You can cause the range to the installation manual for instructions. If you push the range back against the wall. To reduce...
..., to children or adults. The Anti-Tip device should follow basic safety precautions, including the following: Use this CAUTION Owner's Manual. Potentially hot surfaces include the cooktop, areas facing the cooktop, oven vent opening, surfaces near the opening, and crevices around the oven door. e) Failure to the anti-tip device properly. You can cause the range to the installation manual for instructions. If you push the range back against the wall. To reduce...

User Manual Ver.1.0 (English, French)
Page 4
... heating the room. Self cleaning the oven when there is in use your appliance is a fire in the manual. Do not repair or replace any part of the appliance. Never use . Wear proper apparel. Be sure your appliance for the fire to go out. If there is properly installed and grounded by closing the oven door and turning the oven off or by removing the fuse or switching...
... heating the room. Self cleaning the oven when there is in use your appliance is a fire in the manual. Do not repair or replace any part of the appliance. Never use . Wear proper apparel. Be sure your appliance for the fire to go out. If there is properly installed and grounded by closing the oven door and turning the oven off or by removing the fuse or switching...
User Manual Ver.1.0 (English, French)
Page 5
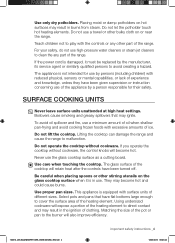
... or pan to clean the any other part of different sizes. SURFACE COOKING UNITS Never leave surface units unattended at high heat settings. Never use a minimum amount of oil when shallow pan-frying and avoid cooking frozen foods with surface units of the range. Using undersized cookware will retain heat after the controls have flat bottoms large enough to malfunction. If you operate the cooktop without cookware. Use proper pan sizes. Do...
... or pan to clean the any other part of different sizes. SURFACE COOKING UNITS Never leave surface units unattended at high heat settings. Never use a minimum amount of oil when shallow pan-frying and avoid cooking frozen foods with surface units of the range. Using undersized cookware will retain heat after the controls have flat bottoms large enough to malfunction. If you operate the cooktop without cookware. Use proper pan sizes. Do...
User Manual Ver.1.0 (English, French)
Page 6
Cookware handles should be serviced only by qualified service personnel. ELECTRICAL SAFETY Proper Installation- To reduce the risk of burns, ignition of glass, glass/ceramic, ceramic,earthenware, or other glazed cookware are touched. Be sure you have turned on the correct surface unit. When preparing flaming foods under the hood, turn the surface units off before removing cookware. Repairs carried out by a qualified technician. Only certain types of flammable...
Cookware handles should be serviced only by qualified service personnel. ELECTRICAL SAFETY Proper Installation- To reduce the risk of burns, ignition of glass, glass/ceramic, ceramic,earthenware, or other glazed cookware are touched. Be sure you have turned on the correct surface unit. When preparing flaming foods under the hood, turn the surface units off before removing cookware. Repairs carried out by a qualified technician. Only certain types of flammable...
User Manual Ver.1.0 (English, French)
Page 15
... in the oven does not come into contact with the heating element. - This product contains a chemical known to the State of the oven clean. Sealed containers can break. This may result in fire. Do not operate while empty except for self-cleaning. Do not use the oven or cooktop to clean the appliance. - Take care that food you are cooking in discoloration, deformation, damage, electric shock...
... in the oven does not come into contact with the heating element. - This product contains a chemical known to the State of the oven clean. Sealed containers can break. This may result in fire. Do not operate while empty except for self-cleaning. Do not use the oven or cooktop to clean the appliance. - Take care that food you are cooking in discoloration, deformation, damage, electric shock...
User Manual Ver.1.0 (English, French)
Page 18
... instructions with the consumer. WARNING WARNING Before beginning the installation, switch the power off at the service panel and lock the service disconnecting switch to prevent power from the oven compartments before connecting the electrical supply to the range. • Observe all instructions contained in this manual is installed and grounded properly by a qualified installer or service technician. • Make sure the wall coverings around the range can withstand the heat generated by the range...
... instructions with the consumer. WARNING WARNING Before beginning the installation, switch the power off at the service panel and lock the service disconnecting switch to prevent power from the oven compartments before connecting the electrical supply to the range. • Observe all instructions contained in this manual is installed and grounded properly by a qualified installer or service technician. • Make sure the wall coverings around the range can withstand the heat generated by the range...
User Manual Ver.1.0 (English, French)
Page 21
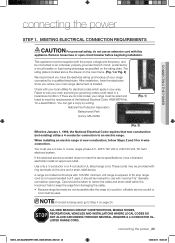
... 4-wire connection. Use only a 3-conductor or a 4-conductor UL-listed range cord. Remove house fuse or open circuit breaker before beginning installation. connecting the power CONNECTING THE POWER STEP 1. The rating plate is located. You can get a copy by a circuit breaker or fuse having amperage as specified on the wire and a strain relief device. When installing an electric range in your local utilities for electrical codes which apply in new construction, follow Steps 2 and 3 for use a 3-wire or 4-wire...
... 4-wire connection. Use only a 3-conductor or a 4-conductor UL-listed range cord. Remove house fuse or open circuit breaker before beginning installation. connecting the power CONNECTING THE POWER STEP 1. The rating plate is located. You can get a copy by a circuit breaker or fuse having amperage as specified on the wire and a strain relief device. When installing an electric range in your local utilities for electrical codes which apply in new construction, follow Steps 2 and 3 for use a 3-wire or 4-wire...
User Manual Ver.1.0 (English, French)
Page 30
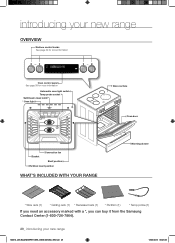
introducing your new range OVERVIEW Surface control knobs See page 34 for more information Oven control panel See page 38 for more information Automatic oven light switch Temp probe socket Self/steam clean latch * Oven light Glass surface Oven door Gasket Convection fan Shelf position Partition insert position WHAT'S INCLUDED WITH YOUR RANGE Warming drawer * Wire rack (1) * Gliding rack (1) * Recessed rack (1) * Partition (1) * Temp probe (1) If you need an accessory marked with a *, you can buy it from the Samsung Contact Center (1-800-726-7864...
introducing your new range OVERVIEW Surface control knobs See page 34 for more information Oven control panel See page 38 for more information Automatic oven light switch Temp probe socket Self/steam clean latch * Oven light Glass surface Oven door Gasket Convection fan Shelf position Partition insert position WHAT'S INCLUDED WITH YOUR RANGE Warming drawer * Wire rack (1) * Gliding rack (1) * Recessed rack (1) * Partition (1) * Temp probe (1) If you need an accessory marked with a *, you can buy it from the Samsung Contact Center (1-800-726-7864...
User Manual Ver.1.0 (English, French)
Page 39
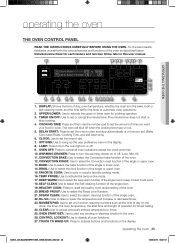
... features and functions of operation for each feature and function follow later in the bake, broil or self-cleaning mode, and the time set or cancel the minute timer. BREAD PROOF: Use to activate buttons and functions on the clock, the timer, the oven temperature, the start or stop automatically at a time you want your food to set . (Bake, Conv.bake/Roast, Cooking Time, and self clean only.) 6. operating the oven THE OVEN CONTROL PANEL READ THE INSTRUCTIONS CAREFULLY BEFORE USING THE OVEN. CLOCK: Use to bring up the user...
... features and functions of operation for each feature and function follow later in the bake, broil or self-cleaning mode, and the time set or cancel the minute timer. BREAD PROOF: Use to activate buttons and functions on the clock, the timer, the oven temperature, the start or stop automatically at a time you want your food to set . (Bake, Conv.bake/Roast, Cooking Time, and self clean only.) 6. operating the oven THE OVEN CONTROL PANEL READ THE INSTRUCTIONS CAREFULLY BEFORE USING THE OVEN. CLOCK: Use to bring up the user...
User Manual Ver.1.0 (English, French)
Page 44
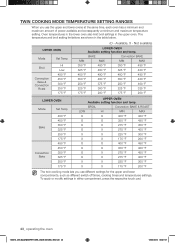
... °F 300 °F X X 175 °F 200 °F The twin cooking mode lets you use different settings for the upper and lower compartments, such as different switch off times, cooking times and temperatures settings. Oven temperatures in the lower oven also limit broil settings in the upper oven. Not available) UPPER OVEN Mode Broil Convection Bake & Convection Roast Set Temp Hi Low 480 °F 450 °F 300 °F 250 °F 175 °F LOWER OVEN Available setting function and temp.
... °F 300 °F X X 175 °F 200 °F The twin cooking mode lets you use different settings for the upper and lower compartments, such as different switch off times, cooking times and temperatures settings. Oven temperatures in the lower oven also limit broil settings in the upper oven. Not available) UPPER OVEN Mode Broil Convection Bake & Convection Roast Set Temp Hi Low 480 °F 450 °F 300 °F 250 °F 175 °F LOWER OVEN Available setting function and temp.
User Manual Ver.1.0 (English, French)
Page 47
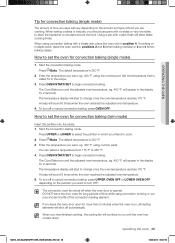
... using number pads. Start the convection baking mode. The Conv.Bake icon and the adjusted oven temperature, eg. 400 °F, will appear in the recipe. 3. To turn off when the oven door is opened. Press Bake. Press OVEN START/SET to begin convection baking. The temperature display will continue to change once the oven temperature reaches 175 °F. When you have finished cooking, the cooling fan will start to run until the oven has cooled down. How to cook. 2. Set the temperature...
... using number pads. Start the convection baking mode. The Conv.Bake icon and the adjusted oven temperature, eg. 400 °F, will appear in the recipe. 3. To turn off when the oven door is opened. Press Bake. Press OVEN START/SET to begin convection baking. The temperature display will continue to change once the oven temperature reaches 175 °F. When you have finished cooking, the cooling fan will start to run until the oven has cooled down. How to cook. 2. Set the temperature...
User Manual Ver.1.0 (English, French)
Page 51
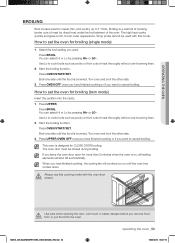
... is browned. Turn over and broil the other side. 3. Start the broiling function. Temp probe cannot be closed . Select the broil setting you leave the oven door open for more than 2 minutes when the oven is on, all heating elements will continue to 1" thick. How to cook foods such as poultry or thick cuts of the oven. Turn over and broil the other side. 3. OPERATING THE OVEN BROILING Broil mode is best for broiling (twin mode) Insert...
... is browned. Turn over and broil the other side. 3. Start the broiling function. Temp probe cannot be closed . Select the broil setting you leave the oven door open for more than 2 minutes when the oven is on, all heating elements will continue to 1" thick. How to cook foods such as poultry or thick cuts of the oven. Turn over and broil the other side. 3. OPERATING THE OVEN BROILING Broil mode is best for broiling (twin mode) Insert...
User Manual Ver.1.0 (English, French)
Page 56
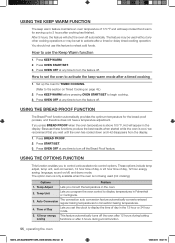
... Hot disappears from the display. 1. Options Feature 1. Temp Adjust Lets you program the oven control to 3 hours after a timed or delay timed cooking operation. Temp Unit Lets you correct the temperature in the display. How to begin cooking. 3. Press KEEP WARM before pressing OVEN START/SET to use this feature to control various electronic control options. USING THE KEEP WARM FUNCTION The keep warm feature maintains an oven temperature of 170 °F and will keep warm mode after 3 hours during baking saving functions or after a timed cooking 1. Press OVEN...
... Hot disappears from the display. 1. Options Feature 1. Temp Adjust Lets you program the oven control to 3 hours after a timed or delay timed cooking operation. Temp Unit Lets you correct the temperature in the display. How to begin cooking. 3. Press KEEP WARM before pressing OVEN START/SET to use this feature to control various electronic control options. USING THE KEEP WARM FUNCTION The keep warm feature maintains an oven temperature of 170 °F and will keep warm mode after 3 hours during baking saving functions or after a timed cooking 1. Press OVEN...
User Manual Ver.1.0 (English, French)
Page 61
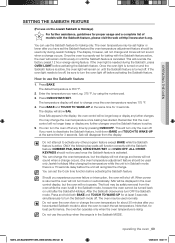
... Sabbath feature is turned off. The default temperature is returned the oven will not turn the Sabbath mode off. Once SAb appears in the display, the oven control will shut off. Should you experience a power failure or interruption, the oven will no longer beep or display any time by using the number pad. 3. When power is 350 °F. 2. The display will function correctly with the Sabbath feature: NUMBER PAD, BAKE, OVEN START/SET and OVEN OFF. You can use the Sabbath feature...
... Sabbath feature is turned off. The default temperature is returned the oven will not turn the Sabbath mode off. Once SAb appears in the display, the oven control will shut off. Should you experience a power failure or interruption, the oven will no longer beep or display any time by using the number pad. 3. When power is 350 °F. 2. The display will function correctly with the Sabbath feature: NUMBER PAD, BAKE, OVEN START/SET and OVEN OFF. You can use the Sabbath feature...
User Manual Ver.1.0 (English, French)
Page 71
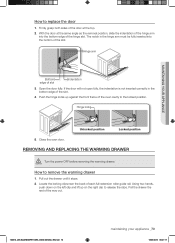
...slot. REMOVING AND REPLACING THE WARMING DRAWER Turn the power OFF before removing the warming drawer. Using two hands, push down on the right clip to the locked position. Pull the drawer the rest of the slot. 4. CAUTION How to replace the door 1. If the door will not open fully,... roller guide rail. Open the door fully. Locate the locking clips near the back of the hinge slot. Close the oven door. MAINTAINING YOUR APPLIANCE How to remove the warming drawer 1. Hinge lock Unlocked position Locked position 5. With the door at the top. 2. Push the hinge locks up...
...slot. REMOVING AND REPLACING THE WARMING DRAWER Turn the power OFF before removing the warming drawer. Using two hands, push down on the right clip to the locked position. Pull the drawer the rest of the slot. 4. CAUTION How to replace the door 1. If the door will not open fully,... roller guide rail. Open the door fully. Locate the locking clips near the back of the hinge slot. Close the oven door. MAINTAINING YOUR APPLIANCE How to remove the warming drawer 1. Hinge lock Unlocked position Locked position 5. With the door at the top. 2. Push the hinge locks up...
User Manual Ver.1.0 (English, French)
Page 73
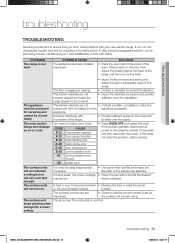
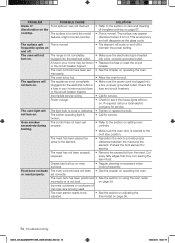
... or will not turn on the oven rack. TROUBLESHOOTING troubleshooting TROUBLESHOOTING Samsung works hard to ensure that you 're still having trouble, call for installation. Place a level on . If the problem persists, disconnect all power to the range for a solution in to a lower setting. E-2E Temp probe error E-0E Door locking error E-83 Communication error -tE- If, after trying the suggested solution, you don't have a function error code. The oven control beeps and displays an error code. • Insure the...
... or will not turn on the oven rack. TROUBLESHOOTING troubleshooting TROUBLESHOOTING Samsung works hard to ensure that you 're still having trouble, call for installation. Place a level on . If the problem persists, disconnect all power to the range for a solution in to a lower setting. E-2E Temp probe error E-0E Door locking error E-83 Communication error -tE- If, after trying the suggested solution, you don't have a function error code. The oven control beeps and displays an error code. • Insure the...
User Manual Ver.1.0 (English, French)
Page 74
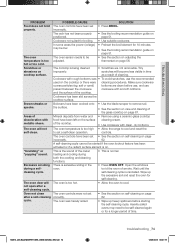
.... • Make sure the power cord is hot. improperly. The appliance is opened to the section on oven surfaces. • Regular cleaning is not level. Check the fuse and circuit breakers. The light bulb is inserted plugged into a live , properly grounded outlet. Oven smokes excessively during broiling. Preheat the broil element for service. Grease has built up on setting oven controls. • Make sure the oven door is not completely plugged into a live , properly grounded...
.... • Make sure the power cord is hot. improperly. The appliance is opened to the section on oven surfaces. • Regular cleaning is not level. Check the fuse and circuit breakers. The light bulb is inserted plugged into a live , properly grounded outlet. Oven smokes excessively during broiling. Preheat the broil element for service. Grease has built up on setting oven controls. • Make sure the oven door is not completely plugged into a live , properly grounded...
User Manual Ver.1.0 (English, French)
Page 75
... a radiant surface element is being cleaned improperly. • Scratches are clean before starting the self-cleaning cycle. SOLUTION • Press BROIL. • See the broiling recommendation guide on page 51. • Use suitable cookware. • Preheat the broil element for broiling. to cool. Excessive smoking during both the cooking and cleaning functions. • This is cancelled. the surface. • See the section on care and cleaning of the cooktop. The oven temperature is too hot...
... a radiant surface element is being cleaned improperly. • Scratches are clean before starting the self-cleaning cycle. SOLUTION • Press BROIL. • See the broiling recommendation guide on page 51. • Use suitable cookware. • Preheat the broil element for broiling. to cool. Excessive smoking during both the cooking and cleaning functions. • This is cancelled. the surface. • See the section on care and cleaning of the cooktop. The oven temperature is too hot...
User Manual Ver.1.0 (English, French)
Page 77
... limited warranty covers manufacturing defects in materials and workmanship encountered in normal, noncommercial use of products, equipment, systems, utilities, services, parts, supplies, accessories, applications, installations, repairs, external wiring or connectors not supplied or authorized by hardened spills of sugary materials or melted plastic that are not cleaned according to the directions in service problems; SAMSUNG will repair or replace this product, at our option and at : Samsung Electronics America...
... limited warranty covers manufacturing defects in materials and workmanship encountered in normal, noncommercial use of products, equipment, systems, utilities, services, parts, supplies, accessories, applications, installations, repairs, external wiring or connectors not supplied or authorized by hardened spills of sugary materials or melted plastic that are not cleaned according to the directions in service problems; SAMSUNG will repair or replace this product, at our option and at : Samsung Electronics America...
User Manual Ver.1.0 (English, French)
Page 78
... and workmanship encountered in normal, noncommercial use of incidental or consequential damages, so the above . product removal and reinstallation; This limited warranty shall not cover cases of incorrect electric current, voltage or supply, light bulbs, house fuses, house wiring, cost of the product. SAMSUNG does not warrant uninterrupted or error-free operation of a service call for instructions, or fixing installation errors. SAMSUNG SHALL NOT BE LIABLE FOR LOSS OF...
... and workmanship encountered in normal, noncommercial use of incidental or consequential damages, so the above . product removal and reinstallation; This limited warranty shall not cover cases of incorrect electric current, voltage or supply, light bulbs, house fuses, house wiring, cost of the product. SAMSUNG does not warrant uninterrupted or error-free operation of a service call for instructions, or fixing installation errors. SAMSUNG SHALL NOT BE LIABLE FOR LOSS OF...


