
Owners Manual
Page 2
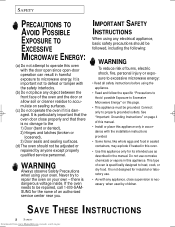
... when used by anyone except properly qualified service personnel. It is no damage to the 1) Door (bent or dented), 2) Hinges and latches (broken or loosened), 3) Door seals and sealing surfaces. (d) The oven should be adjusted or repaired by children. If the oven needs to heat, cook, or dry food. See "Important Grounding Instructions" on your oven. there is damaged. This type of this manual. • Install...
... when used by anyone except properly qualified service personnel. It is no damage to the 1) Door (bent or dented), 2) Hinges and latches (broken or loosened), 3) Door seals and sealing surfaces. (d) The oven should be adjusted or repaired by children. If the oven needs to heat, cook, or dry food. See "Important Grounding Instructions" on your oven. there is damaged. This type of this manual. • Install...
Owners Manual
Page 3
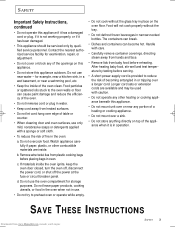
... table or counter. • When cleaning door and oven surfaces, use near a swimming pool, etc. • Keep the inside of the oven clean. If materials inside . Handle with care. • Carefully remove container coverings, directing steam away from hands and face. • Remove lids from www.Manualslib.com manuals search engine SAFETY 3 After heating baby food, stir well and test temperature by tasting before serving. • A short power-supply cord is not working...
... table or counter. • When cleaning door and oven surfaces, use near a swimming pool, etc. • Keep the inside of the oven clean. If materials inside . Handle with care. • Carefully remove container coverings, directing steam away from hands and face. • Remove lids from www.Manualslib.com manuals search engine SAFETY 3 After heating baby food, stir well and test temperature by tasting before serving. • A short power-supply cord is not working...
Owners Manual
Page 4
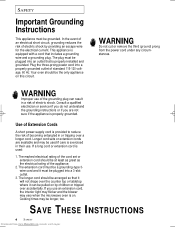
... in their use an extension cord, the interior light may flicker and the blower may be grounded. WARNING Do not cut or remove the third (ground) prong from www.Manualslib.com manuals search engine Use of Extension Cords A short power-supply cord is provided to reduce the risk of electric shock by children or tripped over a longer cord. Longer cord sets or extension cords are not...
... in their use an extension cord, the interior light may flicker and the blower may be grounded. WARNING Do not cut or remove the third (ground) prong from www.Manualslib.com manuals search engine Use of Extension Cords A short power-supply cord is provided to reduce the risk of electric shock by children or tripped over a longer cord. Longer cord sets or extension cords are not...
Owners Manual
Page 5
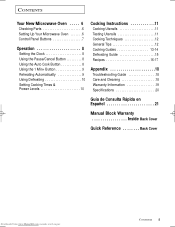
... 6 Control Panel Buttons 7 Operation 8 Setting the Clock 8 Using the Pause/Cancel Button 8 Using the Auto Cook Button 8 Using the 1 Min+ Button 9 Reheating Automatically 9 Using Defrosting 10 Setting Cooking Times & Power Levels 10 Cooking Instructions 11 Cooking Utensils 11 Testing Utensils 11 Cooking Techniques 12 General Tips 12 Cooking Guides 13-14 Defrosting Guide 15 Recipes 16-17 Appendix 18 Troubleshooting Guide 18 Care and Cleaning 18 Warranty Information 19 Specifications 20 Guía de Consulta Rápida en Español 21 Manual Block Warranty Inside...
... 6 Control Panel Buttons 7 Operation 8 Setting the Clock 8 Using the Pause/Cancel Button 8 Using the Auto Cook Button 8 Using the 1 Min+ Button 9 Reheating Automatically 9 Using Defrosting 10 Setting Cooking Times & Power Levels 10 Cooking Instructions 11 Cooking Utensils 11 Testing Utensils 11 Cooking Techniques 12 General Tips 12 Cooking Guides 13-14 Defrosting Guide 15 Recipes 16-17 Appendix 18 Troubleshooting Guide 18 Care and Cleaning 18 Warranty Information 19 Specifications 20 Guía de Consulta Rápida en Español 21 Manual Block Warranty Inside...
Owners Manual
Page 6
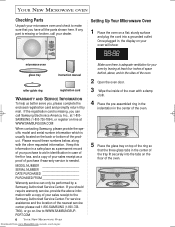
... the cord into the tabs on the floor of the oven. MODEL NUMBER SERIAL NUMBER DATE PURCHASED PURCHASED FROM Warranty service can call Samsung Electronics America, Inc., at 1-800SAMSUNG (1-800-726-7864), or register on-line at least four inches of space behind, above information with the other requested information. Once plugged in, the display on your oven will show: microwave oven glass tray instruction manual roller guide...
... the cord into the tabs on the floor of the oven. MODEL NUMBER SERIAL NUMBER DATE PURCHASED PURCHASED FROM Warranty service can call Samsung Electronics America, Inc., at 1-800SAMSUNG (1-800-726-7864), or register on-line at least four inches of space behind, above information with the other requested information. Once plugged in, the display on your oven will show: microwave oven glass tray instruction manual roller guide...
Owners Manual
Page 7
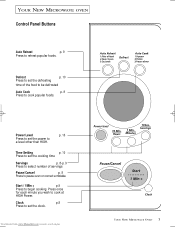
Start / 1Min + p.9 Press to reheat popular foods. Clock p.8 Press to set the defrosting time of servings Pause/Cancel p. 8 Press to cook at HIGH Power. YOUR NEW MICROWAVE OVEN Control Panel Buttons Auto Reheat p. 9 Press to begin cooking. Defrost p. 10 Press to a level other than HIGH. Time Setting p. 10 Press to set the power to set the clock. Downloaded from www.Manualslib.com manuals search engine YOUR NEW MICROWAVE OVEN 7 Power Level p. 10 Press to set the cooking time Servings p. 8-p. 9 Press to select number of...
Start / 1Min + p.9 Press to reheat popular foods. Clock p.8 Press to set the defrosting time of servings Pause/Cancel p. 8 Press to cook at HIGH Power. YOUR NEW MICROWAVE OVEN Control Panel Buttons Auto Reheat p. 9 Press to begin cooking. Defrost p. 10 Press to a level other than HIGH. Time Setting p. 10 Press to set the power to set the clock. Downloaded from www.Manualslib.com manuals search engine YOUR NEW MICROWAVE OVEN 7 Power Level p. 10 Press to set the cooking time Servings p. 8-p. 9 Press to select number of...

Owners Manual
Page 8
... • Use one microwave-only bag of popcorn. • Use caution when removing and opening hot bag from oven. • To help prevent the popcorn bag from www.Manualslib.com manuals search engine 2 Select the number of day by pressing the Auto Cook button one or more times. OPERATION Setting the Clock 1 Press the Clock button. The display will appear, indicating that the time is over, the oven will need to pause the oven's cooking cycle...
... • Use one microwave-only bag of popcorn. • Use caution when removing and opening hot bag from oven. • To help prevent the popcorn bag from www.Manualslib.com manuals search engine 2 Select the number of day by pressing the Auto Cook button one or more times. OPERATION Setting the Clock 1 Press the Clock button. The display will appear, indicating that the time is over, the oven will need to pause the oven's cooking cycle...

Owners Manual
Page 9
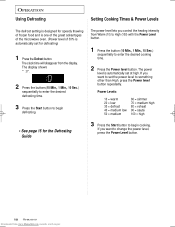
... at the High power level. 1 Press the 1 Min+ button once for two minutes. You can only adjust the time during cooking when the time cook mode is over, the oven will display, and the oven starts automatically. with lid or vented (8 oz./serving) plastic wrap. Reheating Automatically The Auto Reheat feature has three pre-programmed cooking times. OPERATION Using the 1 Min+ Button This button offers a convenient way to heat food in progress by...
... at the High power level. 1 Press the 1 Min+ button once for two minutes. You can only adjust the time during cooking when the time cook mode is over, the oven will display, and the oven starts automatically. with lid or vented (8 oz./serving) plastic wrap. Reheating Automatically The Auto Reheat feature has three pre-programmed cooking times. OPERATION Using the 1 Min+ Button This button offers a convenient way to heat food in progress by...
Owners Manual
Page 10
... to begin defrosting • See page 15 for defrosting) 1 Press the Defrost button. Power Levels: 10 = warm 20 = low 30 = defrost 40 = medium low 50 = medium 60 = simmer 70 = medium high 80 = reheat 90 = sauté 100 = high 3 Press the Start button to change the power level, press the Power Level button. 10 OPERATION Downloaded from www.Manualslib.com manuals search engine If you control the heating intensity from the display.
... to begin defrosting • See page 15 for defrosting) 1 Press the Defrost button. Power Levels: 10 = warm 20 = low 30 = defrost 40 = medium low 50 = medium 60 = simmer 70 = medium high 80 = reheat 90 = sauté 100 = high 3 Press the Start button to change the power level, press the Power Level button. 10 OPERATION Downloaded from www.Manualslib.com manuals search engine If you control the heating intensity from the display.
Owners Manual
Page 11
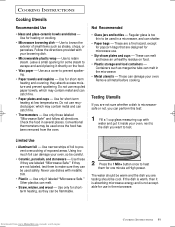
.... 2 Press the 1 Min+ button once to heat them to make sure they are not labeled, test them for use in the microwave. • Metal utensils - Use only if labeled "Microwave Safe." Use narrow strips of small items such as a cover to be used once the food has been removed from www.Manualslib.com manuals search engine COOKING INSTRUCTIONS 11 Never use recycled paper, which may...
.... 2 Press the 1 Min+ button once to heat them to make sure they are not labeled, test them for use in the microwave. • Metal utensils - Use only if labeled "Microwave Safe." Use narrow strips of small items such as a cover to be used once the food has been removed from www.Manualslib.com manuals search engine COOKING INSTRUCTIONS 11 Never use recycled paper, which may...
Owners Manual
Page 12
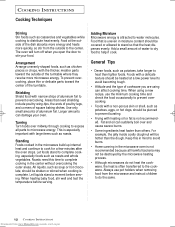
... minutes after the oven stops. Areas that is uneven in the microwave oven is not recommended because all parts to distribute heat evenly. When using can affect cooking time. To prevent overcooking, place thin or delicate parts toward the outside of the turntable. Shielding Shield food with a non-porous skin or shell, such as potatoes, eggs, or hot dogs, should be covered or allowed to...
... minutes after the oven stops. Areas that is uneven in the microwave oven is not recommended because all parts to distribute heat evenly. When using can affect cooking time. To prevent overcooking, place thin or delicate parts toward the outside of the turntable. Shielding Shield food with a non-porous skin or shell, such as potatoes, eggs, or hot dogs, should be covered or allowed to...
Owners Manual
Page 13
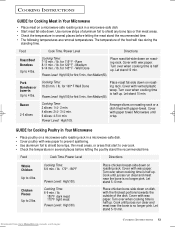
.... Cooking Time: 6-9 min. / lb. 170° -180°F Power Level: High(100). Cooking Time: 6-9 min. / lb. 180°F dark meat 170°F light meat Power Level: High(100). Cover with paper towel. Let stand 5-10 min. Downloaded from www.Manualslib.com manuals search engine COOKING INSTRUCTIONS 13 The temperature of the dish. Cooking Time: Place roast fat-side down on roasting rack. Let stand 10 min. Food Cook Time /Power Level Directions Whole...
.... Cooking Time: 6-9 min. / lb. 170° -180°F Power Level: High(100). Cooking Time: 6-9 min. / lb. 180°F dark meat 170°F light meat Power Level: High(100). Cover with paper towel. Let stand 5-10 min. Downloaded from www.Manualslib.com manuals search engine COOKING INSTRUCTIONS 13 The temperature of the dish. Cooking Time: Place roast fat-side down on roasting rack. Let stand 10 min. Food Cook Time /Power Level Directions Whole...
Owners Manual
Page 14
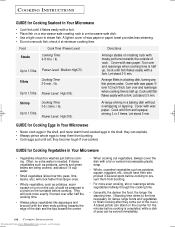
... . Food Cook Time /Power Level Directions Steaks Cooking Time: 6-8 min. / lb. Up to steam fish. Arrange steaks on roasting rack with meaty portions towards the edge of wax paper or paper towel provides less steaming. • Do not overcook fish; Power Level: High(100). GUIDE for Cooking Vegetables in a microwave-safe dish. • Use a tight cover to 1.5 lbs. Let stand 3-5 min. COOKING INSTRUCTIONS GUIDE for Cooking Seafood in Your Microwave • Cook...
... . Food Cook Time /Power Level Directions Steaks Cooking Time: 6-8 min. / lb. Up to steam fish. Arrange steaks on roasting rack with meaty portions towards the edge of wax paper or paper towel provides less steaming. • Do not overcook fish; Power Level: High(100). GUIDE for Cooking Vegetables in a microwave-safe dish. • Use a tight cover to 1.5 lbs. Let stand 3-5 min. COOKING INSTRUCTIONS GUIDE for Cooking Seafood in Your Microwave • Cook...
Owners Manual
Page 15
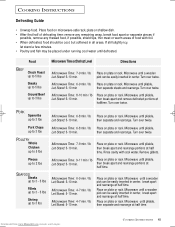
... 3 lbs Microwave Time: 6-8 min / lb Place on microwave-safe rack, plate or shallow dish. • After first half of defrosting time: remove any remaining wrap, break food apart or separate pieces if possible, remove any thawed food, if possible, shield tips, thin meat or warm areas of food with cool water. Microwave until pliable, then separate and rearrange at half time. COOKING INSTRUCTIONS Defrosting Guide • Unwrap food. Microwave until...
... 3 lbs Microwave Time: 6-8 min / lb Place on microwave-safe rack, plate or shallow dish. • After first half of defrosting time: remove any remaining wrap, break food apart or separate pieces if possible, remove any thawed food, if possible, shield tips, thin meat or warm areas of food with cool water. Microwave until pliable, then separate and rearrange at half time. COOKING INSTRUCTIONS Defrosting Guide • Unwrap food. Microwave until...

Owners Manual
Page 17
... about 2 quarts. In a medium bowl, cook bacon at High until tender. 2. turn back a corner to dressing. Stir well. small red potatoes, cut into 1/2-inch pieces 4 slices bacon (uncooked), cut into 1/2-inch pieces 1/4 cup chopped onion 2 tsp. Downloaded from www.Manualslib.com manuals search engine COOKING INSTRUCTIONS 17 apple cider vinegar 1. Cover with lid. Cover with a fork. stir. stir once. Reserve...
... about 2 quarts. In a medium bowl, cook bacon at High until tender. 2. turn back a corner to dressing. Stir well. small red potatoes, cut into 1/2-inch pieces 4 slices bacon (uncooked), cut into 1/2-inch pieces 1/4 cup chopped onion 2 tsp. Downloaded from www.Manualslib.com manuals search engine COOKING INSTRUCTIONS 17 apple cider vinegar 1. Cover with lid. Cover with a fork. stir. stir once. Reserve...
Owners Manual
Page 18
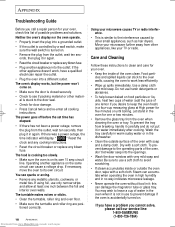
... your microwave causes TV or radio interference. • This is similar to the interference caused by a wall switch, make sure the wall switch is accidentally turned on food particles or liquids, heat two cups of water (add the juice of the oven with a soft cloth. If there was a power outage, the time indicator will display " " Reset the clock and any cooking instructions. • Reset the circuit breaker or replace...
... your microwave causes TV or radio interference. • This is similar to the interference caused by a wall switch, make sure the wall switch is accidentally turned on food particles or liquids, heat two cups of water (add the juice of the oven with a soft cloth. If there was a power outage, the time indicator will display " " Reset the clock and any cooking instructions. • Reset the circuit breaker or replace...
Owners Manual
Page 19
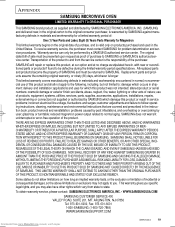
SAMSUNG will repair or replace this product and shall not apply to the following, including, but not limited to: damage which this product or result in service problems; reduced magnetron power output related to follow operating instructions, cleaning, maintenance and environmental instructions that are covered and prescribed in the instruction book; This warranty gives you specific legal rights, and you . ARLINGTON, NJ 07856 Tel: 973-601-6000...
SAMSUNG will repair or replace this product and shall not apply to the following, including, but not limited to: damage which this product or result in service problems; reduced magnetron power output related to follow operating instructions, cleaning, maintenance and environmental instructions that are covered and prescribed in the instruction book; This warranty gives you specific legal rights, and you . ARLINGTON, NJ 07856 Tel: 973-601-6000...
Owners Manual
Page 20
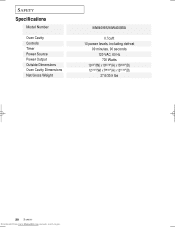
SAFETY Specifications Model Number Oven Cavity Controls Timer Power Source Power Output Outside Dimensions Oven Cavity Dimensions Net/Gross Weight MW4699S/MW4688BA 0.7cuft 10 power levels, including defrost 99 minutes, 90 seconds 120 VAC, 60 Hz 700 Watts 191/4"(W) X 1013/16"(H) X 1515/32"(D) 121/16"(W) X 729/32"(H) X 1211/16"(D) 27.6/30.9 lbs 20 SAFETY Downloaded from www.Manualslib.com manuals search engine
SAFETY Specifications Model Number Oven Cavity Controls Timer Power Source Power Output Outside Dimensions Oven Cavity Dimensions Net/Gross Weight MW4699S/MW4688BA 0.7cuft 10 power levels, including defrost 99 minutes, 90 seconds 120 VAC, 60 Hz 700 Watts 191/4"(W) X 1013/16"(H) X 1515/32"(D) 121/16"(W) X 729/32"(H) X 1211/16"(D) 27.6/30.9 lbs 20 SAFETY Downloaded from www.Manualslib.com manuals search engine
Owners Manual
Page 22
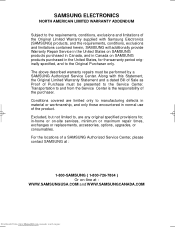
... services, minimum or maximum repair times, exchanges or replacements, accessories, options, upgrades, or consumables. The above described warranty repairs must be performed by a SAMSUNG Authorized Service Center. Excluded, but not limited to, are limited only to manufacturing defects in material or workmanship, and only those encountered in -home or on -line at : WWW.SAMSUNGUSA.COM and WWW.SAMSUNGCANADA.COM Downloaded...
... services, minimum or maximum repair times, exchanges or replacements, accessories, options, upgrades, or consumables. The above described warranty repairs must be performed by a SAMSUNG Authorized Service Center. Excluded, but not limited to, are limited only to manufacturing defects in material or workmanship, and only those encountered in -home or on -line at : WWW.SAMSUNGUSA.COM and WWW.SAMSUNGCANADA.COM Downloaded...
Owners Manual
Page 23
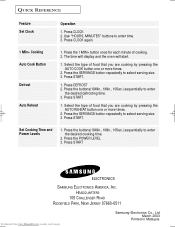
... the AUTO REHEAT button one or more times. 2. Press START ELECTRONICS SAMSUNG ELECTRONICS AMERICA, INC. Press the SERVINGS button repeatedly to enter the desired defrosting time. 3. Press START 1. Press START. Press the POWER LEVEL. 3. Press CLOCK again. 1 Min+ Cooking Auto Cook Button Defrost Auto Reheat 1. Select the type of cooking. 2. The time will display and the oven will start. 1. Press the buttons(10Min., 1Min., 10Sec.) sequentially to select serving size. 3. Press CLOCK. 2. QUICK REFERENCE Feature Set Clock Operation 1. Use "HOURS, MINUTES" buttons to...
... the AUTO REHEAT button one or more times. 2. Press START ELECTRONICS SAMSUNG ELECTRONICS AMERICA, INC. Press the SERVINGS button repeatedly to enter the desired defrosting time. 3. Press START 1. Press START. Press the POWER LEVEL. 3. Press CLOCK again. 1 Min+ Cooking Auto Cook Button Defrost Auto Reheat 1. Select the type of cooking. 2. The time will display and the oven will start. 1. Press the buttons(10Min., 1Min., 10Sec.) sequentially to select serving size. 3. Press CLOCK. 2. QUICK REFERENCE Feature Set Clock Operation 1. Use "HOURS, MINUTES" buttons to...


