
Owners Manual
Page 2
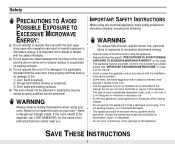
... not operate this appliance if it has a damaged cord or plug, if it is not working properly, or if it is damaged. IMPORTANT SAFETY INSTRUCTIONS When using any electrical appliance, basic safety precautions should be serviced only by anyone except properly qualified service personnel. If the oven needs to be repaired, call 1-800-SAMSUNG for examination, repair, or adjustment. • Do not cover or...
... not operate this appliance if it has a damaged cord or plug, if it is not working properly, or if it is damaged. IMPORTANT SAFETY INSTRUCTIONS When using any electrical appliance, basic safety precautions should be serviced only by anyone except properly qualified service personnel. If the oven needs to be repaired, call 1-800-SAMSUNG for examination, repair, or adjustment. • Do not cover or...
Owners Manual
Page 3
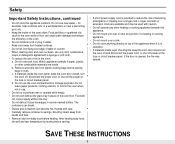
... oven compartment for example, near a kitchen sink, in operation. • If materials inside oven should ignite, keep the oven door closed , turn the oven off, disconnect the power cord, or shut off power at the fuse or circuit breaker panel. Watch appliance carefully if paper, plastic, or other heating or cooking appliance beneath this appliance outdoors. Do not use only mild, nonabrasive soaps or detergents applied with care. • Carefully remove container coverings, directing...
... oven compartment for example, near a kitchen sink, in operation. • If materials inside oven should ignite, keep the oven door closed , turn the oven off, disconnect the power cord, or shut off power at the fuse or circuit breaker panel. Watch appliance carefully if paper, plastic, or other heating or cooking appliance beneath this appliance outdoors. Do not use only mild, nonabrasive soaps or detergents applied with care. • Carefully remove container coverings, directing...

Owners Manual
Page 4
... you use of the cord set or extension cord should be the only appliance on by providing an escape wire for the electrical current. WARNING Do not cut or remove the third (ground) prong from the power cord under any circumstances. Safety IMPORTANT GROUNDING INSTRUCTIONS This appliance must be plugged into an outlet that is properly installed and grounded. This appliance is operable...
... you use of the cord set or extension cord should be the only appliance on by providing an escape wire for the electrical current. WARNING Do not cut or remove the third (ground) prong from the power cord under any circumstances. Safety IMPORTANT GROUNDING INSTRUCTIONS This appliance must be plugged into an outlet that is properly installed and grounded. This appliance is operable...
Owners Manual
Page 5
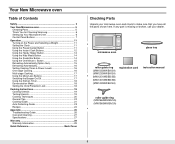
... Cooking 17 Using the More/Less Buttons 17 Switching the Beeper On/Off 17 Using the Kitchen Timer 18 Demonstration Mode 18 Setting the Child Protection Lock 18 Cooking Instructions 19 Cooking Utensils 19 Testing Utensils 19 Cooking Techniques 20 General Tips 20 Cooking Guide 21 Auto Defrosting Guide 23 Recipes 24 Appendix 26 Troubleshooting Guide 26 Care and Cleaning 27 Specifications 27 Warranty 29 Warranty Information 29 Quick Reference Back Cover Checking Parts Unpack your dealer. 123 456 789 0 microwave oven glass tray roller guide...
... Cooking 17 Using the More/Less Buttons 17 Switching the Beeper On/Off 17 Using the Kitchen Timer 18 Demonstration Mode 18 Setting the Child Protection Lock 18 Cooking Instructions 19 Cooking Utensils 19 Testing Utensils 19 Cooking Techniques 20 General Tips 20 Cooking Guide 21 Auto Defrosting Guide 23 Recipes 24 Appendix 26 Troubleshooting Guide 26 Care and Cleaning 27 Specifications 27 Warranty 29 Warranty Information 29 Quick Reference Back Cover Checking Parts Unpack your dealer. 123 456 789 0 microwave oven glass tray roller guide...
Owners Manual
Page 6
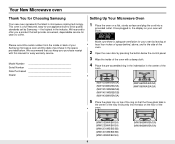
... oven by pressing the button below . Model Number Serial Number Date Purchased Dealer Setting Up Your Microwave Oven 1 Place the oven on top of the ring so that you keep your purchase receipt with this manual for easy warranty service. QTY. the highest in the space provided below the control panel. 3 Wipe the inside or back of your Samsung microwave oven and the date of the oven. (MW1030WA/BA/SA) (MW1230WA...
... oven by pressing the button below . Model Number Serial Number Date Purchased Dealer Setting Up Your Microwave Oven 1 Place the oven on top of the ring so that you keep your purchase receipt with this manual for easy warranty service. QTY. the highest in the space provided below the control panel. 3 Wipe the inside or back of your Samsung microwave oven and the date of the oven. (MW1030WA/BA/SA) (MW1230WA...
Owners Manual
Page 10
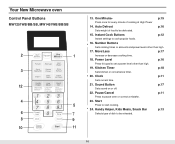
... convenience timer. 20. Handy Helper, Kids Meals, Snack Bar p.13 Selects type of dish to be reheated. 10 Start Press to cook popular foods. 16. Auto Defrost p.16 Sets weight of cooking at High Power 14. Power Level p.16 Press this pad to pause oven or correct a mistake. 23. Sound Button p.17 Sets sound on or off. 22. Number Buttons Sets cooking times or amounts and power levels other than high. 17. Your New Microwave oven Control Panel Buttons...
... convenience timer. 20. Handy Helper, Kids Meals, Snack Bar p.13 Selects type of dish to be reheated. 10 Start Press to cook popular foods. 16. Auto Defrost p.16 Sets weight of cooking at High Power 14. Power Level p.16 Press this pad to pause oven or correct a mistake. 23. Sound Button p.17 Sets sound on or off. 22. Number Buttons Sets cooking times or amounts and power levels other than high. 17. Your New Microwave oven Control Panel Buttons...
Owners Manual
Page 11
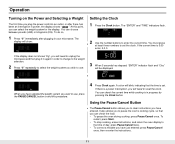
... a power interruption, you to unplug the microwave and then plug it in again in progress by pressing the Clock button. You can select the weight system for the display. Setting the Clock 1 Press the Clock button. You can check the food. • To pause the oven during cooking: press Pause/Cancel once. The "ENTER" and "TIME" indicators flash. It also allows you will need to reset...
... a power interruption, you to unplug the microwave and then plug it in again in progress by pressing the Clock button. You can select the weight system for the display. Setting the Clock 1 Press the Clock button. You can check the food. • To pause the oven during cooking: press Pause/Cancel once. The "ENTER" and "TIME" indicators flash. It also allows you will need to reset...
Owners Manual
Page 12
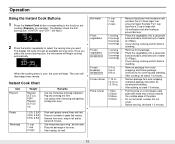
... cooking, let stand 1-3 minutes. The display will then beep every minute. START ENTER COOK TIME TIME2 Kg g Oz Lbs QTY. Remove from outer wrapping and follow package instructions for covering and standing. Example: For 1 cup liquid use a 2 cup or larger dish. Put the pizza on turntable in spoke-like fashion. Do not let slices overlap. Instant Cook Chart Item Popcorn Weight Remarks Regular (3.5 oz), Light...
... cooking, let stand 1-3 minutes. The display will then beep every minute. START ENTER COOK TIME TIME2 Kg g Oz Lbs QTY. Remove from outer wrapping and follow package instructions for covering and standing. Example: For 1 cup liquid use a 2 cup or larger dish. Put the pizza on turntable in spoke-like fashion. Do not let slices overlap. Instant Cook Chart Item Popcorn Weight Remarks Regular (3.5 oz), Light...
Owners Manual
Page 13
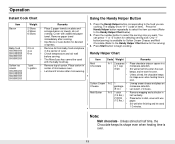
... display show "A-1" (code of microwave oven. • Let stand 2 minutes after finishing and let stand 1-2 minutes. Unless stirred, the chocolate keeps its shape even when heating time is over . Place butter in center of item). Cover with wax paper. Remove paper towel immediately after cooking. • Use More or Less button for selecting serving size. Press the Handy Helper button corresponding to begin cooking...
... display show "A-1" (code of microwave oven. • Let stand 2 minutes after finishing and let stand 1-2 minutes. Unless stirred, the chocolate keeps its shape even when heating time is over . Place butter in center of item). Cover with wax paper. Remove paper towel immediately after cooking. • Use More or Less button for selecting serving size. Press the Handy Helper button corresponding to begin cooking...
Owners Manual
Page 15
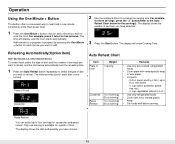
... a program in one-minute increments at the High power level. 1 Press the One Minute + button once for each minute you wish to four servings for two minutes. Plate of food. QTY. Casserole START ENTER COOK TIME TIME2 Kg g Oz Lbs. Auto Reheat Chart Item Plate of food Weight 1 serving Casserole Pasta Reheat 1 to 4 servings (8 oz./serving) 1 to increase the serving size. QTY. The display shows...
... a program in one-minute increments at the High power level. 1 Press the One Minute + button once for each minute you wish to four servings for two minutes. Plate of food. QTY. Casserole START ENTER COOK TIME TIME2 Kg g Oz Lbs. Auto Reheat Chart Item Plate of food Weight 1 serving Casserole Pasta Reheat 1 to 4 servings (8 oz./serving) 1 to increase the serving size. QTY. The display shows...
Owners Manual
Page 16
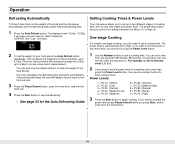
... frozen food, set the weight of your oven for the Auto Defrosting Guide. Setting Cooking Times & Power Levels Your microwave allows you only need to High (0). The power level button lets you control the heating intensity from one -stage cooking, you to set a time over . 4 Press the Start button to enter the weight of the food directly. To set up to 6.0 lbs (The Auto Defrost button will flash). One-stage Cooking For simple one second to two different stages of the instructions. 16...
... frozen food, set the weight of your oven for the Auto Defrosting Guide. Setting Cooking Times & Power Levels Your microwave allows you only need to High (0). The power level button lets you control the heating intensity from one -stage cooking, you to set a time over . 4 Press the Start button to enter the weight of the food directly. To set up to 6.0 lbs (The Auto Defrost button will flash). One-stage Cooking For simple one second to two different stages of the instructions. 16...
Owners Manual
Page 17
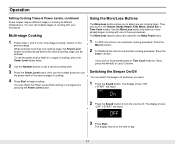
... switch the beeper off whenever you have already begun cooking with the Baby Food button. 1 To ADD more than one of these procedures. To set the power level at different temperatures. You can be used with one cooking stage, the Power Level button must be pressed before the second cooking stage can check the Power Level while cooking is in Time Cook mode by pressing the Power Level button. The display shows "ON". ("START...
... switch the beeper off whenever you have already begun cooking with the Baby Food button. 1 To ADD more than one of these procedures. To set the power level at different temperatures. You can be used with one cooking stage, the Power Level button must be pressed before the second cooking stage can check the Power Level while cooking is in Time Cook mode by pressing the Power Level button. The display shows "ON". ("START...
Owners Manual
Page 18
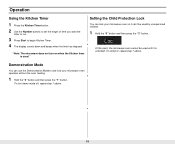
... , repeat step 1 above . 18 To unlock it is used." Setting the Child Protection Lock You can use the Demonstration Mode to begin Kitchen Timer. 4 The display counts down and beeps when the time has elapsed. . To turn on when the Kitchen timer is unlocked. "Note: The microwave does not turn demo mode off, repeat step 1 above . Demonstration Mode You can lock your microwave oven operates without the oven heating. 1 Hold the "0" button and then press the...
... , repeat step 1 above . 18 To unlock it is used." Setting the Child Protection Lock You can use the Demonstration Mode to begin Kitchen Timer. 4 The display counts down and beeps when the time has elapsed. . To turn on when the Kitchen timer is unlocked. "Note: The microwave does not turn demo mode off, repeat step 1 above . Demonstration Mode You can lock your microwave oven operates without the oven heating. 1 Hold the "0" button and then press the...
Owners Manual
Page 19
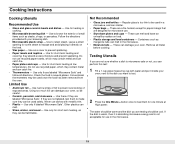
... glass measuring cup with water and put it directly on food. • Plastic storage and food containers - Use for short-term heating at High power. Use for short-term heating and covering; Conventional thermometers may be used in the microwave. • Metal utensils - Use narrow strips of foil to retain steam. Remove all directions. Use to brown the exterior of exposed areas. Never use dishes with your oven...
... glass measuring cup with water and put it directly on food. • Plastic storage and food containers - Use for short-term heating at High power. Use for short-term heating and covering; Conventional thermometers may be used in the microwave. • Metal utensils - Use narrow strips of foil to retain steam. Remove all directions. Use to brown the exterior of exposed areas. Never use dishes with your oven...
Owners Manual
Page 20
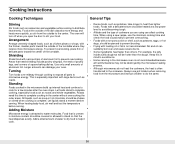
... heats more quickly, so stir from the microwave and instruct children to complete cooking in the microwave oven is not recommended because all parts to stand so that need this in mind to avoid burns. • Home canning in the center without overcooking the outer areas. Adding Moisture Microwave energy is often transferred to water molecules. Arrangement Arrange unevenly shaped foods...
... heats more quickly, so stir from the microwave and instruct children to complete cooking in the microwave oven is not recommended because all parts to stand so that need this in mind to avoid burns. • Home canning in the center without overcooking the outer areas. Adding Moisture Microwave energy is often transferred to water molecules. Arrangement Arrange unevenly shaped foods...
Owners Manual
Page 22
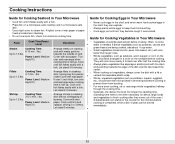
... it flakes easily with a fork. Power Level: Medium- High(70). Fillets Cooking Time: 3-7 min. / lbs. Up to steam fish. Cover with wax paper. Cook until firm and opaque, stirring 2 or 3 times. Arrange fillets in a circle on a microwave-safe roasting rack in several spots before cooking is needed. Guide for dense, large foods and vegetables to finish cooking after half the cooking time. • Always place vegetables...
... it flakes easily with a fork. Power Level: Medium- High(70). Fillets Cooking Time: 3-7 min. / lbs. Up to steam fish. Cover with wax paper. Cook until firm and opaque, stirring 2 or 3 times. Arrange fillets in a circle on a microwave-safe roasting rack in several spots before cooking is needed. Guide for dense, large foods and vegetables to finish cooking after half the cooking time. • Always place vegetables...
Owners Manual
Page 26
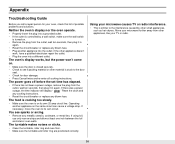
...; Plug the oven into the outlet; The oven's display works, but the power won't come on its own circuit. The turntable makes noises or sticks. • Clean the turntable, roller ring and oven floor. • Make sure the turntable and roller ring are positioned correctly. If there was a power outage, the time indicator will display " " Reset the clock and any cooking instructions. • Reset the circuit breaker or replace any metallic...
...; Plug the oven into the outlet; The oven's display works, but the power won't come on its own circuit. The turntable makes noises or sticks. • Clean the turntable, roller ring and oven floor. • Make sure the turntable and roller ring are positioned correctly. If there was a power outage, the time indicator will display " " Reset the clock and any cooking instructions. • Reset the circuit breaker or replace any metallic...
Owners Manual
Page 27
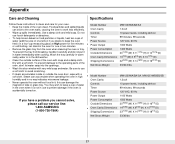
... microwave leakage. • Never operate the oven without food in a four-cup measuring glass at High power for one lemon if you cannot solve, please call our service line: 1-800-SAMSUNG (1-800-726-7864) Specifications Model Number Oven Cavity Controls Timer Power Source Power Output Power Consumption Outside Dimensions Oven Cavity Dimensions Shipping Dumensions Net/Gross Weight MW1030WA/BA/SA 1.0cuft 10 power levels, including defrost 99 minutes, 99 seconds 120 VAC, 60 Hz 1000 Watts...
... microwave leakage. • Never operate the oven without food in a four-cup measuring glass at High power for one lemon if you cannot solve, please call our service line: 1-800-SAMSUNG (1-800-726-7864) Specifications Model Number Oven Cavity Controls Timer Power Source Power Output Power Consumption Outside Dimensions Oven Cavity Dimensions Shipping Dumensions Net/Gross Weight MW1030WA/BA/SA 1.0cuft 10 power levels, including defrost 99 minutes, 99 seconds 120 VAC, 60 Hz 1000 Watts...
Owners Manual
Page 29
.... All warranty repairs or part replacements must be performed by a SECA Authorized Service Center. (To find the nearest SECA Service Center, call 1-800-SAMSUNG.) Obligation to the Original Owner The original dated sales receipt must be presented to an SECA Authorized Service Center at the time service is requested before warranty services are not covered under the terms of this product fails to operate properly...
.... All warranty repairs or part replacements must be performed by a SECA Authorized Service Center. (To find the nearest SECA Service Center, call 1-800-SAMSUNG.) Obligation to the Original Owner The original dated sales receipt must be presented to an SECA Authorized Service Center at the time service is requested before warranty services are not covered under the terms of this product fails to operate properly...

Owners Manual
Page 30
... set cooking time. 2. Use number buttons to set cooking time. 2. To set power level at high. 3. Use number buttons to begin cooking. Press the ONE MINUTE + button once for example, POPCORN). 2. When the oven beeps, press PAUSE/ CANCEL button and turn food over. Press START to reheat. 2. Press START to select type of cooking. 2. Press START to enter the current time. 3. The time will display and the oven will start. 1. Press AUTO DEFROST. 2. Press HANDY HELPER, KIDS MELAS, SNACK BAR repeatedly to begin cooking. 1. ELECTRONICS SAMSUNG...
... set cooking time. 2. Use number buttons to set cooking time. 2. To set power level at high. 3. Use number buttons to begin cooking. Press the ONE MINUTE + button once for example, POPCORN). 2. When the oven beeps, press PAUSE/ CANCEL button and turn food over. Press START to reheat. 2. Press START to select type of cooking. 2. Press START to enter the current time. 3. The time will display and the oven will start. 1. Press AUTO DEFROST. 2. Press HANDY HELPER, KIDS MELAS, SNACK BAR repeatedly to begin cooking. 1. ELECTRONICS SAMSUNG...


