User Manual (ENGLISH)
Page 63
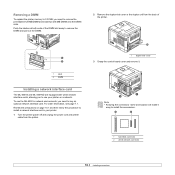
... Knowing the connectors' name and location will make it . Review the precautions on a network. For order information, see page 7.1. Removing a DIMM To expand the printer memory to 512 MB, you to use the ML-4550 in your printer on page 10.1 and then follow this procedure to install a...256 MB DIMMs into the DIMM slots. To use your printer. 1 Turn the printer power off and unplug the power cord and printer cable from the back of the printer. 1 2 1 latch 2 DIMM Installing a network interface card The ML-4551N and ML-4551ND are equipped with wired network interface cards, allowing ...
... Knowing the connectors' name and location will make it . Review the precautions on a network. For order information, see page 7.1. Removing a DIMM To expand the printer memory to 512 MB, you to use the ML-4550 in your printer on page 10.1 and then follow this procedure to install a...256 MB DIMMs into the DIMM slots. To use your printer. 1 Turn the printer power off and unplug the power cord and printer cable from the back of the printer. 1 2 1 latch 2 DIMM Installing a network interface card The ML-4551N and ML-4551ND are equipped with wired network interface cards, allowing ...

User Manual (ENGLISH)
Page 64
... the control board cover by aligning the groove on the control board. Review the precautions on page 10.1. 1 Turn the printer power off and unplug the power cord and printer cable from the printer. 2 Remove the duplex-slot cover or the duplex unit from your network card. You can also...storing a job in place. 1 2 1 wired network connector 2 wired network interface card 5 Insert and tighten the two screws supplied with the notch on the printer and sliding it. 1 1 duplex-slot cover 3 Grasp the control board cover and remove it. 7 Reinstall the duplex-slot cover or the duplex unit. 8 ...
... the control board cover by aligning the groove on the control board. Review the precautions on page 10.1. 1 Turn the printer power off and unplug the power cord and printer cable from the printer. 2 Remove the duplex-slot cover or the duplex unit from your network card. You can also...storing a job in place. 1 2 1 wired network connector 2 wired network interface card 5 Insert and tighten the two screws supplied with the notch on the printer and sliding it. 1 1 duplex-slot cover 3 Grasp the control board cover and remove it. 7 Reinstall the duplex-slot cover or the duplex unit. 8 ...

User Manual (ENGLISH)
Page 85
... permanent, make them in the printer driver. Select Printers and Faxes. 3. Portrait Landscape Layout Options Layout Options allows you can review and change remain in use the printer properties window, which information is for Windows XP. Your printer driver Properties window that appears in... this feature. • For details, see "Printer Tab" on page 20. 13 Basic...
... permanent, make them in the printer driver. Select Printers and Faxes. 3. Portrait Landscape Layout Options Layout Options allows you can review and change remain in use the printer properties window, which information is for Windows XP. Your printer driver Properties window that appears in... this feature. • For details, see "Printer Tab" on page 20. 13 Basic...

User Manual (ENGLISH)
Page 95
... on any remaining settings using the current program. Click the Windows Start button. 2. Change all of the printer options you need when using your printer. Select Printers and Faxes. 3. This chapter includes: Printer Settings You can review and change remain in the software application first, and change any setting. 23 Using Windows PostScript Driver This...
... on any remaining settings using the current program. Click the Windows Start button. 2. Change all of the printer options you need when using your printer. Select Printers and Faxes. 3. This chapter includes: Printer Settings You can review and change remain in the software application first, and change any setting. 23 Using Windows PostScript Driver This...
