User Manual (ENGLISH)
Page 5
... Cleaning the Printer 6.7 Cleaning the Outside 6.7 Cleaning the Inside 6.7 Consumables and Replacement Parts 6.10 Chapter 7: SOLVING PROBLEMS Troubleshooting Checklist 7.2 Solving General Printing Problems 7.3 Clearing Paper Jams 7.7 In the Paper Feed Area 7.7 Around the Toner Cartridge 7.10 In the Paper Exit Area... 7.12 In the Duplex Area 7.13 Tips for Avoiding Paper Jams 7.14 Solving Print Quality Problems 7.15 Understanding...
... Cleaning the Printer 6.7 Cleaning the Outside 6.7 Cleaning the Inside 6.7 Consumables and Replacement Parts 6.10 Chapter 7: SOLVING PROBLEMS Troubleshooting Checklist 7.2 Solving General Printing Problems 7.3 Clearing Paper Jams 7.7 In the Paper Feed Area 7.7 Around the Toner Cartridge 7.10 In the Paper Exit Area... 7.12 In the Duplex Area 7.13 Tips for Avoiding Paper Jams 7.14 Solving Print Quality Problems 7.15 Understanding...

User Manual (ENGLISH)
Page 29
Changing the Paper Size in the Tray If you load long paper in the tray, you want to change the paper size in the tray, refer to "Changing the Paper Size in the Tray" below. 5 Slide the tray back into the printer. Paper overloading may cause paper jams. NOTE: If you should adjust the paper guides to the paper limit mark on the left inside wall of the tray. 2.8 SETTING UP YOUR PRINTER 4 Pay attention to the paper length. 1 Push the back plate of the tray outwards completely so that it can extend the length of the tray.
Changing the Paper Size in the Tray If you load long paper in the tray, you want to change the paper size in the tray, refer to "Changing the Paper Size in the Tray" below. 5 Slide the tray back into the printer. Paper overloading may cause paper jams. NOTE: If you should adjust the paper guides to the paper limit mark on the left inside wall of the tray. 2.8 SETTING UP YOUR PRINTER 4 Pay attention to the paper length. 1 Push the back plate of the tray outwards completely so that it can extend the length of the tray.

User Manual (ENGLISH)
Page 30
NOTES: • Do not push the width guide far enough to cause the material to warp. • If you do not adjust the width guide, it to the desired paper size marked at the bottom of the tray. 2 Squeeze the tab on the paper length guide and adjust it, so that it fits to the desired paper size marked at the bottom of the tray. 2 3 Squeeze the paper width guide and adjust it may cause paper jams. SETTING UP YOUR PRINTER 2.9
NOTES: • Do not push the width guide far enough to cause the material to warp. • If you do not adjust the width guide, it to the desired paper size marked at the bottom of the tray. 2 Squeeze the tab on the paper length guide and adjust it, so that it fits to the desired paper size marked at the bottom of the tray. 2 3 Squeeze the paper width guide and adjust it may cause paper jams. SETTING UP YOUR PRINTER 2.9
User Manual (ENGLISH)
Page 57
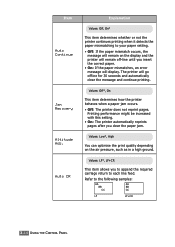
... message will go offline for 30 seconds and automatically clear the message and continue printing. Values: LF*, LF+CR This item allows you clear the paper jam. Refer to each line feed. Values: Off*, On This item determines how the printer behaves when a paper jam occurs. • Off: The printer does not reprint pages.
... message will go offline for 30 seconds and automatically clear the message and continue printing. Values: LF*, LF+CR This item allows you clear the paper jam. Refer to each line feed. Values: Off*, On This item determines how the printer behaves when a paper jam occurs. • Off: The printer does not reprint pages.
User Manual (ENGLISH)
Page 69
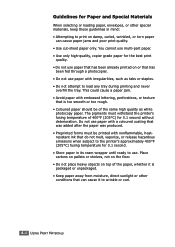
... paper jams and poor print quality. • Use cut-sheet paper only. Guidelines for Paper and Special Materials When selecting or loading paper, envelopes, or other special materials, keep these guidelines in its ream wrapper until ready to use paper with a coloured coating that was added after the paper was produced. • Preprinted forms must withstand the printer...
... paper jams and poor print quality. • Use cut-sheet paper only. Guidelines for Paper and Special Materials When selecting or loading paper, envelopes, or other special materials, keep these guidelines in its ream wrapper until ready to use paper with a coloured coating that was added after the paper was produced. • Preprinted forms must withstand the printer...
User Manual (ENGLISH)
Page 70
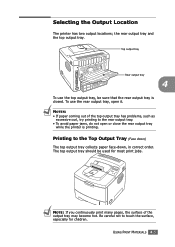
... tray 4 To use the rear output tray, open or close the rear output tray while the printer is closed. To use the top output tray, be used for children. The top output tray ...should be sure that the rear output tray is printing. USING PRINT MATERIALS 4.5 NOTES: • If paper coming out of the output tray may become hot. the rear output tray and the top output tray....touch the surface, especially for most print jobs. Printing to the rear output tray. • To avoid paper jams, do not open it. NOTE: If you continuously print many pages, the surface of the top output tray...
... tray 4 To use the rear output tray, open or close the rear output tray while the printer is closed. To use the top output tray, be used for children. The top output tray ...should be sure that the rear output tray is printing. USING PRINT MATERIALS 4.5 NOTES: • If paper coming out of the output tray may become hot. the rear output tray and the top output tray....touch the surface, especially for most print jobs. Printing to the rear output tray. • To avoid paper jams, do not open it. NOTE: If you continuously print many pages, the surface of the top output tray...

User Manual (ENGLISH)
Page 72
Remove the pages so that the tray is printing. Paper full Paper empty USING PRINT MATERIALS 4.7 Doing so may fall from the printer. The paper level bar on the front of the paper tray(s) shows the amount of paper. Loading Paper Proper paper loading helps prevent paper jams and ensure trouble-free printing. See "Sizes and Capacities" on the rear output...
Remove the pages so that the tray is printing. Paper full Paper empty USING PRINT MATERIALS 4.7 Doing so may fall from the printer. The paper level bar on the front of the paper tray(s) shows the amount of paper. Loading Paper Proper paper loading helps prevent paper jams and ensure trouble-free printing. See "Sizes and Capacities" on the rear output...

User Manual (ENGLISH)
Page 74
... centre of print material at a time in the Multi-Purpose Tray. • To prevent paper jams, do not add paper when there is still paper in the Multi-Purpose Tray. USING PRINT MATERIALS 4.9 The tray may fall apart from the printer. Also avoid pressing down towards you. 4 2 Slide the extender to extend the tray to... loaded face up with the top edge going into the Multi-Purpose Tray first and be placed on it. This also applies to hold longer paper.
... centre of print material at a time in the Multi-Purpose Tray. • To prevent paper jams, do not add paper when there is still paper in the Multi-Purpose Tray. USING PRINT MATERIALS 4.9 The tray may fall apart from the printer. Also avoid pressing down towards you. 4 2 Slide the extender to extend the tray to... loaded face up with the top edge going into the Multi-Purpose Tray first and be placed on it. This also applies to hold longer paper.
User Manual (ENGLISH)
Page 82
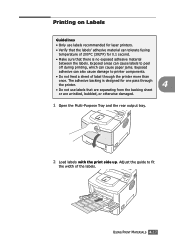
.... USING PRINT MATERIALS 4.17 Printing on Labels Guidelines • Only use labels recommended for laser printers. • Verify that the labels' adhesive material can also cause damage to printer components. • Do not feed a sheet of label through the printer. 4 • Do not use labels that there is no exposed adhesive material between the... and the rear output tray. 2 Load labels with the print side up. Exposed areas can cause labels to peel off during printing, which can cause paper jams. Exposed adhesive can tolerate fusing temperature of the labels.
.... USING PRINT MATERIALS 4.17 Printing on Labels Guidelines • Only use labels recommended for laser printers. • Verify that the labels' adhesive material can also cause damage to printer components. • Do not feed a sheet of label through the printer. 4 • Do not use labels that there is no exposed adhesive material between the... and the rear output tray. 2 Load labels with the print side up. Exposed areas can cause labels to peel off during printing, which can cause paper jams. Exposed adhesive can tolerate fusing temperature of the labels.

User Manual (ENGLISH)
Page 87
For details, see page 3.5. Inserting paper long-edge first may cause a paper jam. • Do not load more than 76 mm (3 in.) wide or 127 mm(5 in.) long. • Set margins at a time. • Do not print on ... mm (3 by 5 in.) and the maximum size is 216 by 356 mm (8.5 by 5.83 in landscape mode, make this selection through your printer. If you print, configure the paper source, type and size properly in the software application. For details about setting on Card Stock or Custom-sized Materials Postcards, 3.5 by 14...
For details, see page 3.5. Inserting paper long-edge first may cause a paper jam. • Do not load more than 76 mm (3 in.) wide or 127 mm(5 in.) long. • Set margins at a time. • Do not print on ... mm (3 by 5 in.) and the maximum size is 216 by 356 mm (8.5 by 5.83 in landscape mode, make this selection through your printer. If you print, configure the paper source, type and size properly in the software application. For details about setting on Card Stock or Custom-sized Materials Postcards, 3.5 by 14...

User Manual (ENGLISH)
Page 88
NOTE: If the size of your print material is too thin, a paper jam may occur. See page 5.7. Adjust the guide to fit the width of the printer driver properties, click the Add Custom button and set the size manually. Use the card stock heavier than 105g/m2 For details about setting on... the control panel, see page 5.7. CAUTIONS: When you print, configure the paper source, type and size 4 properly in...
NOTE: If the size of your print material is too thin, a paper jam may occur. See page 5.7. Adjust the guide to fit the width of the printer driver properties, click the Add Custom button and set the size manually. Use the card stock heavier than 105g/m2 For details about setting on... the control panel, see page 5.7. CAUTIONS: When you print, configure the paper source, type and size 4 properly in...

User Manual (ENGLISH)
Page 100
... in the same menu, if necessary. For further details about using the control panel menu, see page 3.5. The binding options are three ways to the printer and paper jamming might result. • To use the double-sided printing, you will be binding your finished document. Using the control panel menu You can use...
... in the same menu, if necessary. For further details about using the control panel menu, see page 3.5. The binding options are three ways to the printer and paper jamming might result. • To use the double-sided printing, you will be binding your finished document. Using the control panel menu You can use...
User Manual (ENGLISH)
Page 117
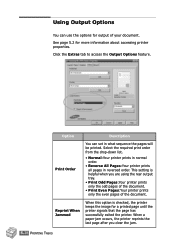
... the image for more information about accessing printer properties. When a paper jam occurs, the printer reprints the last page after you are using the rear output tray. • Print Odd Pages:Your printer prints only the odd pages of the document. • Print Even Pages:Your printer prints only the even pages of your document. See...
... the image for more information about accessing printer properties. When a paper jam occurs, the printer reprints the last page after you are using the rear output tray. • Print Odd Pages:Your printer prints only the odd pages of the document. • Print Even Pages:Your printer prints only the even pages of your document. See...
User Manual (ENGLISH)
Page 128
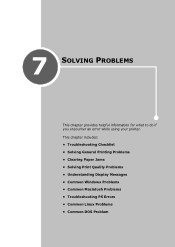
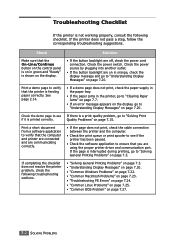
7 SOLVING PROBLEMS This chapter provides helpful information for what to do if you encounter an error while using your printer. This chapter includes: • Troubleshooting Checklist • Solving General Printing Problems • Clearing Paper Jams • Solving Print Quality Problems • Understanding Display Messages • Common Windows Problems • Common Macintosh Problems • Troubleshooting PS Errors • Common Linux Problems • Common DOS Problem
7 SOLVING PROBLEMS This chapter provides helpful information for what to do if you encounter an error while using your printer. This chapter includes: • Troubleshooting Checklist • Solving General Printing Problems • Clearing Paper Jams • Solving Print Quality Problems • Understanding Display Messages • Common Windows Problems • Common Macintosh Problems • Troubleshooting PS Errors • Common Linux Problems • Common DOS Problem
User Manual (ENGLISH)
Page 129
... page 7.27. 7.2 SOLVING PROBLEMS See page 2.14. • If a demo page does not print, check the paper supply in the paper tray. • If the paper jams in green and "Ready" is on in the printer, go to "Clearing Paper Jams" on page 7.7. • If an error message appears on the display, go to "Understanding Display Messages...
... page 7.27. 7.2 SOLVING PROBLEMS See page 2.14. • If a demo page does not print, check the paper supply in the paper tray. • If the paper jams in green and "Ready" is on in the printer, go to "Clearing Paper Jams" on page 7.7. • If an error message appears on the display, go to "Understanding Display Messages...

User Manual (ENGLISH)
Page 134
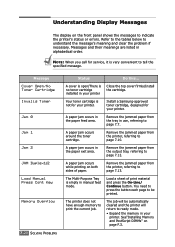
...paper feed area below to locate the paper jam and to ... Clearing Paper Jams When a paper jam occurs, the display on the control panel shows the message indicating the corresponding location of the paper is properly aligned in the tray. Make sure that all of the paper jam. SOLVING PROBLEMS 7.7 Message Jam0 Jam1 Jam2 Jam Duplex1/2 Location of Jam... Go to clear it out by pulling it . Refer to the table below Around the toner cartridge page 7.10 In the paper exit area page ...
...paper feed area below to locate the paper jam and to ... Clearing Paper Jams When a paper jam occurs, the display on the control panel shows the message indicating the corresponding location of the paper is properly aligned in the tray. Make sure that all of the paper jam. SOLVING PROBLEMS 7.7 Message Jam0 Jam1 Jam2 Jam Duplex1/2 Location of Jam... Go to clear it out by pulling it . Refer to the table below Around the toner cartridge page 7.10 In the paper exit area page ...

User Manual (ENGLISH)
Page 141
... the tray. • Use only recommended print materials. 3 Remove the jammed paper. 4 Slide the tray back into the printer. 5 Open and close the top cover. Tips for Avoiding Paper Jams By selecting the correct paper types, most paper jams can be avoided. If a paper jam occurs, follow the steps outlined in "Clearing Paper Jams" on page 7.7. • Follow the procedures in "Loading...
... the tray. • Use only recommended print materials. 3 Remove the jammed paper. 4 Slide the tray back into the printer. 5 Open and close the top cover. Tips for Avoiding Paper Jams By selecting the correct paper types, most paper jams can be avoided. If a paper jam occurs, follow the steps outlined in "Clearing Paper Jams" on page 7.7. • Follow the procedures in "Loading...
User Manual (ENGLISH)
Page 147
... ready mode. • Expand the memory in your printer. A paper jam occurs around the toner cartridge. NOTE: When you call for service, it is not for your printer. Install a Samsung-approved toner cartridge, designed for your printer. Remove the jammed paper from the tray in alphabetical order. Remove the jammed paper from the printer, referring to be automatically cleared and the...
... ready mode. • Expand the memory in your printer. A paper jam occurs around the toner cartridge. NOTE: When you call for service, it is not for your printer. Install a Samsung-approved toner cartridge, designed for your printer. Remove the jammed paper from the tray in alphabetical order. Remove the jammed paper from the printer, referring to be automatically cleared and the...

User Manual (ENGLISH)
Page 189
... a manual feed print job is checked, the printer keeps the image in the Multi-Purpose Tray. • Jam Recovery determines what action the printer should take when a paper jam occurs. Config Tab You can configure various printer features. • Emulation selects the emulation for... a printed page until the printer signals that has jammed. If it goes to the printer. The factory default ...
... a manual feed print job is checked, the printer keeps the image in the Multi-Purpose Tray. • Jam Recovery determines what action the printer should take when a paper jam occurs. Config Tab You can configure various printer features. • Emulation selects the emulation for... a printed page until the printer signals that has jammed. If it goes to the printer. The factory default ...

User Manual (ENGLISH)
Page 218
NOTE: When you print a document, configure the printer driver from the printer while you do this, a paper jam may occur. CAUTIONS:Do not remove Tray 1 from your application. 4 Align the printer with Tray 1. For information about loading paper in the Tray2. If you are printing using the optional Tray 2. To access the printer driver, see page 2.6. 7 Reconnect the...
NOTE: When you print a document, configure the printer driver from the printer while you do this, a paper jam may occur. CAUTIONS:Do not remove Tray 1 from your application. 4 Align the printer with Tray 1. For information about loading paper in the Tray2. If you are printing using the optional Tray 2. To access the printer driver, see page 2.6. 7 Reconnect the...


