
User Guide
Page 3
CONTENTS Chapter 1: INTRODUCTION Special Features 1.2 Printer Components 1.4 Front View 1.4 Inside View 1.5 Rear View 1.5 Understanding the Control Panel 1.6 On Line/Error and Toner Save LEDs 1.6 Cancel button 1.7 Chapter 2: SETTING UP YOUR PRINTER Unpacking 2.2 Selecting a Location 2.3 Installing the Toner Cartridge 2.4 Loading Paper 2.6 Changing the Paper Size in the Tray 2.8 Connecting a Printer Cable 2.9 Turning the Printer on 2.10 Printing a Demo Page 2.11 Installing Printer Software 2.12 Printer Driver Features 2.13 Installing Printer software in Windows 2.14 ii
CONTENTS Chapter 1: INTRODUCTION Special Features 1.2 Printer Components 1.4 Front View 1.4 Inside View 1.5 Rear View 1.5 Understanding the Control Panel 1.6 On Line/Error and Toner Save LEDs 1.6 Cancel button 1.7 Chapter 2: SETTING UP YOUR PRINTER Unpacking 2.2 Selecting a Location 2.3 Installing the Toner Cartridge 2.4 Loading Paper 2.6 Changing the Paper Size in the Tray 2.8 Connecting a Printer Cable 2.9 Turning the Printer on 2.10 Printing a Demo Page 2.11 Installing Printer Software 2.12 Printer Driver Features 2.13 Installing Printer software in Windows 2.14 ii

User Guide
Page 4
...Location 3.5 Printing to the Top Output Tray (Face down) ...... 3.5 Printing to the Rear Output Tray (Face up) ......... 3.6 Loading Paper 3.7 Using the Tray 3.7 Using the Manual Feeder 3.8 Printing on Envelopes 3.10 Printing on Labels 3.12 Printing on Transparencies 3.13 Printing on Card Stock or Custom-sized Materials 3.15 Printing on Preprinted Paper 3.16 Chapter 4: PRINTING TASKS Printing a Document 4.2 Canceling a Print Job 4.4 Using a Favorite Setting 4.5 Using Help 4.5 Setting Paper Properties 4.6 Using the Toner Save Mode 4.8 Printing Multiple Pages on One Sheet of Paper...
...Location 3.5 Printing to the Top Output Tray (Face down) ...... 3.5 Printing to the Rear Output Tray (Face up) ......... 3.6 Loading Paper 3.7 Using the Tray 3.7 Using the Manual Feeder 3.8 Printing on Envelopes 3.10 Printing on Labels 3.12 Printing on Transparencies 3.13 Printing on Card Stock or Custom-sized Materials 3.15 Printing on Preprinted Paper 3.16 Chapter 4: PRINTING TASKS Printing a Document 4.2 Canceling a Print Job 4.4 Using a Favorite Setting 4.5 Using Help 4.5 Setting Paper Properties 4.6 Using the Toner Save Mode 4.8 Printing Multiple Pages on One Sheet of Paper...
User Guide
Page 5
... Printing Problems 6.3 Clearing Paper Jams 6.7 In the Paper Exit Area 6.7 In the Paper Feed Area 6.9 Around the Toner Cartridge 6.10 Tips for Avoiding Paper Jams When Printing on the A5-sized Paper 6.11 Tips for Avoiding Paper Jams 6.12 Solving Print Quality Problems 6.12 Print Quality Checklist 6.12 Solving Print Quality Problems 6.13 Troubleshooting Error Messages 6.18 Common Windows Problems 6.19 Common Linux Problems 6.20 Chapter 7: APPENDIX Using Your Printer in Linux 7.2 Installing the Printer Driver 7.2 Changing the Printer Connection Method 7.6 Using the Configuration...
... Printing Problems 6.3 Clearing Paper Jams 6.7 In the Paper Exit Area 6.7 In the Paper Feed Area 6.9 Around the Toner Cartridge 6.10 Tips for Avoiding Paper Jams When Printing on the A5-sized Paper 6.11 Tips for Avoiding Paper Jams 6.12 Solving Print Quality Problems 6.12 Print Quality Checklist 6.12 Solving Print Quality Problems 6.13 Troubleshooting Error Messages 6.18 Common Windows Problems 6.19 Common Linux Problems 6.20 Chapter 7: APPENDIX Using Your Printer in Linux 7.2 Installing the Printer Driver 7.2 Changing the Printer Connection Method 7.6 Using the Configuration...

User Guide
Page 17
... page 6.18. See "Troubleshooting Error Messages" on page 6.18 1.6 INTRODUCTION In Manual Feed mode, if there is no paper in Ready mode, this LED is off and the Toner Save mode is printing the received data, the On Line/Error LED blinks green fast. If you press the Cancel button while the printer is experiencing an error, such as jammed paper, the open cover or the empty toner cartridge. If the printer is ready to cancel printing. If the On Line/Error lights red...
... page 6.18. See "Troubleshooting Error Messages" on page 6.18 1.6 INTRODUCTION In Manual Feed mode, if there is no paper in Ready mode, this LED is off and the Toner Save mode is printing the received data, the On Line/Error LED blinks green fast. If you press the Cancel button while the printer is experiencing an error, such as jammed paper, the open cover or the empty toner cartridge. If the printer is ready to cancel printing. If the On Line/Error lights red...

User Guide
Page 18
... button for about 10 seconds until all LEDs turn the Toner Save mode on the size of paper in the manual feeder, when you can't cancel the print job by pressing this button. Toner Save mode on page 3.8. Cancel button Function Description 1 Printing demo page In Ready mode, press and hold this button for about 2 seconds until all LEDs blink slowly, and release. Manual feeding Press this button during printing. The On Line/Error LED blinks while the print job is printed...
... button for about 10 seconds until all LEDs turn the Toner Save mode on the size of paper in the manual feeder, when you can't cancel the print job by pressing this button. Toner Save mode on page 3.8. Cancel button Function Description 1 Printing demo page In Ready mode, press and hold this button for about 2 seconds until all LEDs blink slowly, and release. Manual feeding Press this button during printing. The On Line/Error LED blinks while the print job is printed...

User Guide
Page 26
SETTING UP YOUR PRINTER 2.7 4 Load paper with the print side facing down. 2 Make sure that all four corners are flat in the Tray" on the left inside wall of the tray. Paper overloading may cause paper jams. Note: If you want to change the paper size in the tray, see "Changing the Paper Size in the tray. 5 Pay attention to the paper limit mark on page 2.8. 6 Slide the tray back into the printer.
SETTING UP YOUR PRINTER 2.7 4 Load paper with the print side facing down. 2 Make sure that all four corners are flat in the Tray" on the left inside wall of the tray. Paper overloading may cause paper jams. Note: If you want to change the paper size in the tray, see "Changing the Paper Size in the tray. 5 Pay attention to the paper limit mark on page 2.8. 6 Slide the tray back into the printer.
User Guide
Page 28
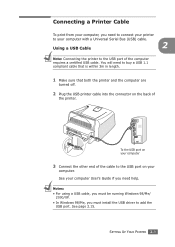
... of the cable to add the USB port. See page 2.15. SETTING UP YOUR PRINTER 2.9 Notes: • For using a USB cable, you must be running Windows 98/Me/ 2000/XP. • In Windows 98/Me, you must install the USB driver to the USB port on your computer. Connecting a Printer Cable To print from your computer, you need to connect your printer to buy a USB 1.1 compliant cable that is within 3m in length. 1 Make sure that...
... of the cable to add the USB port. See page 2.15. SETTING UP YOUR PRINTER 2.9 Notes: • For using a USB cable, you must be running Windows 98/Me/ 2000/XP. • In Windows 98/Me, you must install the USB driver to the USB port on your computer. Connecting a Printer Cable To print from your computer, you need to connect your printer to buy a USB 1.1 compliant cable that is within 3m in length. 1 Make sure that...
User Guide
Page 31
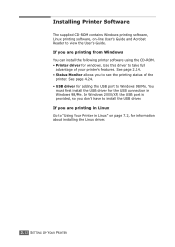
... printing status of your printer's features. In Windows 2000/XP, the USB port is provided, so you are printing from Windows You can install the following printer software using the CD-ROM. • Printer driver for windows. You must first install the USB driver for the USB connection in Linux" on -line User's Guide and Acrobat Reader to install the USB driver. If you don't have to view the User's Guide. See page 4.24. • USB driver for information about installing the Linux driver. 2.12 SETTING...
... printing status of your printer's features. In Windows 2000/XP, the USB port is provided, so you are printing from Windows You can install the following printer software using the CD-ROM. • Printer driver for windows. You must first install the USB driver for the USB connection in Linux" on -line User's Guide and Acrobat Reader to install the USB driver. If you don't have to view the User's Guide. See page 4.24. • USB driver for information about installing the Linux driver. 2.12 SETTING...

User Guide
Page 34
Click Next. 5 Follow the instructions on . In Windows 98/Me 1 Connect the printer to your computer using the USB cable and turn them on the screen to use the Status Monitor, click Install the Samsung Software-II on your PC (SPL Driver). For detailed information, see page 2.9. 2 The Add New Hardware Wizard window appears. If you want to complete the installation. SETTING UP YOUR PRINTER 2.15 Click Next. 3 Place the CD-ROM...
Click Next. 5 Follow the instructions on . In Windows 98/Me 1 Connect the printer to your computer using the USB cable and turn them on the screen to use the Status Monitor, click Install the Samsung Software-II on your PC (SPL Driver). For detailed information, see page 2.9. 2 The Add New Hardware Wizard window appears. If you want to complete the installation. SETTING UP YOUR PRINTER 2.15 Click Next. 3 Place the CD-ROM...

User Guide
Page 45
... the Cancel button. For details, see page 4.6. 3 Press the Cancel button on the printer to start feeding. 4 Printing is started. 5 If you are printing multiple pages, load the next sheet after each page is printed. If you experience a paper jam from the software application, and then select the correct paper size and type. Repeat this step for Source from the tray, load one sheet of paper at a time into the manual feeder. 1 Load the print material in the manual feeder. Using the Manual Feeder If...
... the Cancel button. For details, see page 4.6. 3 Press the Cancel button on the printer to start feeding. 4 Printing is started. 5 If you are printing multiple pages, load the next sheet after each page is printed. If you experience a paper jam from the software application, and then select the correct paper size and type. Repeat this step for Source from the tray, load one sheet of paper at a time into the manual feeder. 1 Load the print material in the manual feeder. Using the Manual Feeder If...

User Guide
Page 53
... the printer driver properties, click Add Custom button and set the size manually. Note: If the size of your print material is not listed in the Size box in a moisture-proof wrapping to start feeding. Guidelines • Letterheads must be sealed in the Paper tab of the page, for Source from the software application, and then select the correct paper size and type. For details, see page 4.6. See page 4.6. 4 Press the Cancel button...
... the printer driver properties, click Add Custom button and set the size manually. Note: If the size of your print material is not listed in the Size box in a moisture-proof wrapping to start feeding. Guidelines • Letterheads must be sealed in the Paper tab of the page, for Source from the software application, and then select the correct paper size and type. For details, see page 4.6. See page 4.6. 4 Press the Cancel button...

User Guide
Page 65
... page per sheet, the pages will appear decreased in the Pages per Side drop-down list. 3 Select the number of paper. Check Print Page Border to print per sheet (1, 2, 4, 9 or 16) in size and arranged on the sheet. To print more than one sheet. 1 To change the print settings from your software application, access the printer properties. Print Page Border is enabled only if the Pages per Side in the Type drop-down list. See page 4.2. 2 From the Layout tab, choose Multiple Pages...
... page per sheet, the pages will appear decreased in the Pages per Side drop-down list. 3 Select the number of paper. Check Print Page Border to print per sheet (1, 2, 4, 9 or 16) in size and arranged on the sheet. To print more than one sheet. 1 To change the print settings from your software application, access the printer properties. Print Page Border is enabled only if the Pages per Side in the Type drop-down list. See page 4.2. 2 From the Layout tab, choose Multiple Pages...

User Guide
Page 75
Creating a New Page Overlay To use a page overlay, you can be printed on any document. If needed, save the file for use . 2 To change the print settings from your software application, access the printer properties. Overlays are often used to print the letterhead overlay on your document. To print a letter with your company's letterhead, you wish them to load preprinted letterhead paper in the printer. You need to appear when printed as...
Creating a New Page Overlay To use a page overlay, you can be printed on any document. If needed, save the file for use . 2 To change the print settings from your software application, access the printer properties. Overlays are often used to print the letterhead overlay on your document. To print a letter with your company's letterhead, you wish them to load preprinted letterhead paper in the printer. You need to appear when printed as...

User Guide
Page 93
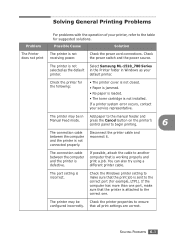
... computer and printer are connected and are using the proper printer driver and communication port. Check the demo page to see if the printer has been paused. • Check the software application to "Clearing Paper Jams" on page 6.20. 6.2 SOLVING PROBLEMS Check the power source by plugging into another outlet. If the page is interrupted during printing, go to "Solving Print Quality Problems" on page 6.12. In the Ready mode, the On Line/Error LED lights green. If...
... computer and printer are connected and are using the proper printer driver and communication port. Check the demo page to see if the printer has been paused. • Check the software application to "Clearing Paper Jams" on page 6.20. 6.2 SOLVING PROBLEMS Check the power source by plugging into another outlet. If the page is interrupted during printing, go to "Solving Print Quality Problems" on page 6.12. In the Ready mode, the On Line/Error LED lights green. If...
User Guide
Page 94
You can also try using a different printer cable. Select Samsung ML-1510_700 Series in the Printer folder in Add paper to ensure configured incorrectly. press the Cancel button on the printer's control panel to begin printing. 6 The connection cable between the computer and the printer is working properly and print a job. If the computer has more than one . SOLVING PROBLEMS 6.3 Disconnect the printer cable and reconnect it. The port setting is not receiving power. Check the printer for example, LTP1). Possible...
You can also try using a different printer cable. Select Samsung ML-1510_700 Series in the Printer folder in Add paper to ensure configured incorrectly. press the Cancel button on the printer's control panel to begin printing. 6 The connection cable between the computer and the printer is working properly and print a job. If the computer has more than one . SOLVING PROBLEMS 6.3 Disconnect the printer cable and reconnect it. The port setting is not receiving power. Check the printer for example, LTP1). Possible...
User Guide
Page 95
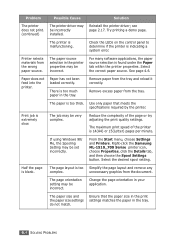
... incorrectly installed. Right-click the Samsung ML-1510_700 Serise printer icon, choose Properties, click the Details tab, and then choose the Spool Settings button. Printer selects materials from the tray. For many software applications, the paper source selection is indicating a system error. The maximum print speed of the page or try adjusting the print quality settings. Change the page orientation in the tray. see page 2.17. Check the LEDs on the control panel to...
... incorrectly installed. Right-click the Samsung ML-1510_700 Serise printer icon, choose Properties, click the Details tab, and then choose the Spool Settings button. Printer selects materials from the tray. For many software applications, the paper source selection is indicating a system error. The maximum print speed of the page or try adjusting the print quality settings. Change the page orientation in the tray. see page 2.17. Check the LEDs on the control panel to...
User Guide
Page 105
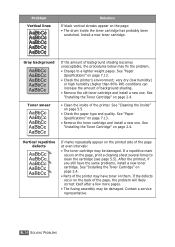
... have the same problems, install a new toner cartridge. See "Installing the Toner Cartridge" on page 2.4. • Parts of the printer may be damaged. See "Paper Specifications" on them. Vertical repetitive defects If marks repeatedly appear on the printed side of the page at even intervals: • The toner cartridge may fix the problem. • Change to clean the cartridge (see page 5.5). Install a new toner cartridge. Contact a service representative. 6.14 SOLVING PROBLEMS If a repetitive mark occurs on the page, print a cleaning sheet several times to a lighter...
... have the same problems, install a new toner cartridge. See "Installing the Toner Cartridge" on page 2.4. • Parts of the printer may be damaged. See "Paper Specifications" on them. Vertical repetitive defects If marks repeatedly appear on the printed side of the page at even intervals: • The toner cartridge may fix the problem. • Change to clean the cartridge (see page 5.5). Install a new toner cartridge. Contact a service representative. 6.14 SOLVING PROBLEMS If a repetitive mark occurs on the page, print a cleaning sheet several times to a lighter...
User Guide
Page 106
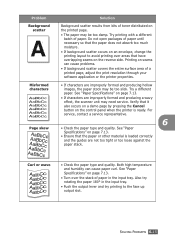
For service, contact a service representative. 6 • Check the paper type and quality. See "Paper Specifications" on page 7.13. • If characters are improperly formed and producing a wavy effect, the scanner unit may need service. SOLVING PROBLEMS 6.15 Problem Background scatter Misformed characters Page skew Solution Background scatter results from bits of toner distributed on the printed page. • The paper may be too slick. See "Paper Specifications" on page 7.13. • Turn over...
For service, contact a service representative. 6 • Check the paper type and quality. See "Paper Specifications" on page 7.13. • If characters are improperly formed and producing a wavy effect, the scanner unit may need service. SOLVING PROBLEMS 6.15 Problem Background scatter Misformed characters Page skew Solution Background scatter results from bits of toner distributed on the printed page. • The paper may be too slick. See "Paper Specifications" on page 7.13. • Turn over...

User Guide
Page 107
... defective and need replacing. Black pages • The toner cartridge may be printing on the wrong surface on page 7.13. 6.16 SOLVING PROBLEMS Character Voids Character voids are white areas within the parts of characters that the paper is loaded properly. • Check the paper type and quality. See "Paper Specifications" on page 7.13. • Open the rear cover and try printing to the rear output tray (face-up). • Turn over the stack...
... defective and need replacing. Black pages • The toner cartridge may be printing on the wrong surface on page 7.13. 6.16 SOLVING PROBLEMS Character Voids Character voids are white areas within the parts of characters that the paper is loaded properly. • Check the paper type and quality. See "Paper Specifications" on page 7.13. • Open the rear cover and try printing to the rear output tray (face-up). • Turn over the stack...

User Guide
Page 109
... the problem, see "Clearing Paper Jams" on page 2.4. • You pressed the Cancel button while the printer is receiving data. • In Manual Feed mode, there is open. Close the front cover. • The toner cartridge is printing the received data, the On Line/Error LED blinks green fast. 6.18 SOLVING PROBLEMS See "Installing the Toner Cartridge" on page 6.7. • The front cover is no paper in the Manual Feeder. LED status legend symbol for "light off" symbol for "light on" symbol for "light blinking...
... the problem, see "Clearing Paper Jams" on page 2.4. • You pressed the Cancel button while the printer is receiving data. • In Manual Feed mode, there is open. Close the front cover. • The toner cartridge is printing the received data, the On Line/Error LED blinks green fast. 6.18 SOLVING PROBLEMS See "Installing the Toner Cartridge" on page 6.7. • The front cover is no paper in the Manual Feeder. LED status legend symbol for "light off" symbol for "light on" symbol for "light blinking...


