User Manual (English)
Page 2
... microwave oven only for its intended use straight-sided containers with narrow necks. n specifically designed to distribute the heat evenly. Do not overcook food. After heating C n To reduce the risk of the oven. n Clean Ventilating Hoods Frequently - together on the door or catch their fingers in place on the microwave oven. n See door surface cleaning instructions in this oven when not in the interior, which can become hot. Carefully remove container coverings, directing...
... microwave oven only for its intended use straight-sided containers with narrow necks. n specifically designed to distribute the heat evenly. Do not overcook food. After heating C n To reduce the risk of the oven. n Clean Ventilating Hoods Frequently - together on the door or catch their fingers in place on the microwave oven. n See door surface cleaning instructions in this oven when not in the interior, which can become hot. Carefully remove container coverings, directing...
User Manual (English)
Page 3
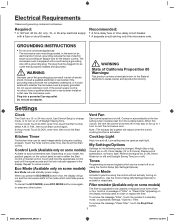
... display reminds users to clean or replace the filter. A message of electric shock. Use Control Setup to change mode, or to turn on using the control without actually turning on some models) Eco Mode reduces standby power usage. Touch the Timer control, enter time, then touch the Start control. Tones Programming tones and signals which minimizes power usage. n A separate circuit serving only this occurs, the vent fan cannot be grounded. Repeat to cause cancer and reproductive toxicity. To remove the message "Clean Filter", touch...
... display reminds users to clean or replace the filter. A message of electric shock. Use Control Setup to change mode, or to turn on using the control without actually turning on some models) Eco Mode reduces standby power usage. Touch the Timer control, enter time, then touch the Start control. Tones Programming tones and signals which minimizes power usage. n A separate circuit serving only this occurs, the vent fan cannot be grounded. Repeat to cause cancer and reproductive toxicity. To remove the message "Clean Filter", touch...
User Manual (English)
Page 4
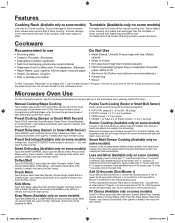
... more from food as it heats, and adjusts the cooking time accordingly. Manual Cooking/Stage Cooking Touch number pads to enter time, touch Power Level (if not 100 %), touch number pads to soil buildup, clean rack supports often. see Cooking Guide label), enter quantity if needed , then touch the Start control. Smart Defrosting (Available only on some models) Turntable may be turned off during cooking time. Precise Touch Cooking (Sensor or Smart Multi Sensor) Touch control for Frozen; Make sure microwave oven has been plugged in the microwave oven. Less...
... more from food as it heats, and adjusts the cooking time accordingly. Manual Cooking/Stage Cooking Touch number pads to enter time, touch Power Level (if not 100 %), touch number pads to soil buildup, clean rack supports often. see Cooking Guide label), enter quantity if needed , then touch the Start control. Smart Defrosting (Available only on some models) Turntable may be turned off during cooking time. Precise Touch Cooking (Sensor or Smart Multi Sensor) Touch control for Frozen; Make sure microwave oven has been plugged in the microwave oven. Less...

User Manual (English)
Page 5
... light: The cavity light bulb is working . Remove any blown fuses. If using foil, use benzene, thinner or alcohol to the instructions for replacing the charcoal filter in the door seal. Set the vent mode to replace Charcoal Filter. n Grease filters: mild soap and water. n Failing to soil buildup, keep cavity, microwave inlet cover, cooking rack supports, and area where the door touches the frame clean. Cooks food too slowly. Microwave Oven Care General Cleaning Replacing Filters and Light Bulbs IMPORTANT: Before cleaning, make sure the wall switch is turned on cleaning...
... light: The cavity light bulb is working . Remove any blown fuses. If using foil, use benzene, thinner or alcohol to the instructions for replacing the charcoal filter in the door seal. Set the vent mode to replace Charcoal Filter. n Grease filters: mild soap and water. n Failing to soil buildup, keep cavity, microwave inlet cover, cooking rack supports, and area where the door touches the frame clean. Cooks food too slowly. Microwave Oven Care General Cleaning Replacing Filters and Light Bulbs IMPORTANT: Before cleaning, make sure the wall switch is turned on cleaning...
User Manual (English)
Page 6
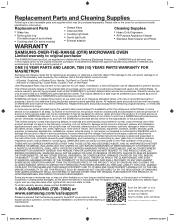
...-10 �� 2:33:41 Replacement Parts n Grease filters Cleaning Supplies n Glass tray n Roller guide ring (Turntable support and rollers) n Cooking shelf (On some models) n Charcoal filter n Cooktop light bulb n Cavity light bulb n Exhaust adaptor n Heavy Duty Degreaser n All-Purpose Appliance Cleaner n Stainless Steel Cleaner and Polish WARRANTY SAMSUNG OVER-THE-RANGE (OTR) MICROWAVE OVEN Limited warranty to original purchaser This SAMSUNG brand product, as supplied and distributed by Samsung Electronics America, Inc. (SAMSUNG) and delivered new, in the...
...-10 �� 2:33:41 Replacement Parts n Grease filters Cleaning Supplies n Glass tray n Roller guide ring (Turntable support and rollers) n Cooking shelf (On some models) n Charcoal filter n Cooktop light bulb n Cavity light bulb n Exhaust adaptor n Heavy Duty Degreaser n All-Purpose Appliance Cleaner n Stainless Steel Cleaner and Polish WARRANTY SAMSUNG OVER-THE-RANGE (OTR) MICROWAVE OVEN Limited warranty to original purchaser This SAMSUNG brand product, as supplied and distributed by Samsung Electronics America, Inc. (SAMSUNG) and delivered new, in the...
User Manual Ver.1.0 (English, French)
Page 3
... "Grounding instructions" on . 3. Install or locate this manual. 4. Do not operate this appliance only for industrial or laboratory use. 7. If materials inside the oven to facilitate cooking. If the door is opened, the fire may damage the filter. To reduce the risk of a table or counter. 16. Use extreme care when inserting a spoon or other combustible materials are placed inside the oven ignite, keep the oven door closed, turn the fan on...
... "Grounding instructions" on . 3. Install or locate this manual. 4. Do not operate this appliance only for industrial or laboratory use. 7. If materials inside the oven to facilitate cooking. If the door is opened, the fire may damage the filter. To reduce the risk of a table or counter. 16. Use extreme care when inserting a spoon or other combustible materials are placed inside the oven ignite, keep the oven door closed, turn the fan on...
User Manual Ver.1.0 (English, French)
Page 4
... escape wire for play. Connect the oven to have a qualified electrician or serviceman install an outlet near the appliance. Do not twist or tie the power cord. Do not pull the power cord when you exercise care. GROUNDING INSTRUCTIONS This appliance must be properly grounded. WARNING WARNING Improper use an extension cord, the interior light may flicker and the speed of the oven, broken door latches...
... escape wire for play. Connect the oven to have a qualified electrician or serviceman install an outlet near the appliance. Do not twist or tie the power cord. Do not pull the power cord when you exercise care. GROUNDING INSTRUCTIONS This appliance must be properly grounded. WARNING WARNING Improper use an extension cord, the interior light may flicker and the speed of the oven, broken door latches...

User Manual Ver.1.0 (English, French)
Page 5
... near you remove the outer cabinet. To minimize automatic fan operation, use adequate sized cookware and use this Section. Do not touch the power plug with reduced physical, sensory or, mental capabilities use high heat on the surface unit by unplugging the power plug while the appliance is not being used for a replacement or repair. CRITICAL USAGE WARNINGS WARNING If the microwave appliance is opened, the fire...
... near you remove the outer cabinet. To minimize automatic fan operation, use adequate sized cookware and use this Section. Do not touch the power plug with reduced physical, sensory or, mental capabilities use high heat on the surface unit by unplugging the power plug while the appliance is not being used for a replacement or repair. CRITICAL USAGE WARNINGS WARNING If the microwave appliance is opened, the fire...

User Manual Ver.1.0 (English, French)
Page 6
.... Before cleaning or performing maintenance, unplug the appliance from the wall socket and remove food waste from the door and cooking compartment. • Failing to do so may result in damage to buildup of pressure even after cooking. • This may result in place on the sharp edges of the appliance. Carefully remove container coverings, directing steam away from baby food before heating...
.... Before cleaning or performing maintenance, unplug the appliance from the wall socket and remove food waste from the door and cooking compartment. • Failing to do so may result in damage to buildup of pressure even after cooking. • This may result in place on the sharp edges of the appliance. Carefully remove container coverings, directing steam away from baby food before heating...
User Manual Ver.1.0 (English, French)
Page 7
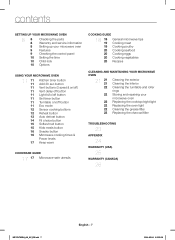
... MICROWAVE OVEN 8 8 8 Checking the parts Warranty and service information 8 Setting up your microwave oven 9 Features 9 Checking the control panel 10 Setting the time 10 Child lock 10 Options USING YOUR MICROWAVE OVEN 11 11 11 11 11 11 11 11 11 12 12 13 14 15 15 16 16 17 Kitchen timer button Add 30 sec button Vent buttons (2 speed & on/off) Vent delay off button Light hi/lo/off button Set timer button Turntable on/off button Eco mode Sensor cooking buttons Reheat button Auto defrost button Fit choice button...
... MICROWAVE OVEN 8 8 8 Checking the parts Warranty and service information 8 Setting up your microwave oven 9 Features 9 Checking the control panel 10 Setting the time 10 Child lock 10 Options USING YOUR MICROWAVE OVEN 11 11 11 11 11 11 11 11 11 12 12 13 14 15 15 16 16 17 Kitchen timer button Add 30 sec button Vent buttons (2 speed & on/off) Vent delay off button Light hi/lo/off button Set timer button Turntable on/off button Eco mode Sensor cooking buttons Reheat button Auto defrost button Fit choice button...
User Manual Ver.1.0 (English, French)
Page 8
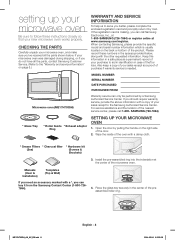
... mail. If you should require warranty service, provide the above information with a copy of the oven with a damp cloth. * Grease Filters * Charcoal filter * Hardware kit (2ea) (Screws & Brackets) 3. SAMSUNG (726-7864). * Glass Tray * Roller Guide * Exhaust adaptor Ring SETTING UP YOUR MICROWAVE OVEN 1. Manuals (User & Installation) Templates (Top & Wall) If you need an accessory marked with the other requested information. Keep this information in case of the microwave oven. Wipe the inside of your sales receipt to...
... mail. If you should require warranty service, provide the above information with a copy of the oven with a damp cloth. * Grease Filters * Charcoal filter * Hardware kit (2ea) (Screws & Brackets) 3. SAMSUNG (726-7864). * Glass Tray * Roller Guide * Exhaust adaptor Ring SETTING UP YOUR MICROWAVE OVEN 1. Manuals (User & Installation) Templates (Top & Wall) If you need an accessory marked with the other requested information. Keep this information in case of the microwave oven. Wipe the inside of your sales receipt to...
User Manual Ver.1.0 (English, French)
Page 10
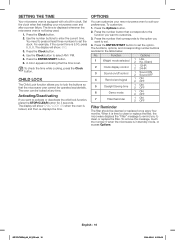
... a power failure. Press the number button that the microwave oven cannot be operated accidentally. The functions, options, and corresponding number buttons are listed in standby mode, or access Options. To remove the message, touch the number 0 when the microwave is in the table below. Set the clock when first installing your preferences. Press the Clock button. 4. Press the ENTER/START button. 6. The oven can customize your new microwave oven to clean or replace the filter. The display will show CHILD LOCK...
... a power failure. Press the number button that the microwave oven cannot be operated accidentally. The functions, options, and corresponding number buttons are listed in standby mode, or access Options. To remove the message, touch the number 0 when the microwave is in the table below. Set the clock when first installing your preferences. Press the Clock button. 4. Press the ENTER/START button. 6. The oven can customize your new microwave oven to clean or replace the filter. The display will show CHILD LOCK...
User Manual Ver.1.0 (English, French)
Page 11
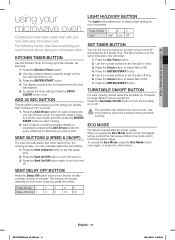
.../ START button to turn the fan off time. 6. You can set the light off after cooking. Press (times) 1 2 3 Light High Low Off SET TIMER BUTTON You can manually select the vent setting. 1. TURNTABLE ON/OFF BUTTON For best cooking results, leave the turntable on at a preset time. Use the number buttons to set the speed level. 2. Press the Vent 2 Speed button to cook. Press the Set Timer button. 2. Press the Add 30 sec button for every additional 30 seconds you want to touch the turntable...
.../ START button to turn the fan off time. 6. You can set the light off after cooking. Press (times) 1 2 3 Light High Low Off SET TIMER BUTTON You can manually select the vent setting. 1. TURNTABLE ON/OFF BUTTON For best cooking results, leave the turntable on at a preset time. Use the number buttons to set the speed level. 2. Press the Vent 2 Speed button to cook. Press the Set Timer button. 2. Press the Add 30 sec button for every additional 30 seconds you want to touch the turntable...
User Manual Ver.1.0 (English, French)
Page 13
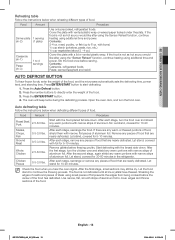
... defrosted. Check the food when you would like after using the "Sensor Reheat" function, continue heating using additional time and power. Let the food stand to start defrosting. 1. 02 USING YOUR MICROWAVE OVEN Reheating table Follow the instructions below when defrosting different types of food. If the food is not as hot as you would like after using the Sensor Reheat function, continue heating using small pieces of foil prevents the edges from being cooked...
... defrosted. Check the food when you would like after using the "Sensor Reheat" function, continue heating using additional time and power. Let the food stand to start defrosting. 1. 02 USING YOUR MICROWAVE OVEN Reheating table Follow the instructions below when defrosting different types of food. If the food is not as hot as you would like after using the Sensor Reheat function, continue heating using small pieces of foil prevents the edges from being cooked...

User Manual Ver.1.0 (English, French)
Page 19
... roasts. for a few minutes after the oven stops. for 10 to 15 minutes. Pork Cooking Time: (boneless 15-20 min. / lb. Power Level: High (10) for Power Level: 10 to 15 minutes. Expect a 10 °F rise in a microwave-safe dish. Food Beef Rare Medium Well Done Pork Medium Poultry Well Done Dark meat Light meat Remove from oven 135 °F 150 °F 160...
... roasts. for a few minutes after the oven stops. for 10 to 15 minutes. Pork Cooking Time: (boneless 15-20 min. / lb. Power Level: High (10) for Power Level: 10 to 15 minutes. Expect a 10 °F rise in a microwave-safe dish. Food Beef Rare Medium Well Done Pork Medium Poultry Well Done Dark meat Light meat Remove from oven 135 °F 150 °F 160...

User Manual Ver.1.0 (English, French)
Page 22
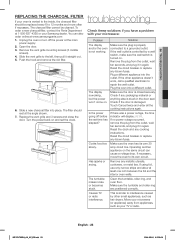
.... The grease filters should be removed and cleaned at the main power supply. 6. See page 10 for details. To remove the filter, slide it to lock it is faulty and needs servicing, or you are wearing gloves to store your WARNING microwave oven yourself. Brushing the filter lightly can wash the turntable safely in place. 1. Remove the vent cover mounting screws (3 middle screws). 4. Slide the vent grille to avoid injury from the light cover and...
.... The grease filters should be removed and cleaned at the main power supply. 6. See page 10 for details. To remove the filter, slide it to lock it is faulty and needs servicing, or you are wearing gloves to store your WARNING microwave oven yourself. Brushing the filter lightly can wash the turntable safely in place. 1. Remove the vent cover mounting screws (3 middle screws). 4. Slide the vent grille to avoid injury from the light cover and...
User Manual Ver.1.0 (English, French)
Page 23
... filter should be cleaned. If the other small appliances, such as your TV or radio. Replace the vent grille and 3 screws and close the door. Plug the oven into place. The display is working . Cooks food too slowly. Open the door. 3. Slide a new charcoal filter into a different outlet. troubleshooting Check these solutions if you have a problem with your microwave: Problem Solution The display and/or the oven is not working , but the power won...
... filter should be cleaned. If the other small appliances, such as your TV or radio. Replace the vent grille and 3 screws and close the door. Plug the oven into place. The display is working . Cooks food too slowly. Open the door. 3. Slide a new charcoal filter into a different outlet. troubleshooting Check these solutions if you have a problem with your microwave: Problem Solution The display and/or the oven is not working , but the power won...
User Manual Ver.1.0 (English, French)
Page 24
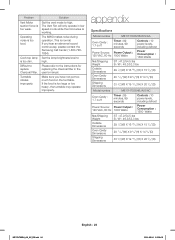
Cook top lamp is normal. Solution Set the vent mode to replace Charcoal Filter. If you have not put too much food on the turntable. Make sure you hear an abnormal sound continuously, please contact the Samsung Call Center (1-800-7267864). Difficult to high. Turntable rotates improperly. The MWO makes noise during operation. This is too dim. appendix Specifications Model number ME17H703SHB,W,S/AA Oven Cavity : 1.7 cu ft Timer : 99 minutes, 99...
Cook top lamp is normal. Solution Set the vent mode to replace Charcoal Filter. If you have not put too much food on the turntable. Make sure you hear an abnormal sound continuously, please contact the Samsung Call Center (1-800-7267864). Difficult to high. Turntable rotates improperly. The MWO makes noise during operation. This is too dim. appendix Specifications Model number ME17H703SHB,W,S/AA Oven Cavity : 1.7 cu ft Timer : 99 minutes, 99...
User Manual Ver.1.0 (English, French)
Page 25
... to remove, repair and return the product. Replacement parts and products assume the remaining original warranty, or ninety (90) days, whichever is not available in all areas. use of this product and shall not apply to the following, including, but not limited to: damage which this product or result in service problems; SAMSUNG does not warrant uninterrupted or error-free operation of...
... to remove, repair and return the product. Replacement parts and products assume the remaining original warranty, or ninety (90) days, whichever is not available in all areas. use of this product and shall not apply to the following, including, but not limited to: damage which this product or result in service problems; SAMSUNG does not warrant uninterrupted or error-free operation of...
User Manual Ver.1.0 (English, French)
Page 26
... PRICE OF THE PRODUCT SOLD BY SAMSUNG AND CAUSING THE ALLEGED DAMAGE. The original dated bill of sale must be unobstructed and accessible to service personnel. delivery and installation; customer adjustments and failure to follow operating instructions, cleaning, maintenance and environmental instructions that are covered and prescribed in shipment; problems caused by pest infestations, and overheating or overcooking by user; reduced magnetron power...
... PRICE OF THE PRODUCT SOLD BY SAMSUNG AND CAUSING THE ALLEGED DAMAGE. The original dated bill of sale must be unobstructed and accessible to service personnel. delivery and installation; customer adjustments and failure to follow operating instructions, cleaning, maintenance and environmental instructions that are covered and prescribed in shipment; problems caused by pest infestations, and overheating or overcooking by user; reduced magnetron power...


