
User Manual (ENGLISH)
Page 12
... another vertically or adjusts selected menu values. VOL+ Moves from one menu item to change the input signal source. Power button [ ] Use this button to open the on-screen menu and to close the screen adjustment menu. - Your Monitor Front Introduction Activates a highlighted menu item. In TV/DTV mode, .... To switch Screen modes: [PC] → [DVI] → [TV] → [Component] → [HDMI1] → [HDMI2] >> Click here to see an animation clip MENU Use this button for external devices connected to another horizontally or adjusts selected menu values.
... another vertically or adjusts selected menu values. VOL+ Moves from one menu item to change the input signal source. Power button [ ] Use this button to open the on-screen menu and to close the screen adjustment menu. - Your Monitor Front Introduction Activates a highlighted menu item. In TV/DTV mode, .... To switch Screen modes: [PC] → [DVI] → [TV] → [Component] → [HDMI1] → [HDMI2] >> Click here to see an animation clip MENU Use this button for external devices connected to another horizontally or adjusts selected menu values.
User Manual (ENGLISH)
Page 13
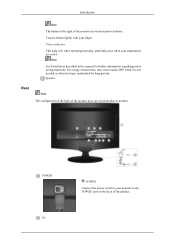
... your adjustments are touch-sensitive buttons. Note See PowerSaver described in the manual for long periods. For energy conservation, turn your monitor to the POWER port on the back of the product may vary from product to the right of the monitor are saved. POWER PC POWER Connect the power cord for your monitor OFF...
... your adjustments are touch-sensitive buttons. Note See PowerSaver described in the manual for long periods. For energy conservation, turn your monitor to the POWER port on the back of the product may vary from product to the right of the monitor are saved. POWER PC POWER Connect the power cord for your monitor OFF...
User Manual (ENGLISH)
Page 17
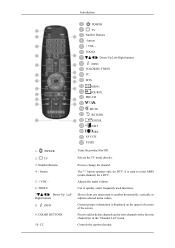
...FAV.CH P.SIZE 1. INFO 9. The "-" button operates only for a DTV. It is displayed on the upper left corner of the screen. Press to add or delete channels and to store channels to change the channel. POWER 2. Press to the favorite channel list in ...the "Channel List" menu. Moves from one menu item to select MMS (multi-channel) for DTV. Number Buttons 4. - button 5. + VOL - 6. Down-Up Left- Adjusts the audio volume. Introduction POWER TV Number Buttons - Right buttons 8. Selects the ...
...FAV.CH P.SIZE 1. INFO 9. The "-" button operates only for a DTV. It is displayed on the upper left corner of the screen. Press to add or delete channels and to store channels to change the channel. POWER 2. Press to the favorite channel list in ...the "Channel List" menu. Moves from one menu item to select MMS (multi-channel) for DTV. Number Buttons 4. - button 5. + VOL - 6. Down-Up Left- Adjusts the audio volume. Introduction POWER TV Number Buttons - Right buttons 8. Selects the ...
User Manual (ENGLISH)
Page 22
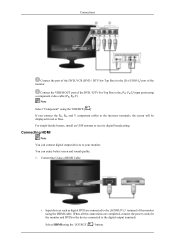
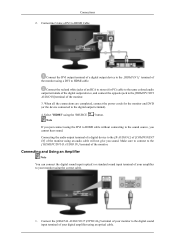
...SOURCE [ ]' If you connect the PR, PB, and Y component cables to the [R-AUDIO-L] port of the monitor. Note Select "Component" using the 'SOURCE [ ]' button. Connections Connect the port of the DVD, VCR (DVD / DTV Set-Top Box) to the incorrect terminals, the screen will be displayed in red or... can enjoy better screen and sound quality. 1. Connecting Using a HDMI Cable • Input devices such as digital DVD are completed, connect the power cords for the monitor and DVD(or the device connected to the digital output terminal). When all the connections are connected to your monitor.
...SOURCE [ ]' If you connect the PR, PB, and Y component cables to the [R-AUDIO-L] port of the monitor. Note Select "Component" using the 'SOURCE [ ]' button. Connections Connect the port of the DVD, VCR (DVD / DTV Set-Top Box) to the incorrect terminals, the screen will be displayed in red or... can enjoy better screen and sound quality. 1. Connecting Using a HDMI Cable • Input devices such as digital DVD are completed, connect the power cords for the monitor and DVD(or the device connected to the digital output terminal). When all the connections are connected to your monitor.
User Manual (ENGLISH)
Page 23
When all the connections are completed, connect the power cords for PC) cable to the same colored audio output terminals of the digital output device, and connect the opposite jack to the [ HDMI/PC/... digital output terminal). 4. Connect the [DIGITAL AUDIO OUT (OPTICAL)] terminal of your monitor to the digital sound input terminal of the monitor using the 'SOURCE [ ]' button. Select "HDMI" using a DVI to the [R-AUDIO-L] of [COMPONENT IN] of the monitor. Connecting the audio output terminal of a digital device to HDMI cable. Connecting...
When all the connections are completed, connect the power cords for PC) cable to the same colored audio output terminals of the digital output device, and connect the opposite jack to the [ HDMI/PC/... digital output terminal). 4. Connect the [DIGITAL AUDIO OUT (OPTICAL)] terminal of your monitor to the digital sound input terminal of the monitor using the 'SOURCE [ ]' button. Select "HDMI" using a DVI to the [R-AUDIO-L] of [COMPONENT IN] of the monitor. Connecting the audio output terminal of a digital device to HDMI cable. Connecting...
User Manual (ENGLISH)
Page 24
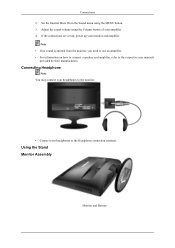
If the connections are set up, power up your headphones to the Headphone connection terminal. Set the Internal Mute On in the Sound menu using the Volume button of your amplifier 4. Connecting Headphone Note You may connect your headphones to the respective user manuals provided by their ...manufacturers. Connections 2. Adjust the sound volume using the MENU button. 3. Using the Stand Monitor Assembly Monitor and Bottom Note • If no sound is emitted from the monitor, you need to use...
If the connections are set up, power up your headphones to the Headphone connection terminal. Set the Internal Mute On in the Sound menu using the Volume button of your amplifier 4. Connecting Headphone Note You may connect your headphones to the respective user manuals provided by their ...manufacturers. Connections 2. Adjust the sound volume using the MENU button. 3. Using the Stand Monitor Assembly Monitor and Bottom Note • If no sound is emitted from the monitor, you need to use...
User Manual (ENGLISH)
Page 57
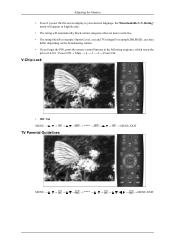
Adjusting the Monitor • Even if you forget the PIN, press the remote-control buttons in the following sequence, which resets the pin to your desired language, the"Downloadable U.S. Rating" menu will appear in English only. • The rating ... TV ratings(For example:DH,MH,H..etc) may differ depending on the broadcasting station. • If you set the On-screen display to 0-0-0-0 : Power Off → Mute → 8 → 2 → 4 → Power On. V-Chip Lock • Off / On MENU TV Parental Guidelines → **** → → , → → MENU,EXIT MENU MENU...
Adjusting the Monitor • Even if you forget the PIN, press the remote-control buttons in the following sequence, which resets the pin to your desired language, the"Downloadable U.S. Rating" menu will appear in English only. • The rating ... TV ratings(For example:DH,MH,H..etc) may differ depending on the broadcasting station. • If you set the On-screen display to 0-0-0-0 : Power Off → Mute → 8 → 2 → 4 → Power On. V-Chip Lock • Off / On MENU TV Parental Guidelines → **** → → , → → MENU,EXIT MENU MENU...
User Manual (ENGLISH)
Page 69
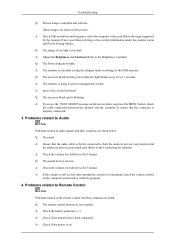
... card.(Refer to the Connecting the monitor) A: Check the volume level.(Refer to audio signals and their solutions are listed. Q: The remote control buttons do not respond. A: The monitor is too low. Problems related to Audio Note Problems related to the Volume) Q: The sound level is using... not, reset them referring to the OSD memory. Q: The image is still too low after turning the control to the Brightness, Contrast) Q: The Power Indicator blinks. A: Check the volume level.(Refer to the Volume) A: If the volume is too light or too dark A: Adjust the Brightness and...
... card.(Refer to the Connecting the monitor) A: Check the volume level.(Refer to audio signals and their solutions are listed. Q: The remote control buttons do not respond. A: The monitor is too low. Problems related to Audio Note Problems related to the Volume) Q: The sound level is using... not, reset them referring to the OSD memory. Q: The image is still too low after turning the control to the Brightness, Contrast) Q: The Power Indicator blinks. A: Check the volume level.(Refer to the Volume) A: If the volume is too light or too dark A: Adjust the Brightness and...
User Manual (ENGLISH)
Page 74
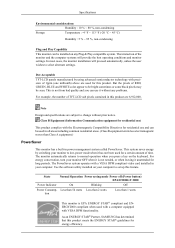
... semiconductor technology with VESA DPM functionality. The monitor automatically returns to low-power mode when it without prior notice. State Normal Operation Power saving mode Power off (Power button) EPA/ENERGY 2000 Power Indicator On Blinking Off Power Consump- As an ENERGY STAR® Partner, SAMSUNG has determined that this feature. Use the software utility installed on your...
... semiconductor technology with VESA DPM functionality. The monitor automatically returns to low-power mode when it without prior notice. State Normal Operation Power saving mode Power off (Power button) EPA/ENERGY 2000 Power Indicator On Blinking Off Power Consump- As an ENERGY STAR® Partner, SAMSUNG has determined that this feature. Use the software utility installed on your...
User Manual (ENGLISH)
Page 77
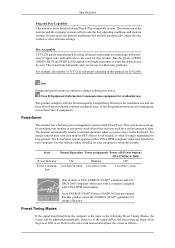
... equipment for residential use it unattended for energy efficiency. State Normal Operation Power saving mode Power off (Power button) EPA/ENERGY 2000 Power Indicator On Blinking Off Power Consump- Less than 54 watts Less than 2 watts tion Less than Class... A equipment.) PowerSaver This monitor has a built-in your monitor OFF when it is not needed, or when leaving it without prior notice. As an ENERGY STAR® Partner, SAMSUNG...
... equipment for residential use it unattended for energy efficiency. State Normal Operation Power saving mode Power off (Power button) EPA/ENERGY 2000 Power Indicator On Blinking Off Power Consump- Less than 54 watts Less than 2 watts tion Less than Class... A equipment.) PowerSaver This monitor has a built-in your monitor OFF when it is not needed, or when leaving it without prior notice. As an ENERGY STAR® Partner, SAMSUNG...


