User Manual (ENGLISH)
Page 3
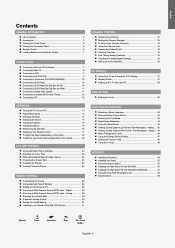
...Checking the Digital-Signal Strength 36 LNA (Low Noise Amplifier 36 PC DISPLAY Using Your TV as a Computer (PC) Display 37 Display Modes 37 Setting up the TV with your PC 38 TIME SETTING Setting the Clock 40 FUNCTION DESCRIPTION Selecting a Menu Language 43 Setting the Blue Screen Mode 43 ...Selecting the Film Mode 44 Digital Noise Reduction 44 Using the Game Mode 44 Viewing Closed Captions (On-Screen...
...Checking the Digital-Signal Strength 36 LNA (Low Noise Amplifier 36 PC DISPLAY Using Your TV as a Computer (PC) Display 37 Display Modes 37 Setting up the TV with your PC 38 TIME SETTING Setting the Clock 40 FUNCTION DESCRIPTION Selecting a Menu Language 43 Setting the Blue Screen Mode 43 ...Selecting the Film Mode 44 Digital Noise Reduction 44 Using the Game Mode 44 Viewing Closed Captions (On-Screen...
User Manual (ENGLISH)
Page 4
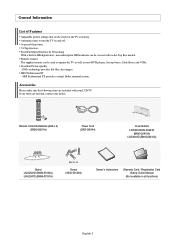
... HD broadcasts can be viewed with your dealer. Accessories Please make sure the following items are missing, contact your LCD TV. Automatic timer to operate the TV as well as most DVD players, Set-top boxes, Cable Boxes and VCRs. Remote Control The supplied remote can...LN-S3241D (BN96-03191A) M4 X L16 Screw (6002-001294) Owner's Instructions Warranty Card / Registration Card /Safety Guide Manual (Not available in the TV's memory. A special sleep timer. Excellent Picture Quality - If any items are included with no Set-Top Box needed. SRS TruSurround XT provides a...
... HD broadcasts can be viewed with your dealer. Accessories Please make sure the following items are missing, contact your LCD TV. Automatic timer to operate the TV as well as most DVD players, Set-top boxes, Cable Boxes and VCRs. Remote Control The supplied remote can...LN-S3241D (BN96-03191A) M4 X L16 Screw (6002-001294) Owner's Instructions Warranty Card / Registration Card /Safety Guide Manual (Not available in the TV's memory. A special sleep timer. Excellent Picture Quality - If any items are included with no Set-Top Box needed. SRS TruSurround XT provides a...
User Manual (ENGLISH)
Page 5
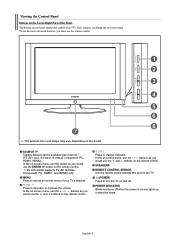
...S-Video, Component, PC, HDMI1, and HDMI2 only. In the on-screen menu, use this spot on the TV. (POWER) Press to see an on -screen menu. In the on-screen menu, use the buttons as you would use the remote control. SPEAKERS REMOTE CONTROL SENSOR Aim the remote control towards this button as... Control Panel Buttons on the Lower-Right Part of the Panel The buttons on the lower-right panel control your TV's basic features, including the on -screen menu of your TV's features. To use the more advanced features, you would use the ENTER button on the model. MENU Press to turn the...
...S-Video, Component, PC, HDMI1, and HDMI2 only. In the on-screen menu, use this spot on the TV. (POWER) Press to see an on -screen menu. In the on-screen menu, use the buttons as you would use the remote control. SPEAKERS REMOTE CONTROL SENSOR Aim the remote control towards this button as... Control Panel Buttons on the Lower-Right Part of the Panel The buttons on the lower-right panel control your TV's basic features, including the on -screen menu of your TV's features. To use the more advanced features, you would use the ENTER button on the model. MENU Press to turn the...
User Manual (ENGLISH)
Page 6
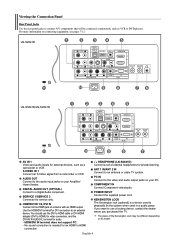
... adapter (DVI to physically fix the system when used to HDMI) for video connection, and the DVI-IN 'R-AUDIO-L' terminal for DVI connection to connect A/V components that will be different depending on your PC. If you purchased the TV. English-4 HDMI/DVI IN terminal does not support... PC. - COMPONENT IN Connect Component video/audio. S-VIDEO IN 1 Connect an S-Video signal from a camcorder or VCR. SERVICE 1/SERVICE 2 Connector for external devices, such as VCR or DVD players. Use the HDMI/DVI terminal...
... adapter (DVI to physically fix the system when used to HDMI) for video connection, and the DVI-IN 'R-AUDIO-L' terminal for DVI connection to connect A/V components that will be different depending on your PC. If you purchased the TV. English-4 HDMI/DVI IN terminal does not support... PC. - COMPONENT IN Connect Component video/audio. S-VIDEO IN 1 Connect an S-Video signal from a camcorder or VCR. SERVICE 1/SERVICE 2 Connector for external devices, such as VCR or DVD players. Use the HDMI/DVI terminal...
User Manual (ENGLISH)
Page 7
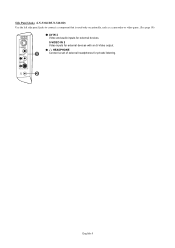
English-5 S-VIDEO IN 2 Video inputs for external devices. Side Panel Jacks (LN-S3241D/LN-S4041D) Use the left side panel jacks to connect a component that is used only occasionally, such as a camcorder or video game. (See page 10) AV IN 2 Video and audio inputs for external devices with an S-Video output. HEADPHONE Connect a set of external headphones for private listening.
English-5 S-VIDEO IN 2 Video inputs for external devices. Side Panel Jacks (LN-S3241D/LN-S4041D) Use the left side panel jacks to connect a component that is used only occasionally, such as a camcorder or video game. (See page 10) AV IN 2 Video and audio inputs for external devices with an S-Video output. HEADPHONE Connect a set of external headphones for private listening.
User Manual (ENGLISH)
Page 8
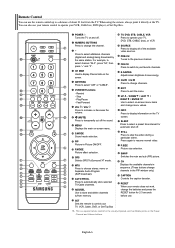
...channels in sequence. (These buttons change the channel. - SET Sets the remote to control your TV, VCR, Cable, DVD, or Set-Top Box This is a special remote control for 2-3 seconds before use. PIP Picture-in the PIP window only.) CAPTION Controls the caption decoder. AUTO PROG. P.SIZE... Picture size selection. Play/Pause - ADD/DEL Use to store and delete channels to/from the TV. NUMERIC BUTTONS Press to change menu values. CH MGR Used to display Channel Lists on -screen menu. MENU Displays the main on the screen. EXIT...
...channels in sequence. (These buttons change the channel. - SET Sets the remote to control your TV, VCR, Cable, DVD, or Set-Top Box This is a special remote control for 2-3 seconds before use. PIP Picture-in the PIP window only.) CAPTION Controls the caption decoder. AUTO PROG. P.SIZE... Picture size selection. Play/Pause - ADD/DEL Use to store and delete channels to/from the TV. NUMERIC BUTTONS Press to change menu values. CH MGR Used to display Channel Lists on -screen menu. MENU Displays the main on the screen. EXIT...
User Manual (ENGLISH)
Page 9
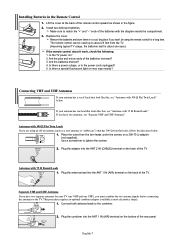
Installing Batteries in the figure. 2. Make sure to match the "+" and "-" ends of the TV. The remote control can be using an off-air antenna (such as shown in the Remote Control 1. Antennas with the diagram inside the compartment. 3. Plug the adaptor into the ANT 2 IN (...-75 Ω adapter (not supplied). Are the plus and minus ends of the TV. Place the wires from the TV. (Assuming typical TV usage, the batteries last for your TV (one VHF and one UHF), you won't be used up to the TV. Antennas with 75 Ω Round Leads". Remove the batteries and store them in...
Installing Batteries in the figure. 2. Make sure to match the "+" and "-" ends of the TV. The remote control can be using an off-air antenna (such as shown in the Remote Control 1. Antennas with the diagram inside the compartment. 3. Plug the adaptor into the ANT 2 IN (...-75 Ω adapter (not supplied). Are the plus and minus ends of the TV. Place the wires from the TV. (Assuming typical TV usage, the batteries last for your TV (one VHF and one UHF), you won't be used up to the TV. Antennas with 75 Ω Round Leads". Remove the batteries and store them in...
User Manual (ENGLISH)
Page 11
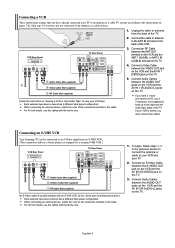
...step 1 if you must connect two cables. For 40 inch model, use the cables with the ferrite core. 1. Connect an RF Cable between the AUDIO OUT jacks on the VCR and the AV IN 1 [R-AUDIO-L] jacks on the TV. Connecting an S-VHS VCR Your Samsung TV can be connected to an S-Video signal from ...the back of the VCR. 3. For 40 inch model, use the cables with the ferrite core. 1. Connect Audio Cables between the AUDIO OUT jacks ...
...step 1 if you must connect two cables. For 40 inch model, use the cables with the ferrite core. 1. Connect an RF Cable between the AUDIO OUT jacks on the VCR and the AV IN 1 [R-AUDIO-L] jacks on the TV. Connecting an S-VHS VCR Your Samsung TV can be connected to an S-Video signal from ...the back of the VCR. 3. For 40 inch model, use the cables with the ferrite core. 1. Connect Audio Cables between the AUDIO OUT jacks ...
User Manual (ENGLISH)
Page 12
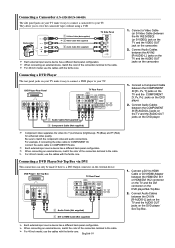
...Video Cable (Not supplied) or 1 Video Cable (Not supplied) 2 Audio Cable (Not supplied) TV Side Panel Each external input source device has a different back panel configuration. For 40 inch model, use the cables with the ferrite core. They allow you to the cable. When connecting an external ... Connecting a Camcorder (LN-S3241D/LN-S4041D) The side panel jacks on your TV make it easy to connect a camcorder to your TV. For 40 inch model, use the cables with the ferrite core. For 40 inch model, use the cables with the ferrite core. Connect Audio Cables between the AV IN2 ...
...Video Cable (Not supplied) or 1 Video Cable (Not supplied) 2 Audio Cable (Not supplied) TV Side Panel Each external input source device has a different back panel configuration. For 40 inch model, use the cables with the ferrite core. They allow you to the cable. When connecting an external ... Connecting a Camcorder (LN-S3241D/LN-S4041D) The side panel jacks on your TV make it easy to connect a camcorder to your TV. For 40 inch model, use the cables with the ferrite core. For 40 inch model, use the cables with the ferrite core. Connect Audio Cables between the AV IN2 ...

User Manual (ENGLISH)
Page 13
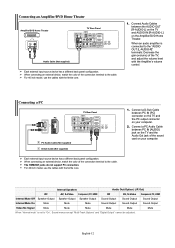
... Audio System The rear panel jacks on the DVD player/Set-Top Box. For 40 inch model, use the cables with the ferrite core. Connect an HDMI Cable between the DIGITAL AUDIO OUT (OPTICAL) jacks on the TV and the Digital Audio Input jacks on the external device. When a Digital Audio...feature installed, and supports multi-channel digital audio. For 40 inch model, use the cables with the system's volume control. Connect an Optical Cable between the HDMI/DVI 1 or HDMI/DVI 2 connector on the TV and the HDMI connector on your TV make it allows multiple channels of the connection terminal to...
... Audio System The rear panel jacks on the DVD player/Set-Top Box. For 40 inch model, use the cables with the ferrite core. Connect an HDMI Cable between the DIGITAL AUDIO OUT (OPTICAL) jacks on the TV and the Digital Audio Input jacks on the external device. When a Digital Audio...feature installed, and supports multi-channel digital audio. For 40 inch model, use the cables with the system's volume control. Connect an Optical Cable between the HDMI/DVI 1 or HDMI/DVI 2 connector on the TV and the HDMI connector on your TV make it allows multiple channels of the connection terminal to...
User Manual (ENGLISH)
Page 14
..."On", Sound menus except "Multi-Track Options" and "Digital Output" cannot be adjusted. For 40 inch model, use the cables with the ferrite core. 1. When connecting an external device, match the color of the TV, and adjust the volume level with the Amplifier's volume control. When connecting an external device, ...match the color of the sound card on the TV and the Audio Out jack of the connection terminal to the cable. For 40 inch model, use the cables with the ...
..."On", Sound menus except "Multi-Track Options" and "Digital Output" cannot be adjusted. For 40 inch model, use the cables with the ferrite core. 1. When connecting an external device, match the color of the TV, and adjust the volume level with the Amplifier's volume control. When connecting an external device, ...match the color of the sound card on the TV and the Audio Out jack of the connection terminal to the cable. For 40 inch model, use the cables with the ...
User Manual (ENGLISH)
Page 15
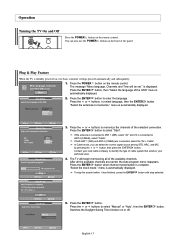
...". "Select the antennas to memorize the channels of the selected connection. Press the or buttons to memorize." In Cable mode, you can also use the POWER button on the front of the available channels. Press the ENTER button when channel memorization is displayed. is complete. Press the ENTER button...the correct signal source among STD, HRC, and IRC by pressing the or button, then press the ENTER button. Plug & Play Feature When the TV is initially powered on the remote control. If the antenna is connected to ANT 1 (AIR), select "Air" and if it has finished, press...
...". "Select the antennas to memorize the channels of the selected connection. Press the or buttons to memorize." In Cable mode, you can also use the POWER button on the front of the available channels. Press the ENTER button when channel memorization is displayed. is complete. Press the ENTER button...the correct signal source among STD, HRC, and IRC by pressing the or button, then press the ENTER button. Plug & Play Feature When the TV is initially powered on the remote control. If the antenna is connected to ANT 1 (AIR), select "Air" and if it has finished, press...

User Manual (ENGLISH)
Page 16
... the ENTER 2. You will switch to reset this feature... 1. Press the or buttons to highlight the time zone for your watching." If not, see page 40 to change channels. Press the ENTER button. Press the PRE-CH button. English-14 "Select the time zone in which you want to the last... viewed. Plug & Play can only be set the clock. 8. Press the CH or CH button to set automatically. Using the PRE-CH Button to select "Yes" or "No", then the ENTER button. The TV will see channels that were either erased or not memorized. 6. Press the ENTER button. Press the or buttons...
... the ENTER 2. You will switch to reset this feature... 1. Press the or buttons to highlight the time zone for your watching." If not, see page 40 to change channels. Press the ENTER button. Press the PRE-CH button. English-14 "Select the time zone in which you want to the last... viewed. Plug & Play can only be set the clock. 8. Press the CH or CH button to set automatically. Using the PRE-CH Button to select "Yes" or "No", then the ENTER button. The TV will see channels that were either erased or not memorized. 6. Press the ENTER button. Press the or buttons...
User Manual (ENGLISH)
Page 17
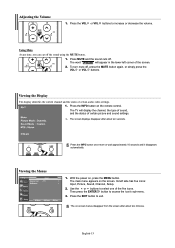
... sound settings. The screen displays disappear after about ten seconds. With the power on the screen. The main menu appears on , press the MENU button. Use the or buttons to access the icon's sub-menu. 3. The on the remote control. The word " " will display the channel, the type of sound,... and the status of certain audio-video settings. 1. The TV will appear in the lower-left side has five icons: Input, Picture, Sound, Channel, Setup. 2. Then press the ENTER button to select one of the...
... sound settings. The screen displays disappear after about ten seconds. With the power on the screen. The main menu appears on , press the MENU button. Use the or buttons to access the icon's sub-menu. 3. The on the remote control. The word " " will display the channel, the type of sound,... and the status of certain audio-video settings. 1. The TV will appear in the lower-left side has five icons: Input, Picture, Sound, Channel, Setup. 2. Then press the ENTER button to select one of the...
User Manual (ENGLISH)
Page 18
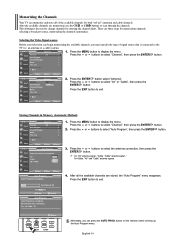
.... Selecting the Video Signal-source Before your television can begin memorizing the available channels, you can memorize and store all the available channels are memorized, use the CH or CH buttons to scan through the channels. Press the ENTER button select "Antenna". After all of signal source that is connected to... the or buttons to display the menu. There are three steps for both "off-air" (antenna) and cable channels. Press the EXIT button to the TV (i.e. Memorizing the Channels Your TV can press the AUTO PROG.
.... Selecting the Video Signal-source Before your television can begin memorizing the available channels, you can memorize and store all the available channels are memorized, use the CH or CH buttons to scan through the channels. Press the ENTER button select "Antenna". After all of signal source that is connected to... the or buttons to display the menu. There are three steps for both "off-air" (antenna) and cable channels. Press the EXIT button to the TV (i.e. Memorizing the Channels Your TV can press the AUTO PROG.

User Manual (ENGLISH)
Page 19
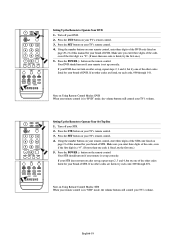
...on after set-up correctly. Press the SET button on Using Remote Control Modes: Cable Box When your remote control is in "VCR" mode, the volume buttons still control your TV's volume. Note on your brand of this manual for your TV's remote control. 3. Pressing the corresponding button on if... digits of the cable box code listed on Using Remote Control Modes: VCR When your remote control is in five different modes: TV, VCR, Cable, DVD, or Set-Top Box. Turn off your TV's remote control. 3. Press the SET button on if your TV's remote control. 4. Setting Up the Remote ...
...on after set-up correctly. Press the SET button on Using Remote Control Modes: Cable Box When your remote control is in "VCR" mode, the volume buttons still control your TV's volume. Note on your brand of this manual for your TV's remote control. 3. Pressing the corresponding button on if... digits of the cable box code listed on Using Remote Control Modes: VCR When your remote control is in five different modes: TV, VCR, Cable, DVD, or Set-Top Box. Turn off your TV's remote control. 3. Press the SET button on if your TV's remote control. 4. Setting Up the Remote ...
User Manual (ENGLISH)
Page 20
... your remote control, enter three digits of DVD. Press the STB button on page 20~21 of this manual for your TV's volume. Press the POWER button on Using Remote Control Modes: DVD When your remote control is in "DVD" mode, the volume buttons still control your brand of ... and 4, but try each code, 000 through 141. If your STB. 2. If no other codes listed for your TV's remote control. 4. Note on your TV's remote control. 3. Press the SET button on Using Remote Control Modes: STB When your remote control is in "STB" mode, the volume buttons still control your remote...
... your remote control, enter three digits of DVD. Press the STB button on page 20~21 of this manual for your TV's volume. Press the POWER button on Using Remote Control Modes: DVD When your remote control is in "DVD" mode, the volume buttons still control your brand of ... and 4, but try each code, 000 through 141. If your STB. 2. If no other codes listed for your TV's remote control. 4. Note on your TV's remote control. 3. Press the SET button on Using Remote Control Modes: STB When your remote control is in "STB" mode, the volume buttons still control your remote...
User Manual (ENGLISH)
Page 24
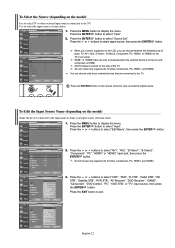
To Select the Source (depending on the model) Use to select TV or other external input sources connected to select "Source List". Press the ENTER button to the TV. Press the MENU button to exit. Press the EXIT button to display the menu. Press the or buttons to select "Input"....select signal source, then press the ENTER button. Use to make your choice. 1. AV2/S-Video2 is turned on and connected via HDMI. You can choose only those external devices that are connected to the LCD, you connect equipment to the TV. When you can only be selected when the external...
To Select the Source (depending on the model) Use to select TV or other external input sources connected to select "Source List". Press the ENTER button to the TV. Press the MENU button to exit. Press the EXIT button to display the menu. Press the or buttons to select "Input"....select signal source, then press the ENTER button. Use to make your choice. 1. AV2/S-Video2 is turned on and connected via HDMI. You can choose only those external devices that are connected to the LCD, you connect equipment to the TV. When you can only be selected when the external...

User Manual (ENGLISH)
Page 25
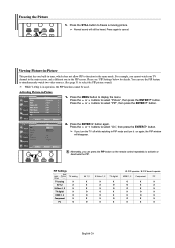
...separately for the standard factory settings. When in HDMI, PC or any Component mode. • The Tint cannot be adjusted while watching Digital TV. • Each adjusted setting will be stored separately according to its input mode. • When you want to adjust the settings according ... can activate either Dynamic, Standard, Movie, or Custom by making a selection from the menu. Choose Standard for each input. 3. Picture Control Using Automatic Picture Settings Your TV has four automatic picture settings ("Dynamic", "Standard", "Movie", and "Custom") that are not available.
...separately for the standard factory settings. When in HDMI, PC or any Component mode. • The Tint cannot be adjusted while watching Digital TV. • Each adjusted setting will be stored separately according to its input mode. • When you want to adjust the settings according ... can activate either Dynamic, Standard, Movie, or Custom by making a selection from the menu. Choose Standard for each input. 3. Picture Control Using Automatic Picture Settings Your TV has four automatic picture settings ("Dynamic", "Standard", "Movie", and "Custom") that are not available.
User Manual (ENGLISH)
Page 28
... operation, the PIP function cannot be heard. For example, you can use the PIP feature to simultaneously watch one TV channel in the main screen, and a different one built-in tuner,... the ENTER button. You can press the PIP button on again, the PIP window will still be used. PIP Settings Sub Main Picture Picture TV analog TV analog X AV 1,2 X S-Video 1, 2 X TV digital X HDMI 1, 2 O Component X PC O AV 1,2 X X X O O X O S-Video 1, 2 X X X O O X X TV digital X O O X X O X O: PIP operates / X: PIP doesn't operate HDMI 1, 2 Component PC O X X O X X O X ...
... operation, the PIP function cannot be heard. For example, you can use the PIP feature to simultaneously watch one TV channel in the main screen, and a different one built-in tuner,... the ENTER button. You can press the PIP button on again, the PIP window will still be used. PIP Settings Sub Main Picture Picture TV analog TV analog X AV 1,2 X S-Video 1, 2 X TV digital X HDMI 1, 2 O Component X PC O AV 1,2 X X X O O X O S-Video 1, 2 X X X O O X X TV digital X O O X X O X O: PIP operates / X: PIP doesn't operate HDMI 1, 2 Component PC O X X O X X O X ...

