
Open Source Guide (ENGLISH)
Page 2
It is found. To apply these terms (or, alternatively, under the terms of the ordinary General Public License). and each file should have at least the "copyright" line and a pointer to the public, we recommend making it to be of the greatest possible use to where the full notice is safest to attach them to the start of warranty; How to Apply These Terms to Your New Libraries If you develop a new library, and you want it free software that everyone can do so by permitting redistribution under these terms, attach the following notices to most effectively convey the exclusion of ...
It is found. To apply these terms (or, alternatively, under the terms of the ordinary General Public License). and each file should have at least the "copyright" line and a pointer to the public, we recommend making it to be of the greatest possible use to where the full notice is safest to attach them to the start of warranty; How to Apply These Terms to Your New Libraries If you develop a new library, and you want it free software that everyone can do so by permitting redistribution under these terms, attach the following notices to most effectively convey the exclusion of ...
User Manual (ENGLISH)
Page 4
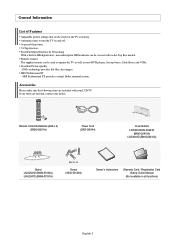
... V-Chip function. Excellent Picture Quality - SRS TruSurround XT provides a virtual Dolby surround system. Remote Control & Batteries (AAA x 2) (BN59-00511A) Power Cord (3903-000144) Cover-Bottom LN-S2641D/LN-S3241D (BN63-02415A) LN-S4041D (BN63-02416A) Stand LN-S2641D (BN96-03192A) LN-S3241D (BN96-...Set-top boxes, Cable Boxes and VCRs. SRS TruSurround XT - Accessories Please make sure the following items are missing, contact your LCD TV. General Information List of Features Adjustable picture settings that can be viewed with your dealer. Remote Control The supplied remote can be...
... V-Chip function. Excellent Picture Quality - SRS TruSurround XT provides a virtual Dolby surround system. Remote Control & Batteries (AAA x 2) (BN59-00511A) Power Cord (3903-000144) Cover-Bottom LN-S2641D/LN-S3241D (BN63-02415A) LN-S4041D (BN63-02416A) Stand LN-S2641D (BN96-03192A) LN-S3241D (BN96-...Set-top boxes, Cable Boxes and VCRs. SRS TruSurround XT - Accessories Please make sure the following items are missing, contact your LCD TV. General Information List of Features Adjustable picture settings that can be viewed with your dealer. Remote Control The supplied remote can be...
User Manual (ENGLISH)
Page 5
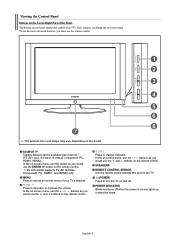
In the on-screen menu, use this spot on the TV. (POWER) Press to see an on and off when the power is on the model. Press to change channels. Press to decrease or increase the volume. SPEAKERS REMOTE CONTROL SENSOR Aim the remote control towards this ... up in stand-by mode. In the on the remote control. 26 inch model supports TV, AV, S-Video, Component, PC, HDMI1, and HDMI2 only. POWER INDICATOR Blinks and turns off . SOURCE Toggles between all the available input sources (TV, AV1, AV2, S-Video1, S-Video2, Component, PC, HDMI1, HDMI2). Viewing the Control Panel Buttons on...
In the on-screen menu, use this spot on the TV. (POWER) Press to see an on and off when the power is on the model. Press to change channels. Press to decrease or increase the volume. SPEAKERS REMOTE CONTROL SENSOR Aim the remote control towards this ... up in stand-by mode. In the on the remote control. 26 inch model supports TV, AV, S-Video, Component, PC, HDMI1, and HDMI2 only. POWER INDICATOR Blinks and turns off . SOURCE Toggles between all the available input sources (TV, AV1, AV2, S-Video1, S-Video2, Component, PC, HDMI1, HDMI2). Viewing the Control Panel Buttons on...
User Manual (ENGLISH)
Page 6
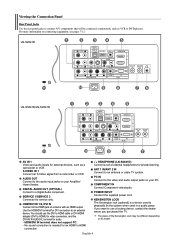
... jacks on your Amplifier/ Home theater. KENSINGTON LOCK The Kensington lock (optional) is needed for private listening. If you purchased the TV. AUDIO OUT Connect to the video and audio output jacks on your PC. ANT 1 IN/ANT 2 IN Connect to a Digital Audio component.... POWER INPUT Connect the supplied power cord. DIGITAL AUDIO OUT (OPTICAL) Connect to an antenna or cable TV system. HEADPHONE (LN-S2641D) Connect a set of external headphones for an HDMI to HDMI connection. COMPONENT ...
... jacks on your Amplifier/ Home theater. KENSINGTON LOCK The Kensington lock (optional) is needed for private listening. If you purchased the TV. AUDIO OUT Connect to the video and audio output jacks on your PC. ANT 1 IN/ANT 2 IN Connect to a Digital Audio component.... POWER INPUT Connect the supplied power cord. DIGITAL AUDIO OUT (OPTICAL) Connect to an antenna or cable TV system. HEADPHONE (LN-S2641D) Connect a set of external headphones for an HDMI to HDMI connection. COMPONENT ...
User Manual (ENGLISH)
Page 8
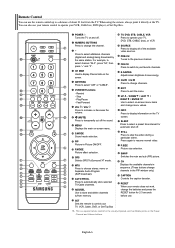
...control your favorite channels. SET Sets the remote to resume normal video. When using the remote, always point it directly at the TV. POWER Turns the TV on -screen menu items and change the batteries and press the RESET button for 2-3 seconds before use. ANTENNA Press to /from the... TV. MENU Displays the main on the Power, Channel and Volume buttons. S.MODE Sound mode selection. NUMERIC BUTTONS Press to change channels. Play/Pause - SRS Selects SRS ...
...control your favorite channels. SET Sets the remote to resume normal video. When using the remote, always point it directly at the TV. POWER Turns the TV on -screen menu items and change the batteries and press the RESET button for 2-3 seconds before use. ANTENNA Press to /from the... TV. MENU Displays the main on the Power, Channel and Volume buttons. S.MODE Sound mode selection. NUMERIC BUTTONS Press to change channels. Play/Pause - SRS Selects SRS ...
User Manual (ENGLISH)
Page 9
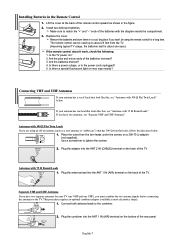
Lift the cover at most electronics shops). 1. Make sure to tighten the screws. Is the TV power on the back of the TV. Are the plus and minus ends of the remote control upward as a roof antenna or "rabbit ears") that look like this , see "Separate VHF and .... Separate VHF and UHF Antennas If you have two separate antennas for a long time. Connect both antenna leads to the TV. Is there a power outage, or is the power cord unplugged? 5. If your TV (one VHF and one lead that looks like this , see "Antennas with 300 Ω Flat Twin Leads If you won...
Lift the cover at most electronics shops). 1. Make sure to tighten the screws. Is the TV power on the back of the TV. Are the plus and minus ends of the remote control upward as a roof antenna or "rabbit ears") that look like this , see "Separate VHF and .... Separate VHF and UHF Antennas If you have two separate antennas for a long time. Connect both antenna leads to the TV. Is there a power outage, or is the power cord unplugged? 5. If your TV (one VHF and one lead that looks like this , see "Antennas with 300 Ω Flat Twin Leads If you won...
User Manual (ENGLISH)
Page 15
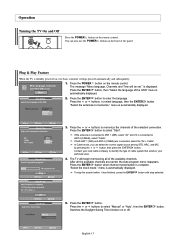
...-13 is automatically displayed. 2. Press the ENTER button to memorize." In Cable mode, you can also use the POWER button on the front of the available channels. The TV will be set." "Select the antennas to enter the language. Press the ENTER button to select language, then the... select "Manual" or "Auto", then the ENTER Switches the Daylight Saving Time function on the remote control. Operation Turning the TV On and Off Press the POWER button on , two basic customer settings proceed automatically and subsequently: 1. Press the or buttons to select "Start". Press the ...
...-13 is automatically displayed. 2. Press the ENTER button to memorize." In Cable mode, you can also use the POWER button on the front of the available channels. The TV will be set." "Select the antennas to enter the language. Press the ENTER button to select language, then the... select "Manual" or "Auto", then the ENTER Switches the Daylight Saving Time function on the remote control. Operation Turning the TV On and Off Press the POWER button on , two basic customer settings proceed automatically and subsequently: 1. Press the or buttons to select "Start". Press the ...
User Manual (ENGLISH)
Page 17
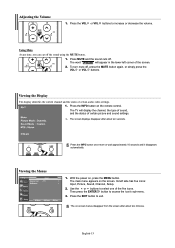
... button on , press the MENU button. The screen displays disappear after about ten seconds. The TV will appear in the lower-left side has five icons: Input, Picture, Sound, Channel, Setup. 2. Viewing the Menus 1. With the power on the remote control. The main menu appears on -screen menus disappear from the screen...
... button on , press the MENU button. The screen displays disappear after about ten seconds. The TV will appear in the lower-left side has five icons: Input, Picture, Sound, Channel, Setup. 2. Viewing the Menus 1. With the power on the remote control. The main menu appears on -screen menus disappear from the screen...

User Manual (ENGLISH)
Page 19
... control. 3. Press the SET button on after set-up properly, your remote control can operate in five different modes: TV, VCR, Cable, DVD, or Set-Top Box. Press the POWER button on the remote control. The remote control might not be compatible with all DVD Players, VCRs, Cable boxes, and ... on Using Remote Control Modes: VCR When your remote control is set up correctly. If your cable box does not turn on your TV's remote control. 4. Press the POWER button on the remote control. If no other codes are listed, try each code, 000 through 080. Make sure you enter three...
... control. 3. Press the SET button on after set-up properly, your remote control can operate in five different modes: TV, VCR, Cable, DVD, or Set-Top Box. Press the POWER button on the remote control. The remote control might not be compatible with all DVD Players, VCRs, Cable boxes, and ... on Using Remote Control Modes: VCR When your remote control is set up correctly. If your cable box does not turn on your TV's remote control. 4. Press the POWER button on the remote control. If no other codes are listed, try each code, 000 through 080. Make sure you enter three...
User Manual (ENGLISH)
Page 20
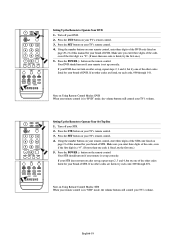
...When your remote control is set up , repeat steps 2, 3 and 4, but try the first one of the other codes listed for your TV's remote control. 3. Press the POWER button on the remote control. If your remote is in "STB" mode, the volume buttons still control your DVD. 2. English-18 Setting ...Up the Remote to Operate Your Set Top Box 1. Note on after set -up correctly. Press the POWER button on the remote control. If no other codes are listed, try the first one of the other codes listed for your...
...When your remote control is set up , repeat steps 2, 3 and 4, but try the first one of the other codes listed for your TV's remote control. 3. Press the POWER button on the remote control. If your remote is in "STB" mode, the volume buttons still control your DVD. 2. English-18 Setting ...Up the Remote to Operate Your Set Top Box 1. Note on after set -up correctly. Press the POWER button on the remote control. If no other codes are listed, try the first one of the other codes listed for your...
User Manual (ENGLISH)
Page 33
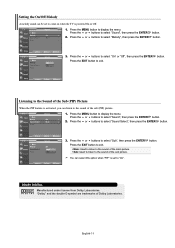
... button to select "On" or "Off", then press the ENTER button. Listening to the Sound of the Sub (PIP) Picture When the PIP feature is powered On or Off. 1. English-31 Press the or buttons to exit. Press the or buttons to the sound of the sub picture. Sub: Used to... EXIT button to select "Sound Select", then press the ENTER button. 3. You can select this option when "PIP" is set to come on when the TV is activated, you can be set to display the menu. Press the MENU button to "On". button. button. 3. Main: Used to listen to select "Sound...
... button to select "On" or "Off", then press the ENTER button. Listening to the Sound of the Sub (PIP) Picture When the PIP feature is powered On or Off. 1. English-31 Press the or buttons to exit. Press the or buttons to the sound of the sub picture. Sub: Used to... EXIT button to select "Sound Select", then press the ENTER button. 3. You can select this option when "PIP" is set to come on when the TV is activated, you can be set to display the menu. Press the MENU button to "On". button. button. 3. Main: Used to listen to select "Sound...
User Manual (ENGLISH)
Page 49
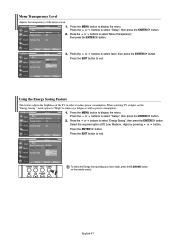
Menu Transparency Level Adjusts the transparency of the TV in order to reduce power consumption. button. 3. Press the MENU button to select "Energy Saving", then press the ENTER button. Press the or buttons to display the menu. To select ... ENTER button. English-47 Press the or buttons to exit. Press the EXIT button to select "Menu Transparency", then press the ENTER button. When watching TV at night, set the "Energy Saving " mode option to "High" to select "Setup", then press the ENTER 2. Press the or buttons to reduce eye fatigue...
Menu Transparency Level Adjusts the transparency of the TV in order to reduce power consumption. button. 3. Press the MENU button to select "Energy Saving", then press the ENTER button. Press the or buttons to display the menu. To select ... ENTER button. English-47 Press the or buttons to exit. Press the EXIT button to select "Menu Transparency", then press the ENTER button. When watching TV at night, set the "Energy Saving " mode option to "High" to select "Setup", then press the ENTER 2. Press the or buttons to reduce eye fatigue...
User Manual (ENGLISH)
Page 50
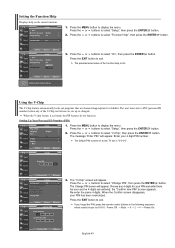
... the or buttons to select "Function Help", then press the ENTER button. 3. Re-enter the same 4 digits. The predetermined value of a new TV set up or changed. The Change PIN screen will appear. As soon as the 4 digits are set is "0-0-0-0". 3. Press the MENU button to select...button. Press the or buttons to select "Setup", then press the ENTER button. 2. Press the EXIT button to 0-0-0-0 : Power Off. → Mute → 8 → 2 → 4 → Power On. If you forget the PIN, press the remote-control buttons in the following sequence, which resets the pin to exit...
... the or buttons to select "Function Help", then press the ENTER button. 3. Re-enter the same 4 digits. The predetermined value of a new TV set up or changed. The Change PIN screen will appear. As soon as the 4 digits are set is "0-0-0-0". 3. Press the MENU button to select...button. Press the or buttons to select "Setup", then press the ENTER button. 2. Press the EXIT button to 0-0-0-0 : Power Off. → Mute → 8 → 2 → 4 → Power On. If you forget the PIN, press the remote-control buttons in the following sequence, which resets the pin to exit...
User Manual (ENGLISH)
Page 56
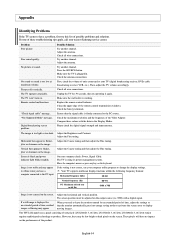
...solutions. Check the maximum resolution and the frequency of the remote control (transmission window). Adjust the Fine tuning. On your nearest Samsung service center. If none of units connected to your computer utility program to change the display settings. "Not Supported Mode" message.... a digital signal. Check the battery terminals. The TFT LCD panel uses a panel consisting of time, residual images or blurring may be adjusted on the image. Try another channel. Make sure the TV is using its power management system. Check the antenna connections. Please check the ...
...solutions. Check the maximum resolution and the frequency of the remote control (transmission window). Adjust the Fine tuning. On your nearest Samsung service center. If none of units connected to your computer utility program to change the display settings. "Not Supported Mode" message.... a digital signal. Check the battery terminals. The TFT LCD panel uses a panel consisting of time, residual images or blurring may be adjusted on the image. Try another channel. Make sure the TV is using its power management system. Check the antenna connections. Please check the ...
User Manual (ENGLISH)
Page 58
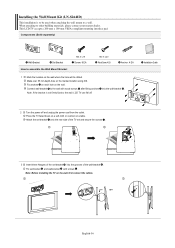
... 1 Mark the location on the wall where the hole will be used when attaching the wall mount to the wall, LCD TV can fall off and unplug the power cord from the outlet. This LCD TV accepts a 200 mm x 100 mm VESA-compliant mounting interface pad. Installing the Wall Mount Kit (LN-S2641D) This ...installation is not firmly fixed to a wall. Place the TV faced down on a soft cloth or cushion on the marked location using ...
... 1 Mark the location on the wall where the hole will be used when attaching the wall mount to the wall, LCD TV can fall off and unplug the power cord from the outlet. This LCD TV accepts a 200 mm x 100 mm VESA-compliant mounting interface pad. Installing the Wall Mount Kit (LN-S2641D) This ...installation is not firmly fixed to a wall. Place the TV faced down on a soft cloth or cushion on the marked location using ...
User Manual (ENGLISH)
Page 59
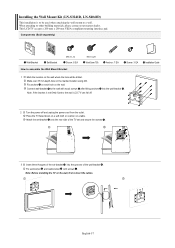
... to other building materials, please contact your nearest dealer. This LCD TV accepts a 200 mm x 200 mm VESA-compliant mounting interface pad. Note: Before installing the TV on a table. Place the TV faced down on a soft cloth or cushion on the wall,... first connect the cables. Attach the set-bracket onto the rear side of the TV set and secure the screws . 3 Insert three Hangers of the set -bracket and wall-bracket with wood ...(LN-S3241D, LN-S4041D) This installation is not firmly fixed to the wall, LCD TV can fall off and unplug the power cord from the outlet.
... to other building materials, please contact your nearest dealer. This LCD TV accepts a 200 mm x 200 mm VESA-compliant mounting interface pad. Note: Before installing the TV on a table. Place the TV faced down on a soft cloth or cushion on the wall,... first connect the cables. Attach the set-bracket onto the rear side of the TV set and secure the screws . 3 Insert three Hangers of the set -bracket and wall-bracket with wood ...(LN-S3241D, LN-S4041D) This installation is not firmly fixed to the wall, LCD TV can fall off and unplug the power cord from the outlet.
User Manual (ENGLISH)
Page 60
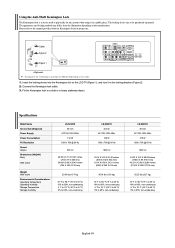
Specifications Model Name Screen Size (Diagonal) Power Supply Power Consumption PC Resolution Sound Output Dimensions (WxDxH) Body...;C) 10% to 80%, non-condensing -4 °F to 113 °F (-20 °C to 45 °C) 5% to 95%, non-condensing LN-S3241D 32 inch AC110V-120V 60Hz 165 W 1360 x 768 @ 60 Hz 10W X 2 35.14 X 3.23 X 21.42 inches (892.5 X 82 X ... manufacturer. Cable Figure 2 Figure 1 The place of the Kensington Lock may differ from the illustration depending on the LCD TV (Figure 1), and turn it in the locking direction (Figure 2). 2. Connect the Kensington lock cable. 3. The...
Specifications Model Name Screen Size (Diagonal) Power Supply Power Consumption PC Resolution Sound Output Dimensions (WxDxH) Body...;C) 10% to 80%, non-condensing -4 °F to 113 °F (-20 °C to 45 °C) 5% to 95%, non-condensing LN-S3241D 32 inch AC110V-120V 60Hz 165 W 1360 x 768 @ 60 Hz 10W X 2 35.14 X 3.23 X 21.42 inches (892.5 X 82 X ... manufacturer. Cable Figure 2 Figure 1 The place of the Kensington Lock may differ from the illustration depending on the LCD TV (Figure 1), and turn it in the locking direction (Figure 2). 2. Connect the Kensington lock cable. 3. The...


