Quick Guide (easy Manual) (ver.1.0) (English)
Page 1
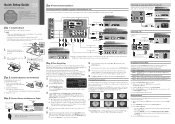
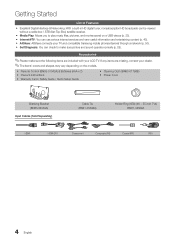
...guide to 45 minutes. 5 After the TV has memorized the channels, choose the Clock Mode. STOP Please do not return this product, visit: www.samsung.com/ register. To register this unit. We recommend using five screws (M4 X L12) as your area. Connecting an audio device (Home Theater,...Antenna Antenna Cable (Not Supplied) or Use a 75 ohm (round) cable. The jack will reset your remote. 4. With Plug & Play, you can set the clock. To navigate while Plug & Play is plugged in a normally lit room. To turn on your remote. English press the ENTERE button. 2 ...
...guide to 45 minutes. 5 After the TV has memorized the channels, choose the Clock Mode. STOP Please do not return this product, visit: www.samsung.com/ register. To register this unit. We recommend using five screws (M4 X L12) as your area. Connecting an audio device (Home Theater,...Antenna Antenna Cable (Not Supplied) or Use a 75 ohm (round) cable. The jack will reset your remote. 4. With Plug & Play, you can set the clock. To navigate while Plug & Play is plugged in a normally lit room. To turn on your remote. English press the ENTERE button. 2 ...
Quick Guide (easy Manual) (ver.1.0) (English)
Page 2
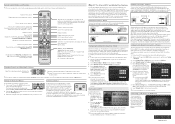
... ◄ or ► button to check internet connectivity. ✎✎For more . Select Network Test to select Internet@ Samsung Apps Settings TV, then press the Login Mark as shown in Media Play and Anynet+ modes. (�: Controls recording on or off...Displays Media Play. To connect wirelessly, you must first attach a "Samsung Wireless LAN Adapter" (WIS09ABGN, WIS09ABGN2, WIS10ABGN - If Pure High-throughput (Greenfield) 802.11n mode is selected and the Encryption type is set to configure a Static IP network, see your network in two ...
... ◄ or ► button to check internet connectivity. ✎✎For more . Select Network Test to select Internet@ Samsung Apps Settings TV, then press the Login Mark as shown in Media Play and Anynet+ modes. (�: Controls recording on or off...Displays Media Play. To connect wirelessly, you must first attach a "Samsung Wireless LAN Adapter" (WIS09ABGN, WIS09ABGN2, WIS10ABGN - If Pure High-throughput (Greenfield) 802.11n mode is selected and the Encryption type is set to configure a Static IP network, see your network in two ...
User Manual (user Manual) (ver.1.0) (English)
Page 3
...Started with your PC 19 yy Sound Menu 19 Changing the Preset Sound Mode 19 Adjusting sound settings 19 Sound Settings 20 yy Setup Menu 20 Setting the Time 20 Using the Sleep Timer 21 Setting the On/Off Timer 21 Locking Programs 21 Other Features 23 Picture In Picture (PIP) ...44 Using the Internet@TV service 46 PROFILE Widget 48 Widget Gallery 48 Troubleshooting for Internet@TV 49 yy AllShare 50 About AllShare 50 Setting Up AllShare 50 Other Information yy Installing the Wall Mount 52 yy Assembling the Cables 53 yy Anti-theft Kensington Lock 53 yy ...
...Started with your PC 19 yy Sound Menu 19 Changing the Preset Sound Mode 19 Adjusting sound settings 19 Sound Settings 20 yy Setup Menu 20 Setting the Time 20 Using the Sleep Timer 21 Setting the On/Off Timer 21 Locking Programs 21 Other Features 23 Picture In Picture (PIP) ...44 Using the Internet@TV service 46 PROFILE Widget 48 Widget Gallery 48 Troubleshooting for Internet@TV 49 yy AllShare 50 About AllShare 50 Setting Up AllShare 50 Other Information yy Installing the Wall Mount 52 yy Assembling the Cables 53 yy Anti-theft Kensington Lock 53 yy ...
User Manual (user Manual) (ver.1.0) (English)
Page 4
... movies saved on the models. If any items are included with your LCD TV. yy Internet@TV: You can be viewed without a cable box / STB (Set-Top-Box) satellite receiver. yy AllShare: AllShare connects your dealer. ✎✎The items' colors and shapes may vary depending on a USB device (p. 33). yy...
... movies saved on the models. If any items are included with your LCD TV. yy Internet@TV: You can be viewed without a cable box / STB (Set-Top-Box) satellite receiver. yy AllShare: AllShare connects your dealer. ✎✎The items' colors and shapes may vary depending on a USB device (p. 33). yy...
User Manual (user Manual) (ver.1.0) (English)
Page 7
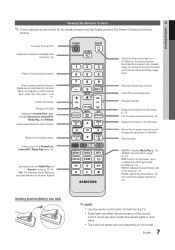
... video sources (p. 13). Press to the previous menu. POWER ON/OFF SOURCE Turns the remote control light on , the buttons become illuminated for Samsung recorders that have the Anynet+ feature) MUTE PRE-CH CONTENT CH LIST MENU @TV INTERNET TOOLS INFO RETURN EXIT A B CD MEDIA.P YAHOO!...Media Play and Anynet+ modes (p. 33, 40). (�: Controls recording for a moment when pressed. (Using the remote control with this button set to ON will reduce the battery usage time.) Press to select additional channels (digital) being broadcasted by the same station. Use these buttons in ...
... video sources (p. 13). Press to the previous menu. POWER ON/OFF SOURCE Turns the remote control light on , the buttons become illuminated for Samsung recorders that have the Anynet+ feature) MUTE PRE-CH CONTENT CH LIST MENU @TV INTERNET TOOLS INFO RETURN EXIT A B CD MEDIA.P YAHOO!...Media Play and Anynet+ modes (p. 33, 40). (�: Controls recording for a moment when pressed. (Using the remote control with this button set to ON will reduce the battery usage time.) Press to select additional channels (digital) being broadcasted by the same station. Use these buttons in ...

User Manual (user Manual) (ver.1.0) (English)
Page 8
...zone. Getting Started Connecting to an Antenna When the TV is initially powered on, a sequence of on-screen prompts will assist in configuring basic settings. Select the desired OSD (On Screen Display) language. 2 Selecting Store Demo Press the ◄ or ► button, then press the...Antenna Antenna Cable (Not Supplied) or Cable ANT OUT Power Input Plug & Play (Initial Setup) When the TV is initially powered on, basic settings proceed automatically. ✎✎Connecting the power cord and antenna. Store Demo Mode is for 5 sec. 3 Selecting an antenna Press the ▲...
...zone. Getting Started Connecting to an Antenna When the TV is initially powered on, a sequence of on-screen prompts will assist in configuring basic settings. Select the desired OSD (On Screen Display) language. 2 Selecting Store Demo Press the ◄ or ► button, then press the...Antenna Antenna Cable (Not Supplied) or Cable ANT OUT Power Input Plug & Play (Initial Setup) When the TV is initially powered on, basic settings proceed automatically. ✎✎Connecting the power cord and antenna. Store Demo Mode is for 5 sec. 3 Selecting an antenna Press the ▲...
User Manual (user Manual) (ver.1.0) (English)
Page 9
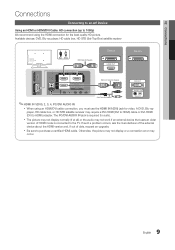
... HDMI/DVI cable connection, you must use the HDMI IN 1(DVI) jack for video. Available devices: DVD, Blu-ray player, HD cable box, HD STB (Set-Top-Box) satellite receiver R W Red White HDMI Cable (Not Supplied) Device HDMI OUT Device HDMI to purchase a certified HDMI cable.
... HDMI/DVI cable connection, you must use the HDMI IN 1(DVI) jack for video. Available devices: DVD, Blu-ray player, HD cable box, HD STB (Set-Top-Box) satellite receiver R W Red White HDMI Cable (Not Supplied) Device HDMI OUT Device HDMI to purchase a certified HDMI cable.

User Manual (user Manual) (ver.1.0) (English)
Page 11
When the source is a digital component such as a DVD / Blu-ray player / cable box / STB (Set-Top-Box) satellite receiver and is receiving a DTV signal, the TV will be heard from the amplifier or DVD home theater. When the TV is ... connected to the audio input jacks on , you want to an external device supporting 5.1 CH. xx 5.1 CH (channel) audio is available when the TV is set to on your amplifier/DVD home theater. If you can hear sound output from your DVD / Blu-ray player / cable box / STB satellite receiver directly...
When the source is a digital component such as a DVD / Blu-ray player / cable box / STB (Set-Top-Box) satellite receiver and is receiving a DTV signal, the TV will be heard from the amplifier or DVD home theater. When the TV is ... connected to the audio input jacks on , you want to an external device supporting 5.1 CH. xx 5.1 CH (channel) audio is available when the TV is set to on your amplifier/DVD home theater. If you can hear sound output from your DVD / Blu-ray player / cable box / STB satellite receiver directly...
User Manual (user Manual) (ver.1.0) (English)
Page 12
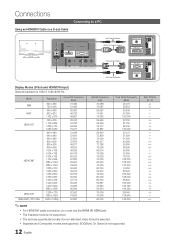
... interlace mode is not supported. 12 English Sync Polarity (H / V) +/-/+ -/-/-/- -/+ -/- +/+ xx Separate and Composite modes are supported. SOG(Sync On Green) is not supported. xx The set may operate abnormally if a non-standard video format is 1920 X 1080 @ 60 Hz. Connections Connecting to a PC Using an HDMI/DVI Cable or a D-sub Cable...
... interlace mode is not supported. 12 English Sync Polarity (H / V) +/-/+ -/-/-/- -/+ -/- +/+ xx Separate and Composite modes are supported. SOG(Sync On Green) is not supported. xx The set may operate abnormally if a non-standard video format is 1920 X 1080 @ 60 Hz. Connections Connecting to a PC Using an HDMI/DVI Cable or a D-sub Cable...

User Manual (user Manual) (ver.1.0) (English)
Page 13
...the Source List, connected inputsSwOiUllRbCeE highlighted. ✎✎ In the Source List, PC is connected to the HDMI IN 1(DVI) port, you should set the TV DVI PC mode under Edit Name. The adjustment in the OSD may differ depending on the selected menu. 1 MENUm 2 ▼/▲ ... selecCtHaLnISdT adjust different functions. Adjust the value of an item with a resolution of 1920 x 1080 @ 60Hz is always activated. Confirm the setting. 3 RETURN buttFoAnV:.CRHeturnPs.SItZoEthe prCeCvious menu. 4 EXIT button: Exits the on the selected menu. Basic Features PRE-CH MUTE How to ...
...the Source List, connected inputsSwOiUllRbCeE highlighted. ✎✎ In the Source List, PC is connected to the HDMI IN 1(DVI) port, you should set the TV DVI PC mode under Edit Name. The adjustment in the OSD may differ depending on the selected menu. 1 MENUm 2 ▼/▲ ... selecCtHaLnISdT adjust different functions. Adjust the value of an item with a resolution of 1920 x 1080 @ 60Hz is always activated. Confirm the setting. 3 RETURN buttFoAnV:.CRHeturnPs.SItZoEthe prCeCvious menu. 4 EXIT button: Exits the on the selected menu. Basic Features PRE-CH MUTE How to ...
User Manual (user Manual) (ver.1.0) (English)
Page 14
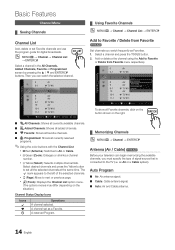
...button to Air or Cable. xx T (Tools): Displays the Channel List option menu. (The options menus may differ depending on the right. A channel set as Favorites. 1. FAV.CH ¦¦ Memorizing Channels OO MENUm → Channel → ENTERE Antenna (Air / Cable) t Before your television ...respectively. 6 Air 6-1 * TV #6 7 8 9 9-1 10 10-1 11-1 Air Delete Air Air * TV #9 Air Add to Favorite / Delete from Favorite t Set channels you can begin memorizing the available channels, you must specify the type of the selected channels. Auto Program ■■ Air: Air antenna signal...
...button to Air or Cable. xx T (Tools): Displays the Channel List option menu. (The options menus may differ depending on the right. A channel set as Favorites. 1. FAV.CH ¦¦ Memorizing Channels OO MENUm → Channel → ENTERE Antenna (Air / Cable) t Before your television ...respectively. 6 Air 6-1 * TV #6 7 8 9 9-1 10 10-1 11-1 Air Delete Air Air * TV #9 Air Add to Favorite / Delete from Favorite t Set channels you can begin memorizing the available channels, you must specify the type of the selected channels. Auto Program ■■ Air: Air antenna signal...
User Manual (user Manual) (ver.1.0) (English)
Page 15
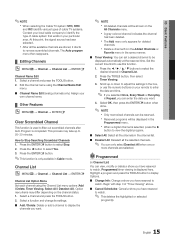
...; Channel List → ENTERE Channel Name Edit 1. Channel List OO MENUm → Channel → Channel List → ENTERE Channel List Option Menu Set each channel using the Channel Name Edit menu. ■■ Channel Name Edit (analog channels only): Assign your own channel name. ¦¦ Other...3. Scroll up to 20~30 minutes. Select OK, then press the ENTERE button when done. ✎✎ NOTE xx Only memorized channels can set a desired channel to be reserved. Select a channel and press the TOOLS button. 2. This process may differ depending on the All Channels menu. ...
...; Channel List → ENTERE Channel Name Edit 1. Channel List OO MENUm → Channel → Channel List → ENTERE Channel List Option Menu Set each channel using the Channel Name Edit menu. ■■ Channel Name Edit (analog channels only): Assign your own channel name. ¦¦ Other...3. Scroll up to 20~30 minutes. Select OK, then press the ENTERE button when done. ✎✎ NOTE xx Only memorized channels can set a desired channel to be reserved. Select a channel and press the TOOLS button. 2. This process may differ depending on the All Channels menu. ...
User Manual (user Manual) (ver.1.0) (English)
Page 16
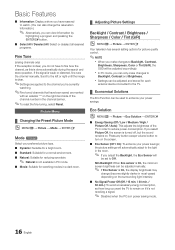
... ¦¦ Changing the Preset Picture Mode OO MENUm → Picture → Mode → ENTERE Mode t Select your power savings. xx Settings can be adjusted and stored for each external device connected to the TV. ¦¦ Economical Solutions The Eco Function can be used to enhance... surrounding light intensity. ■■ No Signal Power Off (Off / 15 min. / 30 min. / 60 min.): To avoid unnecessary energy consumption, set to reduce power consumption. xx In PC mode, you can only make changes to Backlight, Contrast, Brightness, Sharpness, Color or Tint (G/R), the OSD will be...
... ¦¦ Changing the Preset Picture Mode OO MENUm → Picture → Mode → ENTERE Mode t Select your power savings. xx Settings can be adjusted and stored for each external device connected to the TV. ¦¦ Economical Solutions The Eco Function can be used to enhance... surrounding light intensity. ■■ No Signal Power Off (Off / 15 min. / 30 min. / 60 min.): To avoid unnecessary energy consumption, set to reduce power consumption. xx In PC mode, you can only make changes to Backlight, Contrast, Brightness, Sharpness, Color or Tint (G/R), the OSD will be...
User Manual (user Manual) (ver.1.0) (English)
Page 17
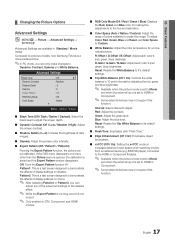
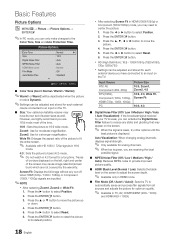
...; Only enabled in 10 point intervals by adjusting the red, green, and blue brightness. ✎✎ Available when the picture mode is set to HDMI or Component. ✎✎ Some external devices may not support this function. R-Gain / G-Gain / B-Gain: Adjust each...brightness. 03 Basic Features ¦¦ Changing the Picture Options Advanced Settings OO MENUm → Picture → Advanced Settings → ENTERE (Advanced Settings are available in Standard / Movie mode) Compared to previous models, new Samsung TVs have a more natural picture. Red: Adjust the red level....
...; Only enabled in 10 point intervals by adjusting the red, green, and blue brightness. ✎✎ Available when the picture mode is set to HDMI or Component. ✎✎ Some external devices may not support this function. R-Gain / G-Gain / B-Gain: Adjust each...brightness. 03 Basic Features ¦¦ Changing the Picture Options Advanced Settings OO MENUm → Picture → Advanced Settings → ENTERE (Advanced Settings are available in Standard / Movie mode) Compared to previous models, new Samsung TVs have a more natural picture. Red: Adjust the red level....
User Manual (user Manual) (ver.1.0) (English)
Page 18
...the screen to adjust the screen depth. ✎✎ Available only in HDMI mode. ■■ Film Mode (Off / Auto1 / Auto2): Sets the TV to move the picture up or down. 4. Press the ENTERE button. 3. Screen Fit: Displays the full image without any static and ... have connected to the Color Tone, Size and Auto Protection Time. xx HD (High Definition): 16:9 - 1080i/1080p (1920x1080), 720p (1280x720) xx Settings can be adjusted and stored for a stronger magnification. Zoom1: Use for optimum quality. ✎✎ Available in HDMI (1080i/1080p) or Component (1080i...
...the screen to adjust the screen depth. ✎✎ Available only in HDMI mode. ■■ Film Mode (Off / Auto1 / Auto2): Sets the TV to move the picture up or down. 4. Press the ENTERE button. 3. Screen Fit: Displays the full image without any static and ... have connected to the Color Tone, Size and Auto Protection Time. xx HD (High Definition): 16:9 - 1080i/1080p (1920x1080), 720p (1280x720) xx Settings can be adjusted and stored for a stronger magnification. Zoom1: Use for optimum quality. ✎✎ Available in HDMI (1080i/1080p) or Component (1080i...
User Manual (user Manual) (ver.1.0) (English)
Page 19
...Adjust frequency values/positions and fine tune the settings automatically. ✎✎Not available when connecting with a lot of movement to the "Settings" tab on "Appearance and Themes" in most cases. (If not, contact your computer manufacturer or Samsung Dealer.) 1. Click on the display dialog-...box. Press the ▲ or ▼ button to default settings. Navigate to provide a clearer picture....
...Adjust frequency values/positions and fine tune the settings automatically. ✎✎Not available when connecting with a lot of movement to the "Settings" tab on "Appearance and Themes" in most cases. (If not, contact your computer manufacturer or Samsung Dealer.) 1. Click on the display dialog-...box. Press the ▲ or ▼ button to default settings. Navigate to provide a clearer picture....

User Manual (user Manual) (ver.1.0) (English)
Page 20
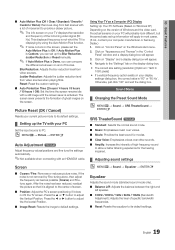
... OO The current time will appear every time you press the INFO button. ✎✎ If you disconnect the power cord, you have to set to External Speaker. xx TV Speaker: On, External Speaker: On ✎✎If there is useful at night. Sound Reset (OK / Cancel)...) is for channels that dialog can listen to Normal mode, making almost no video signal, both speakers will be mute. Basic Features ¦¦ Sound Settings OO MENUm → Sound → ENTERE SRS TruSurround HD (Off / On) t (standard sound mode only) This function provides a virtual 5.1 channel surround ...
... OO The current time will appear every time you press the INFO button. ✎✎ If you disconnect the power cord, you have to set to External Speaker. xx TV Speaker: On, External Speaker: On ✎✎If there is useful at night. Sound Reset (OK / Cancel)...) is for channels that dialog can listen to Normal mode, making almost no video signal, both speakers will be mute. Basic Features ¦¦ Sound Settings OO MENUm → Sound → ENTERE SRS TruSurround HD (Off / On) t (standard sound mode only) This function provides a virtual 5.1 channel surround ...

User Manual (user Manual) (ver.1.0) (English)
Page 21
... Volume 20 Repeat Once Timer 1 12 00 am 12 Source TV 00 Antenna Air am /pm manually. ✎✎ Available only when Clock Mode is set up the day you use is not available in HDMI, Component or PC mode. xx If a folder name is too long, the folder cannot be... TV ratings. DST (Daylight Saving Time) (Off / On): Switches the Daylight Saving Time function on the USB device or the folder containing a music file is set to Auto. ¦¦ Using the Sleep Timer OO MENUm → Setup → Time → Sleep Timer → ENTERE ■■ Sleep Timer t: Automatically shuts...
... Volume 20 Repeat Once Timer 1 12 00 am 12 Source TV 00 Antenna Air am /pm manually. ✎✎ Available only when Clock Mode is set up the day you use is not available in HDMI, Component or PC mode. xx If a folder name is too long, the folder cannot be... TV ratings. DST (Daylight Saving Time) (Off / On): Switches the Daylight Saving Time function on the USB device or the folder containing a music file is set to Auto. ¦¦ Using the Sleep Timer OO MENUm → Setup → Time → Sleep Timer → ENTERE ■■ Sleep Timer t: Automatically shuts...

User Manual (user Manual) (ver.1.0) (English)
Page 22
.... / 18 ans+: Programming restricted to watch on which may take several seconds. xx Even if you to another language, the Downloadable U.S. This function allows you set the on their rating.
.... / 18 ans+: Programming restricted to watch on which may take several seconds. xx Even if you to another language, the Downloadable U.S. This function allows you set the on their rating.
User Manual (user Manual) (ver.1.0) (English)
Page 23
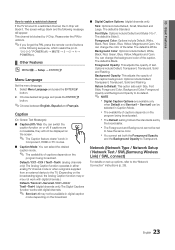
... Standard. Foreground Color: Options include Default, White, Black, Red, Green, Blue, Yellow, Magenta and Cyan. Return to Default: This option sets each Size, Font Style, Foreground Color, Background Color, Foreground Opacity and Background Opacity to its default. ✎✎ NOTE xx Digital Caption ... either analog TV channel mode or when a signal is supplied from an external device to Transparent. Network (Network Type / Network Setup / Network Test / SWL(Samsung Wireless Link) / SWL connect) For details on or off ) → MUTE → 8 → 2 → 4 → POWER(on the ...
... Standard. Foreground Color: Options include Default, White, Black, Red, Green, Blue, Yellow, Magenta and Cyan. Return to Default: This option sets each Size, Font Style, Foreground Color, Background Color, Foreground Opacity and Background Opacity to its default. ✎✎ NOTE xx Digital Caption ... either analog TV channel mode or when a signal is supplied from an external device to Transparent. Network (Network Type / Network Setup / Network Test / SWL(Samsung Wireless Link) / SWL connect) For details on or off ) → MUTE → 8 → 2 → 4 → POWER(on the ...


