Brochure
Page 2
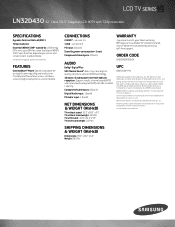
...: 2 (back) Audio Dolby® Digital Plus SRS TheaterSound®: Get crisp, clear digitalquality sound via the remote. Environmental Protection Agency. All other product and brand names are trademarks of SRS Labs, Inc. See www.energystar....registered trademarks of the U. SRS TheaterSound is a registered trademark of HDMI Licensing LLC. order code LN32D430G3DXZA UPC 036725234741 ©2011 Samsung Electronics America, Inc. Samsung is a registered trademark of Samsung Electronics Co., Ltd. Connections 2 HDMI® - shipping dimensions & weight (wxhxd) Dimensions: ...
...: 2 (back) Audio Dolby® Digital Plus SRS TheaterSound®: Get crisp, clear digitalquality sound via the remote. Environmental Protection Agency. All other product and brand names are trademarks of SRS Labs, Inc. See www.energystar....registered trademarks of the U. SRS TheaterSound is a registered trademark of HDMI Licensing LLC. order code LN32D430G3DXZA UPC 036725234741 ©2011 Samsung Electronics America, Inc. Samsung is a registered trademark of Samsung Electronics Co., Ltd. Connections 2 HDMI® - shipping dimensions & weight (wxhxd) Dimensions: ...

User Manual
Page 6
English NN When you press the CH LIST button on your TV displays (added channels) when you press the Channel button on the remote control, the Channel List Added Channels 6-1 TV#6 ◀ Channel List screen is displayed at once. 7-1 a3 TV#7 Air ▶ 23 TV#23 ●● Added...Each group has a separate screen. ■■ Channel List OOCONTENT → Watch TV → Channel List → ENTERE The Channel List contains the channels your remote control. On the Channel List, you can view Added Channels, channel information, Favorites, and manage channels.
English NN When you press the CH LIST button on your TV displays (added channels) when you press the Channel button on the remote control, the Channel List Added Channels 6-1 TV#6 ◀ Channel List screen is displayed at once. 7-1 a3 TV#7 Air ▶ 23 TV#23 ●● Added...Each group has a separate screen. ■■ Channel List OOCONTENT → Watch TV → Channel List → ENTERE The Channel List contains the channels your remote control. On the Channel List, you can view Added Channels, channel information, Favorites, and manage channels.

User Manual
Page 13
... Channel Manager section for ◀ information. ▶ Options ●● Watch: Watch the channel you are not currently watching. To use, select Watch on your remote control. 3. 1.
... Channel Manager section for ◀ information. ▶ Options ●● Watch: Watch the channel you are not currently watching. To use, select Watch on your remote control. 3. 1.

User Manual
Page 14
The Add to Favorites screen appears. 2. Select a group ◀ using the up and down arrows on your remote control, and then press ▶ ENTERE. 3. English The Add to Favorites screen has five groups, Favorites 1, Favorites 2, etc. Select Add to the Favorites List: 1. ●&#...
The Add to Favorites screen appears. 2. Select a group ◀ using the up and down arrows on your remote control, and then press ▶ ENTERE. 3. English The Add to Favorites screen has five groups, Favorites 1, Favorites 2, etc. Select Add to the Favorites List: 1. ●&#...

User Manual
Page 16
... and select the channel. ●● Add / Delete: Add a channel or delete a channel from the Channel List: 1. When you use the channel button on your remote control to a channel. Deleting a Channel from the channel list. Select OK on the channel list. ●● Channel Name Edit (analog channels only): Assign a name...
... and select the channel. ●● Add / Delete: Add a channel or delete a channel from the Channel List: 1. When you use the channel button on your remote control to a channel. Deleting a Channel from the channel list. Select OK on the channel list. ●● Channel Name Edit (analog channels only): Assign a name...

User Manual
Page 17
... All Channels list indicates the channel has been deleted from the channel list, on the All Channels list. ●● A gray-colored channel on your remote control. Select a deleted channel on the All Channels list, and then press the ENTERE button.
... All Channels list indicates the channel has been deleted from the channel list, on the All Channels list. ●● A gray-colored channel on your remote control. Select a deleted channel on the All Channels list, and then press the ENTERE button.
User Manual
Page 20
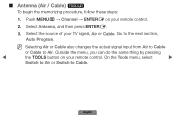
.... Outside the menu, you can do the same thing by pressing ◀ the TOOLS button on your remote control. 2. ■■ Antenna (Air / Cable) t To begin the memorizing procedure, follow these steps: 1. Go to Air. English NN Selecting Air or Cable also changes ...
.... Outside the menu, you can do the same thing by pressing ◀ the TOOLS button on your remote control. 2. ■■ Antenna (Air / Cable) t To begin the memorizing procedure, follow these steps: 1. Go to Air. English NN Selecting Air or Cable also changes ...

User Manual
Page 21
... If you selected Air or Cable or both by highlighting and then pressing ENTERE. Push MENUm → Channel → ENTERE on the Antenna screen, your remote control. 2. Select Auto Program, and then press ENTERE. 3. To start Auto Program, follow these steps: 1.
... If you selected Air or Cable or both by highlighting and then pressing ENTERE. Push MENUm → Channel → ENTERE on the Antenna screen, your remote control. 2. Select Auto Program, and then press ENTERE. 3. To start Auto Program, follow these steps: 1.

User Manual
Page 60
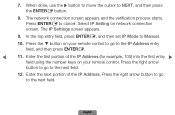
... to go to the next field. ◀ 8. Repeat the entry process for example, 105) into the first entry field using the number keys on your remote control. 4. In the top entry field, press ENTERE, and then set IP Mode to the IP Address entry field, and then press ENTERE. 6. English Enter... the first portion of the IP Address. Press the ▼ button on your remote control to go to Manual. 5. You can also press the up or down arrow button to correct it. Enter the next portion of the IP...
... to go to the next field. ◀ 8. Repeat the entry process for example, 105) into the first entry field using the number keys on your remote control. 4. In the top entry field, press ENTERE, and then set IP Mode to the IP Address entry field, and then press ENTERE. 6. English Enter... the first portion of the IP Address. Press the ▼ button on your remote control to go to Manual. 5. You can also press the up or down arrow button to correct it. Enter the next portion of the IP...
User Manual
Page 70
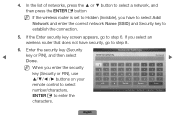
...; button to step 6. NN If the wireless router is set to Hidden (Invisible), you enter the security a b c d e f 1 2 3 g h i j k l 4 5 6 key (Security or PIN), use m n o p q r 7 8 9 buttons on your s t u v w x y z 0 remote control to establish the connection. 5. If you select an wireless router that does not have to select Add Network and enter the correct network Name...
...; button to step 6. NN If the wireless router is set to Hidden (Invisible), you enter the security a b c d e f 1 2 3 g h i j k l 4 5 6 key (Security or PIN), use m n o p q r 7 8 9 buttons on your s t u v w x y z 0 remote control to establish the connection. 5. If you select an wireless router that does not have to select Add Network and enter the correct network Name...
User Manual
Page 71
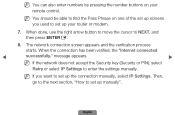
..., the "Internet connected ◀ successfully." NN If you used to set up manually". English Then, go to the next section, "How to set up your remote control. When done, use the right arrow button to move the cursor to enter the settings manually.
..., the "Internet connected ◀ successfully." NN If you used to set up manually". English Then, go to the next section, "How to set up your remote control. When done, use the right arrow button to move the cursor to enter the settings manually.

User Manual
Page 74
... key (Security key or PIN), use ▲/▼/◄ /► buttons on one of the set up screens ▶ you used to set up your remote control to find the Pass Phrase on your router or modem. Press ENTERE to step 6. 5. Enter the security key (Security key or PIN), and then... select Done. NN You can also enter numbers by pressing the number buttons on your remote control. ◀ NN You should be able to select number/characters. English If the Enter security key screen appears, go to step 8. 6.
... key (Security key or PIN), use ▲/▼/◄ /► buttons on one of the set up screens ▶ you used to set up your remote control to find the Pass Phrase on your router or modem. Press ENTERE to step 6. 5. Enter the security key (Security key or PIN), and then... select Done. NN You can also enter numbers by pressing the number buttons on your remote control. ◀ NN You should be able to select number/characters. English If the Enter security key screen appears, go to step 8. 6.
User Manual
Page 75
... the top entry field, press ENTERE, and then set IP Mode to NEXT, and then press the ENTERE button. 8. English Select IP Setting on your remote control. Enter the first portion of the IP Address. Enter the next portion of the IP Address (for example, 105) into the first entry ▶...; field using the number keys on your remote control to go to cancel. Press ENTERE to the IP Address entry field, and then press ENTERE. ◀ 11.
... the top entry field, press ENTERE, and then set IP Mode to NEXT, and then press the ENTERE button. 8. English Select IP Setting on your remote control. Enter the first portion of the IP Address. Enter the next portion of the IP Address (for example, 105) into the first entry ▶...; field using the number keys on your remote control to go to cancel. Press ENTERE to the IP Address entry field, and then press ENTERE. ◀ 11.

User Manual
Page 101
... is blocked by Program Rating Lock. Enter the PIN to unblock the program or movie. ▶ NN If you forget the PIN code, press the remote control buttons in the following message will go blank and the following sequence in Standby mode, which resets the PIN to ◀ unblock. The TV...
... is blocked by Program Rating Lock. Enter the PIN to unblock the program or movie. ▶ NN If you forget the PIN code, press the remote control buttons in the following message will go blank and the following sequence in Standby mode, which resets the PIN to ◀ unblock. The TV...
User Manual
Page 106
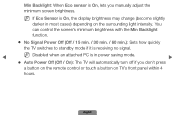
... in most cases) depending on TV's front panel within 4 hours. English Min Backlight: When Eco sensor is On, lets you don't press a button on the remote control or touch a button on the surrounding light intensity.
... in most cases) depending on TV's front panel within 4 hours. English Min Backlight: When Eco sensor is On, lets you don't press a button on the remote control or touch a button on the surrounding light intensity.

User Manual
Page 115
●● Menu Transparency (Bright / Dark): Set the Transparency of names (for example, Home TV) or by selecting from a list of the menu. ●● Boot Logo (Off / On): Display the Samsung logo when the TV is turned on the screen and you can key in a name for LCD 550 series : Lets you change the TV's name by keying in a name manually. NN If you select User Input, a keyboard appears on . ●● TV name for your TV manually using your remote control. ◀ ▶ English
●● Menu Transparency (Bright / Dark): Set the Transparency of names (for example, Home TV) or by selecting from a list of the menu. ●● Boot Logo (Off / On): Display the Samsung logo when the TV is turned on the screen and you can key in a name for LCD 550 series : Lets you change the TV's name by keying in a name manually. NN If you select User Input, a keyboard appears on . ●● TV name for your TV manually using your remote control. ◀ ▶ English

User Manual
Page 118
For more details, refer to connect with and control the TV. ■■ Network Remote Control (On / Off) for LCD 550 series Turn on/off or give permission to Samsung mobile phones devices to each device's manual. ◀ ▶ English You must have a Samsung Mobile phone/device which supports Network Remote Control.
For more details, refer to connect with and control the TV. ■■ Network Remote Control (On / Off) for LCD 550 series Turn on/off or give permission to Samsung mobile phones devices to each device's manual. ◀ ▶ English You must have a Samsung Mobile phone/device which supports Network Remote Control.

User Manual
Page 142
You can use the � (REW), µ (FF), Pause, Stop, and Play buttons on the ◀ top with its playing time. The file name appears on the bottom of your remote control during playback. L Jump T Tools R Return ▶ -- Press the ENTERE button or � (Play) button. -- ■■ Videos Playing a Video 1. English If video time information is unknown, playing time and the progress bar are not displayed. -- Press the button to select the desired video in the file list. 2.
You can use the � (REW), µ (FF), Pause, Stop, and Play buttons on the ◀ top with its playing time. The file name appears on the bottom of your remote control during playback. L Jump T Tools R Return ▶ -- Press the ENTERE button or � (Play) button. -- ■■ Videos Playing a Video 1. English If video time information is unknown, playing time and the progress bar are not displayed. -- Press the button to select the desired video in the file list. 2.

User Manual
Page 151
Music ▶ E Play L Page T Tools R Return English Press the ENTERE button or � (Play) button. -- ■■ Music Playing Music 1. Press the button to select the desired music file in the file list. 2. You can use the � (REW), ◀ µ (FF), Pause, Stop, and Play buttons on the bottom of your remote control during playback.
Music ▶ E Play L Page T Tools R Return English Press the ENTERE button or � (Play) button. -- ■■ Music Playing Music 1. Press the button to select the desired music file in the file list. 2. You can use the � (REW), ◀ µ (FF), Pause, Stop, and Play buttons on the bottom of your remote control during playback.

User Manual
Page 155
NN During a Slide Show, press the TOOLS button to play. NN You can add background music to a slide show . ◀ ▶ English NN You can use the Pause, Stop, and Play buttons on your remote control during a slide show if you have music files on the bottom of your USB device or PC by setting Background Music to On in the Tools menu, and then selecting music files to access additional functions such as Slide Show Speed, Background Music, Zoom, and Rotate.
NN During a Slide Show, press the TOOLS button to play. NN You can add background music to a slide show . ◀ ▶ English NN You can use the Pause, Stop, and Play buttons on your remote control during a slide show if you have music files on the bottom of your USB device or PC by setting Background Music to On in the Tools menu, and then selecting music files to access additional functions such as Slide Show Speed, Background Music, Zoom, and Rotate.

