
Open Source Guide (ENGLISH)
Page 1
The original manual has wrong versions of the Program into another work based on , we are not derived from the Program is intended to apply in themselves, then ... the Free Software Foundation, write to incorporate parts of the GPL and LGPL. The precise terms and conditions for questions regarding open sources, contact Samsung via Email (vdswmanager@samsung. If identifiable sections of this License. However, parties who places the Program under the terms of Section 1 above .) The source code for a work...
The original manual has wrong versions of the Program into another work based on , we are not derived from the Program is intended to apply in themselves, then ... the Free Software Foundation, write to incorporate parts of the GPL and LGPL. The precise terms and conditions for questions regarding open sources, contact Samsung via Email (vdswmanager@samsung. If identifiable sections of this License. However, parties who places the Program under the terms of Section 1 above .) The source code for a work...

User Manual (ENGLISH)
Page 4
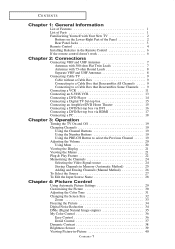
... Antennas with 300-ohm Flat Twin Leads 7 Antennas with 75-ohm Round Leads 8 Separate VHF and UHF Antennas 8 Connecting Cable TV 9 Cable without a Cable Box 9 Connecting to a Cable Box that Descrambles All Channels . . . . . 9 Connecting ...Signal-source 24 Storing Channels in Memory (Automatic Method 25 Adding and Erasing Channels (Manual Method 26 To Select the Source 27 To Edit the Input Source Name 28 Chapter...29 Customizing the Picture 30 Adjusting the Color Tone 31 Changing the Screen Size 32 Zoom 33 Freezing the Picture 34 Digital Noise Reduction 34 DNIe (Digital Natural Image...
... Antennas with 300-ohm Flat Twin Leads 7 Antennas with 75-ohm Round Leads 8 Separate VHF and UHF Antennas 8 Connecting Cable TV 9 Cable without a Cable Box 9 Connecting to a Cable Box that Descrambles All Channels . . . . . 9 Connecting ...Signal-source 24 Storing Channels in Memory (Automatic Method 25 Adding and Erasing Channels (Manual Method 26 To Select the Source 27 To Edit the Input Source Name 28 Chapter...29 Customizing the Picture 30 Adjusting the Color Tone 31 Changing the Screen Size 32 Zoom 33 Freezing the Picture 34 Digital Noise Reduction 34 DNIe (Digital Natural Image...

User Manual (ENGLISH)
Page 19
... on the DVD player. DVD Player Rear Panel Audio Cable (Option) Component Cable (Option) TV Rear Panel Note: For an explanation of Component video, see your DVD player owner's manual. English-14 Be sure to your TV. 1 Connect an audio cable between the COMPONENT IN 1 or COMPONENT IN 2 [PR, PB..., Y] jacks on the TV and the COMPONENT [Y, PB, PR] jacks on the DVD player. CONNECTIONS ...
... on the DVD player. DVD Player Rear Panel Audio Cable (Option) Component Cable (Option) TV Rear Panel Note: For an explanation of Component video, see your DVD player owner's manual. English-14 Be sure to your TV. 1 Connect an audio cable between the COMPONENT IN 1 or COMPONENT IN 2 [PR, PB..., Y] jacks on the TV and the COMPONENT [Y, PB, PR] jacks on the DVD player. CONNECTIONS ...

User Manual (ENGLISH)
Page 20
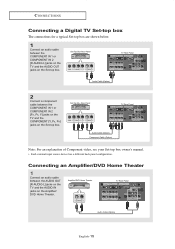
... Panel Note: For an explanation of Component video, see your Set-top box owner's manual. * Each external input source device has a different back panel configuration. Amplifier/DVD Home Theater TV Rear Panel Audio Cable (Option) English-15 Connecting an Amplifier/DVD Home Theater 1 Connect an audio cable...) 2 Connect a component cable between the COMPONENT IN 1 or COMPONENT IN 2 [R-AUDIO-L] jacks on the TV and the AUDIO OUT jacks on the Set-top box. CONNECTIONS Connecting a Digital TV Set-top box The connections for a typical Set-top box are shown below. 1 Connect an audio cable ...
... Panel Note: For an explanation of Component video, see your Set-top box owner's manual. * Each external input source device has a different back panel configuration. Amplifier/DVD Home Theater TV Rear Panel Audio Cable (Option) English-15 Connecting an Amplifier/DVD Home Theater 1 Connect an audio cable...) 2 Connect a component cable between the COMPONENT IN 1 or COMPONENT IN 2 [R-AUDIO-L] jacks on the TV and the AUDIO OUT jacks on the Set-top box. CONNECTIONS Connecting a Digital TV Set-top box The connections for a typical Set-top box are shown below. 1 Connect an audio cable ...
User Manual (ENGLISH)
Page 29
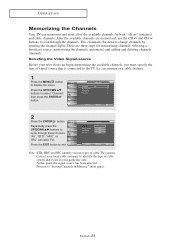
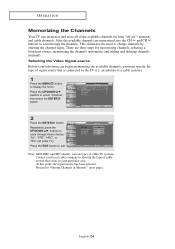
... the UP/DOWN buttons to change channels by entering the channel digits. Note: STD, HRC and IRC identify various types of cable TV systems. Contact your local cable company to identify the type of cable system that is connected to scan through these choices: "Air",... P E R AT I O N Memorizing the Channels Your TV can begin memorizing the available channels, you must specify the type of the available channels for memorizing channels: selecting a broadcast source, memorizing the channels (automatic) and adding and deleting channels (manual). an antenna or a cable system). 1 Press the MENU ...
... the UP/DOWN buttons to change channels by entering the channel digits. Note: STD, HRC and IRC identify various types of cable TV systems. Contact your local cable company to identify the type of cable system that is connected to scan through these choices: "Air",... P E R AT I O N Memorizing the Channels Your TV can begin memorizing the available channels, you must specify the type of the available channels for memorizing channels: selecting a broadcast source, memorizing the channels (automatic) and adding and deleting channels (manual). an antenna or a cable system). 1 Press the MENU ...
User Manual (ENGLISH)
Page 31
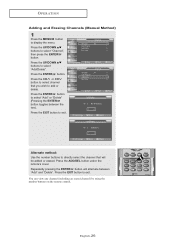
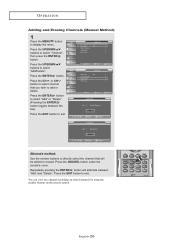
... an erased channel) by using the number buttons on the remote control. Press the ENTER button to display the menu. O P E R AT I O N Adding and Erasing Channels (Manual Method) 1 Press the MENU button to select "Add" or "Delete" (Pressing the ENTER button toggles between "Add" and "Delete". Press the CH or CH button...
... an erased channel) by using the number buttons on the remote control. Press the ENTER button to display the menu. O P E R AT I O N Adding and Erasing Channels (Manual Method) 1 Press the MENU button to select "Add" or "Delete" (Pressing the ENTER button toggles between "Add" and "Delete". Press the CH or CH button...
User Manual (ENGLISH)
Page 55
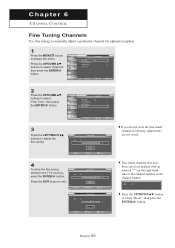
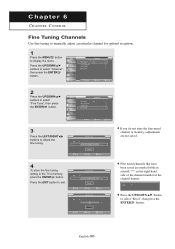
...not store the fine-tuned channel in memory, adjustments are marked with an asterisk "*" on the right-hand side of the channel number in the TV's memory, press the ENTER button. Press the UP/DOWN buttons to select "Channel", then press the ENTER button. 2 Press the UP/DOWN ..."Fine Tune", then press the ENTER button. 3 Press the LEFT/RIGHT buttons to exit. Chapter 6 CHANNEL CONTROL Fine Tuning Channels Use fine tuning to manually adjust a particular channel for optimal reception. 1 Press the MENU button to select "Reset", than press the ENTER button. Press the UP/DOWN button to...
...not store the fine-tuned channel in memory, adjustments are marked with an asterisk "*" on the right-hand side of the channel number in the TV's memory, press the ENTER button. Press the UP/DOWN buttons to select "Channel", then press the ENTER button. 2 Press the UP/DOWN ..."Fine Tune", then press the ENTER button. 3 Press the LEFT/RIGHT buttons to exit. Chapter 6 CHANNEL CONTROL Fine Tuning Channels Use fine tuning to manually adjust a particular channel for optimal reception. 1 Press the MENU button to select "Reset", than press the ENTER button. Press the UP/DOWN button to...

User Manual (ENGLISH)
Page 85
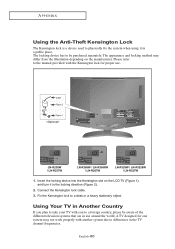
... from the illustration depending on the LCD TV (Figure 1), and turn it in a public place. Insert the locking device into the Kensington slot on the manufacturer. A TV designed for proper use around the ...manual provided with another system due to differences in the TV channel frequencies. Fix the Kensington lock to a desk or a heavy stationary object. Using Your TV in Another Country If you plan to take your TV with you to a foreign country, please be purchased separately. Cable Figure 2 Figure 1 LN-R238W / LN-R237W LN-R268W / LN-R2668W / LN-R267W LN-R328W / LN-R3228W / LN...
... from the illustration depending on the LCD TV (Figure 1), and turn it in a public place. Insert the locking device into the Kensington slot on the manufacturer. A TV designed for proper use around the ...manual provided with another system due to differences in the TV channel frequencies. Fix the Kensington lock to a desk or a heavy stationary object. Using Your TV in Another Country If you plan to take your TV with you to a foreign country, please be purchased separately. Cable Figure 2 Figure 1 LN-R238W / LN-R237W LN-R268W / LN-R2668W / LN-R267W LN-R328W / LN-R3228W / LN...
User Manual (ENGLISH)
Page 4
... Antennas with 300-ohm Flat Twin Leads 7 Antennas with 75-ohm Round Leads 8 Separate VHF and UHF Antennas 8 Connecting Cable TV 9 Cable without a Cable Box 9 Connecting to a Cable Box that Descrambles All Channels . . . . . 9 Connecting ...Signal-source 24 Storing Channels in Memory (Automatic Method 25 Adding and Erasing Channels (Manual Method 26 To Select the Source 27 To Edit the Input Source Name 28 Chapter...29 Customizing the Picture 30 Adjusting the Color Tone 31 Changing the Screen Size 32 Zoom 33 Freezing the Picture 34 Digital Noise Reduction 34 DNIe (Digital Natural Image...
... Antennas with 300-ohm Flat Twin Leads 7 Antennas with 75-ohm Round Leads 8 Separate VHF and UHF Antennas 8 Connecting Cable TV 9 Cable without a Cable Box 9 Connecting to a Cable Box that Descrambles All Channels . . . . . 9 Connecting ...Signal-source 24 Storing Channels in Memory (Automatic Method 25 Adding and Erasing Channels (Manual Method 26 To Select the Source 27 To Edit the Input Source Name 28 Chapter...29 Customizing the Picture 30 Adjusting the Color Tone 31 Changing the Screen Size 32 Zoom 33 Freezing the Picture 34 Digital Noise Reduction 34 DNIe (Digital Natural Image...

User Manual (ENGLISH)
Page 19
.... CONNECTIONS Connecting a DVD Player The rear panel jacks on your TV make it easy to connect a DVD player to your DVD player owner's manual. DVD Player Rear Panel Audio Cable (Option) Component Cable (Option) TV Rear Panel Note: For an explanation of Component video, see your... TV. 1 Connect an audio cable between the COMPONENT IN 1 or COMPONENT IN 2 [PR, PB, Y] jacks on the TV and the COMPONENT [Y, ...
.... CONNECTIONS Connecting a DVD Player The rear panel jacks on your TV make it easy to connect a DVD player to your DVD player owner's manual. DVD Player Rear Panel Audio Cable (Option) Component Cable (Option) TV Rear Panel Note: For an explanation of Component video, see your... TV. 1 Connect an audio cable between the COMPONENT IN 1 or COMPONENT IN 2 [PR, PB, Y] jacks on the TV and the COMPONENT [Y, ...
User Manual (ENGLISH)
Page 20
... for a typical Set-top box are shown below. 1 Connect an audio cable between the COMPONENT IN 1 or COMPONENT IN 2 [R-AUDIO-L] jacks on the TV and the AUDIO OUT jacks on the Amplifier/ DVD Home Theater. Connecting an Amplifier/DVD Home Theater 1 Connect an audio cable between the COMPONENT IN...the AUDIO OUT [R-AUDIO-L] jacks on the TV and the AUDIO IN jacks on the Set-top box. Set-Top Box Rear Panel Audio Cable (Option) Component Cable (Option) TV Rear Panel Note: For an explanation of Component video, see your Set-top box owner's manual. * Each external input source device has a...
... for a typical Set-top box are shown below. 1 Connect an audio cable between the COMPONENT IN 1 or COMPONENT IN 2 [R-AUDIO-L] jacks on the TV and the AUDIO OUT jacks on the Amplifier/ DVD Home Theater. Connecting an Amplifier/DVD Home Theater 1 Connect an audio cable between the COMPONENT IN...the AUDIO OUT [R-AUDIO-L] jacks on the TV and the AUDIO IN jacks on the Set-top box. Set-Top Box Rear Panel Audio Cable (Option) Component Cable (Option) TV Rear Panel Note: For an explanation of Component video, see your Set-top box owner's manual. * Each external input source device has a...
User Manual (ENGLISH)
Page 29
...are three steps for both "off-air" (antenna) and cable channels. Note: STD, HRC and IRC identify various types of cable TV systems. Contact your local cable company to identify the type of cable system that is connected to "Storing Channels in your television can memorize... and store all cable TV). O P E R AT I O N Memorizing the Channels Your TV can begin memorizing the available channels, you must specify the type of the available channels for memorizing channels: selecting a...
...are three steps for both "off-air" (antenna) and cable channels. Note: STD, HRC and IRC identify various types of cable TV systems. Contact your local cable company to identify the type of cable system that is connected to "Storing Channels in your television can memorize... and store all cable TV). O P E R AT I O N Memorizing the Channels Your TV can begin memorizing the available channels, you must specify the type of the available channels for memorizing channels: selecting a...
User Manual (ENGLISH)
Page 31
Press the ENTER button to add or delete. Press the ADD/DEL button under the remote's cover. English-26 O P E R AT I O N Adding and Erasing Channels (Manual Method) 1 Press the MENU button to select "Add/Delete". Repeatedly pressing the ENTER button will be added or erased. Alternate method: Use the number buttons ...
Press the ENTER button to add or delete. Press the ADD/DEL button under the remote's cover. English-26 O P E R AT I O N Adding and Erasing Channels (Manual Method) 1 Press the MENU button to select "Add/Delete". Repeatedly pressing the ENTER button will be added or erased. Alternate method: Use the number buttons ...
User Manual (ENGLISH)
Page 55
... Tune", then press the ENTER button. 3 Press the LEFT/RIGHT buttons to display the menu. Chapter 6 CHANNEL CONTROL Fine Tuning Channels Use fine tuning to manually adjust a particular channel for optimal reception. 1 Press the MENU button to adjust the fine tuning. 4 To store the fine tuning setting in the...
... Tune", then press the ENTER button. 3 Press the LEFT/RIGHT buttons to display the menu. Chapter 6 CHANNEL CONTROL Fine Tuning Channels Use fine tuning to manually adjust a particular channel for optimal reception. 1 Press the MENU button to adjust the fine tuning. 4 To store the fine tuning setting in the...
User Manual (ENGLISH)
Page 85
... due to the manual provided with the Kensington lock for one system may differ from the illustration depending on the LCD TV (Figure 1), and turn it in use . English-80 Insert the locking device into the Kensington slot on the manufacturer. Cable Figure 2 Figure 1 LN-R238W / LN-R237W LN-R268W / LN-R2668W / LN-R267W LN-R328W / LN-R3228W / LN-R327W 1. Connect the...
... due to the manual provided with the Kensington lock for one system may differ from the illustration depending on the LCD TV (Figure 1), and turn it in use . English-80 Insert the locking device into the Kensington slot on the manufacturer. Cable Figure 2 Figure 1 LN-R238W / LN-R237W LN-R268W / LN-R2668W / LN-R267W LN-R328W / LN-R3228W / LN-R327W 1. Connect the...


