

Open Source Guide (ENGLISH)
Page 1
... to it . These restrictions translate to any warranty; The precise terms and conditions for questions regarding open sources, contact Samsung via Email (vdswmanager@samsung. This License applies to certain responsibilities for this License; Any attempt otherwise to work as separate works. To protect your... (whether by the two goals of preserving the free status of all its terms and conditions for software interchange; The original manual has wrong versions of free software, we want its recipients to freedom, not price. To send inquiries and requests for copying...
... to it . These restrictions translate to any warranty; The precise terms and conditions for questions regarding open sources, contact Samsung via Email (vdswmanager@samsung. This License applies to certain responsibilities for this License; Any attempt otherwise to work as separate works. To protect your... (whether by the two goals of preserving the free status of all its terms and conditions for software interchange; The original manual has wrong versions of free software, we want its recipients to freedom, not price. To send inquiries and requests for copying...

User Manual (ENGLISH)
Page 4
... Connecting VHF and UHF Antennas 7 Antennas with 300-ohm Flat Twin Leads 7 Antennas with 75-ohm Round Leads 8 Separate VHF and UHF Antennas 8 Connecting Cable TV 9 Cable without a Cable Box 9 Connecting to a Cable Box that Descrambles All Channels . . . . . 9 Connecting to a Cable Box that Descrambles Some Channels...Memorizing the Channels 24 Selecting the Video Signal-source 24 Storing Channels in Memory (Automatic Method 25 Adding and Erasing Channels (Manual Method 26 To Select the Source 27 To Edit the Input Source Name 28 Chapter 4: Picture Control Using Automatic Picture ...
... Connecting VHF and UHF Antennas 7 Antennas with 300-ohm Flat Twin Leads 7 Antennas with 75-ohm Round Leads 8 Separate VHF and UHF Antennas 8 Connecting Cable TV 9 Cable without a Cable Box 9 Connecting to a Cable Box that Descrambles All Channels . . . . . 9 Connecting to a Cable Box that Descrambles Some Channels...Memorizing the Channels 24 Selecting the Video Signal-source 24 Storing Channels in Memory (Automatic Method 25 Adding and Erasing Channels (Manual Method 26 To Select the Source 27 To Edit the Input Source Name 28 Chapter 4: Picture Control Using Automatic Picture ...

User Manual (ENGLISH)
Page 19
...the component video and audio connections. CONNECTIONS Connecting a DVD Player The rear panel jacks on your TV make it easy to connect a DVD player to your DVD player owner's manual. DVD Player Rear Panel TV Rear Panel Audio Cable (Option) 2 Connect a component cable between the COMPONENT IN 1 or... COMPONENT IN 2 [R-AUDIO-L] jacks on the TV and the AUDIO OUT jacks on the DVD player. Be sure ...
...the component video and audio connections. CONNECTIONS Connecting a DVD Player The rear panel jacks on your TV make it easy to connect a DVD player to your DVD player owner's manual. DVD Player Rear Panel TV Rear Panel Audio Cable (Option) 2 Connect a component cable between the COMPONENT IN 1 or... COMPONENT IN 2 [R-AUDIO-L] jacks on the TV and the AUDIO OUT jacks on the DVD player. Be sure ...

User Manual (ENGLISH)
Page 20
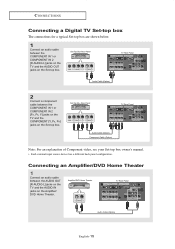
... explanation of Component video, see your Set-top box owner's manual. * Each external input source device has a different back panel configuration. Amplifier/DVD Home Theater TV Rear Panel Audio Cable (Option) English-15 CONNECTIONS Connecting a Digital TV Set-top box The connections for a typical Set-top box ... an audio cable between the COMPONENT IN 1 or COMPONENT IN 2 [PR, PB, Y] jacks on the TV and the COMPONENT [Y, PB, PR] jacks on the Set-top box. Set-Top Box Rear Panel TV Rear Panel Audio Cable (Option) 2 Connect a component cable between the COMPONENT IN 1 or COMPONENT IN 2...
... explanation of Component video, see your Set-top box owner's manual. * Each external input source device has a different back panel configuration. Amplifier/DVD Home Theater TV Rear Panel Audio Cable (Option) English-15 CONNECTIONS Connecting a Digital TV Set-top box The connections for a typical Set-top box ... an audio cable between the COMPONENT IN 1 or COMPONENT IN 2 [PR, PB, Y] jacks on the TV and the COMPONENT [Y, PB, PR] jacks on the Set-top box. Set-Top Box Rear Panel TV Rear Panel Audio Cable (Option) 2 Connect a component cable between the COMPONENT IN 1 or COMPONENT IN 2...
User Manual (ENGLISH)
Page 29
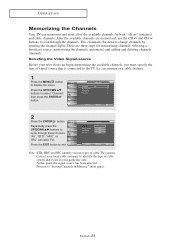
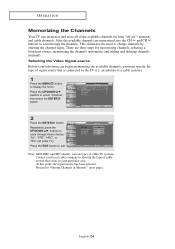
... or "IRC" (all of signal source that exists in Memory" (next page). O P E R AT I O N Memorizing the Channels Your TV can begin memorizing the available channels, you must specify the type of the available channels for memorizing channels: selecting a broadcast source, memorizing the channels (...automatic) and adding and deleting channels (manual). an antenna or a cable system). 1 Press the MENU button to select "Channel", then press the ENTER button. 2 Press the ...
... or "IRC" (all of signal source that exists in Memory" (next page). O P E R AT I O N Memorizing the Channels Your TV can begin memorizing the available channels, you must specify the type of the available channels for memorizing channels: selecting a broadcast source, memorizing the channels (...automatic) and adding and deleting channels (manual). an antenna or a cable system). 1 Press the MENU button to select "Channel", then press the ENTER button. 2 Press the ...
User Manual (ENGLISH)
Page 31
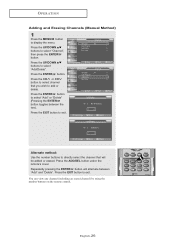
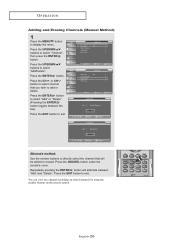
Alternate method: Use the number buttons to display the menu. English-26 O P E R AT I O N Adding and Erasing Channels (Manual Method) 1 Press the MENU button to directly select the channel that you wish to select "Channel", then press the ENTER button. Press the UP/DOWN ...
Alternate method: Use the number buttons to display the menu. English-26 O P E R AT I O N Adding and Erasing Channels (Manual Method) 1 Press the MENU button to directly select the channel that you wish to select "Channel", then press the ENTER button. Press the UP/DOWN ...
User Manual (ENGLISH)
Page 55
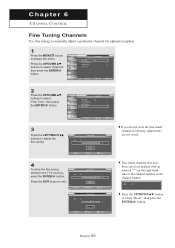
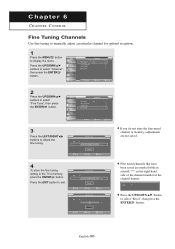
... memory, adjustments are marked with an asterisk "*" on the right-hand side of the channel number in the TV's memory, press the ENTER button. Chapter 6 CHANNEL CONTROL Fine Tuning Channels Use fine tuning to manually adjust a particular channel for optimal reception. 1 Press the MENU button to adjust the fine tuning. 4 To store...
... memory, adjustments are marked with an asterisk "*" on the right-hand side of the channel number in the TV's memory, press the ENTER button. Chapter 6 CHANNEL CONTROL Fine Tuning Channels Use fine tuning to manually adjust a particular channel for optimal reception. 1 Press the MENU button to adjust the fine tuning. 4 To store...

User Manual (ENGLISH)
Page 85
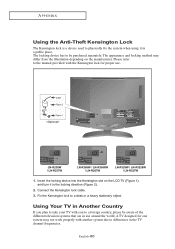
... lock for one system may differ from the illustration depending on the LCD TV (Figure 1), and turn it in a public place. Please refer to the manual provided with another system due to differences in the TV channel frequencies. Connect the Kensington lock cable. 3. Using Your TV in Another Country If you plan to take your... to a desk or a heavy stationary object. Fix the Kensington lock to be aware of the different television systems that are in use . Cable Figure 2 Figure 1 LN-R238W / LN-R237W LN-R268W / LN-R2668W / LN-R267W LN-R328W / LN-R3228W / LN-R327W 1.
... lock for one system may differ from the illustration depending on the LCD TV (Figure 1), and turn it in a public place. Please refer to the manual provided with another system due to differences in the TV channel frequencies. Connect the Kensington lock cable. 3. Using Your TV in Another Country If you plan to take your... to a desk or a heavy stationary object. Fix the Kensington lock to be aware of the different television systems that are in use . Cable Figure 2 Figure 1 LN-R238W / LN-R237W LN-R268W / LN-R2668W / LN-R267W LN-R328W / LN-R3228W / LN-R327W 1.
User Manual (ENGLISH)
Page 4
... Connecting VHF and UHF Antennas 7 Antennas with 300-ohm Flat Twin Leads 7 Antennas with 75-ohm Round Leads 8 Separate VHF and UHF Antennas 8 Connecting Cable TV 9 Cable without a Cable Box 9 Connecting to a Cable Box that Descrambles All Channels . . . . . 9 Connecting to a Cable Box that Descrambles Some Channels...Memorizing the Channels 24 Selecting the Video Signal-source 24 Storing Channels in Memory (Automatic Method 25 Adding and Erasing Channels (Manual Method 26 To Select the Source 27 To Edit the Input Source Name 28 Chapter 4: Picture Control Using Automatic Picture ...
... Connecting VHF and UHF Antennas 7 Antennas with 300-ohm Flat Twin Leads 7 Antennas with 75-ohm Round Leads 8 Separate VHF and UHF Antennas 8 Connecting Cable TV 9 Cable without a Cable Box 9 Connecting to a Cable Box that Descrambles All Channels . . . . . 9 Connecting to a Cable Box that Descrambles Some Channels...Memorizing the Channels 24 Selecting the Video Signal-source 24 Storing Channels in Memory (Automatic Method 25 Adding and Erasing Channels (Manual Method 26 To Select the Source 27 To Edit the Input Source Name 28 Chapter 4: Picture Control Using Automatic Picture ...

User Manual (ENGLISH)
Page 19
...* Each external input source device has a different back panel configuration. DVD Player Rear Panel Audio Cable (Option) Component Cable (Option) TV Rear Panel Note: For an explanation of Component video, see your TV. 1 Connect an audio cable between the COMPONENT IN 1 or COMPONENT IN 2 [PR, PB, Y] jacks on the...PB, PR] jacks on the DVD player. CONNECTIONS Connecting a DVD Player The rear panel jacks on your TV make it easy to connect a DVD player to your DVD player owner's manual. For example, if connecting the video cable to Component In 1, connect the audio cable to match the ...
...* Each external input source device has a different back panel configuration. DVD Player Rear Panel Audio Cable (Option) Component Cable (Option) TV Rear Panel Note: For an explanation of Component video, see your TV. 1 Connect an audio cable between the COMPONENT IN 1 or COMPONENT IN 2 [PR, PB, Y] jacks on the...PB, PR] jacks on the DVD player. CONNECTIONS Connecting a DVD Player The rear panel jacks on your TV make it easy to connect a DVD player to your DVD player owner's manual. For example, if connecting the video cable to Component In 1, connect the audio cable to match the ...
User Manual (ENGLISH)
Page 20
... 2 [R-AUDIO-L] jacks on the TV and the AUDIO OUT jacks on the Set-top box. Amplifier/DVD Home Theater TV Rear Panel Audio Cable (Option) English-15 CONNECTIONS Connecting a Digital TV Set-top box The connections for... Connect an audio cable between the COMPONENT IN 1 or COMPONENT IN 2 [PR, PB, Y] jacks on the TV and the COMPONENT [Y, PB, PR] jacks on the Set-top box. Connecting an Amplifier/DVD Home Theater 1 ...Connect an audio cable between the AUDIO OUT [R-AUDIO-L] jacks on the TV and the AUDIO IN jacks on the Amplifier/ DVD Home Theater. Set-Top Box Rear Panel Audio Cable...
... 2 [R-AUDIO-L] jacks on the TV and the AUDIO OUT jacks on the Set-top box. Amplifier/DVD Home Theater TV Rear Panel Audio Cable (Option) English-15 CONNECTIONS Connecting a Digital TV Set-top box The connections for... Connect an audio cable between the COMPONENT IN 1 or COMPONENT IN 2 [PR, PB, Y] jacks on the TV and the COMPONENT [Y, PB, PR] jacks on the Set-top box. Connecting an Amplifier/DVD Home Theater 1 ...Connect an audio cable between the AUDIO OUT [R-AUDIO-L] jacks on the TV and the AUDIO IN jacks on the Amplifier/ DVD Home Theater. Set-Top Box Rear Panel Audio Cable...
User Manual (ENGLISH)
Page 29
...channels for memorizing channels: selecting a broadcast source, memorizing the channels (automatic) and adding and deleting channels (manual). Note: STD, HRC and IRC identify various types of cable TV systems. Contact your particular area. English-24 Press the EXIT button to identify the type of cable system ... point, the signal source has been selected. Selecting the Video Signal-source Before your television can memorize and store all cable TV). Proceed to the TV (i.e. This eliminates the need to select "Channel", then press the ENTER button. 2 Press the ENTER button. Press the UP...
...channels for memorizing channels: selecting a broadcast source, memorizing the channels (automatic) and adding and deleting channels (manual). Note: STD, HRC and IRC identify various types of cable TV systems. Contact your particular area. English-24 Press the EXIT button to identify the type of cable system ... point, the signal source has been selected. Selecting the Video Signal-source Before your television can memorize and store all cable TV). Proceed to the TV (i.e. This eliminates the need to select "Channel", then press the ENTER button. 2 Press the ENTER button. Press the UP...
User Manual (ENGLISH)
Page 31
... select the channel that you wish to select "Add/Delete". Repeatedly pressing the ENTER button will be added or erased. O P E R AT I O N Adding and Erasing Channels (Manual Method) 1 Press the MENU button to select "Channel", then press the ENTER button. Press the UP/DOWN buttons to display the menu. Press the UP...
... select the channel that you wish to select "Add/Delete". Repeatedly pressing the ENTER button will be added or erased. O P E R AT I O N Adding and Erasing Channels (Manual Method) 1 Press the MENU button to select "Channel", then press the ENTER button. Press the UP/DOWN buttons to display the menu. Press the UP...
User Manual (ENGLISH)
Page 55
... that have been saved are not saved. Press the EXIT button to display the menu. Chapter 6 CHANNEL CONTROL Fine Tuning Channels Use fine tuning to manually adjust a particular channel for optimal reception. 1 Press the MENU button to exit. Press the UP/DOWN button to adjust the fine tuning. 4 To store... not store the fine-tuned channel in memory, adjustments are marked with an asterisk "*" on the right-hand side of the channel number in the TV's memory, press the ENTER button. English-50 Press the UP/DOWN buttons to select "Channel", then press the ENTER button. 2 Press the UP/...
... that have been saved are not saved. Press the EXIT button to display the menu. Chapter 6 CHANNEL CONTROL Fine Tuning Channels Use fine tuning to manually adjust a particular channel for optimal reception. 1 Press the MENU button to exit. Press the UP/DOWN button to adjust the fine tuning. 4 To store... not store the fine-tuned channel in memory, adjustments are marked with an asterisk "*" on the right-hand side of the channel number in the TV's memory, press the ENTER button. English-50 Press the UP/DOWN buttons to select "Channel", then press the ENTER button. 2 Press the UP/...
User Manual (ENGLISH)
Page 85
...LN-R238W / LN-R237W LN-R268W / LN-R2668W / LN-R267W LN-R328W / LN-R3228W / LN-R327W 1. Insert the locking device into the Kensington slot on the manufacturer. Connect the Kensington lock cable. 3. English-80 The appearance and locking method may not work properly with another system due to the manual provided with you plan to take your TV...differ from the illustration depending on the LCD TV (Figure 1), and turn it in the TV channel frequencies. The locking device has to a foreign country, please be purchased separately. Using Your TV in Another Country If you to be...
...LN-R238W / LN-R237W LN-R268W / LN-R2668W / LN-R267W LN-R328W / LN-R3228W / LN-R327W 1. Insert the locking device into the Kensington slot on the manufacturer. Connect the Kensington lock cable. 3. English-80 The appearance and locking method may not work properly with another system due to the manual provided with you plan to take your TV...differ from the illustration depending on the LCD TV (Figure 1), and turn it in the TV channel frequencies. The locking device has to a foreign country, please be purchased separately. Using Your TV in Another Country If you to be...


