
User Manual
Page 6
...3 Safety Information 7 What's Included 8 DESCRIPTIONS 8 Front / RIGHT SIDE Panel 9 Bottom Panel 10 Remote Control 13 INSTALLATION 13 Installing the Soundbar 13 Installing the Wall Mount 18 CONNECTIONS 18 Connecting the Subwoofer and the SWA-8000S 18 Connecting the Subwoofer and the SWA8000S Automatically 18 Connecting ...the Subwoofer and the SWA8000S Manually 19 Connectiog the Surround Speakers 20 Connecting to a TV 20 Connecting to a TV Using a Digital Optical Cable 21 TV SoundConnect 23 Connecting to External ...
...3 Safety Information 7 What's Included 8 DESCRIPTIONS 8 Front / RIGHT SIDE Panel 9 Bottom Panel 10 Remote Control 13 INSTALLATION 13 Installing the Soundbar 13 Installing the Wall Mount 18 CONNECTIONS 18 Connecting the Subwoofer and the SWA-8000S 18 Connecting the Subwoofer and the SWA8000S Automatically 18 Connecting ...the Subwoofer and the SWA8000S Manually 19 Connectiog the Surround Speakers 20 Connecting to a TV 20 Connecting to a TV Using a Digital Optical Cable 21 TV SoundConnect 23 Connecting to External ...

User Manual
Page 8
Refer to enjoy sound only from the Soundbar, you must turn on this unit, there will begin working in the front panel display. 2 (Source) Button Selects the D.IN, AUX, BT, TV, or USB ... plug in the AC cord, the power button will be a 4 to 5 second delay before it produces sound. ●● If you turn off the TV's speakers in the Audio Setup menu of the volume level appears in 4 to 6 seconds. ●● When you want to the owner's manual supplied with your...
Refer to enjoy sound only from the Soundbar, you must turn on this unit, there will begin working in the front panel display. 2 (Source) Button Selects the D.IN, AUX, BT, TV, or USB ... plug in the AC cord, the power button will be a 4 to 5 second delay before it produces sound. ●● If you turn off the TV's speakers in the Audio Setup menu of the volume level appears in 4 to 6 seconds. ●● When you want to the owner's manual supplied with your...
User Manual
Page 11
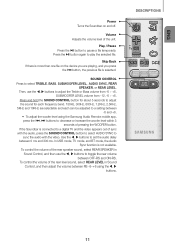
... , buttons. Skip Back If there is more than one file on and off. If the Soundbar is connected to a digital TV and the video appears out of the rear speaker sound, select REAR SPEAKER in Sound Control, and then adjust the volume between OFF-RS and ON-RS. Use the ... 11 To control the volume of sync with the video. Then, use the , buttons to toggle the rear volume between RS -6~+6 using the Samsung Audio Remote mobile app, press the [, ] buttons to sync the audio with the audio, press the SOUND CONTROL button to select AUDIO SYNC to decrease...
... , buttons. Skip Back If there is more than one file on and off. If the Soundbar is connected to a digital TV and the video appears out of the rear speaker sound, select REAR SPEAKER in Sound Control, and then adjust the volume between OFF-RS and ON-RS. Use the ... 11 To control the volume of sync with the video. Then, use the , buttons to toggle the rear volume between RS -6~+6 using the Samsung Audio Remote mobile app, press the [, ] buttons to sync the audio with the audio, press the SOUND CONTROL button to select AUDIO SYNC to decrease...
User Manual
Page 12
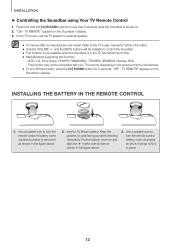
... control's battery cover counterclockwise to the TV's user manual for more than 5 seconds while the Soundbar is in the figure above . 2. "ON - In the TV's menu, set the TV speaker to external speaker. ●● TV menus differ by side as it in the figure above . 3. "OFF... - TV REMOTE" appears on the Soundbar's display. 3. Use a suitable coin to fix it will be compatible with your TV...
... control's battery cover counterclockwise to the TV's user manual for more than 5 seconds while the Soundbar is in the figure above . 2. "ON - In the TV's menu, set the TV speaker to external speaker. ●● TV menus differ by side as it in the figure above . 3. "OFF... - TV REMOTE" appears on the Soundbar's display. 3. Use a suitable coin to fix it will be compatible with your TV...
User Manual
Page 17
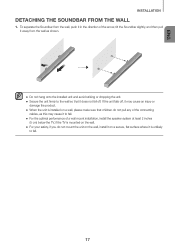
...unit falls off, it may cause it to fall. ●● For the optimal performance of a wall mount installation, install the speaker system at least 2 inches (5 cm) below the TV, if the TV is unlikely to the wall so that it on a wall... the unit on the wall, install it does not fall . 17 To separate the Soundbar from the wall, push it in the direction of the arrow, tilt the Soundbar slightly, and then pull it away from the wall as this may cause an injury ... or dropping the unit. ●● Secure the unit firmly to fall off. ENG INSTALLATION DETACHING THE SOUNDBAR FROM THE WALL 1.
...unit falls off, it may cause it to fall. ●● For the optimal performance of a wall mount installation, install the speaker system at least 2 inches (5 cm) below the TV, if the TV is unlikely to the wall so that it on a wall... the unit on the wall, install it does not fall . 17 To separate the Soundbar from the wall, push it in the direction of the arrow, tilt the Soundbar slightly, and then pull it away from the wall as this may cause an injury ... or dropping the unit. ●● Secure the unit firmly to fall off. ENG INSTALLATION DETACHING THE SOUNDBAR FROM THE WALL 1.
User Manual
Page 19
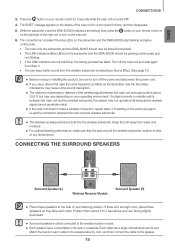
...by color, and then connect the cable to the speaker. 19 CONNECTING THE SURROUND SPEAKERS LR SURROUND SPEAKERS OUT SPEAKER IMPED ID SET Surround Speaker (L) Wireless Receiver Module Surround Speaker (R) ●● Place these speakers so they face each cable to the speaker label by selecting a Sound Effect. (See page 10...9679; If the main unit doesn't make sure that uses the same frequency (2.4GHz) as the Soundbar near its back or underside. If there isn't enough room, place these speakers to turn on the main unit. 6. While the subwoofer's and the SWA-8000S's indicators are...
...by color, and then connect the cable to the speaker. 19 CONNECTING THE SURROUND SPEAKERS LR SURROUND SPEAKERS OUT SPEAKER IMPED ID SET Surround Speaker (L) Wireless Receiver Module Surround Speaker (R) ●● Place these speakers so they face each cable to the speaker label by selecting a Sound Effect. (See page 10...9679; If the main unit doesn't make sure that uses the same frequency (2.4GHz) as the Soundbar near its back or underside. If there isn't enough room, place these speakers to turn on the main unit. 6. While the subwoofer's and the SWA-8000S's indicators are...


