
User Manual
Page 1
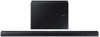
Soundbar Imagine the possibilities Thank you for purchasing this Samsung product. To receive more complete service, please register your product at www.samsung.com/register 'This Nanum Gothic Eco font is provided by NAVER' HW-J650 HW-J651 Wireless Subwoofer (PS-WJ650 / PS-WJ651) User manual Wireless Audio -
Soundbar Imagine the possibilities Thank you for purchasing this Samsung product. To receive more complete service, please register your product at www.samsung.com/register 'This Nanum Gothic Eco font is provided by NAVER' HW-J650 HW-J651 Wireless Subwoofer (PS-WJ650 / PS-WJ651) User manual Wireless Audio -
User Manual
Page 2
.... HDMI HDMI transmits digital video and audio signals simultaneously, and provides a clearer picture. using the Soundbar's USB HOST function. Simply access the Samsung Multiroom App to experience the best of DTS, Inc. © DTS, Inc. Easily control the Soundbar and TV from Dolby Laboratories. DTS, the Symbol, & DTS and the Symbol together are...
.... HDMI HDMI transmits digital video and audio signals simultaneously, and provides a clearer picture. using the Soundbar's USB HOST function. Simply access the Samsung Multiroom App to experience the best of DTS, Inc. © DTS, Inc. Easily control the Soundbar and TV from Dolby Laboratories. DTS, the Symbol, & DTS and the Symbol together are...
User Manual
Page 5
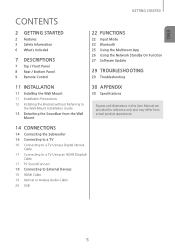
... 11 INSTALLATION 11 Installing the Wall Mount 11 Installation Precautions 12 Installing the Bracket without Referring to the Wall-Mount Installation Guide 13 Detaching the Soundbar from the Wall Mount 30 APPENDIX 30 Specifications Figures and illustrations in this User Manual are provided for reference only and may differ from actual...
... 11 INSTALLATION 11 Installing the Wall Mount 11 Installation Precautions 12 Installing the Bracket without Referring to the Wall-Mount Installation Guide 13 Detaching the Soundbar from the Wall Mount 30 APPENDIX 30 Specifications Figures and illustrations in this User Manual are provided for reference only and may differ from actual...
User Manual
Page 7
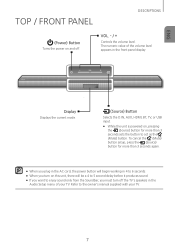
... power on this unit, there will be a 4 to 5 second delay before it produces sound. ●● If you want to enjoy sound only from the Soundbar, you turn on and off the TV's speakers in the Audio Setup menu of the volume level appears in 4 to 6 seconds. ●● When you...
... power on this unit, there will be a 4 to 5 second delay before it produces sound. ●● If you want to enjoy sound only from the Soundbar, you turn on and off the TV's speakers in the Audio Setup menu of the volume level appears in 4 to 6 seconds. ●● When you...
User Manual
Page 8
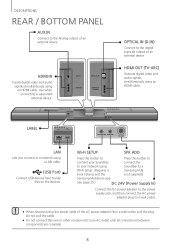
... Port) Connect USB devices here to a wall outlet. ●● When disconnecting the power cable of an external device. smart device and the (not supplied) Samsung Multiroom app. DC 24V Wi-Fi SETUP SPK ADD LABEL LAN 5V 0.5A Wi-Fi SETUP SPK ADD DC 24V LAN Lets you connect to... IN (D.IN) Connect to your network using an HDMI cable. Do not pull the cable. ●● Do not connect this button to connect your Soundbar connect the to the digital (optical) output of the AC power adaptor from a wall outlet, pull the plug. HDMI IN Inputs digital video and audio...
... Port) Connect USB devices here to a wall outlet. ●● When disconnecting the power cable of an external device. smart device and the (not supplied) Samsung Multiroom app. DC 24V Wi-Fi SETUP SPK ADD LABEL LAN 5V 0.5A Wi-Fi SETUP SPK ADD DC 24V LAN Lets you connect to... IN (D.IN) Connect to your network using an HDMI cable. Do not pull the cable. ●● Do not connect this button to connect your Soundbar connect the to the digital (optical) output of the AC power adaptor from a wall outlet, pull the plug. HDMI IN Inputs digital video and audio...
User Manual
Page 9
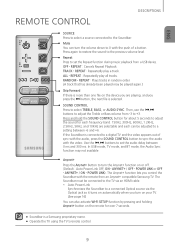
...to +3. POWER LINK or OFF - TRACK - Use the [,] buttons to 0 with the remote from a USB device. The Soundbar must be played again.) Skip Forward If there is a Samsung proprietary name. ●● Operate the TV using the TV's remote control. 9 Repeat Press to the previous volume level. REPEAT... the volume down to set the Repeat function during music playback from an Anynet+ compatible Samsung TV. The Anynet+ function lets you press the ] button, the next file is connected to the Soundbar. OFF - Press again to restore the sound to set the audio delay between -6 ...
...to +3. POWER LINK or OFF - TRACK - Use the [,] buttons to 0 with the remote from a USB device. The Soundbar must be played again.) Skip Forward If there is a Samsung proprietary name. ●● Operate the TV using the TV's remote control. 9 Repeat Press to the previous volume level. REPEAT... the volume down to set the Repeat function during music playback from an Anynet+ compatible Samsung TV. The Anynet+ function lets you press the ] button, the next file is connected to the Soundbar. OFF - Press again to restore the sound to set the audio delay between -6 ...

User Manual
Page 10
...Surr.Sound adds depth and spaciousness to the next default station, cycling through the Surr.Sound settings : ON - Each time you press this button, the Soundbar switches to the sound. To use the [,] buttons to adjust the Subwoofer volume from -12, -6 to . You can select the sound modes - Play...Digital. Skip Back If there is selected. Select the STANDARD mode if you want to listen to +6. Then, use the STREAMING MUSIC function, the Soundbar must be connected to the Internet. (See page 26) DRC (Dynamic Range Control) * Lets you apply dynamic range control to enjoy the original ...
...Surr.Sound adds depth and spaciousness to the next default station, cycling through the Surr.Sound settings : ON - Each time you press this button, the Soundbar switches to the sound. To use the [,] buttons to adjust the Subwoofer volume from -12, -6 to . You can select the sound modes - Play...Digital. Skip Back If there is selected. Select the STANDARD mode if you want to listen to +6. Then, use the STREAMING MUSIC function, the Soundbar must be connected to the Internet. (See page 26) DRC (Dynamic Range Control) * Lets you apply dynamic range control to enjoy the original ...
User Manual
Page 11
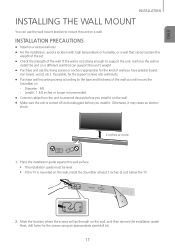
... the wall you install it. Diameter : M5 -- Otherwise, it on the wall. ●● Make sure the unit is mounted on the wall, install the Soundbar at least 2 inches (5 cm) below the TV. 2. Next, drill holes for the kind of the wall. Mark the location where the screws will mount the... Soundbar on. -- If the wall is not strong enough to support the unit, reinforce the wall or install the unit on a different wall that cannot sustain ...
... the wall you install it. Diameter : M5 -- Otherwise, it on the wall. ●● Make sure the unit is mounted on the wall, install the Soundbar at least 2 inches (5 cm) below the TV. 2. Next, drill holes for the kind of the wall. Mark the location where the screws will mount the... Soundbar on. -- If the wall is not strong enough to support the unit, reinforce the wall or install the unit on a different wall that cannot sustain ...

User Manual
Page 12
Fasten the wall mounts and screws to the screw holes on the back of the Soundbar's main body, one on the left and right mounts are different shapes. Secure the two holder screws to the marked locations. • The left and ...one on the right. ●● Insert the included USB cable into the back of the Soundbar before installing it on the back of the Soundbar into the grooves of the grooves. Set the holder screws on the wall. 5. Installing the Bracket without Referring to position them...
Fasten the wall mounts and screws to the screw holes on the back of the Soundbar's main body, one on the left and right mounts are different shapes. Secure the two holder screws to the marked locations. • The left and ...one on the right. ●● Insert the included USB cable into the back of the Soundbar before installing it on the back of the Soundbar into the grooves of the grooves. Set the holder screws on the wall. 5. Installing the Bracket without Referring to position them...
User Manual
Page 13
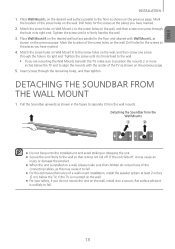
...L to align the mounts with Wall Mount L as shown on the previous page. 5. Detaching the Soundbar from the Wall Mounts ●● Do not hang onto the installed unit and avoid striking or...on the previous page. Tighten the screw until it is firmly fixed to fall . 13 Detaching the Soundbar from the wall mounts. Place Wall Mount L on the desired wall surface parallel to the floor and... wall. 3. Mark the location of the connecting cables, as shown in its right end. Pull the Soundbar upwards as this may cause an injury or damage the product. ●● When the unit is...
...L to align the mounts with Wall Mount L as shown on the previous page. 5. Detaching the Soundbar from the Wall Mounts ●● Do not hang onto the installed unit and avoid striking or...on the previous page. Tighten the screw until it is firmly fixed to fall . 13 Detaching the Soundbar from the wall mounts. Place Wall Mount L on the desired wall surface parallel to the floor and... wall. 3. Mark the location of the connecting cables, as shown in its right end. Pull the Soundbar upwards as this may cause an injury or damage the product. ●● When the unit is...
User Manual
Page 14
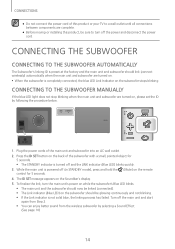
... quickly. 3. Connecting to the Subwoofer Manually If the blue LED light does not stop blinking when the main unit and subwoofer are turned on the Soundbar's display. 5. POWER 1. The ID SET message appears on , please set the ID by selecting a Sound Effect. (See page 10) 14 To finalize the link, turn...
... quickly. 3. Connecting to the Subwoofer Manually If the blue LED light does not stop blinking when the main unit and subwoofer are turned on the Soundbar's display. 5. POWER 1. The ID SET message appears on , please set the ID by selecting a Sound Effect. (See page 10) 14 To finalize the link, turn...
User Manual
Page 15
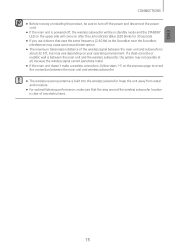
..., because the wireless signal cannot penetrate metal. ●● If the main unit doesn't make sure that uses the same frequency (2.4GHz) as the Soundbar near the Soundbar, interference may vary depending on the previous page to re-set the connection between the main unit and subwoofer is clear of any obstructions...
..., because the wireless signal cannot penetrate metal. ●● If the main unit doesn't make sure that uses the same frequency (2.4GHz) as the Soundbar near the Soundbar, interference may vary depending on the previous page to re-set the connection between the main unit and subwoofer is clear of any obstructions...
User Manual
Page 16
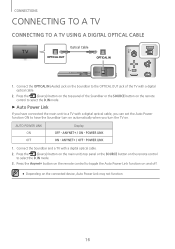
... on the main unit's top panel or the SOURCE button on the remote control to have the Soundbar turn on automatically when you can set the Auto Power function ON to select the D.IN mode....off. ●● Depending on the connected device, Auto Power Link may not function. 16 Connect the Soundbar and a TV with a digital optical cable. 2. AUTO POWER LINK ON OFF Display OFF - POWER LINK ON... - Connect the OPTICAL IN (Audio) jack on the Soundbar to the OPTICAL OUT jack of the Soundbar or the SOURCE button on the remote control to select the D.IN mode. ++Auto ...
... on the main unit's top panel or the SOURCE button on the remote control to have the Soundbar turn on automatically when you can set the Auto Power function ON to select the D.IN mode....off. ●● Depending on the connected device, Auto Power Link may not function. 16 Connect the Soundbar and a TV with a digital optical cable. 2. AUTO POWER LINK ON OFF Display OFF - POWER LINK ON... - Connect the OPTICAL IN (Audio) jack on the Soundbar to the OPTICAL OUT jack of the Soundbar or the SOURCE button on the remote control to select the D.IN mode. ++Auto ...

User Manual
Page 17
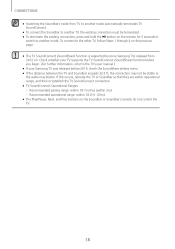
... it is an interface that supports the TV SoundConnect function. Press the (Source) button on the top panel of the Soundbar or the SOURCE button on the TV and Soundbar. • Open the menu of video and audio data with just a single connector. ●● If the TV provides an ARC ..."Add New Device" menu to select the TV mode. 3. Turn on the remote control to select the D.IN mode. ●● HDMI is connected to a Samsung TV that enables the digital transmission of the TV. • Navigate to Speaker Settings on the remote control to "On". 2. Connect an HDMI cable (not...
... it is an interface that supports the TV SoundConnect function. Press the (Source) button on the top panel of the Soundbar or the SOURCE button on the TV and Soundbar. • Open the menu of video and audio data with just a single connector. ●● If the TV provides an ARC ..."Add New Device" menu to select the TV mode. 3. Turn on the remote control to select the D.IN mode. ●● HDMI is connected to a Samsung TV that enables the digital transmission of the TV. • Navigate to Speaker Settings on the remote control to "On". 2. Connect an HDMI cable (not...
User Manual
Page 18
...further information, refer to the TV's user manual.). ●● If your Samsung TV was released before 2014, check the SoundShare setting menu. ●● If the distance between the TV and Soundbar exceeds 32.8 ft, the connection may stutter. Recommended operational range: within 32.8...TV SoundConnect (SoundShare) function is supported by some Samsung TVs released from TV to another mode automatically terminates TV SoundConnect. ●● To connect the Soundbar to another mode. If this occurs, relocate the TV or Soundbar so that they are within 2m). -- Recommended pairing...
...further information, refer to the TV's user manual.). ●● If your Samsung TV was released before 2014, check the SoundShare setting menu. ●● If the distance between the TV and Soundbar exceeds 32.8 ft, the connection may stutter. Recommended operational range: within 32.8...TV SoundConnect (SoundShare) function is supported by some Samsung TVs released from TV to another mode automatically terminates TV SoundConnect. ●● To connect the Soundbar to another mode. If this occurs, relocate the TV or Soundbar so that they are within 2m). -- Recommended pairing...
User Manual
Page 19
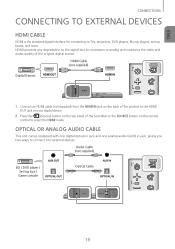
... (TV-ARC) DC 24V Wi-Fi SETUP SPK ADD 1. Connect an HDMI cable (not supplied) from the HDMI IN jack on the back of the Soundbar or the SOURCE button on your digital device. 2. ENG CONNECTIONS Connecting to External Devices HDMI Cable HDMI is the standard digital interface for connecting to...
... (TV-ARC) DC 24V Wi-Fi SETUP SPK ADD 1. Connect an HDMI cable (not supplied) from the HDMI IN jack on the back of the Soundbar or the SOURCE button on your digital device. 2. ENG CONNECTIONS Connecting to External Devices HDMI Cable HDMI is the standard digital interface for connecting to...
User Manual
Page 20
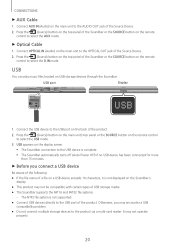
...compatibility problem. ●● Do not connect multiple storage devices to select the USB mode. 3. The NTFS file system is complete. • The Soundbar automatically turns off (Auto Power Off) if no USB device has been connected for more than 15 minutes. ++Before you may not operate properly. ...button on the main unit to the USB port of the Source Device. 2. Connect AUX IN (Audio) on the display screen. • The Soundbar connection to the USB device is not supported. ●● Connect USB devices directly to the OPTICAL OUT jack of the product. CONNECTIONS ++AUX Cable...
...compatibility problem. ●● Do not connect multiple storage devices to select the USB mode. 3. The NTFS file system is complete. • The Soundbar automatically turns off (Auto Power Off) if no USB device has been connected for more than 15 minutes. ++Before you may not operate properly. ...button on the main unit to the USB port of the Source Device. 2. Connect AUX IN (Audio) on the display screen. • The Soundbar connection to the USB device is not supported. ●● Connect USB devices directly to the OPTICAL OUT jack of the product. CONNECTIONS ++AUX Cable...

User Manual
Page 21
... 8 ~ 160kbps 8 ~ 160kbps ~ 8.8Mbps ~ 5.6Mbps ~ 1Mbps ~ 4.4Mbps ●● If there are too many folders and files stored on the USB device, it may take the Soundbar some time to access and play files. 21
... 8 ~ 160kbps 8 ~ 160kbps ~ 8.8Mbps ~ 5.6Mbps ~ 1Mbps ~ 4.4Mbps ●● If there are too many folders and files stored on the USB device, it may take the Soundbar some time to access and play files. 21
User Manual
Page 23
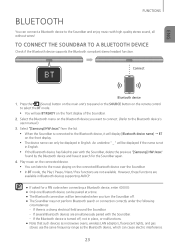
... If several Bluetooth devices are simultaneously paired with the Soundbar, delete the previous "[Samsung] HW-Jxxxx" found by the Bluetooth device and have it will see BT READY on the Bluetooth device you turn the Soundbar off , not in English. • If the .... Connect Bluetooth device 1. If the Bluetooth device is connected to pair with the Soundbar. -- Select "[Samsung] HW-Jxxxx" from the list. • When the Soundbar is turned off . ●● The Soundbar may not perform Bluetooth search or connection correctly under the following circumstances: -- An underline...
... If several Bluetooth devices are simultaneously paired with the Soundbar, delete the previous "[Samsung] HW-Jxxxx" found by the Bluetooth device and have it will see BT READY on the Bluetooth device you turn the Soundbar off , not in English. • If the .... Connect Bluetooth device 1. If the Bluetooth device is connected to pair with the Soundbar. -- Select "[Samsung] HW-Jxxxx" from the list. • When the Soundbar is turned off . ●● The Soundbar may not perform Bluetooth search or connection correctly under the following circumstances: -- An underline...
User Manual
Page 24
... from the device's scanned devices list will automatically change the Soundbar to BT mode. ●● Available only if the Soundbar is listed among the Bluetooth device's paired devices. (The Bluetooth device and the Soundbar must have paired the Soundbar to a Bluetooth device, selecting "[Samsung] HW-Jxxxx" from obstructions caused by obstacles such as walls or...
... from the device's scanned devices list will automatically change the Soundbar to BT mode. ●● Available only if the Soundbar is listed among the Bluetooth device's paired devices. (The Bluetooth device and the Soundbar must have paired the Soundbar to a Bluetooth device, selecting "[Samsung] HW-Jxxxx" from obstructions caused by obstacles such as walls or...


