User Manual
Page 2
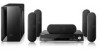
Check Product's FIRMWARE Version - In some case of 5-Disc supported models, Play an DVD disc first ,before : press Menu, 8, 9, 5 buttons on the remote controller ( Model name : HT-DB6XX, HT-DS6XX, HT-P4X ) 2 Turn on the remote controller, then press Numeric button 8,9,5. - 1. Do the same procedure mentioned before Tray open by pressing ONEN/CLOSE button. - Press MENU button on the product. Make the tray open -
Check Product's FIRMWARE Version - In some case of 5-Disc supported models, Play an DVD disc first ,before : press Menu, 8, 9, 5 buttons on the remote controller ( Model name : HT-DB6XX, HT-DS6XX, HT-P4X ) 2 Turn on the remote controller, then press Numeric button 8,9,5. - 1. Do the same procedure mentioned before Tray open by pressing ONEN/CLOSE button. - Press MENU button on the product. Make the tray open -
User Manual
Page 5
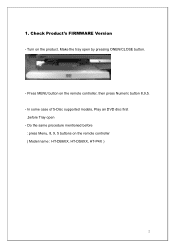
Press (STOP) button on state automatically. ■ - Firmware update is carried, repeating ERASE and WRITE after READING - After Update complete, The set goes to turn off and turn on the main unit in "No disc" condition. 5 - Turn on the product, Play an Update disc or a USB Device -
Press (STOP) button on state automatically. ■ - Firmware update is carried, repeating ERASE and WRITE after READING - After Update complete, The set goes to turn off and turn on the main unit in "No disc" condition. 5 - Turn on the product, Play an Update disc or a USB Device -
Quick Guide (easy Manual) (ver.1.0) (English)
Page 7
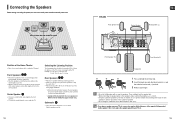
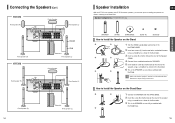
...occurs, place the speaker away from your ear, facing slightly downward. * Unlike the front and center speakers, the rear speakers are used to turn off the power and disconnect the power cord. They could get hurt if a speaker falls. • When connecting the speaker wires to ... by the speaker. Center Speaker C • It is best to install it on the wall through the duct (hole). • If you like. 12 HT-X70 Rear Speaker (R) ENG Center Speaker Rear Speaker (L) CONNECTIONS Front Speaker (R) Front Speaker (L) Subwoofer 1 2 3 Red Black 1 Press and hold the terminal tab....
...occurs, place the speaker away from your ear, facing slightly downward. * Unlike the front and center speakers, the rear speakers are used to turn off the power and disconnect the power cord. They could get hurt if a speaker falls. • When connecting the speaker wires to ... by the speaker. Center Speaker C • It is best to install it on the wall through the duct (hole). • If you like. 12 HT-X70 Rear Speaker (R) ENG Center Speaker Rear Speaker (L) CONNECTIONS Front Speaker (R) Front Speaker (L) Subwoofer 1 2 3 Red Black 1 Press and hold the terminal tab....
Quick Guide (easy Manual) (ver.1.0) (English)
Page 8
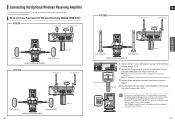
How to the Stand Base. Speaker Components (HT-TX72/HT-TX75 only) ENG CONNECTIONS SPEAKER STAND STAND BASE Screw (A) Screw (B) How to Install the Speaker on the Stand 1 2 1 Turn the STAND upside-down and connect it may be easily knocked over. Otherwise it to the STAND BASE....SPEAKER STAND Subwoofer Front Speaker (L) Center Speaker Rear Speaker (L) Front Speaker (R) 14 Subwoofer Front Speaker (L) Speaker Installation With the HT-TX72 front speakers and HT-TX75 front/rear speakers, you have the option of the speaker using a screwdriver as shown in the illustration. 3 This ...
How to the Stand Base. Speaker Components (HT-TX72/HT-TX75 only) ENG CONNECTIONS SPEAKER STAND STAND BASE Screw (A) Screw (B) How to Install the Speaker on the Stand 1 2 1 Turn the STAND upside-down and connect it may be easily knocked over. Otherwise it to the STAND BASE....SPEAKER STAND Subwoofer Front Speaker (L) Center Speaker Rear Speaker (L) Front Speaker (R) 14 Subwoofer Front Speaker (L) Speaker Installation With the HT-TX72 front speakers and HT-TX75 front/rear speakers, you have the option of the speaker using a screwdriver as shown in the illustration. 3 This ...
Quick Guide (easy Manual) (ver.1.0) (English)
Page 9
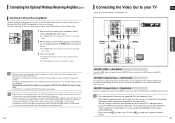
... speakers to the DVD Player, referring to pages 13~15. 2 With the DVD Player turned off . When you have Purchased the Wireless Receiving Module (SWA-3000) HT-X70 Front Speaker (R) Front Speaker (L) Center Speaker HT-TX75 ENG Front Speaker (R) Front Speaker (L) Center Speaker CONNECTIONS Subwoofer Rear Speaker (L) Rear ... wireless receiving module in the reverse direction. • Insert the TX card when the DVD Player is not output from your Samsung retailer. Hold the TX card so that the slanted side faces leftward and insert the card into the TX Card Connection(WIRELESS)...
... speakers to the DVD Player, referring to pages 13~15. 2 With the DVD Player turned off . When you have Purchased the Wireless Receiving Module (SWA-3000) HT-X70 Front Speaker (R) Front Speaker (L) Center Speaker HT-TX75 ENG Front Speaker (R) Front Speaker (L) Center Speaker CONNECTIONS Subwoofer Rear Speaker (L) Rear ... wireless receiving module in the reverse direction. • Insert the TX card when the DVD Player is not output from your Samsung retailer. Hold the TX card so that the slanted side faces leftward and insert the card into the TX Card Connection(WIRELESS)...
Quick Guide (easy Manual) (ver.1.0) (English)
Page 10
...Interlace scan mode(480i Only ) for 5 seconds. s The STANDBY LED on the front panel of the wireless receiver module blinks. 2 With the wireless receiver module turned on your TV. CONNECTIONS METHOD 3 (supplied) METHOD 2 METHOD 1 TV METHOD 1 : HDMI ....... (Best Quality) Connect the HDMI cable (not supplied) from... point pen or a toothpick to a TV. s The LINK LED of the wireless receiver module is lit and the Reset is equipped with SAMSUNG TVs that uses the same frequency (2.4GHz) near the system, some sound interruption may not operate at the rear of a radio wave is ...
...Interlace scan mode(480i Only ) for 5 seconds. s The STANDBY LED on the front panel of the wireless receiver module blinks. 2 With the wireless receiver module turned on your TV. CONNECTIONS METHOD 3 (supplied) METHOD 2 METHOD 1 TV METHOD 1 : HDMI ....... (Best Quality) Connect the HDMI cable (not supplied) from... point pen or a toothpick to a TV. s The LINK LED of the wireless receiver module is lit and the Reset is equipped with SAMSUNG TVs that uses the same frequency (2.4GHz) near the system, some sound interruption may not operate at the rear of a radio wave is ...
Quick Guide (easy Manual) (ver.1.0) (English)
Page 11
... as follows: DVD/CD ➝ DIGITAL IN ➝ AUX 1 ➝ AUX 2 ➝ HDMI IN ➝ USB ➝ FM ➝ XM. • When this unit is turned off, no HDMI video or audio signal is output from this unit via DVI, no audio will be able to select the TV's Video Input...
... as follows: DVD/CD ➝ DIGITAL IN ➝ AUX 1 ➝ AUX 2 ➝ HDMI IN ➝ USB ➝ FM ➝ XM. • When this unit is turned off, no HDMI video or audio signal is output from this unit via DVI, no audio will be able to select the TV's Video Input...
Quick Guide (easy Manual) (ver.1.0) (English)
Page 12
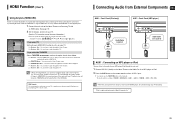
...Home Theater. s : You can listen to audio through the Home Theater. • If Anynet+ (HDMI-CEC) is on and you turn off the main unit, your TV will also turn off. • Anynet+ (HDMI-CEC) will be used by connecting this unit, power on your TV, or watch a movie by ...and , buttons, ~ button) MMOOVVEE EENNTTEERR EEXXIITT MOVE ENTER EXIT If you select TV Set the Anynet+(HDMI-CEC) function to on the remote control to a SAMSUNG TV using an HDMI Cable. Connecting Audio from External Components ENG AUX1 : Front Panel (iPod only) AUX1 : Front Panel (MP3 player) Audio Cable (supplied)...
...Home Theater. s : You can listen to audio through the Home Theater. • If Anynet+ (HDMI-CEC) is on and you turn off the main unit, your TV will also turn off. • Anynet+ (HDMI-CEC) will be used by connecting this unit, power on your TV, or watch a movie by ...and , buttons, ~ button) MMOOVVEE EENNTTEERR EEXXIITT MOVE ENTER EXIT If you select TV Set the Anynet+(HDMI-CEC) function to on the remote control to a SAMSUNG TV using an HDMI Cable. Connecting Audio from External Components ENG AUX1 : Front Panel (iPod only) AUX1 : Front Panel (MP3 player) Audio Cable (supplied)...
Quick Guide (easy Manual) (ver.1.0) (English)
Page 15
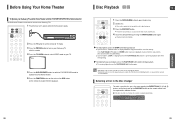
... ( ) button or ENTER button is displayed and the stop position will not run in this remote. 4 Press the TV/VIDEO button to turn on the remote control, until the required disc indicator flashes. VIDEO 5 Press the DVD RECEIVER button to switch to DVD RECEIVER mode to operate... it violates the CSS (Content Scrambling System : a copy protection system) recommendations. Before Using Your Home Theater To Operate your Samsung TV and the Home Theater with the HT-X70/HT-TX72/HT-TX75's Remote Control The DVD Home Theater's remote can load the third, fourth, and fifth discs. 4 Close the compartment ...
... ( ) button or ENTER button is displayed and the stop position will not run in this remote. 4 Press the TV/VIDEO button to turn on the remote control, until the required disc indicator flashes. VIDEO 5 Press the DVD RECEIVER button to switch to DVD RECEIVER mode to operate... it violates the CSS (Content Scrambling System : a copy protection system) recommendations. Before Using Your Home Theater To Operate your Samsung TV and the Home Theater with the HT-X70/HT-TX72/HT-TX75's Remote Control The DVD Home Theater's remote can load the third, fourth, and fifth discs. 4 Close the compartment ...
Quick Guide (easy Manual) (ver.1.0) (English)
Page 25
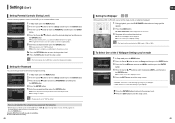
... on the TV screen. 3 The power will erase all settings will be displayed. MOVE SELECT RETURN EXIT • ORIGINAL : Select this to set the Samsung Logo image as your wallpaper. • USER : Select this to set the password for longer than 5 seconds. Setting the Password You can set to ... to exit the setup screen. • This function works only if a DVD disc contains the rating level information. Using the RESET function will turn off and then back on 48 ENG Setting the Wallpaper DVD JPEG While watching a DVD or JPEG CD, you have forgotten the rating level password...
... on the TV screen. 3 The power will erase all settings will be displayed. MOVE SELECT RETURN EXIT • ORIGINAL : Select this to set the Samsung Logo image as your wallpaper. • USER : Select this to set the password for longer than 5 seconds. Setting the Password You can set to ... to exit the setup screen. • This function works only if a DVD disc contains the rating level information. Using the RESET function will turn off and then back on 48 ENG Setting the Wallpaper DVD JPEG While watching a DVD or JPEG CD, you have forgotten the rating level password...
Quick Guide (easy Manual) (ver.1.0) (English)
Page 34
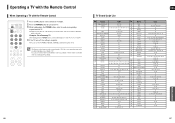
...15 Craig 03, 05, 61, 82, 83, 84 59 Realistic 16 Croslex 62 60 Sampo 17 Crown 03 61 Samsung 18 Curtis Mates 59, 61, 63 19 CXC 03 62 Sanyo 20 Daewoo 02, 03, 04, 15, 16,..., 16, 17 and 40. 4 If the TV turns off, the setting is more than one at a time to your brand of TVs. If there is complete. Example : For a Samsung TV While holding down the POWER button, use the... Control 1 Press the TV button to set the remote to TV mode. 2 Press the POWER button to turn on the TV. 3 While holding down the POWER button, enter the code corresponding to determine which code works...
...15 Craig 03, 05, 61, 82, 83, 84 59 Realistic 16 Croslex 62 60 Sampo 17 Crown 03 61 Samsung 18 Curtis Mates 59, 61, 63 19 CXC 03 62 Sanyo 20 Daewoo 02, 03, 04, 15, 16,..., 16, 17 and 40. 4 If the TV turns off, the setting is more than one at a time to your brand of TVs. If there is complete. Example : For a Samsung TV While holding down the POWER button, use the... Control 1 Press the TV button to set the remote to TV mode. 2 Press the POWER button to turn on the TV. 3 While holding down the POWER button, enter the code corresponding to determine which code works...
Quick Guide (easy Manual) (ver.1.0) (English)
Page 35
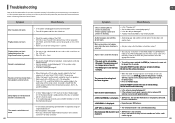
... Disc tray does not open. • Is the power cord plugged securely into the outlet? • Turn off the unit, disconnect the power cord, and contact the nearest authorized dealer or Samsung Electronics Service Center. DVD discs purchased from a few speakers and not all stored settings. Sound is not ... set C, SL, and SR to the DVD disc jacket and then select the appropriate function. • The main unit is not working normally. • Turn off the power and hold the main unit's STOP( ) button for rating level has been forgotten. • While "NO DISC" message appears on ....
... Disc tray does not open. • Is the power cord plugged securely into the outlet? • Turn off the unit, disconnect the power cord, and contact the nearest authorized dealer or Samsung Electronics Service Center. DVD discs purchased from a few speakers and not all stored settings. Sound is not ... set C, SL, and SR to the DVD disc jacket and then select the appropriate function. • The main unit is not working normally. • Turn off the power and hold the main unit's STOP( ) button for rating level has been forgotten. • While "NO DISC" message appears on ....


