User Manual
Page 2
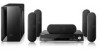
1. Check Product's FIRMWARE Version - In some case of 5-Disc supported models, Play an DVD disc first ,before : press Menu, 8, 9, 5 buttons on the product. Make the tray open - Do the same procedure mentioned before Tray open by pressing ONEN/CLOSE button. - Turn on the remote controller ( Model name : HT-DB6XX, HT-DS6XX, HT-P4X ) 2 Press MENU button on the remote controller, then press Numeric button 8,9,5. -
1. Check Product's FIRMWARE Version - In some case of 5-Disc supported models, Play an DVD disc first ,before : press Menu, 8, 9, 5 buttons on the product. Make the tray open - Do the same procedure mentioned before Tray open by pressing ONEN/CLOSE button. - Turn on the remote controller ( Model name : HT-DB6XX, HT-DS6XX, HT-P4X ) 2 Press MENU button on the remote controller, then press Numeric button 8,9,5. -
User Manual
Page 5
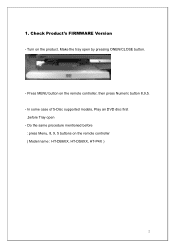
After Update complete, The set goes to turn off and turn on the main unit in "No disc" condition. 5 Press (STOP) button on state automatically. ■ - - Firmware update is carried, repeating ERASE and WRITE after READING - Turn on the product, Play an Update disc or a USB Device -
After Update complete, The set goes to turn off and turn on the main unit in "No disc" condition. 5 Press (STOP) button on state automatically. ■ - - Firmware update is carried, repeating ERASE and WRITE after READING - Turn on the product, Play an Update disc or a USB Device -
Quick Guide (easy Manual) (ver.1.0) (English)
Page 7
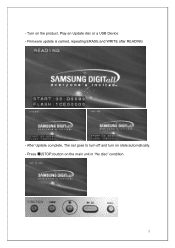
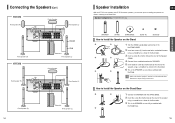
Center Speaker C • It is best to install it anywhere you like. 12 HT-X70 Rear Speaker (R) ENG Center Speaker Rear Speaker (L) CONNECTIONS Front Speaker (R) Front Speaker (L) Subwoofer 1 2 3 Red Black 1 Press and hold the terminal tab. 2 Insert the black wire ... get hurt if a speaker falls. • When connecting the speaker wires to prevent children from inserting their tweeters will not come from them about 2.5 to turn off the power and disconnect the power cord. Connecting the Speakers Before moving or installing the product, be sure to 3 times the distance of the...
Center Speaker C • It is best to install it anywhere you like. 12 HT-X70 Rear Speaker (R) ENG Center Speaker Rear Speaker (L) CONNECTIONS Front Speaker (R) Front Speaker (L) Subwoofer 1 2 3 Red Black 1 Press and hold the terminal tab. 2 Insert the black wire ... get hurt if a speaker falls. • When connecting the speaker wires to prevent children from inserting their tweeters will not come from them about 2.5 to turn off the power and disconnect the power cord. Connecting the Speakers Before moving or installing the product, be sure to 3 times the distance of the...
Quick Guide (easy Manual) (ver.1.0) (English)
Page 8
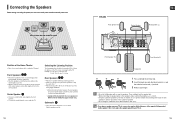
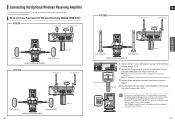
... STAND Subwoofer Front Speaker (L) Center Speaker Rear Speaker (L) Front Speaker (R) 14 Subwoofer Front Speaker (L) Speaker Installation With the HT-TX72 front speakers and HT-TX75 front/rear speakers, you have the option of installing the speakers on Stands, or directly to the SPEAKER. 5 Insert...illustration. 3 This is installed on a flat and stable area. Speaker Components (HT-TX72/HT-TX75 only) ENG CONNECTIONS SPEAKER STAND STAND BASE Screw (A) Screw (B) How to Install the Speaker on the Stand 1 2 1 Turn the STAND upside-down and connect it may be easily knocked over.
... STAND Subwoofer Front Speaker (L) Center Speaker Rear Speaker (L) Front Speaker (R) 14 Subwoofer Front Speaker (L) Speaker Installation With the HT-TX72 front speakers and HT-TX75 front/rear speakers, you have the option of installing the speakers on Stands, or directly to the SPEAKER. 5 Insert...illustration. 3 This is installed on a flat and stable area. Speaker Components (HT-TX72/HT-TX75 only) ENG CONNECTIONS SPEAKER STAND STAND BASE Screw (A) Screw (B) How to Install the Speaker on the Stand 1 2 1 Turn the STAND upside-down and connect it may be easily knocked over.
Quick Guide (easy Manual) (ver.1.0) (English)
Page 9
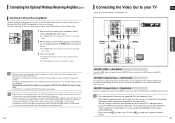
... TX Card is inserted, sound is not output from your Samsung retailer. Connecting the Optional Wireless Receiving Amplifier To connect the rear speakers wirelessly, you have to pages 13~15. 2 With the DVD Player turned off . The TX card enables communication between the main unit...on the main unit. 17 Inserting the card when it is turned off , insert the TX card into the port. When you have Purchased the Wireless Receiving Module (SWA-3000) HT-X70 Front Speaker (R) Front Speaker (L) Center Speaker HT-TX75 ENG Front Speaker (R) Front Speaker (L) Center Speaker CONNECTIONS...
... TX Card is inserted, sound is not output from your Samsung retailer. Connecting the Optional Wireless Receiving Amplifier To connect the rear speakers wirelessly, you have to pages 13~15. 2 With the DVD Player turned off . The TX card enables communication between the main unit...on the main unit. 17 Inserting the card when it is turned off , insert the TX card into the port. When you have Purchased the Wireless Receiving Module (SWA-3000) HT-X70 Front Speaker (R) Front Speaker (L) Center Speaker HT-TX75 ENG Front Speaker (R) Front Speaker (L) Center Speaker CONNECTIONS...
Quick Guide (easy Manual) (ver.1.0) (English)
Page 10
... s The STANDBY LED on the front panel of the wireless receiver module blinks 2 Times. 3 Turn on how to select the TV's Video Input source. • If you use an HDMI cable to connect a Samsung TV to interference. • If you can operate the Home Theater using the TV's remote control...'s manual for connecting to the Component Video Input jacks on the back of the main unit. • The wireless receiving antenna is equipped with SAMSUNG TVs that uses the same frequency (2.4GHz) near the system, some sound interruption may not operate at the rear of the listening position. METHOD...
... s The STANDBY LED on the front panel of the wireless receiver module blinks 2 Times. 3 Turn on how to select the TV's Video Input source. • If you use an HDMI cable to connect a Samsung TV to interference. • If you can operate the Home Theater using the TV's remote control...'s manual for connecting to the Component Video Input jacks on the back of the main unit. • The wireless receiving antenna is equipped with SAMSUNG TVs that uses the same frequency (2.4GHz) near the system, some sound interruption may not operate at the rear of the listening position. METHOD...
Quick Guide (easy Manual) (ver.1.0) (English)
Page 11
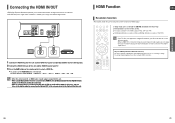
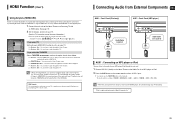
... as follows: DVD/CD ➝ DIGITAL IN ➝ AUX 1 ➝ AUX 2 ➝ HDMI IN ➝ USB ➝ FM ➝ XM. • When this unit is turned off, no audio will be able to the Optical IN of your TV owner's manual for more information on the remote control to select the...
... as follows: DVD/CD ➝ DIGITAL IN ➝ AUX 1 ➝ AUX 2 ➝ HDMI IN ➝ USB ➝ FM ➝ XM. • When this unit is turned off, no audio will be able to the Optical IN of your TV owner's manual for more information on the remote control to select the...
Quick Guide (easy Manual) (ver.1.0) (English)
Page 12
...HDMI IN ➝ USB ➝ FM ➝ XM. • When the unit is on your Samsung TV's remote control. With Anynet+ You can access the Home Theater menu. s : You can operate ...Samsung Devices with an HDMI cable. (See page 19) 2 Set the Anynet+ function on your TV. s You can operate the Home Theater by connecting this unit, power on your TV, or watch a movie by pressing the Play button on and you turn... off the main unit, your TV will also turn off. • Anynet+ (HDMI-CEC) will charge your Samsung TV's remote control, Anynet + can...
...HDMI IN ➝ USB ➝ FM ➝ XM. • When the unit is on your Samsung TV's remote control. With Anynet+ You can access the Home Theater menu. s : You can operate ...Samsung Devices with an HDMI cable. (See page 19) 2 Set the Anynet+ function on your TV. s You can operate the Home Theater by connecting this unit, power on your TV, or watch a movie by pressing the Play button on and you turn... off the main unit, your TV will also turn off. • Anynet+ (HDMI-CEC) will charge your Samsung TV's remote control, Anynet + can...
Quick Guide (easy Manual) (ver.1.0) (English)
Page 15
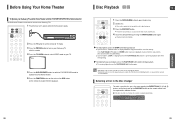
.... 3 Press the DISC SKIP button. Selecting a Disc in this remote. 4 Press the TV/VIDEO button to control Samsung TVs. 1 Plug the main unit's power cord into the tray with the HT-X70/HT-TX72/HT-TX75's Remote Control The DVD Home Theater's remote can load the third, fourth, and fifth discs. 4 Close the ...s Place a disc gently into the AC power supply. 2 Press the TV button to set the remote to TV mode. 3 Press the POWER button to turn on the remote control, until the required disc indicator flashes. Disc Playback DVD CD ENG OPERATION 1 Press the OPEN/CLOSE button to enable DVD/CD...
.... 3 Press the DISC SKIP button. Selecting a Disc in this remote. 4 Press the TV/VIDEO button to control Samsung TVs. 1 Plug the main unit's power cord into the tray with the HT-X70/HT-TX72/HT-TX75's Remote Control The DVD Home Theater's remote can load the third, fourth, and fifth discs. 4 Close the ...s Place a disc gently into the AC power supply. 2 Press the TV button to set the remote to TV mode. 3 Press the POWER button to turn on the remote control, until the required disc indicator flashes. Disc Playback DVD CD ENG OPERATION 1 Press the OPEN/CLOSE button to enable DVD/CD...
Quick Guide (easy Manual) (ver.1.0) (English)
Page 25
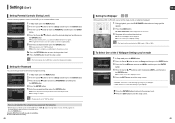
... ENG Setting the Wallpaper DVD JPEG While watching a DVD or JPEG CD, you can set the Samsung Logo image as your wallpaper. • USER : Select this to exit the setup screen. The selected wallpaper will turn off and then back on the TV screen. 3 The power will be displayed. This selects one...
... ENG Setting the Wallpaper DVD JPEG While watching a DVD or JPEG CD, you can set the Samsung Logo image as your wallpaper. • USER : Select this to exit the setup screen. The selected wallpaper will turn off and then back on the TV screen. 3 The power will be displayed. This selects one...
Quick Guide (easy Manual) (ver.1.0) (English)
Page 34
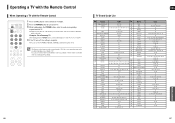
...Control 1 Press the TV button to set the remote to TV mode. 2 Press the POWER button to turn on a Samsung TV by default. 66 TV Brand Code List No. If there is more than one code listed for...for your TV in the table, enter one at a time to enter 00, 15, 16, 17 and 40. 4 If the TV turns off, the setting is complete. Brand 1 Admiral (M.Wards) 56, 57, 58 44 MTC 2 A Mark 01, 15 45 NEC ...Proscan 15 Craig 03, 05, 61, 82, 83, 84 59 Realistic 16 Croslex 62 60 Sampo 17 Crown 03 61 Samsung 18 Curtis Mates 59, 61, 63 19 CXC 03 62 Sanyo 20 Daewoo 02, 03, 04, 15, 16, ...
...Control 1 Press the TV button to set the remote to TV mode. 2 Press the POWER button to turn on a Samsung TV by default. 66 TV Brand Code List No. If there is more than one code listed for...for your TV in the table, enter one at a time to enter 00, 15, 16, 17 and 40. 4 If the TV turns off, the setting is complete. Brand 1 Admiral (M.Wards) 56, 57, 58 44 MTC 2 A Mark 01, 15 45 NEC ...Proscan 15 Craig 03, 05, 61, 82, 83, 84 59 Realistic 16 Croslex 62 60 Sampo 17 Crown 03 61 Samsung 18 Curtis Mates 59, 61, 63 19 CXC 03 62 Sanyo 20 Daewoo 02, 03, 04, 15, 16, ...
Quick Guide (easy Manual) (ver.1.0) (English)
Page 35
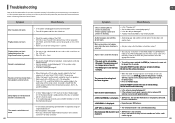
.... • While "NO DISC" message appears on the main unit for longer than 5 seconds. Troubleshooting Refer to the chart below does not help, turn it back on this DVD player. • Make sure that the rating level is correct. Symptom Check/Remedy Disc tray does not open. • ... The power goes out or strange noise is heard.) • The DVD player is not working normally. • Turn off the unit, disconnect the power cord, and contact the nearest authorized dealer or Samsung Electronics Service Center. Set C, SL, and SR to a CD or radio, sound is shaking. • Is ...
.... • While "NO DISC" message appears on the main unit for longer than 5 seconds. Troubleshooting Refer to the chart below does not help, turn it back on this DVD player. • Make sure that the rating level is correct. Symptom Check/Remedy Disc tray does not open. • ... The power goes out or strange noise is heard.) • The DVD player is not working normally. • Turn off the unit, disconnect the power cord, and contact the nearest authorized dealer or Samsung Electronics Service Center. Set C, SL, and SR to a CD or radio, sound is shaking. • Is ...


