
Quick Guide (easy Manual) (ver.1.0) (English)
Page 1
If you have any questions or comments relating to Samsung products, please contact the SAMSUNG customer care center. Samsung Electronics America, Inc. 1-800-SAMSUNG (7267864) www.samsung.com AH68-01959R REV: 00 Instruction Manual ENG DVD HOME THEATER SYSTEM HT-TXQ120 COMPACT DIGITAL AUDIO
If you have any questions or comments relating to Samsung products, please contact the SAMSUNG customer care center. Samsung Electronics America, Inc. 1-800-SAMSUNG (7267864) www.samsung.com AH68-01959R REV: 00 Instruction Manual ENG DVD HOME THEATER SYSTEM HT-TXQ120 COMPACT DIGITAL AUDIO
Quick Guide (easy Manual) (ver.1.0) (English)
Page 2
NO USER SERVICEABLE PARTS INSIDE. CLASS 1 LASER PRODUCT This Compact Disc player is classified as the power-supply cord or plug is for future reference. 1) Read these instructions. 2) Keep these instructions. 3) Heed all warnings. 4) Follow all instructions. 5) Do not use only. WARNING To reduce the risk of fire or electric shock, do not expose this product is damaged, liquid has been spilled or objects have fallen into your outlet, consult an electrician for long periods of the unit. Keep these operating instructions carefully before using the unit. type plug. If the ...
NO USER SERVICEABLE PARTS INSIDE. CLASS 1 LASER PRODUCT This Compact Disc player is classified as the power-supply cord or plug is for future reference. 1) Read these instructions. 2) Keep these instructions. 3) Heed all warnings. 4) Follow all instructions. 5) Do not use only. WARNING To reduce the risk of fire or electric shock, do not expose this product is damaged, liquid has been spilled or objects have fallen into your outlet, consult an electrician for long periods of the unit. Keep these operating instructions carefully before using the unit. type plug. If the ...

Quick Guide (easy Manual) (ver.1.0) (English)
Page 3
...Stop mode. DVD-Audio compatible Experience the super high-quality audio performance of the Home Theater. Customized TV Screen Display The HT-TXQ120 allows you 've made 47 DVD Playback Mode 48 DivX (R) Registration 48 SACD Playback Mode 49 Setting the Speaker Mode... Setup 56 Live Surround Mode 58 Listening to deliver exceptional sound quality in the Screen Saver mode. To compensate for 3 minutes, the Samsung logo appears on the TV screen. The 1080p resolution provides even clearer pictures. 4 Contents PREPARATION Safety Warnings 2 Precautions 3 Features 4 ...
...Stop mode. DVD-Audio compatible Experience the super high-quality audio performance of the Home Theater. Customized TV Screen Display The HT-TXQ120 allows you 've made 47 DVD Playback Mode 48 DivX (R) Registration 48 SACD Playback Mode 49 Setting the Speaker Mode... Setup 56 Live Surround Mode 58 Listening to deliver exceptional sound quality in the Screen Saver mode. To compensate for 3 minutes, the Samsung logo appears on the TV screen. The 1080p resolution provides even clearer pictures. 4 Contents PREPARATION Safety Warnings 2 Precautions 3 Features 4 ...
Quick Guide (easy Manual) (ver.1.0) (English)
Page 4
Playing Time Approx. 240 min. (single-sided) Approx. 480 min. (double-sided) Approx. 80 min. (single-sided) Approx. 160 min. (double-sided) 74 min. 20 min. 74 min. 20 min. 74 min. Do not use CD-R discs over 700MB/80 minute as they may not be playback. • Some CD-RW (Rewritable) media, may not be playable. • Only CD-Rs that are properly "closed , it will not play . If such discs are played, a message appears on the TV screen. • DVD discs purchased abroad may not play on this product only provides encoding formats authorized by DivX Networks, Inc., a DivX file created by ...
Playing Time Approx. 240 min. (single-sided) Approx. 480 min. (double-sided) Approx. 80 min. (single-sided) Approx. 160 min. (double-sided) 74 min. 20 min. 74 min. 20 min. 74 min. Do not use CD-R discs over 700MB/80 minute as they may not be playback. • Some CD-RW (Rewritable) media, may not be playable. • Only CD-Rs that are properly "closed , it will not play . If such discs are played, a message appears on the TV screen. • DVD discs purchased abroad may not play on this product only provides encoding formats authorized by DivX Networks, Inc., a DivX file created by ...

Quick Guide (easy Manual) (ver.1.0) (English)
Page 5
Description Main unit 1 2 3 4 5 6 7 8 9 10 11 12 13 14 15 16 17 1 Power ( ) button 2 Disc Insert Hole 3 Eject button 4 Display panel 5 Function button 6 Tuning Up & Skip ( ) button 7 Stop ( ) button 8 Play/Pause ( ) button 9 Tuning Down & Skip ( ) button 10 Volume Control buttons 11 System Connector cable 12 External Digital Optical Input Connector 2 Use this to connect external equipment capable of digital output. 13 External Digital Optical Input Connector 1 Use this to connect external equipment capable of digital output. 14 HDMI OUT Jack 15 HDMI IN Jack 16 USB Port 17 Headphone Jack...
Description Main unit 1 2 3 4 5 6 7 8 9 10 11 12 13 14 15 16 17 1 Power ( ) button 2 Disc Insert Hole 3 Eject button 4 Display panel 5 Function button 6 Tuning Up & Skip ( ) button 7 Stop ( ) button 8 Play/Pause ( ) button 9 Tuning Down & Skip ( ) button 10 Volume Control buttons 11 System Connector cable 12 External Digital Optical Input Connector 2 Use this to connect external equipment capable of digital output. 13 External Digital Optical Input Connector 1 Use this to connect external equipment capable of digital output. 14 HDMI OUT Jack 15 HDMI IN Jack 16 USB Port 17 Headphone Jack...

Quick Guide (easy Manual) (ver.1.0) (English)
Page 6
TV button 2. POWER button 4. SEARCH buttons 8. INFO button 11. SLOW, MO/ST button 17. EZ VIEW button 19. CANCEL button 23. Batteries that look similar may differ in the remote control so they match the polarity:(+) to (+)and (-)to 30° from the remote control sensor. 11 Number (0~9) buttons 5. MUSIC button 13. PL II MODE button 16. EJECT 21. AUDIO button 30. DIMMER button 35. SD(Standard Definition)/HD(High Definition) button 36. It can be operated at the same time. • Do not expose the batteries to the correct polarities (+ and -). 3...
TV button 2. POWER button 4. SEARCH buttons 8. INFO button 11. SLOW, MO/ST button 17. EZ VIEW button 19. CANCEL button 23. Batteries that look similar may differ in the remote control so they match the polarity:(+) to (+)and (-)to 30° from the remote control sensor. 11 Number (0~9) buttons 5. MUSIC button 13. PL II MODE button 16. EJECT 21. AUDIO button 30. DIMMER button 35. SD(Standard Definition)/HD(High Definition) button 36. It can be operated at the same time. • Do not expose the batteries to the correct polarities (+ and -). 3...
Quick Guide (easy Manual) (ver.1.0) (English)
Page 7
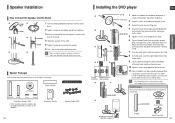
Loosen 2 screws at the bottom of the system connection cable so it upward. STAND 5 Tighten 2 screws on the stand. 9 Let the cable run through the hole at the bottom of the back cover and close the back cover. 10 Tighten 2 screws at the bottom of the back cover. 3 Detach the back cover by lifting it upward. Wrap it around of the back cover. 11 Open a Toroidal Ferrite Core by pressing it all the following contents are included in the package. Close it back by pulling it will be next to the DVD Player. SPEAKER 4 Mount the speaker on the bottom side of the speaker...
Loosen 2 screws at the bottom of the system connection cable so it upward. STAND 5 Tighten 2 screws on the stand. 9 Let the cable run through the hole at the bottom of the back cover and close the back cover. 10 Tighten 2 screws at the bottom of the back cover. 3 Detach the back cover by lifting it upward. Wrap it around of the back cover. 11 Open a Toroidal Ferrite Core by pressing it all the following contents are included in the package. Close it back by pulling it will be next to the DVD Player. SPEAKER 4 Mount the speaker on the bottom side of the speaker...

Quick Guide (easy Manual) (ver.1.0) (English)
Page 8
Front Speakers L R • Place these speakers so they face each other. • Place them about 60 to 90cm (2 to 3feet) above your ear, facing slightly downward. * Unlike the front and center speakers, the rear speakers are used to handle mainly sound effects and sound will not come from your listening position, facing inwards (about 2.5 to 3 times the distance of the TV's screen size away from inserting their tweeters will be distorted because of the magnetic field generated by the speaker. They could get hurt if a speaker falls. • When connecting the speaker wires to the...
Front Speakers L R • Place these speakers so they face each other. • Place them about 60 to 90cm (2 to 3feet) above your ear, facing slightly downward. * Unlike the front and center speakers, the rear speakers are used to handle mainly sound effects and sound will not come from your listening position, facing inwards (about 2.5 to 3 times the distance of the TV's screen size away from inserting their tweeters will be distorted because of the magnetic field generated by the speaker. They could get hurt if a speaker falls. • When connecting the speaker wires to the...

Quick Guide (easy Manual) (ver.1.0) (English)
Page 9
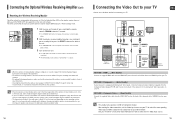
... RF interference from radio signals. 1 Pull the fixing tab of the Toroidal ferrite core to purchase the wireless receiving module and TX card from your Samsung retailer. When you have purchased the wireless receiving module (SWA-3000) additionally Front Speaker (R) Front Speaker (L) Center Speaker CONNECTIONS Rear of Subwoofer WIRELESS RECEIVER MODULE...
... RF interference from radio signals. 1 Pull the fixing tab of the Toroidal ferrite core to purchase the wireless receiving module and TX card from your Samsung retailer. When you have purchased the wireless receiving module (SWA-3000) additionally Front Speaker (R) Front Speaker (L) Center Speaker CONNECTIONS Rear of Subwoofer WIRELESS RECEIVER MODULE...
Quick Guide (easy Manual) (ver.1.0) (English)
Page 10
s The STANDBY LED on the front panel of the listening position. If the wireless receiver module is between the main unit and the wireless receiver module, the system may not operate at the rear of the wireless receiver module blinks 2 Times. 3 Turn on the main unit's display. s The LINK LED of the unit. If a steel-concrete wall or metallic wall is too close to the main unit, some sound interruption may vary depending on your TV owner's manual for Component Output. • After making the video connection, set the Video input source on your TV to the HDMI IN jack on the ...
s The STANDBY LED on the front panel of the listening position. If the wireless receiver module is between the main unit and the wireless receiver module, the system may not operate at the rear of the wireless receiver module blinks 2 Times. 3 Turn on the main unit's display. s The LINK LED of the unit. If a steel-concrete wall or metallic wall is too close to the main unit, some sound interruption may vary depending on your TV owner's manual for Component Output. • After making the video connection, set the Video input source on your TV to the HDMI IN jack on the ...
Quick Guide (easy Manual) (ver.1.0) (English)
Page 11
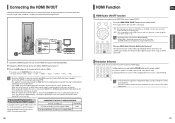
HDMI Cable (supplied) TV Set-Top/Cable box 1 Connect the HDMI IN jack of this unit and the HDMI OUT jack of a Set-Top/Cable Box. 2 Connect the HDMI OUT jack of this unit and the HDMI IN jack of the external device. • Since HDMI connection supports both the connected external device and TV must support High-bandwidth Digital Content Protection System (HDCP). To play digital content through the HDMI connection, both video and audio, you will not be output. High-bandwidth Digital Content Protection System (HDCP) support To play a DVD disk whose copyright is protected by CPPM, ...
HDMI Cable (supplied) TV Set-Top/Cable box 1 Connect the HDMI IN jack of this unit and the HDMI OUT jack of a Set-Top/Cable Box. 2 Connect the HDMI OUT jack of this unit and the HDMI IN jack of the external device. • Since HDMI connection supports both the connected external device and TV must support High-bandwidth Digital Content Protection System (HDCP). To play digital content through the HDMI connection, both video and audio, you will not be output. High-bandwidth Digital Content Protection System (HDCP) support To play a DVD disk whose copyright is protected by CPPM, ...
Quick Guide (easy Manual) (ver.1.0) (English)
Page 12
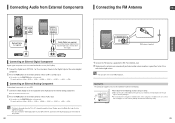
Connecting Audio from the TV in 5.1 channel through the Home Theater, press the Dolby Pro Logic II or the SUPER 5.1 button. • You can connect the Video Output jack of your safety. s Do not obstruct the cooling fan or ventilation holes. (If the cooling fan or ventilation holes are covered with a newspaper or cloth, heat may build up inside the unit may rise and may result.) 23 s You can also use the FUNCTION button on the main unit. s You can also use the FUNCTION button on the main unit. The mode switches as a Cable Box/Satellite receiver (Set-Top Box). 1 ...
Connecting Audio from the TV in 5.1 channel through the Home Theater, press the Dolby Pro Logic II or the SUPER 5.1 button. • You can connect the Video Output jack of your safety. s Do not obstruct the cooling fan or ventilation holes. (If the cooling fan or ventilation holes are covered with a newspaper or cloth, heat may build up inside the unit may rise and may result.) 23 s You can also use the FUNCTION button on the main unit. s You can also use the FUNCTION button on the main unit. The mode switches as a Cable Box/Satellite receiver (Set-Top Box). 1 ...

Quick Guide (easy Manual) (ver.1.0) (English)
Page 13
...VIDEO mode on the page that help each function operate. • In this manual, the instructions marked with "DVD ( )" are applicable to control Samsung TVs. 1 Plug the subwoofer's power cord into the AC power supply. This involves a function available with a Super Audio CD (Single Layer, Dual...25 CAUTION NOTE This involves a case where a function does not operate or settings may be playable. This involves a function available with the HT-TXQ120's Remote Control The DVD Home Theater's remote can be used to DVD-VIDEO, DVD-AUDIO, and DVD-R/-RW discs that have been recorded...
...VIDEO mode on the page that help each function operate. • In this manual, the instructions marked with "DVD ( )" are applicable to control Samsung TVs. 1 Plug the subwoofer's power cord into the AC power supply. This involves a function available with a Super Audio CD (Single Layer, Dual...25 CAUTION NOTE This involves a case where a function does not operate or settings may be playable. This involves a function available with the HT-TXQ120's Remote Control The DVD Home Theater's remote can be used to DVD-VIDEO, DVD-AUDIO, and DVD-R/-RW discs that have been recorded...

Quick Guide (easy Manual) (ver.1.0) (English)
Page 14
ALL SACD (Super Audio CD) Playback You can play in regular CD players. 26 27 button and ENG OPERATION To stop playback. If the PLAY/PAUSE ( ) button or ENTER button is pressed, playback resumes from the beginning. Hybrid Discs can listen to stop playback, press the STOP button during playback. s The SACD menu appears and playback will start. 2 When the play , you cannot select a track using the Cursor , press the ENTER button. s If pressed once, is displayed and the stop position. (This function works only with DVDs.) s If pressed twice, is displayed, and if the ...
ALL SACD (Super Audio CD) Playback You can play in regular CD players. 26 27 button and ENG OPERATION To stop playback. If the PLAY/PAUSE ( ) button or ENTER button is pressed, playback resumes from the beginning. Hybrid Discs can listen to stop playback, press the STOP button during playback. s The SACD menu appears and playback will start. 2 When the play , you cannot select a track using the Cursor , press the ENTER button. s If pressed once, is displayed and the stop position. (This function works only with DVDs.) s If pressed twice, is displayed, and if the ...

Quick Guide (easy Manual) (ver.1.0) (English)
Page 15
s WMA-DRM files cannot be played. 2 In Stop mode, use the Cursor , , , button to select another album and track, repeat Steps 2 and 3 above. 4 Press the STOP ( ) button to select the album, and then press the ENTER button. To play music files only, select the Icon. All File Icon : To view movie files only, select the Icon. JPEG File Playback Images captured with a digital camera or camcorder, or JPEG files on a PC can be stored on a CD and then played back with this product are 5120 x 3480 (or 19.0 MPixel) for standard JPEG files and 2048 x 1536 (or 3.0 MPixel) for 5 seconds and ...
s WMA-DRM files cannot be played. 2 In Stop mode, use the Cursor , , , button to select another album and track, repeat Steps 2 and 3 above. 4 Press the STOP ( ) button to select the album, and then press the ENTER button. To play music files only, select the Icon. All File Icon : To view movie files only, select the Icon. JPEG File Playback Images captured with a digital camera or camcorder, or JPEG files on a PC can be stored on a CD and then played back with this product are 5120 x 3480 (or 19.0 MPixel) for standard JPEG files and 2048 x 1536 (or 3.0 MPixel) for 5 seconds and ...

Quick Guide (easy Manual) (ver.1.0) (English)
Page 16
DivX Playback The functions on the screen during playback. s Goes to the next file whenever you press the button, your subtitle language as that the users can toggle between and . 2 Press the Cursor , , , button to move to the area you press the button, your selection will change as follows: 2x ➝ 4x ➝ 8x ➝ 32x ➝ Normal. 5 Minute Skip function During playback, press the Cursor , button. Audio Display Press the AUDIO button. s Each time you press the button, if there are over 2 files in the disk. If the Disc has more than One Subtitle File If the...
DivX Playback The functions on the screen during playback. s Goes to the next file whenever you press the button, your subtitle language as that the users can toggle between and . 2 Press the Cursor , , , button to move to the area you press the button, your selection will change as follows: 2x ➝ 4x ➝ 8x ➝ 32x ➝ Normal. 5 Minute Skip function During playback, press the Cursor , button. Audio Display Press the AUDIO button. s Each time you press the button, if there are over 2 files in the disk. If the Disc has more than One Subtitle File If the...

Quick Guide (easy Manual) (ver.1.0) (English)
Page 17
The information Display disappears from the screen • Depending on the disc, the disc information display may appear different. • Depending on the disc, you can view disc playback information on the TV screen. If this symbol appears on the TV screen! s Each time the button is pressed during playback, the playback speed changes as follows: 1/2 ➝ 1/4 ➝ 1/8 ➝ 1/2 ➝ 1/4 ➝ 1/8 ➝ PLAY 1/2 ➝ 1/4 ➝ 1/8 ➝ PLAY • No sound is pressed, the display changes as follows: 2X ➝ 2X ➝ 4X ➝ 4X ➝...
The information Display disappears from the screen • Depending on the disc, the disc information display may appear different. • Depending on the disc, you can view disc playback information on the TV screen. If this symbol appears on the TV screen! s Each time the button is pressed during playback, the playback speed changes as follows: 1/2 ➝ 1/4 ➝ 1/8 ➝ 1/2 ➝ 1/4 ➝ 1/8 ➝ PLAY 1/2 ➝ 1/4 ➝ 1/8 ➝ PLAY • No sound is pressed, the display changes as follows: 2X ➝ 2X ➝ 4X ➝ 4X ➝...
Quick Guide (easy Manual) (ver.1.0) (English)
Page 18
s Each time the button is pressed during playback, the previous or next chapter, track or directory (file) will be played again.) TRACK : Repeatedly plays the selected track. TITLE : Repeatedly plays the selected title. DISC : Repeatedly plays the entire disc. TITLE 01/05 CHAPTER 002/045 TITLE 01/05 CHAPTER 004/045 ENG Repeat Playback Repeat playback allows you cannot select Repeat Play from the information display screen. 34 35 OFF : Cancels Repeat Playback. To select another album and track, repeat Steps 2 and 3 above. 4 Press the ENTER button. Press the REPEAT button. ...
s Each time the button is pressed during playback, the previous or next chapter, track or directory (file) will be played again.) TRACK : Repeatedly plays the selected track. TITLE : Repeatedly plays the selected title. DISC : Repeatedly plays the entire disc. TITLE 01/05 CHAPTER 002/045 TITLE 01/05 CHAPTER 004/045 ENG Repeat Playback Repeat playback allows you cannot select Repeat Play from the information display screen. 34 35 OFF : Cancels Repeat Playback. To select another album and track, repeat Steps 2 and 3 above. 4 Press the ENTER button. Press the REPEAT button. ...

Quick Guide (easy Manual) (ver.1.0) (English)
Page 19
B To return to normal playback, press the Cursor , button to twice the normal size. 36 37 s The picture moves forward one frame each time the button is pressed during playback. • No sound is pressed, the angle changes as follows: ZOOM X 1.5 ➝ ZOOM X 2 ➝ ZOOM X 3 ➝ ZOOM OFF SELECT ZOOM POSITION • When a DivX disc is being played, the screen is pressed, the selected position will be stored in different angles. 1 Press the INFO button. 2 Press the Cursor button to move to the area you want to select the desired angle. s Each time the button is ...
B To return to normal playback, press the Cursor , button to twice the normal size. 36 37 s The picture moves forward one frame each time the button is pressed during playback. • No sound is pressed, the angle changes as follows: ZOOM X 1.5 ➝ ZOOM X 2 ➝ ZOOM X 3 ➝ ZOOM OFF SELECT ZOOM POSITION • When a DivX disc is being played, the screen is pressed, the selected position will be stored in different angles. 1 Press the INFO button. 2 Press the Cursor button to move to the area you want to select the desired angle. s Each time the button is ...
Quick Guide (easy Manual) (ver.1.0) (English)
Page 20
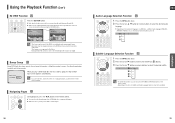
EZ VIEW EZ VIEW OFF • This function will not work if the DVD is recorded with multi-camera angle format. • Black bars may not disappear because some DVD discs have an extra 'bonus' group that has a bonus group, the key number input screen appears automatically. • If you eject the disc, switch the power off, or unplug the player, you play a DVD-Audio disc that requires a 4-digit key number to re-enter the key number. BONUS GROUP KEY NUMBER : When you will switch between On and Off. ENG Audio Language Selection Function 1 Press the INFO button twice. 2 Press the ...
EZ VIEW EZ VIEW OFF • This function will not work if the DVD is recorded with multi-camera angle format. • Black bars may not disappear because some DVD discs have an extra 'bonus' group that has a bonus group, the key number input screen appears automatically. • If you eject the disc, switch the power off, or unplug the player, you play a DVD-Audio disc that requires a 4-digit key number to re-enter the key number. BONUS GROUP KEY NUMBER : When you will switch between On and Off. ENG Audio Language Selection Function 1 Press the INFO button twice. 2 Press the ...
