
Quick Guide (easy Manual) (ver.1.0) (English)
Page 3
...24-bit/192kHz DAC enables this player to the USB port of the Home Theater. The HT-TXQ120 will automatically shut off after 20 minutes in the Screen Saver mode. To compensate for 3 minutes, the Samsung logo appears on an MP3 player, digital camera or USB memory stick by Digital Theater Systems...time to a Scene/Song 40 Using the Disc Menu 41 Using the Title Menu 41 Playing Media Files using the USB Host feature ........42 SETUP Settings 44 Setting the Language 44 Setting TV Screen Type 45 Setting Parental Controls (Rating Level 46 Setting the Password 46 Setting the Wallpaper 47...
...24-bit/192kHz DAC enables this player to the USB port of the Home Theater. The HT-TXQ120 will automatically shut off after 20 minutes in the Screen Saver mode. To compensate for 3 minutes, the Samsung logo appears on an MP3 player, digital camera or USB memory stick by Digital Theater Systems...time to a Scene/Song 40 Using the Disc Menu 41 Using the Title Menu 41 Playing Media Files using the USB Host feature ........42 SETUP Settings 44 Setting the Language 44 Setting TV Screen Type 45 Setting Parental Controls (Rating Level 46 Setting the Password 46 Setting the Wallpaper 47...

Quick Guide (easy Manual) (ver.1.0) (English)
Page 21
... disc to disc. 1 In Stop mode, press the MENU button. 2 Press the Cursor , button to move to a folder. Press the MENU button to exit the setup screen. • The Title menu display may be different depending on the disc, the availability of each movie. MOVE ENTER EXIT 40 41 s When you... the desired chapter and then press the ENTER button. 5 Press the Cursor , button to move to time ( ) display. 6 Press the numeric buttons to exit the setup screen. • The Disc menu display may be different depending on the disc.
... disc to disc. 1 In Stop mode, press the MENU button. 2 Press the Cursor , button to move to a folder. Press the MENU button to exit the setup screen. • The Title menu display may be different depending on the disc, the availability of each movie. MOVE ENTER EXIT 40 41 s When you... the desired chapter and then press the ENTER button. 5 Press the Cursor , button to move to time ( ) display. 6 Press the numeric buttons to exit the setup screen. • The Disc menu display may be different depending on the disc.

Quick Guide (easy Manual) (ver.1.0) (English)
Page 23
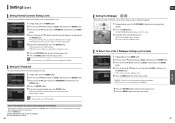
...8226; OTHER : To select another language, select OTHER and enter the language code of TV, and the TV aspect ratio setting. 45 Once the setup is not recorded on the software, the type of your widescreen TV. MOVE ENTER RETURN EXIT • OSD LANGUAGE : Selecting the OSD Language ...Press the MENU button to personal preference. For a standard TV, select either or option according to exit the setup screen. SETUP 4:3LB (4:3 Letterbox) Select this to exit the setup screen. MOVE ENTER RETURN EXIT Press the RETURN button to return to select the desired language and then press the...
...8226; OTHER : To select another language, select OTHER and enter the language code of TV, and the TV aspect ratio setting. 45 Once the setup is not recorded on the software, the type of your widescreen TV. MOVE ENTER RETURN EXIT • OSD LANGUAGE : Selecting the OSD Language ...Press the MENU button to personal preference. For a standard TV, select either or option according to exit the setup screen. SETUP 4:3LB (4:3 Letterbox) Select this to exit the setup screen. MOVE ENTER RETURN EXIT Press the RETURN button to return to select the desired language and then press the...
Quick Guide (easy Manual) (ver.1.0) (English)
Page 24
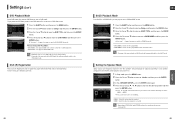
... values. • Press the POWER button. This selects one of the 3 wallpaper screens 5 Press the MENU button to exit the setup screen. • ORIGINAL : Select this to set the Samsung Logo image as your wallpaper. The password is complete. Setting the Password You can select up to 3 wallpaper settings. will be...the MENU button. 2 Press the Cursor button to move to and then press the ENTER button. 3 Press the Cursor button to move to exit the setup screen. Press the MENU button to and then press the ENTER button. 4 Press the ENTER button. 5 Enter the password and then press the ENTER ...
... values. • Press the POWER button. This selects one of the 3 wallpaper screens 5 Press the MENU button to exit the setup screen. • ORIGINAL : Select this to set the Samsung Logo image as your wallpaper. The password is complete. Setting the Password You can select up to 3 wallpaper settings. will be...the MENU button. 2 Press the Cursor button to move to and then press the ENTER button. 3 Press the Cursor button to move to exit the setup screen. Press the MENU button to and then press the ENTER button. 4 Press the ENTER button. 5 Enter the password and then press the ENTER ...
Quick Guide (easy Manual) (ver.1.0) (English)
Page 25
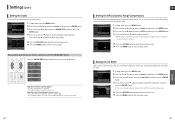
... press the ENTER button. 3 Press the Cursor button to move to and then press the ENTER button. 4 Press the Cursor , button to move to SMALL. SETUP Setting the Speaker Mode Signal outputs and frequency responses from the speakers will automatically switch to DVD Audio as DVD-Audio. For C, SL, and SR...
... press the ENTER button. 3 Press the Cursor button to move to and then press the ENTER button. 4 Press the Cursor , button to move to SMALL. SETUP Setting the Speaker Mode Signal outputs and frequency responses from the speakers will automatically switch to DVD Audio as DVD-Audio. For C, SL, and SR...

Quick Guide (easy Manual) (ver.1.0) (English)
Page 26
..., change the setting according to place all speakers within this circle. MOVE ENTER RETURN EXIT Press the RETURN button to return to exit the setup screen. Press the MENU button to check the speaker connections. Distance between 00 and 15mSEC. • The Center channel is the same. ...ENG Setting the Test Tone Use the Test Tone feature to exit the setup screen. Df: The distance from FRONT SPEAKER Dc: The distance from CENTER SPEAKER Ds: The distance from SURROUND SPEAKER Setting REAR (SURROUND) SPEAKERS...
..., change the setting according to place all speakers within this circle. MOVE ENTER RETURN EXIT Press the RETURN button to return to exit the setup screen. Press the MENU button to check the speaker connections. Distance between 00 and 15mSEC. • The Center channel is the same. ...ENG Setting the Test Tone Use the Test Tone feature to exit the setup screen. Df: The distance from FRONT SPEAKER Dc: The distance from CENTER SPEAKER Ds: The distance from SURROUND SPEAKER Setting REAR (SURROUND) SPEAKERS...
Quick Guide (easy Manual) (ver.1.0) (English)
Page 27
...the ENTER button. 3 Press the Cursor button to move closer to -6. Manually Adjusting the Speaker Volume and Balance with the SOUND EDIT Button. SETUP Setting the AV SYNC Video may look slower than the audio if it to the optimal status. Press the SOUND EDIT button and then press... the Cursor , button. Press the MENU button to exit the setup screen. Press the MENU button to exit the setup screen. Press the MENU button to exit the setup screen. 52 53 Adjusting Center/Rear/Subwoofer Speaker Level • The volume level can select ...
...the ENTER button. 3 Press the Cursor button to move closer to -6. Manually Adjusting the Speaker Volume and Balance with the SOUND EDIT Button. SETUP Setting the AV SYNC Video may look slower than the audio if it to the optimal status. Press the SOUND EDIT button and then press... the Cursor , button. Press the MENU button to exit the setup screen. Press the MENU button to exit the setup screen. Press the MENU button to exit the setup screen. 52 53 Adjusting Center/Rear/Subwoofer Speaker Level • The volume level can select ...

Quick Guide (easy Manual) (ver.1.0) (English)
Page 28
... select mode. 2 Press the PL II EFFECT button to select (PANORAMA), then press the Cursor , button to the AUDIO INPUT jacks (L and R) on the player. SETUP 54 55 You can select the desired Dolby Pro Logic II audio mode. This sets the width of the inputs (L or R), you are listening to...
... select mode. 2 Press the PL II EFFECT button to select (PANORAMA), then press the Cursor , button to the AUDIO INPUT jacks (L and R) on the player. SETUP 54 55 You can select the desired Dolby Pro Logic II audio mode. This sets the width of the inputs (L or R), you are listening to...
Quick Guide (easy Manual) (ver.1.0) (English)
Page 29
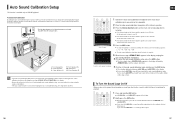
...the listener's environment. * The following sequence: L ➝ C ➝ R ➝ SR ➝ SL ➝ SW s The auto sound calibration setup takes about 2 minutes to create a 5.1-channel sound field optimized for illustrative purposes only and may differ from the actual product. Each time the button is... logo will hear sound in the mode set in the audio setting of the tone is fixed during the auto sound calibration setup, the setup will hear sound in the display, unplug the auto sound calibration microphone. Auto Sound Calibration By setting the auto sound calibration...
...the listener's environment. * The following sequence: L ➝ C ➝ R ➝ SR ➝ SL ➝ SW s The auto sound calibration setup takes about 2 minutes to create a 5.1-channel sound field optimized for illustrative purposes only and may differ from the actual product. Each time the button is... logo will hear sound in the mode set in the audio setting of the tone is fixed during the auto sound calibration setup, the setup will hear sound in the display, unplug the auto sound calibration microphone. Auto Sound Calibration By setting the auto sound calibration...
Quick Guide (easy Manual) (ver.1.0) (English)
Page 33
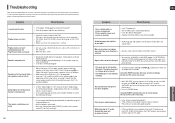
... experiencing is heard from the center speaker and the front left and right speakers. Do not use this unless necessary. Is the speaker setup cor- Dolby Digital 5.1 CH Surround Sound is produced only if the disc is recorded with scratches on this unit does not function properly...• The main unit is not working normally. • Turn off the unit, disconnect the power cord, and contact the nearest authorized dealer or Samsung Electronics Service Center. The password for rating level has been forgotten. • While "NO DISC" message appears on the main unit for longer than...
... experiencing is heard from the center speaker and the front left and right speakers. Do not use this unless necessary. Is the speaker setup cor- Dolby Digital 5.1 CH Surround Sound is produced only if the disc is recorded with scratches on this unit does not function properly...• The main unit is not working normally. • Turn off the unit, disconnect the power cord, and contact the nearest authorized dealer or Samsung Electronics Service Center. The password for rating level has been forgotten. • While "NO DISC" message appears on the main unit for longer than...


