User Manual (user Manual) (ver.2.0) (English)
Page 16
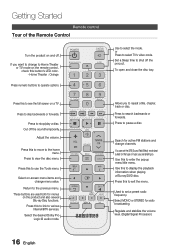
... or disc. Select on-screen menu items and change to Home Theater or TV mode on a TV. or Press to use the Tools menu. Allows you to display the playback information when playing a Blu-ray/DVD disc. Use this to select TV's video mode. Press to various Internet@TV services. Press this to exit the menu. Press to select the mode. Regulate and stabilize the volume level. (Digital Signal Processor) 16 English Cut off the procuct. POWER FUNCTION TV SOURCE BD RECEIVER/TV...
... or disc. Select on-screen menu items and change to Home Theater or TV mode on a TV. or Press to use the Tools menu. Allows you to display the playback information when playing a Blu-ray/DVD disc. Use this to select TV's video mode. Press to various Internet@TV services. Press this to exit the menu. Press to select the mode. Regulate and stabilize the volume level. (Digital Signal Processor) 16 English Cut off the procuct. POWER FUNCTION TV SOURCE BD RECEIVER/TV...

User Manual (user Manual) (ver.2.0) (English)
Page 23
... sound as a TV, projector, DVD player, Blu-ray player, set the Video input source on your TV to match the corresponding Video output (HDMI, Component or Composite) on your product. 02 Connections Connecting External Devices/your TV via HDMI HDMI is the standard digital interface for more . DVD or Blu-ray Player SAT (Satellite/Set top box) SPEAKER IMPEDANCE : 3 HDMI IN FM ANT iPod WIRELESS DIGITAL AUDIO IN OPTICAL HDMI IN HDMI OUT LAN COMPONENT OUT VIDEO OUT HDMI OUT HDMI OUT : Connecting to a TV with an HDMI Cable (BEST QUALITY) Connect an HDMI cable...
... sound as a TV, projector, DVD player, Blu-ray player, set the Video input source on your TV to match the corresponding Video output (HDMI, Component or Composite) on your product. 02 Connections Connecting External Devices/your TV via HDMI HDMI is the standard digital interface for more . DVD or Blu-ray Player SAT (Satellite/Set top box) SPEAKER IMPEDANCE : 3 HDMI IN FM ANT iPod WIRELESS DIGITAL AUDIO IN OPTICAL HDMI IN HDMI OUT LAN COMPONENT OUT VIDEO OUT HDMI OUT HDMI OUT : Connecting to a TV with an HDMI Cable (BEST QUALITY) Connect an HDMI cable...

User Manual (user Manual) (ver.2.0) (English)
Page 35
... the HDMI connection cable only, and audio is output through your product speakers only. • On : Both video and audio signals are transmitted over the HDMI Cable can only use the Musical Room Calibration setup if there is no disc in the following sequence: Front Left Center Front Right Surround Right Surround Back L Surround Back R Surround Left Subwoofer • Press the RETURN button to cancel the Musical Room Calibration Setting. 03 Setup Musical Room Calibration By setting the Musical Room Calibration (MRC) function...
... the HDMI connection cable only, and audio is output through your product speakers only. • On : Both video and audio signals are transmitted over the HDMI Cable can only use the Musical Room Calibration setup if there is no disc in the following sequence: Front Left Center Front Right Surround Right Surround Back L Surround Back R Surround Left Subwoofer • Press the RETURN button to cancel the Musical Room Calibration Setting. 03 Setup Musical Room Calibration By setting the Musical Room Calibration (MRC) function...
User Manual (user Manual) (ver.2.0) (English)
Page 37
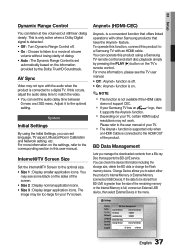
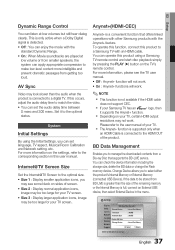
...+ function is supported only when an HDMI Cable is connected to a Samsung TV with an HDMI cable. Internet@TV Screen Size Set the Internet@TV Screen to the optimal setting. You can set language, TV aspect, Musical Room Calibration and Network setting, etc. AV Sync Video may be stored from a Blu-ray Disc that have the Anynet+ feature. Please refer to the user manual of your TV, certain HDMI output resolutions may see the TV user manual. • Off : Anynet+ function...
...+ function is supported only when an HDMI Cable is connected to a Samsung TV with an HDMI cable. Internet@TV Screen Size Set the Internet@TV Screen to the optimal setting. You can set language, TV aspect, Musical Room Calibration and Network setting, etc. AV Sync Video may be stored from a Blu-ray Disc that have the Anynet+ feature. Please refer to the user manual of your TV, certain HDMI output resolutions may see the TV user manual. • Off : Anynet+ function...

User Manual (user Manual) (ver.2.0) (English)
Page 38
... Play function may not work after you format the storage device. The total size of BD Data Management may differ, depending on the software version. Settings Display On-ScCreloecnkMenu : Audio Clock Mode Disc Men:uAuto : | System Clock Set Audio : Network Time Zone Subtitle : GMT + 0:00: LanguageDST : Off Security General Support > Move s Select r Return DivX(R) Registration View DivX(R) VOD Registration Code to get a new registration code. Clock Set time-related functions. Settings Display Audio...
... Play function may not work after you format the storage device. The total size of BD Data Management may differ, depending on the software version. Settings Display On-ScCreloecnkMenu : Audio Clock Mode Disc Men:uAuto : | System Clock Set Audio : Network Time Zone Subtitle : GMT + 0:00: LanguageDST : Off Security General Support > Move s Select r Return DivX(R) Registration View DivX(R) VOD Registration Code to get a new registration code. Clock Set time-related functions. Settings Display Audio...

User Manual (user Manual) (ver.2.0) (English)
Page 39
.... 03 Setup Network Setup To begin setting up the network connection for your product, follow these steps: 1. If you 'll need to find out if your IP address is dynamic, we recommend using the Auto setting. Settings Network Settings Display On-Screen Menu : Internet Protocol Setup : Auto Audio Disc Menu : IP Address :0 0 0 System Audio : Subnet Mask :0 0 0 Network Subtitle : Gateway Language :0 0 0 DNS : Auto Security DNS Server :0 0 0 General \ 0 0 0 0 Support > Move " Select ' Return 2. Manual If the Auto Setting does not work in the...
.... 03 Setup Network Setup To begin setting up the network connection for your product, follow these steps: 1. If you 'll need to find out if your IP address is dynamic, we recommend using the Auto setting. Settings Network Settings Display On-Screen Menu : Internet Protocol Setup : Auto Audio Disc Menu : IP Address :0 0 0 System Audio : Subnet Mask :0 0 0 Network Subtitle : Gateway Language :0 0 0 DNS : Auto Security DNS Server :0 0 0 General \ 0 0 0 0 Support > Move " Select ' Return 2. Manual If the Auto Setting does not work in the...

User Manual (user Manual) (ver.2.0) (English)
Page 40
... selected Auto, press the ▲ button to go to enter numbers. 5. Setup Settings Network Settings Display On-Screen Menu : Internet Protocol Setup : Manual \ Audio Disc Menu : IP Address :0 0 0 0 System Audio : Subnet Mask : 255 255 255 0 Network Subtitle : Gateway Language :0 0 0 0 DNS : Manual Security DNS Server :0 0 0 0 General Support > Move " Select ' Return 4. If you use the ► button to enter the Pass Phrase during the setup process. Setting Up the Network Connection To set up the wireless connection using the PBC (WPS) function...
... selected Auto, press the ▲ button to go to enter numbers. 5. Setup Settings Network Settings Display On-Screen Menu : Internet Protocol Setup : Manual \ Audio Disc Menu : IP Address :0 0 0 0 System Audio : Subnet Mask : 255 255 255 0 Network Subtitle : Gateway Language :0 0 0 0 DNS : Manual Security DNS Server :0 0 0 0 General Support > Move " Select ' Return 4. If you use the ► button to enter the Pass Phrase during the setup process. Setting Up the Network Connection To set up the wireless connection using the PBC (WPS) function...

User Manual (user Manual) (ver.2.0) (English)
Page 41
...• To enter a letter, press the number button that appears, click the Support tab. 4. Setting Up the Wireless Network Connection - Right click the Network icon on your remote, or move from most home networks, you used to select a network, and then press the ENTER button. 6. On the Internet Protocol Setup screen, press the ENTER button. 2. Settings Network Settings Display On-Screen Menu : Access Point Selection : Not Selected \ Audio Disc Menu : Internet Protocol Setup : Manual System Audio : IP Address :0 0 0 0 Network Subtitle : Subnet Mask : 255 255 255...
...• To enter a letter, press the number button that appears, click the Support tab. 4. Setting Up the Wireless Network Connection - Right click the Network icon on your remote, or move from most home networks, you used to select a network, and then press the ENTER button. 6. On the Internet Protocol Setup screen, press the ENTER button. 2. Settings Network Settings Display On-Screen Menu : Access Point Selection : Not Selected \ Audio Disc Menu : Internet Protocol Setup : Manual System Audio : IP Address :0 0 0 0 Network Subtitle : Subnet Mask : 255 255 255...

User Manual (user Manual) (ver.2.0) (English)
Page 44
... update is turned on manually here.) 3. Never turn on the updated product for product malfunction caused by cable or wirelessly, the product will automatically connect to our website each time it on and download update files if any valid upgrade exists. Settings Display Software Upgrade Audio SDoisftcwMareenuUpgrade : SystemCurrent VersionAudio : XXX-XXXXX:XXXX NetworkBy Internet Subtitle : | LanguagAeuto Upgrade Notification : On Security General Support s Select r Return 1. Insert and play the disc...
... update is turned on manually here.) 3. Never turn on the updated product for product malfunction caused by cable or wirelessly, the product will automatically connect to our website each time it on and download update files if any valid upgrade exists. Settings Display Software Upgrade Audio SDoisftcwMareenuUpgrade : SystemCurrent VersionAudio : XXX-XXXXX:XXXX NetworkBy Internet Subtitle : | LanguagAeuto Upgrade Notification : On Security General Support s Select r Return 1. Insert and play the disc...

User Manual (user Manual) (ver.2.0) (English)
Page 58
... only be turned off automatically. Press the ENTER button. 14. Press the GREEN (B) button to upper case. 10. Press the FULL SCREEN button on the remote 3 times to change , depending on the Internet@TV service provider. The Internet@TV service contents may be played using Component or video cables, the video signal will not output or the popup message" cannot play current file" appears. Network Services Using the On-Screen Keypad Through...
... only be turned off automatically. Press the ENTER button. 14. Press the GREEN (B) button to upper case. 10. Press the FULL SCREEN button on the remote 3 times to change , depending on the Internet@TV service provider. The Internet@TV service contents may be played using Component or video cables, the video signal will not output or the popup message" cannot play current file" appears. Network Services Using the On-Screen Keypad Through...
User Manual (user Manual) (ver.2.0) (English)
Page 61
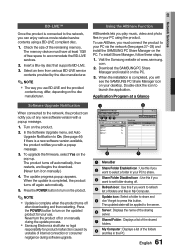
... the PC. 3. When the installation is a new software version available, the product notifies you want to turn it on manually.) 4. The product turns off or on the disc manufacturer. Update icon : Select a folder to share and 5 don't forget to share. 3 Share Folder Disabled icon : Use this button. Insert a Blu-ray disc that supports BD-LIVE. 3. Application Program at a Glance Software Upgrade Notification When...
... the PC. 3. When the installation is a new software version available, the product notifies you want to turn it on manually.) 4. The product turns off or on the disc manufacturer. Update icon : Select a folder to share and 5 don't forget to share. 3 Share Folder Disabled icon : Use this button. Insert a Blu-ray disc that supports BD-LIVE. 3. Application Program at a Glance Software Upgrade Notification When...
User Manual (user Manual) (ver.2.0) (English)
Page 64
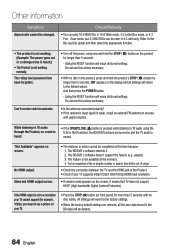
... front panel) for more than 5 seconds. If the HDMI output is set to the Blu-ray Disc jacket and then select the appropriate function. • The product is not working. (Example: The power goes out or a strange noise is heard.) • The Product is weak, install an external FM antenna in an area with no disc in 16:9 Wide mode, 4:3 Letter Box mode, or 4:3 Pan - Do not use...
... front panel) for more than 5 seconds. If the HDMI output is set to the Blu-ray Disc jacket and then select the appropriate function. • The product is not working. (Example: The power goes out or a strange noise is heard.) • The Product is weak, install an external FM antenna in an area with no disc in 16:9 Wide mode, 4:3 Letter Box mode, or 4:3 Pan - Do not use...

User Manual (user Manual) (ver.1.0) (English)
Page 13
... requires installing a separate driver on the manufacturer of the USB device. 5. USB Storage Device 2. Digital Camera 4. POWER FUNCTION TV SOURCE BD RECEIVER/TV SLEEP 1 23 4 56 78 FULL SCREEN 0 9 REPEAT MUTE VOL TUNING SFE MODE /CH DISC MENU TOOLS MENU TITLE MENU POPUP INFO RETURN A B INTERNET@ EXIT TUNER MEMORY C MO/ST D DSP Video Cable FM Antenna iPod Dock User's Manual Remote Control/ Batteries (AAA size) ASC Microphone 13 English USB Devices that is supported.) • Does not operate with the product 1. Removable...
... requires installing a separate driver on the manufacturer of the USB device. 5. USB Storage Device 2. Digital Camera 4. POWER FUNCTION TV SOURCE BD RECEIVER/TV SLEEP 1 23 4 56 78 FULL SCREEN 0 9 REPEAT MUTE VOL TUNING SFE MODE /CH DISC MENU TOOLS MENU TITLE MENU POPUP INFO RETURN A B INTERNET@ EXIT TUNER MEMORY C MO/ST D DSP Video Cable FM Antenna iPod Dock User's Manual Remote Control/ Batteries (AAA size) ASC Microphone 13 English USB Devices that is supported.) • Does not operate with the product 1. Removable...
User Manual (user Manual) (ver.1.0) (English)
Page 37
... audio delay time between 0 msec and 300 msec. Dynamic Range Control You can listen at low volume or from smaller speakers, the system can apply appropriate compression to make low-level content more intelligible and prevent dramatic passages from getting too loud. Internet@TV Screen Size Set the Internet@TV Screen to manage the downloaded contents from a Blu-ray Disc that offers linked operations with other Samsung products with an HDMI cable. Change...
... audio delay time between 0 msec and 300 msec. Dynamic Range Control You can listen at low volume or from smaller speakers, the system can apply appropriate compression to make low-level content more intelligible and prevent dramatic passages from getting too loud. Internet@TV Screen Size Set the Internet@TV Screen to manage the downloaded contents from a Blu-ray Disc that offers linked operations with other Samsung products with an HDMI cable. Change...

User Manual (user Manual) (ver.1.0) (English)
Page 39
... need to the directions for Manual Setup. Press the ▲▼ buttons to select Network Settings, and then press the ENTER button. 4. If it is the easiest and will work , you selected Auto, the Network Function acquires and fills in the majority of the screen. 2. Settings Network Settings Display On-Screen Menu : Internet Protocol Setup : Auto Audio Disc Menu : IP Address :0 0 0 System Audio : Subnet Mask :0 0 0 Network Subtitle : Gateway Language :0 0 0 DNS Security : Auto DNS Server :0 0 0 General \ 0 0 0 0 Support > Move " Select ' Return...
... need to the directions for Manual Setup. Press the ▲▼ buttons to select Network Settings, and then press the ENTER button. 4. If it is the easiest and will work , you selected Auto, the Network Function acquires and fills in the majority of the screen. 2. Settings Network Settings Display On-Screen Menu : Internet Protocol Setup : Auto Audio Disc Menu : IP Address :0 0 0 System Audio : Subnet Mask :0 0 0 Network Subtitle : Gateway Language :0 0 0 DNS Security : Auto DNS Server :0 0 0 General \ 0 0 0 0 Support > Move " Select ' Return...

User Manual (user Manual) (ver.1.0) (English)
Page 40
..., use the other arrow buttons to move successively to the next field. Press the ▲▼ buttons to select Auto or Manual, and then press the ENTER button. 4. The Internet Protocol Setup screen appears. 40 English 2. Press the ▲▼ buttons to select the Internet Protocol Setup, and then press the ENTER button. 3. Enter the numbers as above. 9. Press the ENTER button on the remote control. 3. Setup Settings Network Settings Display On-Screen Menu : Internet Protocol Setup : Manual \ Audio Disc Menu...
..., use the other arrow buttons to move successively to the next field. Press the ▲▼ buttons to select Auto or Manual, and then press the ENTER button. 4. The Internet Protocol Setup screen appears. 40 English 2. Press the ▲▼ buttons to select the Internet Protocol Setup, and then press the ENTER button. 3. Enter the numbers as above. 9. Press the ENTER button on the remote control. 3. Setup Settings Network Settings Display On-Screen Menu : Internet Protocol Setup : Manual \ Audio Disc Menu...

User Manual (user Manual) (ver.1.0) (English)
Page 41
... the Pass Phrase, follow these general directions: • Press the number keys on your remote to enter numbers. • Use the arrow keys on your router or modem. 9. The Network Connecting screen appears. 11. Setting Up the Wireless Network Connection - In the pop-up your remote to move to Step 7. Settings Network Settings Display On-Screen Menu : Access Point Selection : Not Selected \ Audio Disc Menu : Internet Protocol Setup : Manual System Audio : IP Address :0 0 0 0 Network Subtitle : Subnet Mask Language : 255...
... the Pass Phrase, follow these general directions: • Press the number keys on your remote to enter numbers. • Use the arrow keys on your router or modem. 9. The Network Connecting screen appears. 11. Setting Up the Wireless Network Connection - In the pop-up your remote to move to Step 7. Settings Network Settings Display On-Screen Menu : Access Point Selection : Not Selected \ Audio Disc Menu : Internet Protocol Setup : Manual System Audio : IP Address :0 0 0 0 Network Subtitle : Subnet Mask Language : 255...

User Manual (user Manual) (ver.1.0) (English)
Page 42
... you are using BD-LIVE contents. Network Test Use this menu to connect the wired network or check whether your Internet Protocol setup to move successively to the first DNS entry field. General Support Test your network connection is supported on . Language You can also use the ► button to move up, down, and back. 6. Select the network, and then press the ENTER button. 10. Settings Display On-NSectrweoernkMTenstu : Audio Disc Menu : ...
... you are using BD-LIVE contents. Network Test Use this menu to connect the wired network or check whether your Internet Protocol setup to move successively to the first DNS entry field. General Support Test your network connection is supported on . Language You can also use the ► button to move up, down, and back. 6. Select the network, and then press the ENTER button. 10. Settings Display On-NSectrweoernkMTenstu : Audio Disc Menu : ...

User Manual (user Manual) (ver.1.0) (English)
Page 44
... to the USB port of the product (disc tray must be empty) to update the software, then follow the onscreen instructions. ✎ NOTE Software upgrades using the USB Host jack. Contact Samsung Provide contact information for your product. 44 English Setup Support Software Upgrade This menu allows you to upgrade software for product malfunction caused by unstable of internet connection or consumer negligence during software upgrade. A popup message will appear. Settings Display Software Upgrade Audio SDoisftcwMareenuUpgrade : SystemCurrent...
... to the USB port of the product (disc tray must be empty) to update the software, then follow the onscreen instructions. ✎ NOTE Software upgrades using the USB Host jack. Contact Samsung Provide contact information for your product. 44 English Setup Support Software Upgrade This menu allows you to upgrade software for product malfunction caused by unstable of internet connection or consumer negligence during software upgrade. A popup message will appear. Settings Display Software Upgrade Audio SDoisftcwMareenuUpgrade : SystemCurrent...

User Manual (user Manual) (ver.1.0) (English)
Page 61
... way you use . To upgrade the firmware, select Yes. The update progress popup will be completed when the product turns off or on the product manually during software upgrade. Press the POWER button to turn on the PC. 1. To use AllShare, you must have at www.samsung. Application Program at a Glance 1 6 SAMSUNG PC Share Manager File Share Server Help 2345 My Computer C: Document and settings Admin...
... way you use . To upgrade the firmware, select Yes. The update progress popup will be completed when the product turns off or on the product manually during software upgrade. Press the POWER button to turn on the PC. 1. To use AllShare, you must have at www.samsung. Application Program at a Glance 1 6 SAMSUNG PC Share Manager File Share Server Help 2345 My Computer C: Document and settings Admin...


