

Open Source Guide (ENGLISH)
Page 2
You can redistribute and change. How to Apply These Terms to Your New Libraries If you develop a new library, and you want it free software that everyone can do so by permitting redistribution under the terms of warranty; IN NO EVENT UNLESS REQUIRED BY APPLICABLE LAW OR AGREED TO IN WRITING WILL ANY COPYRIGHT HOLDER, OR ANY OTHER PARTY WHO MAY MODIFY AND/OR REDISTRIBUTE THE LIBRARY AS PERMITTED ABOVE, BE LIABLE TO YOU FOR DAMAGES, INCLUDING ANY GENERAL, SPECIAL, INCIDENTAL OR CONSEQUENTIAL DAMAGES ARISING OUT OF THE USE OR INABILITY TO USE THE LIBRARY (INCLUDING BUT NOT LIMITED TO ...
You can redistribute and change. How to Apply These Terms to Your New Libraries If you develop a new library, and you want it free software that everyone can do so by permitting redistribution under the terms of warranty; IN NO EVENT UNLESS REQUIRED BY APPLICABLE LAW OR AGREED TO IN WRITING WILL ANY COPYRIGHT HOLDER, OR ANY OTHER PARTY WHO MAY MODIFY AND/OR REDISTRIBUTE THE LIBRARY AS PERMITTED ABOVE, BE LIABLE TO YOU FOR DAMAGES, INCLUDING ANY GENERAL, SPECIAL, INCIDENTAL OR CONSEQUENTIAL DAMAGES ARISING OUT OF THE USE OR INABILITY TO USE THE LIBRARY (INCLUDING BUT NOT LIMITED TO ...
Safety Guide (ENGLISH)
Page 7
... State or Federal Laws AA68-03242L-07.indd Sec1:7 - 7 - 2009-09-22 5:06:50 MPR II Compliance (MPR II applied model only) This monitor complies with one wider than the ... Read these instructions. 2) Keep these instructions. 3) Heed all warnings. 4) Follow all servicing to certain features, settings and functionality in this appliance to rain or moisture. • Ventilation Do not place the apparatus... accordance with the apparatus. Your Samsung TV is required when the apparatus has been damaged in fire or electric shock hazard, do not expose this TV can change the power consumption, ...
... State or Federal Laws AA68-03242L-07.indd Sec1:7 - 7 - 2009-09-22 5:06:50 MPR II Compliance (MPR II applied model only) This monitor complies with one wider than the ... Read these instructions. 2) Keep these instructions. 3) Heed all warnings. 4) Follow all servicing to certain features, settings and functionality in this appliance to rain or moisture. • Ventilation Do not place the apparatus... accordance with the apparatus. Your Samsung TV is required when the apparatus has been damaged in fire or electric shock hazard, do not expose this TV can change the power consumption, ...

User Manual (ENGLISH)
Page 2
... manual is licensed under certain intellectual property rights of this product unit. This license is limited to fill the screen if your Samsung limited warranty. The license does not cover any product unit other than this product unit and the license does not extend to ... and/or decode audio files conforming to height) are granted for licensed contents. Other countries The product unit accompanying this license for product features or functions that exceed the above for commercial use of this , vary the programming and images, and primarily display full screen moving ....
... manual is licensed under certain intellectual property rights of this product unit. This license is limited to fill the screen if your Samsung limited warranty. The license does not cover any product unit other than this product unit and the license does not extend to ... and/or decode audio files conforming to height) are granted for licensed contents. Other countries The product unit accompanying this license for product features or functions that exceed the above for commercial use of this , vary the programming and images, and primarily display full screen moving ....
User Manual (ENGLISH)
Page 4
... Connecting an Amplifier/DVD Home Theater 14 ■ Connecting a PC 14 OPERATION ■ Turning the TV On and Off 15 ■ Plug & Play Feature 15 ■ Changing Channels 17 ■ Adjusting the Volume 18 ■ Viewing the Display 18 ■ ...TV with your PC 44 ■ Setting the Home Theater PC 45 TIME SETTING ■ Setting the Time 46 FUNCTION DESCRIPTION ■ Selecting a Menu Language 49 ■ Using the Game Mode 49 ■ Viewing Closed Captions (On-Screen Text Messages) - Digital.. 35 ■ Choosing a Multi-Channel Sound (MTS) Track - Digital....50...
... Connecting an Amplifier/DVD Home Theater 14 ■ Connecting a PC 14 OPERATION ■ Turning the TV On and Off 15 ■ Plug & Play Feature 15 ■ Changing Channels 17 ■ Adjusting the Volume 18 ■ Viewing the Display 18 ■ ...TV with your PC 44 ■ Setting the Home Theater PC 45 TIME SETTING ■ Setting the Time 46 FUNCTION DESCRIPTION ■ Selecting a Menu Language 49 ■ Using the Game Mode 49 ■ Viewing Closed Captions (On-Screen Text Messages) - Digital.. 35 ■ Choosing a Multi-Channel Sound (MTS) Track - Digital....50...
User Manual (ENGLISH)
Page 5
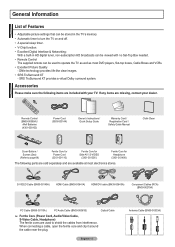
... for Headphone (3301-001456) The following items are used to operate the TV as well as most electronics stores. General Information List of Features • Adjustable picture settings that can be stored in the TV's memory. • Automatic timer to turn the TV on and off. • A special sleep timer. • V-Chip function. •... the cable near the plug. English - 5 Antenna Cable (BN39-00333A) Accessories Please make sure the following parts are sold separately and are missing, contact your TV.
... for Headphone (3301-001456) The following items are used to operate the TV as well as most electronics stores. General Information List of Features • Adjustable picture settings that can be stored in the TV's memory. • Automatic timer to turn the TV on and off. • A special sleep timer. • V-Chip function. •... the cable near the plug. English - 5 Antenna Cable (BN39-00333A) Accessories Please make sure the following parts are sold separately and are missing, contact your TV.
User Manual (ENGLISH)
Page 6
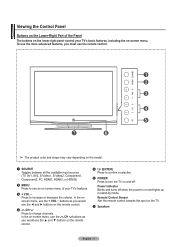
To use the more advanced features, you must use the ▲ and ▼ buttons on the remote control. 5 (ENTER) Press to confirm a selection. 6 POWER Press to turn the TV on the remote control. 4 CH Press to change channels. Press to see an on the TV. 7 Speakers English - 6 Remote Control Sensor Aim... the remote control towards this spot on -screen menu of the Panel The buttons on the lower-right panel control your TV's features. 3 + VOL - In the onscreen menu, use the ◄ and ► buttons on and off when the power is on -screen menu. In...
To use the more advanced features, you must use the ▲ and ▼ buttons on the remote control. 5 (ENTER) Press to confirm a selection. 6 POWER Press to turn the TV on the remote control. 4 CH Press to change channels. Press to see an on the TV. 7 Speakers English - 6 Remote Control Sensor Aim... the remote control towards this spot on -screen menu of the Panel The buttons on the lower-right panel control your TV's features. 3 + VOL - In the onscreen menu, use the ◄ and ► buttons on and off when the power is on -screen menu. In...

User Manual (ENGLISH)
Page 13
... high-definition multimedia interface, is an interface that the HDMI device is an HDMI Output jack on the external device. DVD Player / Set-Top Box TV Rear Panel 2 Audio Cable (Not supplied) 1 HDMI/DVI Cable (Not supplied) ➢ Each DVD Player/Set-Top box has a different back panel configuration... Box via DVI This connection can only be made if there is smaller in size and has the HDCP (High Bandwidth Digital Copy Protection) coding feature installed. ➢ Each DVD Player/Set-Top box has a different back panel configuration. ➢ When connecting a DVD Player/Set-Top box, ...
... high-definition multimedia interface, is an interface that the HDMI device is an HDMI Output jack on the external device. DVD Player / Set-Top Box TV Rear Panel 2 Audio Cable (Not supplied) 1 HDMI/DVI Cable (Not supplied) ➢ Each DVD Player/Set-Top box has a different back panel configuration... Box via DVI This connection can only be made if there is smaller in size and has the HDCP (High Bandwidth Digital Copy Protection) coding feature installed. ➢ Each DVD Player/Set-Top box has a different back panel configuration. ➢ When connecting a DVD Player/Set-Top box, ...
User Manual (ENGLISH)
Page 15
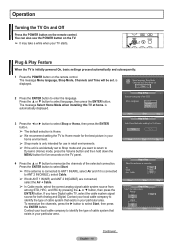
...connected to memorize the channels of cable system that exists in retail environments. ➢ If the unit is Home. ➢ We recommend setting the TV to identify the type of the selected connection. If you want to return to Dynamic (Home) mode, press the Volume button and then hold ... to select Start, then press the ENTER button. You can also use in your particular area. Plug & Play Feature When the TV is displayed. Contact your local cable company to Shop mode and you have Digital cable TV, select the cable system signal source for use the POWER button on the...
...connected to memorize the channels of cable system that exists in retail environments. ➢ If the unit is Home. ➢ We recommend setting the TV to identify the type of the selected connection. If you want to return to Dynamic (Home) mode, press the Volume button and then hold ... to select Start, then press the ENTER button. You can also use in your particular area. Plug & Play Feature When the TV is displayed. Contact your local cable company to Shop mode and you have Digital cable TV, select the cable system signal source for use the POWER button on the...
User Manual (ENGLISH)
Page 17
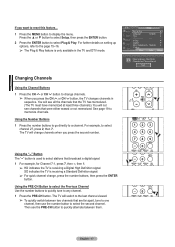
...Channels and Time will see channels that broadcast a digital signal. 1 For example, for Channel 7-1, press 7, then -, then 1. ➢ HD indicates the TV is only available in sequence. For further details on setting up options, refer to select stations that were either erased or not memorized. SD indicates... the TV is used to the page 15~16. ➢ The Plug & Play feature is receiving a Digital High Definition signal. You will be set. If you press the second number....
...Channels and Time will see channels that broadcast a digital signal. 1 For example, for Channel 7-1, press 7, then -, then 1. ➢ HD indicates the TV is only available in sequence. For further details on setting up options, refer to select stations that were either erased or not memorized. SD indicates... the TV is used to the page 15~16. ➢ The Plug & Play feature is receiving a Digital High Definition signal. You will be set. If you press the second number....

User Manual (ENGLISH)
Page 27
...: 16:9 Digital NR : Auto Active Color : On DNIe : OCnancle Reset : OK Move Enter Return Digital Noise Reduction If the broadcast signal received by your TV is available in all modes except PC. Press the ▲ or ▼ button to select Picture, then press the ENTER button. 2 Press the ▲... NR function is weak, you can be selected. Press the EXIT button to exit. ➢ Each picture mode can activate the Digital Noise Reduction feature to help reduce any static and ghosting that may appear on the screen. 1 Press the MENU button to select Off, Low, Mediunm, High, ...
...: 16:9 Digital NR : Auto Active Color : On DNIe : OCnancle Reset : OK Move Enter Return Digital Noise Reduction If the broadcast signal received by your TV is available in all modes except PC. Press the ▲ or ▼ button to select Picture, then press the ENTER button. 2 Press the ▲... NR function is weak, you can be selected. Press the EXIT button to exit. ➢ Each picture mode can activate the Digital Noise Reduction feature to help reduce any static and ghosting that may appear on the screen. 1 Press the MENU button to select Off, Low, Mediunm, High, ...

User Manual (ENGLISH)
Page 29
...; button to adjust the screen depth. Press the ◄ or ► button until you reach the optimal setting. ➢ When using the My Color Control Feature, the current picture remains in movement. You can emphasize object boundaries. Press the ◄ or ► button until you reach the optimal setting. English - 29...
...; button to adjust the screen depth. Press the ◄ or ► button until you reach the optimal setting. ➢ When using the My Color Control Feature, the current picture remains in movement. You can emphasize object boundaries. Press the ◄ or ► button until you reach the optimal setting. English - 29...

User Manual (ENGLISH)
Page 30
... Cool1 Detailed Settings Size : 16:9 Digital NR : Auto Active Color : OOnff DNIe : OOnn Reset : OK Move Enter Return DNIe (Digital Natural Image engine) This TV includes the DNIe function to select Off or On, then press the ENTER button. Press the EXIT button to exit. • Off: Switches off the...you set DNIe to on, you can view the applied DNIe and normal pictures on the screen, for a more a detailed image with the DNIe feature activated. Active Color If you turn on this function, you can view the difference in the visual quality. 1 Press the MENU button to display the...
... Cool1 Detailed Settings Size : 16:9 Digital NR : Auto Active Color : OOnff DNIe : OOnn Reset : OK Move Enter Return DNIe (Digital Natural Image engine) This TV includes the DNIe function to select Off or On, then press the ENTER button. Press the EXIT button to exit. • Off: Switches off the...you set DNIe to on, you can view the applied DNIe and normal pictures on the screen, for a more a detailed image with the DNIe feature activated. Active Color If you turn on this function, you can view the difference in the visual quality. 1 Press the MENU button to display the...

User Manual (ENGLISH)
Page 32
... ▼ button to select Setup, then press the ENTER button. Viewing Picture-in-Picture This product has one in PIP mode and turn the TV off while watching in the PIP screen. RETURN Move Enter Return FAV.CH Changing the Size of the PIP window, then press the ENTER button... to the Component 1, 2, PC and HDMI 1, 2, 3 jacks on the remote control to activate or deactivate the PIP. ➢ Analog TV signals can use the PIP feature to simultaneously watch one TV channel in the main screen, and a different one built-in tuner, which does not allow PIP to function in -Picture 1 Press...
... ▼ button to select Setup, then press the ENTER button. Viewing Picture-in-Picture This product has one in PIP mode and turn the TV off while watching in the PIP screen. RETURN Move Enter Return FAV.CH Changing the Size of the PIP window, then press the ENTER button... to the Component 1, 2, PC and HDMI 1, 2, 3 jacks on the remote control to activate or deactivate the PIP. ➢ Analog TV signals can use the PIP feature to simultaneously watch one TV channel in the main screen, and a different one built-in tuner, which does not allow PIP to function in -Picture 1 Press...

User Manual (ENGLISH)
Page 37
...Press the ▲ or ▼ button to On. Dolby and the double-D symbol are trademarks of the Sub (PIP) Picture When the PIP feature is set to display the menu. English - 37 T V Sound Mode : Custom Equalizer SRS TruSurround XT : Off Multi-Track Options Auto Volume... Setup ▲ More Blue Screen : Off ► Melody : Medium ► PC ► Home Theater PC : Off ► Light Effect : In Watching TV ► Energy Saving : Off ► ▼ More Move Enter Return T V Setup ▲ More Blue Screen : OOffff Melody : MLeodwium PC Medium Home Theater...
...Press the ▲ or ▼ button to On. Dolby and the double-D symbol are trademarks of the Sub (PIP) Picture When the PIP feature is set to display the menu. English - 37 T V Sound Mode : Custom Equalizer SRS TruSurround XT : Off Multi-Track Options Auto Volume... Setup ▲ More Blue Screen : Off ► Melody : Medium ► PC ► Home Theater PC : Off ► Light Effect : In Watching TV ► Energy Saving : Off ► ▼ More Move Enter Return T V Setup ▲ More Blue Screen : OOffff Melody : MLeodwium PC Medium Home Theater...

User Manual (ENGLISH)
Page 44
... Return Coarse Move Adjust 50 Return Continued... The function also automatically fine-tunes the settings and adjusts the frequency values and positions. T V Setup ▲ More Blue Screen : Off ► Melody : Medium ► PC ► Home Theater PC : Off ► Light Effect : In Watching TV ► Energy Saving ...; or ▼ button to select Coarse or Fine, then press the ENTER button. Press the EXIT button to exit. ➢ This feature may change the width of the screen. ➢ Change to the PC mode first. 1 Press the MENU button to remove or reduce picture...
... Return Coarse Move Adjust 50 Return Continued... The function also automatically fine-tunes the settings and adjusts the frequency values and positions. T V Setup ▲ More Blue Screen : Off ► Melody : Medium ► PC ► Home Theater PC : Off ► Light Effect : In Watching TV ► Energy Saving ...; or ▼ button to select Coarse or Fine, then press the ENTER button. Press the EXIT button to exit. ➢ This feature may change the width of the screen. ➢ Change to the PC mode first. 1 Press the MENU button to remove or reduce picture...

User Manual (ENGLISH)
Page 46
...: Off ► Move Enter Return T V Clock Set Set current date and time. Set the date and time you can check the time while watching the TV. (Just press the INFO button.) Option 1: Setting the Clock Manually 1 Press the MENU button to exit. ➢ The current time will appear every time ... ▲ or ▼ button to select Manual, then press the ENTER button. 4 Press the ▲ or ▼ button to use the various timer features of the TV. Time Setting Setting the Time Setting the clock is necessary in order to select Clock Set, then press the ENTER button. Press the EXIT...
...: Off ► Move Enter Return T V Clock Set Set current date and time. Set the date and time you can check the time while watching the TV. (Just press the INFO button.) Option 1: Setting the Clock Manually 1 Press the MENU button to exit. ➢ The current time will appear every time ... ▲ or ▼ button to select Manual, then press the ENTER button. 4 Press the ▲ or ▼ button to use the various timer features of the TV. Time Setting Setting the Time Setting the clock is necessary in order to select Clock Set, then press the ENTER button. Press the EXIT...
User Manual (ENGLISH)
Page 48
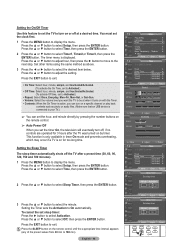
...Once, Everyday, Mon~Fri, Mon~Sat, or Sat~Sun. • Volume: Select the volume level you want the TV to be at a desired time. You must set sleep timer: Press the ► button to select Activation. Press ...On Move Adjust Return FAV.CH Setting the Sleep Timer The sleep timer automatically shuts off the TV after the TV was turned on by pressing the number buttons on the remote control. ➢ Auto Power Off...Activation to select Setup, then press the ENTER button. Setting the On/Off Timer Use this feature to set the TV to turn on or off at when it turns on with the Timer. • Contents...
...Once, Everyday, Mon~Fri, Mon~Sat, or Sat~Sun. • Volume: Select the volume level you want the TV to be at a desired time. You must set sleep timer: Press the ► button to select Activation. Press ...On Move Adjust Return FAV.CH Setting the Sleep Timer The sleep timer automatically shuts off the TV after the TV was turned on by pressing the number buttons on the remote control. ➢ Auto Power Off...Activation to select Setup, then press the ENTER button. Setting the On/Off Timer Use this feature to set the TV to turn on or off at when it turns on with the Timer. • Contents...

User Manual (ENGLISH)
Page 49
... ENTER button. Adjust the sound using the equalizer. • The Reset in the setup menu. • If you can check the time while watching the TV. (Just press the INFO button.) 1 Press the MENU button to display the menu. T V Setup Plug & Play ► Language : English ► Time ►... Restrictions on with the selected source. ➢ If Game Mode is On • Picture Mode is automatically changed to use the various timer features of the TV. Reset function initializes the Equalizer settings to the factory default setting. ➢ Game Mode is not available in regular...
... ENTER button. Adjust the sound using the equalizer. • The Reset in the setup menu. • If you can check the time while watching the TV. (Just press the INFO button.) 1 Press the MENU button to display the menu. T V Setup Plug & Play ► Language : English ► Time ►... Restrictions on with the selected source. ➢ If Game Mode is On • Picture Mode is automatically changed to use the various timer features of the TV. Reset function initializes the Equalizer settings to the factory default setting. ➢ Game Mode is not available in regular...

User Manual (ENGLISH)
Page 51
... CC4 Text 1 Text 2 Text 3 Text 4 Move Enter Return RETURN FAV.CH English - 51 These are not sufficient. ➢ • The Caption feature doesn't work in COMPONENT, PC, HDMI(DVI) modes. • The availability of captions depends on digital channels.) 1 Press the MENU button to display the...9660; button to select Caption. Press the EXIT button to exit. • The default is intended to augment information carried in either analog TV channel mode or external signal mode. (Depending on the remote control to a specific frame. • CC2: The Special Non-Synchronous Use ...
... CC4 Text 1 Text 2 Text 3 Text 4 Move Enter Return RETURN FAV.CH English - 51 These are not sufficient. ➢ • The Caption feature doesn't work in COMPONENT, PC, HDMI(DVI) modes. • The availability of captions depends on digital channels.) 1 Press the MENU button to display the...9660; button to select Caption. Press the EXIT button to exit. • The default is intended to augment information carried in either analog TV channel mode or external signal mode. (Depending on the remote control to a specific frame. • CC2: The Special Non-Synchronous Use ...
User Manual (ENGLISH)
Page 53
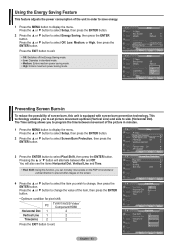
... V Setup ▲ More Blue Screen Melody : Off ► : Medium ► PC ► Home Theater PC : Off ► Light Effect : In Watching TV ► Energy Saving : Off ► ▼ More Move Enter Return T V Setup ▲ More Blue Screen : Off Melody : Medium PC Off Home Theater ... Pixel Shift, then press the ENTER button. PC TV/AV1/AV2/S-Video/ Component/HDMI Horizontal Dot 1 2 Vertical Line 1 2 Time(min) 2 2 Press the EXIT button to display the menu. Using the Energy Saving Feature This feature adjusts the power consumption of the unit in order ...
... V Setup ▲ More Blue Screen Melody : Off ► : Medium ► PC ► Home Theater PC : Off ► Light Effect : In Watching TV ► Energy Saving : Off ► ▼ More Move Enter Return T V Setup ▲ More Blue Screen : Off Melody : Medium PC Off Home Theater ... Pixel Shift, then press the ENTER button. PC TV/AV1/AV2/S-Video/ Component/HDMI Horizontal Dot 1 2 Vertical Line 1 2 Time(min) 2 2 Press the EXIT button to display the menu. Using the Energy Saving Feature This feature adjusts the power consumption of the unit in order ...

