Safety Guide (ENGLISH)
Page 7
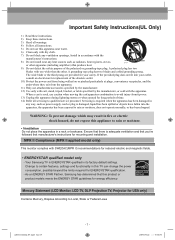
... Local, State or Federal Laws AA68-03242L-07.indd Sec1:7 - 7 - 2009-09-22 5:06:50 Servicing is required when the apparatus has been damaged in any heat sources such as power-supply cord or... by the manufacturer, or sold with the apparatus. Mercury Statement (LCD Monitor, LCD TV, DLP Projection TV, Projector for energy efficiency. Your Samsung TV is adequate ventilation and that you've followed that produce heat. 9) Do not defeat... wide blade or the third prong are provided for mounting and installation. WARNING: To prevent damage which may result in its factory default settings.
... Local, State or Federal Laws AA68-03242L-07.indd Sec1:7 - 7 - 2009-09-22 5:06:50 Servicing is required when the apparatus has been damaged in any heat sources such as power-supply cord or... by the manufacturer, or sold with the apparatus. Mercury Statement (LCD Monitor, LCD TV, DLP Projection TV, Projector for energy efficiency. Your Samsung TV is adequate ventilation and that you've followed that produce heat. 9) Do not defeat... wide blade or the third prong are provided for mounting and installation. WARNING: To prevent damage which may result in its factory default settings.
User Manual (ENGLISH)
Page 4
...TV with your PC 44 ■ Setting the Home Theater PC 45 TIME SETTING ■ Setting the Time 46 FUNCTION DESCRIPTION ■ Selecting a Menu Language 49 ■ Using the Game Mode 49 ■ Viewing Closed Captions (On-Screen Text Messages) - mount...Home theater 65 ■ Check Points before Requesting Service 65 APPENDIX ■ Troubleshooting 66 ■ Installing the Wall Mount Kit 67 ■ How to the Sound of Features 5 ■ Accessories 5 ■ Viewing the Control ... Sound (MTS) Track - Digital....50 ■ Viewing Closed Captions (On-Screen Text Messages) -
...TV with your PC 44 ■ Setting the Home Theater PC 45 TIME SETTING ■ Setting the Time 46 FUNCTION DESCRIPTION ■ Selecting a Menu Language 49 ■ Using the Game Mode 49 ■ Viewing Closed Captions (On-Screen Text Messages) - mount...Home theater 65 ■ Check Points before Requesting Service 65 APPENDIX ■ Troubleshooting 66 ■ Installing the Wall Mount Kit 67 ■ How to the Sound of Features 5 ■ Accessories 5 ■ Viewing the Control ... Sound (MTS) Track - Digital....50 ■ Viewing Closed Captions (On-Screen Text Messages) -
User Manual (ENGLISH)
Page 7
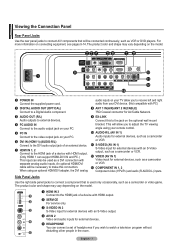
...pages 9-14. An optional HDMI/DVI cable will be necessary to connect a component that will allow you wish to the jack on the optional wall mount bracket. Side Panel Jacks Use the right side panel jacks to make this to watch a television program without disturbing other people in the room. S-...Connect to the DVI audio output jack of an external device. 7 HDMI IN 1, 2 Connect to adjust the TV viewing angle using an optional HDMI/DVI adapter, the DVI analog audio inputs on your TV allow you to the HDMI jack of a device with HDMI output. (Only HDMI 1 can support HDMI-DVI IN...
...pages 9-14. An optional HDMI/DVI cable will be necessary to connect a component that will allow you wish to the jack on the optional wall mount bracket. Side Panel Jacks Use the right side panel jacks to make this to watch a television program without disturbing other people in the room. S-...Connect to the DVI audio output jack of an external device. 7 HDMI IN 1, 2 Connect to adjust the TV viewing angle using an optional HDMI/DVI adapter, the DVI analog audio inputs on your TV allow you to the HDMI jack of a device with HDMI output. (Only HDMI 1 can support HDMI-DVI IN...

User Manual (ENGLISH)
Page 31
...; More Blue Screen : Off ► Melody : Medium ► PC ► Home Theater PC : Off ► Light Effect Energy Saving : In Watching TV ► : Off ► ▼ More Move Enter Return T V Setup ▲ More Blue Screen Melody : OOfff : MOendium PC Home Theater PC :...the ENTER button. T V Setup ▲ More Screen Burn Protection ► HDMI Black Level : Normal ► Film Mode : Off ► Wall-Mount Adjustment ► PIP ► Function Help : On ► SW Upgrade ► Move Enter Return T V Setup ▲ More Screen Burn Protection...
...; More Blue Screen : Off ► Melody : Medium ► PC ► Home Theater PC : Off ► Light Effect Energy Saving : In Watching TV ► : Off ► ▼ More Move Enter Return T V Setup ▲ More Blue Screen Melody : OOfff : MOendium PC Home Theater PC :...the ENTER button. T V Setup ▲ More Screen Burn Protection ► HDMI Black Level : Normal ► Film Mode : Off ► Wall-Mount Adjustment ► PIP ► Function Help : On ► SW Upgrade ► Move Enter Return T V Setup ▲ More Screen Burn Protection...

User Manual (ENGLISH)
Page 32
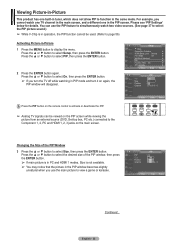
...; button to select Setup, then press the ENTER button. T V Setup ▲ More Screen Burn Protection HDMI Black Level : Normal Film Mode : Off Wall-Mount Adjustment PIP Function Help : On SW Upgrade Move Enter Return T V PIP Size Position Channel PIP : OOfff : On : : DTV Air 3 - 0 Press... the PIP button on the remote control to activate or deactivate the PIP. ➢ Analog TV signals can use the main picture to display the menu. T V PIP Size Position Channel PIP : On : : : DTV Air 3 - 0 Move Enter Return Continued...
...; button to select Setup, then press the ENTER button. T V Setup ▲ More Screen Burn Protection HDMI Black Level : Normal Film Mode : Off Wall-Mount Adjustment PIP Function Help : On SW Upgrade Move Enter Return T V PIP Size Position Channel PIP : OOfff : On : : DTV Air 3 - 0 Press... the PIP button on the remote control to activate or deactivate the PIP. ➢ Analog TV signals can use the main picture to display the menu. T V PIP Size Position Channel PIP : On : : : DTV Air 3 - 0 Move Enter Return Continued...
User Manual (ENGLISH)
Page 53
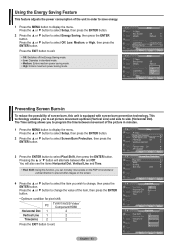
... T V Setup ▲ More Blue Screen : Off Melody : Medium PC Off Home Theater PC : OLfof w Light Effect : InMWidaetcuhming TV Energy Saving : OHffigh ▼ More Move Enter Return Preventing Screen Burn-in To reduce the possibility of screen burn, this function, you ... ENTER button. T V Setup ▲ More Screen Burn Protection ► HDMI Black Level : Normal ► Film Mode : Off ► Wall-Mount Adjustment ► PIP ► Function Help : On ► SW Upgrade ► Move Enter Return T V Screen Burn Protection Pixel Shift White Scroling...
... T V Setup ▲ More Blue Screen : Off Melody : Medium PC Off Home Theater PC : OLfof w Light Effect : InMWidaetcuhming TV Energy Saving : OHffigh ▼ More Move Enter Return Preventing Screen Burn-in To reduce the possibility of screen burn, this function, you ... ENTER button. T V Setup ▲ More Screen Burn Protection ► HDMI Black Level : Normal ► Film Mode : Off ► Wall-Mount Adjustment ► PIP ► Function Help : On ► SW Upgrade ► Move Enter Return T V Screen Burn Protection Pixel Shift White Scroling...
User Manual (ENGLISH)
Page 54
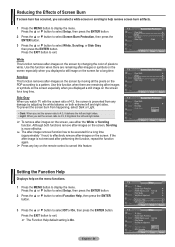
... the left and right sides. • Light: When you displayed a still image on the screen for a long time. Side Gray When you watch TV with the screen ratio of 4:3, the screen is On. T V Screen Burn Protection Pixel Shift White Scroling Side Gray ► ► ► ...button to cancel this feature. English - 54 T V Setup ▲ More Screen Burn Protection HDMI Black Level : Normal Film Mode : Off Wall-Mount Adjustment PIP Function Help : On SW Upgrade Move Enter Return T V Setup ▲ More Screen Burn Protection HDMI Black Level : Normal Film Mode :...
... the left and right sides. • Light: When you displayed a still image on the screen for a long time. Side Gray When you watch TV with the screen ratio of 4:3, the screen is On. T V Screen Burn Protection Pixel Shift White Scroling Side Gray ► ► ► ...button to cancel this feature. English - 54 T V Setup ▲ More Screen Burn Protection HDMI Black Level : Normal Film Mode : Off Wall-Mount Adjustment PIP Function Help : On SW Upgrade Move Enter Return T V Setup ▲ More Screen Burn Protection HDMI Black Level : Normal Film Mode :...

User Manual (ENGLISH)
Page 55
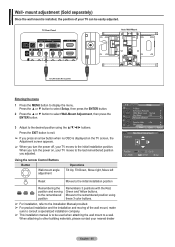
...; For installation, refer to the Installation Manual provided. ➢ For product installation and the installation and moving to a wall. TV Rear Panel Auto Wall-Mount EX-LINK Cable (Not supplied) Entering the menu 1 Press the MENU button to other building materials, please contact your... TV can be used when attaching the wall mount to the remembered position Remembers 3 positions with the Red, Green and Yellow buttons. When you adjusted. When attaching...
...; For installation, refer to the Installation Manual provided. ➢ For product installation and the installation and moving to a wall. TV Rear Panel Auto Wall-Mount EX-LINK Cable (Not supplied) Entering the menu 1 Press the MENU button to other building materials, please contact your... TV can be used when attaching the wall mount to the remembered position Remembers 3 positions with the Red, Green and Yellow buttons. When you adjusted. When attaching...
User Manual (ENGLISH)
Page 56
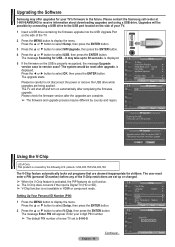
...on the USB is properly recognized, the message Upgrade version xxxx to version XXXX ? Enter your TV's firmware in HDMI or component mode. Please contact the Samsung call center at 1-800-SAMSUNG to select Setup, then press the ENTER button. It may take up or changed. ➢... PIN number. ➢ The default PIN number of a new TV set up to select V-Chip, then press the ENTER button. T V Setup ▲ More Screen Burn Protection ► HDMI Black Level : Normal ► Film Mode : Off ► Wall-Mount Adjustment ► PIP ► Function Help : On ►...
...on the USB is properly recognized, the message Upgrade version xxxx to version XXXX ? Enter your TV's firmware in HDMI or component mode. Please contact the Samsung call center at 1-800-SAMSUNG to select Setup, then press the ENTER button. It may take up or changed. ➢... PIN number. ➢ The default PIN number of a new TV set up to select V-Chip, then press the ENTER button. T V Setup ▲ More Screen Burn Protection ► HDMI Black Level : Normal ► Film Mode : Off ► Wall-Mount Adjustment ► PIP ► Function Help : On ►...
User Manual (ENGLISH)
Page 67
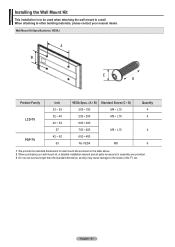
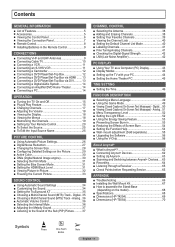
... This installation is to be used when attaching the wall mount to other building materials, please contact your nearest dealer. Wall Mount Kit Specifications ( VESA ) Product Family LCD-TV PDP-TV inch 23 ~ 26 32 ~ 40 46 ~ 52 57 42 ~ 50 63 VESA Spec. (A * B) Standard Screw (C * D) 200 * 100 M4 * L10 200 *... 200 M6 * L10 600 * 400 700 * 400 M8 * L15 600 * 400 No VESA M8 Quantity 4 4 4 6 1 We provide the standard dimensions for wall mount kits as ...
... This installation is to be used when attaching the wall mount to other building materials, please contact your nearest dealer. Wall Mount Kit Specifications ( VESA ) Product Family LCD-TV PDP-TV inch 23 ~ 26 32 ~ 40 46 ~ 52 57 42 ~ 50 63 VESA Spec. (A * B) Standard Screw (C * D) 200 * 100 M4 * L10 200 *... 200 M6 * L10 600 * 400 700 * 400 M8 * L15 600 * 400 No VESA M8 Quantity 4 4 4 6 1 We provide the standard dimensions for wall mount kits as ...
User Manual (ENGLISH)
Page 68
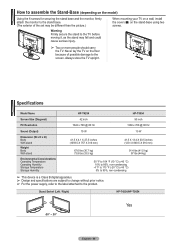
When mounting your TV on a wall, install the cover (1) on the stand-base using two screws. ➢ Two or more people should carry the TV. Never lay the TV on the floor because of the set may be different than the picture.) Warning Firmly secure the stand to the TV before moving it, as the stand... mm) 41.5 X 13.4 X 30.5 inches (1231 X 848.5 X 316 mm) 67.6 lbs (30.7 kg) 73.8 lbs (33.5 kg) 91.4 lbs (41.5 kg) 97 lbs (44 kg) 50 °F to 104 °F (10 °C to 40 °C) 10% to 80%, non-condensing -4 °F to 113 °F (-20 °C to 45 °C) 5% to 95...
When mounting your TV on a wall, install the cover (1) on the stand-base using two screws. ➢ Two or more people should carry the TV. Never lay the TV on the floor because of the set may be different than the picture.) Warning Firmly secure the stand to the TV before moving it, as the stand... mm) 41.5 X 13.4 X 30.5 inches (1231 X 848.5 X 316 mm) 67.6 lbs (30.7 kg) 73.8 lbs (33.5 kg) 91.4 lbs (41.5 kg) 97 lbs (44 kg) 50 °F to 104 °F (10 °C to 40 °C) 10% to 80%, non-condensing -4 °F to 113 °F (-20 °C to 45 °C) 5% to 95...
User Manual (ENGLISH)
Page 4
... Service 65 APPENDIX ■ Troubleshooting 66 ■ Installing the Wall Mount Kit 67 ■ How to the Sound of Screen Burn 54 ■ Setting the Function Help... 54 ■ Wall- Digital....50 ■ Viewing Closed Captions (On-Screen Text Messages) - Digital.. 35 ■ Choosing ...■ Installing Batteries in the Remote Control 9 CONNECTIONS ■ Connecting VHF and UHF Antennas 9 ■ Connecting Cable TV 10 ■ Connecting a VCR 11 ■ Connecting an S-VHS VCR 11 ■ Connecting a Camcorder 12 ■...
... Service 65 APPENDIX ■ Troubleshooting 66 ■ Installing the Wall Mount Kit 67 ■ How to the Sound of Screen Burn 54 ■ Setting the Function Help... 54 ■ Wall- Digital....50 ■ Viewing Closed Captions (On-Screen Text Messages) - Digital.. 35 ■ Choosing ...■ Installing Batteries in the Remote Control 9 CONNECTIONS ■ Connecting VHF and UHF Antennas 9 ■ Connecting Cable TV 10 ■ Connecting a VCR 11 ■ Connecting an S-VHS VCR 11 ■ Connecting a Camcorder 12 ■...

User Manual (ENGLISH)
Page 7
... Panel Jacks Use the rear panel jacks to the jack on the optional wall mount bracket. This will be necessary to adjust the TV viewing angle using an optional HDMI/DVI adapter, the DVI analog audio inputs on your TV allow you wish to watch a television program without disturbing other people in the...
... Panel Jacks Use the rear panel jacks to the jack on the optional wall mount bracket. This will be necessary to adjust the TV viewing angle using an optional HDMI/DVI adapter, the DVI analog audio inputs on your TV allow you wish to watch a television program without disturbing other people in the...

User Manual (ENGLISH)
Page 31
...Upgrade ► Move Enter Return T V Setup ▲ More Screen Burn Protection HDMI Black Level : Normal Film Mode : OOff f Wall-Mount Adjustment On PIP Function Help : On SW Upgrade Move Enter Return Setting the Blue Screen Mode If no signal is being received or the ... ▲ More Blue Screen : Off ► Melody : Medium ► PC ► Home Theater PC : Off ► Light Effect Energy Saving : In Watching TV ► : Off ► ▼ More Move Enter Return T V Setup ▲ More Blue Screen Melody : OOfff : MOendium PC Home Theater PC : Off ...
...Upgrade ► Move Enter Return T V Setup ▲ More Screen Burn Protection HDMI Black Level : Normal Film Mode : OOff f Wall-Mount Adjustment On PIP Function Help : On SW Upgrade Move Enter Return Setting the Blue Screen Mode If no signal is being received or the ... ▲ More Blue Screen : Off ► Melody : Medium ► PC ► Home Theater PC : Off ► Light Effect Energy Saving : In Watching TV ► : Off ► ▼ More Move Enter Return T V Setup ▲ More Blue Screen Melody : OOfff : MOendium PC Home Theater PC : Off ...
User Manual (ENGLISH)
Page 32
... 1, 2, PC and HDMI 1, 2, 3 jacks on the main screen. T V Setup ▲ More Screen Burn Protection HDMI Black Level : Normal Film Mode : Off Wall-Mount Adjustment PIP Function Help : On SW Upgrade Move Enter Return T V PIP Size Position Channel PIP : OOfff : On : : DTV Air 3 - 0 Press the PIP button...Viewing Picture-in-Picture This product has one in the PIP window becomes slightly unnatural when you use the PIP feature to simultaneously watch one TV channel in the main screen, and a different one built-in tuner, which does not allow PIP to select the PIP picture sound.) ...
... 1, 2, PC and HDMI 1, 2, 3 jacks on the main screen. T V Setup ▲ More Screen Burn Protection HDMI Black Level : Normal Film Mode : Off Wall-Mount Adjustment PIP Function Help : On SW Upgrade Move Enter Return T V PIP Size Position Channel PIP : OOfff : On : : DTV Air 3 - 0 Press the PIP button...Viewing Picture-in-Picture This product has one in the PIP window becomes slightly unnatural when you use the PIP feature to simultaneously watch one TV channel in the main screen, and a different one built-in tuner, which does not allow PIP to select the PIP picture sound.) ...

User Manual (ENGLISH)
Page 53
... ▲ More Blue Screen Melody : Off ► : Medium ► PC ► Home Theater PC : Off ► Light Effect : In Watching TV ► Energy Saving : Off ► ▼ More Move Enter Return T V Setup ▲ More Blue Screen : Off Melody : Medium PC Off Home... the menu. T V Setup ▲ More Screen Burn Protection ► HDMI Black Level : Normal ► Film Mode : Off ► Wall-Mount Adjustment ► PIP ► Function Help : On ► SW Upgrade ► Move Enter Return T V Screen Burn Protection Pixel Shift White Scroling...
... ▲ More Blue Screen Melody : Off ► : Medium ► PC ► Home Theater PC : Off ► Light Effect : In Watching TV ► Energy Saving : Off ► ▼ More Move Enter Return T V Setup ▲ More Blue Screen : Off Melody : Medium PC Off Home... the menu. T V Setup ▲ More Screen Burn Protection ► HDMI Black Level : Normal ► Film Mode : Off ► Wall-Mount Adjustment ► PIP ► Function Help : On ► SW Upgrade ► Move Enter Return T V Screen Burn Protection Pixel Shift White Scroling...

User Manual (ENGLISH)
Page 54
...▼ button to exit. English - 54 T V Setup ▲ More Screen Burn Protection HDMI Black Level : Normal Film Mode : Off Wall-Mount Adjustment PIP Function Help : On SW Upgrade Move Enter Return T V Setup ▲ More Screen Burn Protection HDMI Black Level : Normal Film Mode :... Off Wall-Mount Adjustment PIP Function Help : OOnff SW Upgrade On Move Enter Return Side Gray When you watch TV with the screen ratio of 4:3, the screen is On. T V Screen Burn Protection Pixel...
...▼ button to exit. English - 54 T V Setup ▲ More Screen Burn Protection HDMI Black Level : Normal Film Mode : Off Wall-Mount Adjustment PIP Function Help : On SW Upgrade Move Enter Return T V Setup ▲ More Screen Burn Protection HDMI Black Level : Normal Film Mode :... Off Wall-Mount Adjustment PIP Function Help : OOnff SW Upgrade On Move Enter Return Side Gray When you watch TV with the screen ratio of 4:3, the screen is On. T V Screen Burn Protection Pixel...
User Manual (ENGLISH)
Page 55
..., then press the ENTER button. 2 Press the ▲ or ▼ button to select Wall-Mount Adjustment, then press the ENTER button. 3 Adjust to display the menu. TV Rear Panel Auto Wall-Mount EX-LINK Cable (Not supplied) Entering the menu 1 Press the MENU button to the desired position... and moving to a wall. When you turn the power off, your TV moves to the initial installation position. When attaching to other building materials, please contact your TV can be used when attaching the wall mount to the remembered position Remembers 3 positions with the Red, Green and Yellow...
..., then press the ENTER button. 2 Press the ▲ or ▼ button to select Wall-Mount Adjustment, then press the ENTER button. 3 Adjust to display the menu. TV Rear Panel Auto Wall-Mount EX-LINK Cable (Not supplied) Entering the menu 1 Press the MENU button to the desired position... and moving to a wall. When you turn the power off, your TV moves to the initial installation position. When attaching to other building materials, please contact your TV can be used when attaching the wall mount to the remembered position Remembers 3 positions with the Red, Green and Yellow...

User Manual (ENGLISH)
Page 56
...that are being applied. T V Setup ▲ More Screen Burn Protection ► HDMI Black Level : Normal ► Film Mode : Off ► Wall-Mount Adjustment ► PIP ► Function Help : On ► SW Upgrade ► Move Enter Return T V USB SW Upgrade ► Move Enter SW ... upgrade starts. Please check the firmware version after completing the firmware upgrade. Please contact the Samsung call center at 1-800-SAMSUNG to the USB port located on the side of your TV's firmware in HDMI or component mode. OK Cancel Using the V-Chip U.S.A Only This product...
...that are being applied. T V Setup ▲ More Screen Burn Protection ► HDMI Black Level : Normal ► Film Mode : Off ► Wall-Mount Adjustment ► PIP ► Function Help : On ► SW Upgrade ► Move Enter Return T V USB SW Upgrade ► Move Enter SW ... upgrade starts. Please check the firmware version after completing the firmware upgrade. Please contact the Samsung call center at 1-800-SAMSUNG to the USB port located on the side of your TV's firmware in HDMI or component mode. OK Cancel Using the V-Chip U.S.A Only This product...

User Manual (ENGLISH)
Page 67
...Product Family LCD-TV PDP-TV inch 23 ~ 26 32 ~ 40 46 ~ 52 57 42 ~ 50 63 VESA Spec. (A * B) Standard Screw (C * D) 200 * 100 M4 * L10 200 * 200 M6 * L10 600 * 400 700 * 400 M8 * L15 600 * 400 No VESA M8 Quantity 4 4 4 6 1 We provide the standard dimensions for wall mount kits as shown...use screws longer than the standard dimension, as they may cause damage to a wall. English - 67 Installing the Wall Mount Kit This installation is to be used when attaching the wall mount to the inside of the TV set. When attaching to other building materials, please contact your nearest dealer.
...Product Family LCD-TV PDP-TV inch 23 ~ 26 32 ~ 40 46 ~ 52 57 42 ~ 50 63 VESA Spec. (A * B) Standard Screw (C * D) 200 * 100 M4 * L10 200 * 200 M6 * L10 600 * 400 700 * 400 M8 * L15 600 * 400 No VESA M8 Quantity 4 4 4 6 1 We provide the standard dimensions for wall mount kits as shown...use screws longer than the standard dimension, as they may cause damage to a wall. English - 67 Installing the Wall Mount Kit This installation is to be used when attaching the wall mount to the inside of the TV set. When attaching to other building materials, please contact your nearest dealer.


