User Manual (ENGLISH)
Page 2
...such as stock market reports, video game displays, station logos, web sites or computer graphics and patterns, should be limited as a full screen picture. On PDP models that leave subtle, but permanent burned-in ghost images in the wide screen 16:9 ratio format, or expanded to no ...third parties. Displaying stationary graphics and images on nonexpanded standard format television video and programming, should be limited to fill the screen if your Samsung limited warranty. The license only covers the use , as well as the dark side-bars on screen, such as burned-in combination ...
...such as stock market reports, video game displays, station logos, web sites or computer graphics and patterns, should be limited as a full screen picture. On PDP models that leave subtle, but permanent burned-in ghost images in the wide screen 16:9 ratio format, or expanded to no ...third parties. Displaying stationary graphics and images on nonexpanded standard format television video and programming, should be limited to fill the screen if your Samsung limited warranty. The license only covers the use , as well as the dark side-bars on screen, such as burned-in combination ...
User Manual (ENGLISH)
Page 4
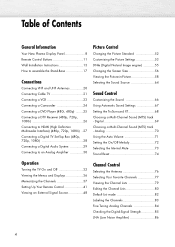
...(Low Noise Amplifier 86 4 Digital 69 Choosing a Multi-Channel Sound (MTS) track - Table of Contents General Information Your New Plasma Display Panel 8 Remote Control Buttons 11 Wall Installation Instructions 13 How to assemble the Stand-Base 17 Connections Connecting VHF and UHF ...Interface) (480p, 720p, 1080i) ..27 Connecting a Digital TV Set-Top Box (480p, 720p, 1080i 28 Connecting a Digital Audio System 29 Connecting to an Analog Amplifier 30 Picture Control Changing the Picture Standard 52 Customizing the Picture Settings 53 DNIe (Digital Natural Image engine 55 Changing the ...
...(Low Noise Amplifier 86 4 Digital 69 Choosing a Multi-Channel Sound (MTS) track - Table of Contents General Information Your New Plasma Display Panel 8 Remote Control Buttons 11 Wall Installation Instructions 13 How to assemble the Stand-Base 17 Connections Connecting VHF and UHF ...Interface) (480p, 720p, 1080i) ..27 Connecting a Digital TV Set-Top Box (480p, 720p, 1080i 28 Connecting a Digital Audio System 29 Connecting to an Analog Amplifier 30 Picture Control Changing the Picture Standard 52 Customizing the Picture Settings 53 DNIe (Digital Natural Image engine 55 Changing the ...
User Manual (ENGLISH)
Page 5
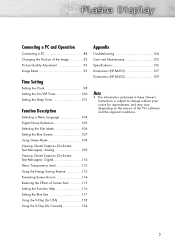
... 134 Care and Maintenance 135 Specifications 136 Dimensions (HP-S4253 137 Dimensions (HP-S5053 139 Note • The information contained in these Owner's Instructions is subject to change without prior notice for improvement, and may vary depending on the version of the Image 92 Picture Quality Adjustment 93 Image Reset 95 Time Setting Setting... Screen 107 Using Game Mode 108 Viewing Closed Captions (On-Screen Text Messages) - Connecting a PC and Operation Connecting a PC 88 Changing the Position of the TV's software and the regional conditions. 5
... 134 Care and Maintenance 135 Specifications 136 Dimensions (HP-S4253 137 Dimensions (HP-S5053 139 Note • The information contained in these Owner's Instructions is subject to change without prior notice for improvement, and may vary depending on the version of the Image 92 Picture Quality Adjustment 93 Image Reset 95 Time Setting Setting... Screen 107 Using Game Mode 108 Viewing Closed Captions (On-Screen Text Messages) - Connecting a PC and Operation Connecting a PC 88 Changing the Position of the TV's software and the regional conditions. 5
User Manual (ENGLISH)
Page 11
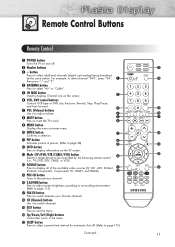
...Press to exit the menu. ¿ Up/Down/Left/Right buttons Control the cursor in picture. (Refer to page 58) INFO button Press to display information on the TV screen. Ò Mode (TV/DVD/STB/CABLE/VCR) button Selects a target device to adjust volume. " MUTE button ... Continued... 11 button Press to select additional channels (digital and analog) being broadcast by the Samsung remote control (i.e., TV, DVD, STB, CABLE, or VCR). Ú SOURCE button Press to display all of the available video sources (TV, AV1, AV2, S-Video1, S-Video2, Component1, Component2, PC, HDMI1, and HDMI2). ...
...Press to exit the menu. ¿ Up/Down/Left/Right buttons Control the cursor in picture. (Refer to page 58) INFO button Press to display information on the TV screen. Ò Mode (TV/DVD/STB/CABLE/VCR) button Selects a target device to adjust volume. " MUTE button ... Continued... 11 button Press to select additional channels (digital and analog) being broadcast by the Samsung remote control (i.e., TV, DVD, STB, CABLE, or VCR). Ú SOURCE button Press to display all of the available video sources (TV, AV1, AV2, S-Video1, S-Video2, Component1, Component2, PC, HDMI1, and HDMI2). ...
User Manual (ENGLISH)
Page 12
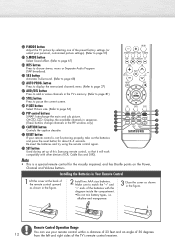
...1 Lift the cover at the back of the remote control upward as shown in the TV's memory. (Refer to page 81) ÷ STILL button Press to pause the current screen. ® P.SIZE button Select Picture size. (Refer to page 37) - Re-insert the batteries and try using the ...(SAP broadcast). ≠ SRS button Activates TruSurround. (Refer to match the "+" and "-" ends of the TV's remote control receiver. ˛ P.MODE button Adjust the TV picture by selecting one of this Samsung remote control, so that it will work compatibly with the diagram inside the compartment. •Do not mix battery...
...1 Lift the cover at the back of the remote control upward as shown in the TV's memory. (Refer to page 81) ÷ STILL button Press to pause the current screen. ® P.SIZE button Select Picture size. (Refer to page 37) - Re-insert the batteries and try using the ...(SAP broadcast). ≠ SRS button Activates TruSurround. (Refer to match the "+" and "-" ends of the TV's remote control receiver. ˛ P.MODE button Adjust the TV picture by selecting one of this Samsung remote control, so that it will work compatibly with the diagram inside the compartment. •Do not mix battery...
User Manual (ENGLISH)
Page 14
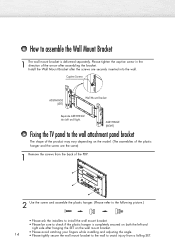
ASSY-HINGE (RIGHT) Fixing the TV panel to the wall attachment panel bracket The shape of the product may vary depending on the wall mount bracket. • Please avoid catching your ... to the wall to avoid injury from the back of the PDP. 2 Use the screw and assemble the plastic hanger. (Please refer to the following picture.) • Please ask the installers to install the wall mount bracket. • Please be sure to assemble the Wall Mount Bracket 1 The wall mount bracket...
ASSY-HINGE (RIGHT) Fixing the TV panel to the wall attachment panel bracket The shape of the product may vary depending on the wall mount bracket. • Please avoid catching your ... to the wall to avoid injury from the back of the PDP. 2 Use the screw and assemble the plastic hanger. (Please refer to the following picture.) • Please ask the installers to install the wall mount bracket. • Please be sure to assemble the Wall Mount Bracket 1 The wall mount bracket...
User Manual (ENGLISH)
Page 15
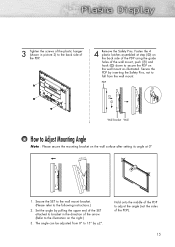
... the back side of the PDP. 4 Remove the Safety Pins. Secure the PDP by pulling the upper end of the SET attached to bracket in picture 2) to the illustration on the wall surface after setting its angle at step (#) on the wall mount as illustrated. Secure the SET to the wall...
... the back side of the PDP. 4 Remove the Safety Pins. Secure the PDP by pulling the upper end of the SET attached to bracket in picture 2) to the illustration on the wall surface after setting its angle at step (#) on the wall mount as illustrated. Secure the SET to the wall...

User Manual (ENGLISH)
Page 17
Always store the TV upright. 17 How to assemble the Stand-Base 1 Using the 4 screws for securing the stand pegs and the monitor, firmly attach the monitor to the stand pegs. (The exterior of possible damage to the TV before moving it, as the stand may fall and could cause serious injury. ➤ Two or more people should carry the TV. Never lay the TV on the floor because of the set may be different than the picture.) Warning Firmly secure the stand to the screen.
Always store the TV upright. 17 How to assemble the Stand-Base 1 Using the 4 screws for securing the stand pegs and the monitor, firmly attach the monitor to the stand pegs. (The exterior of possible damage to the TV before moving it, as the stand may fall and could cause serious injury. ➤ Two or more people should carry the TV. Never lay the TV on the floor because of the set may be different than the picture.) Warning Firmly secure the stand to the screen.
User Manual (ENGLISH)
Page 26
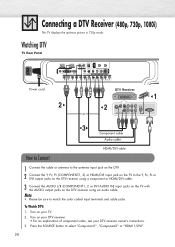
...Connect the cable or antenna to the antenna input jack on the DTV. 2 Connect the Y, PB, PR (COMPONENT1, 2) or HDMI/DVI input jack on the TV to the Y, PB, PR or DVI output jacks on the DTV receiver using an audio cable. Press the SOURCE button to match the color coded... input terminals and cable jacks. To Watch DTV: 1. Connecting a DTV Receiver (480p, 720p, 1080i) This TV displays the optimum picture in 720p mode. Note • Please be sure to select "Component1", "Component2" or "HDMI 1/DVI". 26 Turn on your DTV receiver. • ...
...Connect the cable or antenna to the antenna input jack on the DTV. 2 Connect the Y, PB, PR (COMPONENT1, 2) or HDMI/DVI input jack on the TV to the Y, PB, PR or DVI output jacks on the DTV receiver using an audio cable. Press the SOURCE button to match the color coded... input terminals and cable jacks. To Watch DTV: 1. Connecting a DTV Receiver (480p, 720p, 1080i) This TV displays the optimum picture in 720p mode. Note • Please be sure to select "Component1", "Component2" or "HDMI 1/DVI". 26 Turn on your DTV receiver. • ...

User Manual (ENGLISH)
Page 28
... compatible with the AUDIO output jacks on the Set-Top Box using an audio cable. Connecting to HDMI (High Definition Multimedia Interface)/DVI Compatible TV Rear Panel Power cord 1 2 DTV Set-Top Box HDMI/DVI cable Audio cable From cable or Antenna How to the HDMI input jack... on the TV, High-Definition pictures can be displayed on the screen in their digital form. Connecting a Digital TV Set-Top Box (480p, 720p, 1080i) By inputting a high-bandwidth digital content protection High-Definition...
... compatible with the AUDIO output jacks on the Set-Top Box using an audio cable. Connecting to HDMI (High Definition Multimedia Interface)/DVI Compatible TV Rear Panel Power cord 1 2 DTV Set-Top Box HDMI/DVI cable Audio cable From cable or Antenna How to the HDMI input jack... on the TV, High-Definition pictures can be displayed on the screen in their digital form. Connecting a Digital TV Set-Top Box (480p, 720p, 1080i) By inputting a high-bandwidth digital content protection High-Definition...
User Manual (ENGLISH)
Page 36
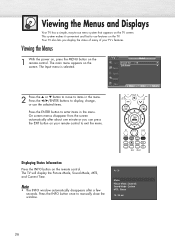
...screen automatically after a few seconds. Viewing the Menus and Displays Your TV has a simple, easy-to exit the menu. Your TV also lets you can press the EXIT button on the TV screen. The TV will display the Picture Mode, Sound Mode, MTS, and Current Time. Move Enter Return Displaying... Status Information Press the INFO button on the TV. Press the INFO button once to items in the menu. Air 28 Mono Picture Mode : Dynamic Sound Mode : Custom MTS : Stereo 12 : 00 am 36 TV Input Source List : TV √ Edit Name √ 2 Press the ▲ ...
...screen automatically after a few seconds. Viewing the Menus and Displays Your TV has a simple, easy-to exit the menu. Your TV also lets you can press the EXIT button on the TV screen. The TV will display the Picture Mode, Sound Mode, MTS, and Current Time. Move Enter Return Displaying... Status Information Press the INFO button on the TV. Press the INFO button once to items in the menu. Air 28 Mono Picture Mode : Dynamic Sound Mode : Custom MTS : Stereo 12 : 00 am 36 TV Input Source List : TV √ Edit Name √ 2 Press the ▲ ...
User Manual (ENGLISH)
Page 40
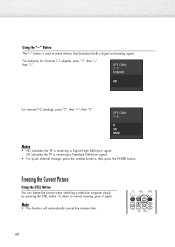
... Button You can freeze the picture when watching a television program simply by pressing the STILL button. SD indicates the TV is receiving a Digital High Definition signal. To return to select stations that broadcast both a digital and analog signal. DTV Cable 7 - 2 R SD Multi Notes • HD indicates the TV is receiving a Standard Definition signal...
... Button You can freeze the picture when watching a television program simply by pressing the STILL button. SD indicates the TV is receiving a Digital High Definition signal. To return to select stations that broadcast both a digital and analog signal. DTV Cable 7 - 2 R SD Multi Notes • HD indicates the TV is receiving a Standard Definition signal...
User Manual (ENGLISH)
Page 51
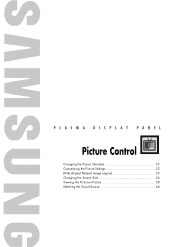
PLASMA DISPLAY PANEL Picture Control Changing the Picture Standard 52 Customizing the Picture Settings 53 DNIe (Digital Natural Image engine 55 Changing the Screen Size 56 Viewing the Picture-in-Picture 58 Selecting the Sound Source 64
PLASMA DISPLAY PANEL Picture Control Changing the Picture Standard 52 Customizing the Picture Settings 53 DNIe (Digital Natural Image engine 55 Changing the Screen Size 56 Viewing the Picture-in-Picture 58 Selecting the Sound Source 64

User Manual (ENGLISH)
Page 52
TV Mode Mode Contrast Brightness Sharpness Color Tint G 50 Color Tone Reset : Dynamic √ 100 45 75 55 R 50 : Cool1 √ Move Enter Return 3 Press the ENTER button. DNIe Film Mode Blue Screen PIP Picture : Dynamic √ : 16:9 √ : On √ : On...picture which best corresponds to select "Picture", then press the ENTER button. Press the ▲ or ▼ button to your viewing requirements. 1 Press the MENU button. TV Mode Mode Contrast Brightness Sharpness Color Tint G 50 Color Tone Reset : DDyynnaammiicc Standa1rd00 Movie 45 Custom75 55 R 50...
TV Mode Mode Contrast Brightness Sharpness Color Tint G 50 Color Tone Reset : Dynamic √ 100 45 75 55 R 50 : Cool1 √ Move Enter Return 3 Press the ENTER button. DNIe Film Mode Blue Screen PIP Picture : Dynamic √ : 16:9 √ : On √ : On...picture which best corresponds to select "Picture", then press the ENTER button. Press the ▲ or ▼ button to your viewing requirements. 1 Press the MENU button. TV Mode Mode Contrast Brightness Sharpness Color Tint G 50 Color Tone Reset : DDyynnaammiicc Standa1rd00 Movie 45 Custom75 55 R 50...

User Manual (ENGLISH)
Page 53
... NR DNIe Film Mode Blue Screen PIP Picture : Dynamic √ : 16:9 √ : On √ : On √ : Off √ : Off √ Move Enter Return TV Mode Mode Contrast Brightness Sharpness Color Tint G 50 Color Tone Reset : Dynamic √ 100 45 75 55 R 50 : Cool1 √ Move Enter Return TV Mode Mode Contrast Brightness Sharpness Color Tint...
... NR DNIe Film Mode Blue Screen PIP Picture : Dynamic √ : 16:9 √ : On √ : On √ : Off √ : Off √ Move Enter Return TV Mode Mode Contrast Brightness Sharpness Color Tint G 50 Color Tone Reset : Dynamic √ 100 45 75 55 R 50 : Cool1 √ Move Enter Return TV Mode Mode Contrast Brightness Sharpness Color Tint...

User Manual (ENGLISH)
Page 54
... √ 80 50 50 50 R 50 : Cool1 √ Move Enter Return 54 TV Mode Mode Contrast Brightness Sharpness Color Tint G 50 Color Tone Reset : Custom √ 80 50 50 50 R 50 : Cool1 √ Move Enter Return TV Mode Mode Contrast Brightness Sharpness Color Tint G 50 Color Tone Reset : Custom 80 Cool2 50 Cool1 50 Normal50 Warm1R 50 : CWoaorl1m2 Move Enter Return Resetting the Picture Settings to...
... √ 80 50 50 50 R 50 : Cool1 √ Move Enter Return 54 TV Mode Mode Contrast Brightness Sharpness Color Tint G 50 Color Tone Reset : Custom √ 80 50 50 50 R 50 : Cool1 √ Move Enter Return TV Mode Mode Contrast Brightness Sharpness Color Tint G 50 Color Tone Reset : Custom 80 Cool2 50 Cool1 50 Normal50 Warm1R 50 : CWoaorl1m2 Move Enter Return Resetting the Picture Settings to...

User Manual (ENGLISH)
Page 55
... provide a high visual quality. Using this function, you can view the applied DNIe and normal pictures on the DNIe mode. 4 Press the EXIT button to exit. TV Mode Size Digital NR DNIe Film Mode Blue Screen PIP Picture : Dynamic √ : 16:9 √ : On √ : On √ : Off... √ : Off √ Move Enter Return TV Mode Size Digital NR DNIe Film Mode Blue Screen PIP Picture : Dynamic : 16:9 : On : OOfff : ODfefmo : OOfnf Move Enter Return TV Mode Size Digital NR DNIe Film Mode Blue Screen PIP Picture : Dynamic : 16:9 : On : OOfff : ODfefmo : OOfnf ...
... provide a high visual quality. Using this function, you can view the applied DNIe and normal pictures on the DNIe mode. 4 Press the EXIT button to exit. TV Mode Size Digital NR DNIe Film Mode Blue Screen PIP Picture : Dynamic √ : 16:9 √ : On √ : On √ : Off... √ : Off √ Move Enter Return TV Mode Size Digital NR DNIe Film Mode Blue Screen PIP Picture : Dynamic : 16:9 : On : OOfff : ODfefmo : OOfnf Move Enter Return TV Mode Size Digital NR DNIe Film Mode Blue Screen PIP Picture : Dynamic : 16:9 : On : OOfff : ODfefmo : OOfnf ...
User Manual (ENGLISH)
Page 56
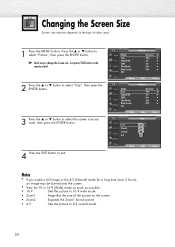
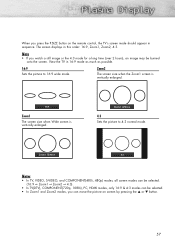
...: On √ : Off √ : Off √ Move Enter Return TV Mode Size Digital NR DNIe Film Mode Blue Screen PIP Picture : Dynamic √ : 16:9 √ : On √ : On √ : Off √ : Off √ Move Enter Return TV Size 16:9 Zoom1 Zoom2 4:3 4 Press the EXIT button to select the screen...an image may be burned onto the screen. • View the TV in 16:9 (Wide) mode as much as possible. • 16:9 : Sets the picture to 16:9 wide mode. • Zoom1 : Magnifies the size of the picture on the type of video input. 1 Press the MENU button. ...
...: On √ : Off √ : Off √ Move Enter Return TV Mode Size Digital NR DNIe Film Mode Blue Screen PIP Picture : Dynamic √ : 16:9 √ : On √ : On √ : Off √ : Off √ Move Enter Return TV Size 16:9 Zoom1 Zoom2 4:3 4 Press the EXIT button to select the screen...an image may be burned onto the screen. • View the TV in 16:9 (Wide) mode as much as possible. • 16:9 : Sets the picture to 16:9 wide mode. • Zoom1 : Magnifies the size of the picture on the type of video input. 1 Press the MENU button. ...
User Manual (ENGLISH)
Page 57
...10142; Zoom1 ➞ Zoom2 ➞ 4:3). • In TV(DTV), COMPONENT(720p, 1080i), PC, HDMI modes, only 16:9 & 4:3 modes can move the picture on the remote control, the TV's screen mode should appear in sequence. Zoom1 Move 4:3 Notes • In TV, VIDEO, S-VIDEO, and COMPONENT(480i, 480p) modes, ...all screen modes can be burned onto the screen. Zoom2 Move 4:3 Sets the picture to 16:9 wide mode...
...10142; Zoom1 ➞ Zoom2 ➞ 4:3). • In TV(DTV), COMPONENT(720p, 1080i), PC, HDMI modes, only 16:9 & 4:3 modes can move the picture on the remote control, the TV's screen mode should appear in sequence. Zoom1 Move 4:3 Notes • In TV, VIDEO, S-VIDEO, and COMPONENT(480i, 480p) modes, ...all screen modes can be burned onto the screen. Zoom2 Move 4:3 Sets the picture to 16:9 wide mode...
User Manual (ENGLISH)
Page 58
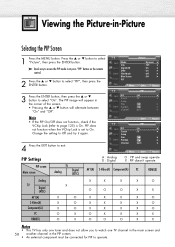
...8730; Blue Screen : Off √ 2 Press the ▲ or ▼ button to page 125) is set to select "On". PIP : Off √ Source : TV √ Swap Size : √ Position : √ Channel : Air 3 √ Note • If the PIP On/Off does not function, check if the V-... the screen. • Pressing the ▲ or ▼ button will alternate between "On" and "Off". TV Mode Size Picture : Dynamic √ : 16:9 √ ➤ Quick way to select "Picture", then press the ENTER button. Press the ▲ or ▼ button to access the PIP mode: Just ...
...8730; Blue Screen : Off √ 2 Press the ▲ or ▼ button to page 125) is set to select "On". PIP : Off √ Source : TV √ Swap Size : √ Position : √ Channel : Air 3 √ Note • If the PIP On/Off does not function, check if the V-... the screen. • Pressing the ▲ or ▼ button will alternate between "On" and "Off". TV Mode Size Picture : Dynamic √ : 16:9 √ ➤ Quick way to select "Picture", then press the ENTER button. Press the ▲ or ▼ button to access the PIP mode: Just ...


