
User Manual (ENGLISH)
Page 15
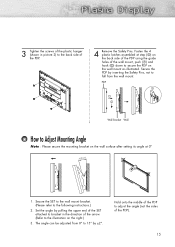
... Wall Bracket Wall How to the following instructions.) 2. Hold onto the middle of the PDP to adjust the angle (not the sides of the wall mount, push (!) and hook (@) down to bracket in picture 2) to the back side of the arrow. (Refer to the illustration on the right.) 3. Secure the SET... adjusted from 0° to fall from the wall mount. Secure the PDP by inserting the Safety Pins, not to 15° by pulling the upper end of the SET attached to secure the PDP on the back side of the PDP using the guide holes of the PDP). 15 Fasten the 4 plastic...
... Wall Bracket Wall How to the following instructions.) 2. Hold onto the middle of the PDP to adjust the angle (not the sides of the wall mount, push (!) and hook (@) down to bracket in picture 2) to the back side of the arrow. (Refer to the illustration on the right.) 3. Secure the SET... adjusted from 0° to fall from the wall mount. Secure the PDP by inserting the Safety Pins, not to 15° by pulling the upper end of the SET attached to secure the PDP on the back side of the PDP using the guide holes of the PDP). 15 Fasten the 4 plastic...
User Manual (ENGLISH)
Page 15
...; to 15° by pulling the upper end of the SET attached to bracket in picture 2) to Adjust Mounting Angle Note : Please secure the mounting bracket on the right.) 3. Secure the SET to the wall mount bracket. (Please refer to adjust the angle (not the sides of the PDP). 15 Set the angle... arrow. (Refer to the illustration on the wall surface after setting its angle at step (#) on the back side of the PDP using the guide holes of the wall mount, push (!) and hook (@) down to secure the PDP on the wall mount as illustrated. The angle can be adjusted from the wall...
...; to 15° by pulling the upper end of the SET attached to bracket in picture 2) to Adjust Mounting Angle Note : Please secure the mounting bracket on the right.) 3. Secure the SET to the wall mount bracket. (Please refer to adjust the angle (not the sides of the PDP). 15 Set the angle... arrow. (Refer to the illustration on the wall surface after setting its angle at step (#) on the back side of the PDP using the guide holes of the wall mount, push (!) and hook (@) down to secure the PDP on the wall mount as illustrated. The angle can be adjusted from the wall...


