
User Manual (ENGLISH)
Page 4
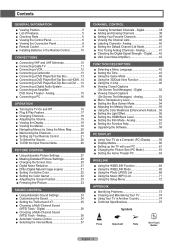
...the Function Help 57 ■ Upgrading the Software 58 PC DISPLAY ■ Using Your TV as a Computer (PC) Display .......... 59 ■ Display Modes 60 ■ Setting up the TV with your PC 61 ■ Changing the Picture Size (PC Mode 63 ■ Setting the Home Theater...the Setup Menu 72 APPENDIX ■ Identifying Problems 73 ■ Cleaning and Maintaining Your TV 74 ■ Using Your TV in the Remote Control 10 CONNECTIONS ■ Connecting VHF and UHF Antennas 10 ■ Connecting Cable TV 11 ■ Connecting a VCR 12 ■ Connecting a Camcorder 13 ■ ...
...the Function Help 57 ■ Upgrading the Software 58 PC DISPLAY ■ Using Your TV as a Computer (PC) Display .......... 59 ■ Display Modes 60 ■ Setting up the TV with your PC 61 ■ Changing the Picture Size (PC Mode 63 ■ Setting the Home Theater...the Setup Menu 72 APPENDIX ■ Identifying Problems 73 ■ Cleaning and Maintaining Your TV 74 ■ Using Your TV in the Remote Control 10 CONNECTIONS ■ Connecting VHF and UHF Antennas 10 ■ Connecting Cable TV 11 ■ Connecting a VCR 12 ■ Connecting a Camcorder 13 ■ ...
User Manual (ENGLISH)
Page 5
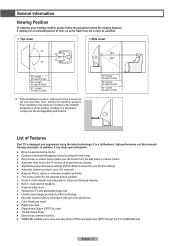
... (more than 10cm / 4inches) for ventilation purposes. English - 5 In addition, it away from the side panel or remote control ● Automatic timer to turn the TV on and off at any time you choose ● Adjustable picture and sound settings and the ability to memorize your favorite ...bilingual listening ● Built-in a shortened component life and degraded performance. 50˝ screen : At least 5.9 feet 56˝ screen : At least 6.6 feet 61˝ screen : At least 7.2 feet List of time, sit as far back from the screen as possible. < Top view> < Side view> 50˝ screen...
... (more than 10cm / 4inches) for ventilation purposes. English - 5 In addition, it away from the side panel or remote control ● Automatic timer to turn the TV on and off at any time you choose ● Adjustable picture and sound settings and the ability to memorize your favorite ...bilingual listening ● Built-in a shortened component life and degraded performance. 50˝ screen : At least 5.9 feet 56˝ screen : At least 6.6 feet 61˝ screen : At least 7.2 feet List of time, sit as far back from the screen as possible. < Top view> < Side view> 50˝ screen...

User Manual (ENGLISH)
Page 6
English - 6 Continued... Checking Parts Owner's Instructions Remote Control (BP59-00125A)/ AAA Batteries Warranty Card/ Registration Card/ Safety Guide Manual/ Quick Guide Manual Sold Separately Power Cord (3903-000144) Cloth-Clean S-Video Cable ... Control Panel Buttons on the Lower-Right Part of the Panel The buttons on the lower-right panel control your TV's basic features, including the on the model. To use the more advanced features, you must use the remote control. ➢ The product color and shape may vary depending on -screen menu.
English - 6 Continued... Checking Parts Owner's Instructions Remote Control (BP59-00125A)/ AAA Batteries Warranty Card/ Registration Card/ Safety Guide Manual/ Quick Guide Manual Sold Separately Power Cord (3903-000144) Cloth-Clean S-Video Cable ... Control Panel Buttons on the Lower-Right Part of the Panel The buttons on the lower-right panel control your TV's basic features, including the on the model. To use the more advanced features, you must use the remote control. ➢ The product color and shape may vary depending on -screen menu.
User Manual (ENGLISH)
Page 7
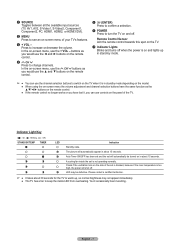
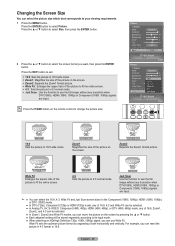
... BY/TEMP TIMER LED Standby state. Auto Timer ON/OFF has been set and the set will automatically be defective. Remote Control Sensor Aim the remote control towards this spot on the TV. 7 Indicator Lights Blinks and turns off when the power is in about 15 seconds. A cooling fan inside LED from ...overheating. buttons as you would use the ▲ and ▼ buttons on the remote control. 5 (ENTER) Press to confirm a selection. 6 POWER Press to turn the TV on the panel of the TV. In the on-screen menu, use the CH buttons as the buttons on the...
... BY/TEMP TIMER LED Standby state. Auto Timer ON/OFF has been set and the set will automatically be defective. Remote Control Sensor Aim the remote control towards this spot on the TV. 7 Indicator Lights Blinks and turns off when the power is in about 15 seconds. A cooling fan inside LED from ...overheating. buttons as you would use the ▲ and ▼ buttons on the remote control. 5 (ENTER) Press to confirm a selection. 6 POWER Press to turn the TV on the panel of the TV. In the on-screen menu, use the CH buttons as the buttons on the...
User Manual (ENGLISH)
Page 9
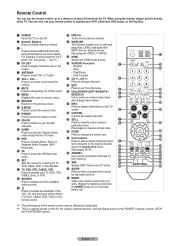
... Audio Program (SAP broadcast). % 3D Press to select the 3D/Dual-View mode. ^ SET Sets the remote to control your TV, VCR, Cable, DVD, or Set-Top Box. & TV, DVD, STB, CABLE, VCR Press to / from the TV. i STILL Press to select "Air" or "Cable". 6 VOL +, VOL - k Color buttons Press to add or ... Press to exit from an external device. (See page 66 (JPEG), 71 (MP3)) b HDMI Selects the HDMI mode directly. When using the remote, always point it directly at the TV. c VCR/DVD Functions - Fast Forward d CH , CH Press to select the sound mode. ! f UP▲/DOWN▼/LEFT◄/RIGHT►/ ...
... Audio Program (SAP broadcast). % 3D Press to select the 3D/Dual-View mode. ^ SET Sets the remote to control your TV, VCR, Cable, DVD, or Set-Top Box. & TV, DVD, STB, CABLE, VCR Press to / from the TV. i STILL Press to select "Air" or "Cable". 6 VOL +, VOL - k Color buttons Press to add or ... Press to exit from an external device. (See page 66 (JPEG), 71 (MP3)) b HDMI Selects the HDMI mode directly. When using the remote, always point it directly at the TV. c VCR/DVD Functions - Fast Forward d CH , CH Press to select the sound mode. ! f UP▲/DOWN▼/LEFT◄/RIGHT►/ ...
User Manual (ENGLISH)
Page 10
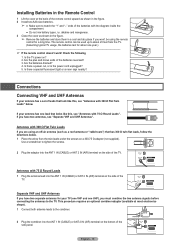
...; twin flat leads, follow the directions below . Check the following 1. Connections Connecting VHF and UHF Antennas If your antenna has a set of the TV. If your TV (one VHF and one UHF), you have two antennas, see "Antennas with 300 Ω Flat Twin Leads" below . 1 Place the wires from...with the diagram inside the compartment. ● Do not mix battery types, i.e. This procedure requires an optional combiner-adaptor (available at the back of the remote control upward as shown in the figure. 2 Install two AAA size batteries. ➢ ● Make sure to match the "+" and "-" ends of ...
...; twin flat leads, follow the directions below . Check the following 1. Connections Connecting VHF and UHF Antennas If your antenna has a set of the TV. If your TV (one VHF and one UHF), you have two antennas, see "Antennas with 300 Ω Flat Twin Leads" below . 1 Place the wires from...with the diagram inside the compartment. ● Do not mix battery types, i.e. This procedure requires an optional combiner-adaptor (available at the back of the remote control upward as shown in the figure. 2 Install two AAA size batteries. ➢ ● Make sure to match the "+" and "-" ends of ...
User Manual (ENGLISH)
Page 16
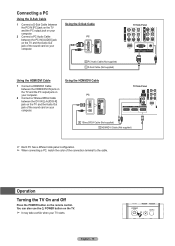
... cable. English - 16 You can also use the POWER button on the TV. ➢ It may take a while when your computer. Operation Turning the TV On and Off Press the POWER button on the remote control. Using the D-Sub Cable PC TV Side Panel 2 PC Audio Cable (Not supplied) 1 D-Sub Cable (Not supplied) Using... the HDMI/DVI Cable 1 Connect a HDMI/DVI Cable between the HDMI3/DVI IN jack on the TV and the PC output jack on your computer...
... cable. English - 16 You can also use the POWER button on the TV. ➢ It may take a while when your computer. Operation Turning the TV On and Off Press the POWER button on the remote control. Using the D-Sub Cable PC TV Side Panel 2 PC Audio Cable (Not supplied) 1 D-Sub Cable (Not supplied) Using... the HDMI/DVI Cable 1 Connect a HDMI/DVI Cable between the HDMI3/DVI IN jack on the TV and the PC output jack on your computer...
User Manual (ENGLISH)
Page 17
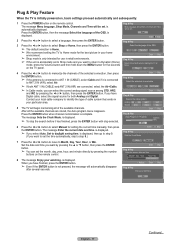
on the remote control. 8 The message Enjoy your particular area. 5 The TV will be set. Shop Home 4 Press the ◄ or &#... initially powered on, basic settings proceed automatically and subsequently: 1 Press the POWER button on the remote control. Select the language of cable system that exists in retail environments. ➢ If the unit is ...Air Cable Air+Cable Enter Skip Plug & Play Selects the cable system. Plug & Play Feature When the TV is automatically displayed. Contact your local cable company to identify the type of the OSD. ➢ The default...
on the remote control. 8 The message Enjoy your particular area. 5 The TV will be set. Shop Home 4 Press the ◄ or &#... initially powered on, basic settings proceed automatically and subsequently: 1 Press the POWER button on the remote control. Select the language of cable system that exists in retail environments. ➢ If the unit is ...Air Cable Air+Cable Enter Skip Plug & Play Selects the cable system. Plug & Play Feature When the TV is automatically displayed. Contact your local cable company to identify the type of the OSD. ➢ The default...
User Manual (ENGLISH)
Page 19
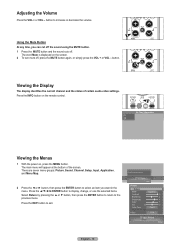
... G50 R50 Color Tone Cool1 Detailed Settings Size 16:9 Picture Enter English - 19 No Time Information Air 3 Viewing the Menus 1 With the power on the remote control. The word Mute is displayed on the screen. 2 To turn mute off . button to exit. Adjusting the Volume Press the VOL + or VOL - The...
... G50 R50 Color Tone Cool1 Detailed Settings Size 16:9 Picture Enter English - 19 No Time Information Air 3 Viewing the Menus 1 With the power on the remote control. The word Mute is displayed on the screen. 2 To turn mute off . button to exit. Adjusting the Volume Press the VOL + or VOL - The...
User Manual (ENGLISH)
Page 21
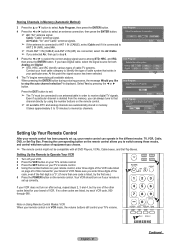
..., then press the ENTER button. Pressing the corresponding button on the remote control allows you to stop the auto channel selection? Setting Up the Remote to receive digital TV signals. Note on if your brand of cable TV systems. Contact your particular area. Cable: "Cable" antenna signal. ... to Operate Your VCR 1 Turn off your VCR. 2 Press the VCR button on your TV's remote control. 3 Press the SET button on your TV's remote control. 4 Using the number buttons on your remote control, enter three digits of this point the signal source has been selected. Cable 3 10...
..., then press the ENTER button. Pressing the corresponding button on the remote control allows you to stop the auto channel selection? Setting Up the Remote to receive digital TV signals. Note on if your brand of cable TV systems. Contact your particular area. Cable: "Cable" antenna signal. ... to Operate Your VCR 1 Turn off your VCR. 2 Press the VCR button on your TV's remote control. 3 Press the SET button on your TV's remote control. 4 Using the number buttons on your remote control, enter three digits of this point the signal source has been selected. Cable 3 10...
User Manual (ENGLISH)
Page 22
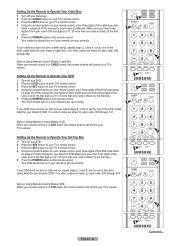
... Operate Your Cable Box 1 Turn off your cable box. 2 Press the CABLE button on your TV's remote control. 3 Press the SET button on your TV's remote control. 4 Using the number buttons on your remote control, enter three digits of the cable box code listed on page 24 of this manual for your brand...1 Turn off your STB. 2 Press the STB button on your TV's remote control. 3 Press the SET button on your TV's remote control. 4 Using the number buttons on your remote control, enter three digits of the STB code listed on if your remote is in CABLE mode, the volume buttons still control your brand of...
... Operate Your Cable Box 1 Turn off your cable box. 2 Press the CABLE button on your TV's remote control. 3 Press the SET button on your TV's remote control. 4 Using the number buttons on your remote control, enter three digits of the cable box code listed on page 24 of this manual for your brand...1 Turn off your STB. 2 Press the STB button on your TV's remote control. 3 Press the SET button on your TV's remote control. 4 Using the number buttons on your remote control, enter three digits of the STB code listed on if your remote is in CABLE mode, the volume buttons still control your brand of...

User Manual (ENGLISH)
Page 26
... AV2 S-Video1 S-Video2 Component1 Component2 PC HDMI1 TV ► Input Enter Input Enter Press the SOURCE button on and connected via HDMI. ➢ You can only be selected when the external device is turned on the remote control to the TV. Input Return Source List Edit Name 2 Press the ▲ or ...▼ button to select TV or other external input sources such as DVD players, VCRs, etc. Edit Name Return AV1 ...
... AV2 S-Video1 S-Video2 Component1 Component2 PC HDMI1 TV ► Input Enter Input Enter Press the SOURCE button on and connected via HDMI. ➢ You can only be selected when the external device is turned on the remote control to the TV. Input Return Source List Edit Name 2 Press the ▲ or ...▼ button to select TV or other external input sources such as DVD players, VCRs, etc. Edit Name Return AV1 ...
User Manual (ENGLISH)
Page 27
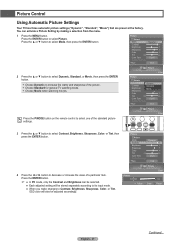
...Movie 45 75 Color 55 Tint G50 R50 Color Tone Cool1 Detailed Settings Size 16:9 Picture Enter Press the P.MODE button on the remote control to select one of the standard picture settings. 3 Press the ▲ or ▼ button to select Contrast, Brightness, Sharpness...changes to decrease or increase the value of the picture. Choose Standard for general TV watching mode. Choose Movie when watching movies. Picture Control Using Automatic Picture Settings Your TV has three automatic picture settings ("Dynamic", "Standard", "Movie") that are preset at the factory...
...Movie 45 75 Color 55 Tint G50 R50 Color Tone Cool1 Detailed Settings Size 16:9 Picture Enter Press the P.MODE button on the remote control to select one of the standard picture settings. 3 Press the ▲ or ▼ button to select Contrast, Brightness, Sharpness...changes to decrease or increase the value of the picture. Choose Standard for general TV watching mode. Choose Movie when watching movies. Picture Control Using Automatic Picture Settings Your TV has three automatic picture settings ("Dynamic", "Standard", "Movie") that are preset at the factory...
User Manual (ENGLISH)
Page 30
...(1080i) mode. ● In DTV (720p), Component (720p) or HDMI (720p) mode, any of 16:9, 4:3 and Wide Fit can be selected. ● In Analog TV, AV, S-VIDEO, Component (480i, 480p), HDMI (480i, 480p), or DTV (480i, 480p) mode, any of 16:9, Zoom1, Zoom2, and 4:3 can be stored separately ... EXIT button to exit. 16:9: Sets the picture to 16:9 wide mode. Zoom1: Magnifies the size of the picture on the remote control to 16:9 wide mode. Picture Return Mode Dynamic Contrast 100 Brightness 45 Sharpness 75 Color 55 Tint G50 R50 Color Tone Cool1 Detailed Settings...
...(1080i) mode. ● In DTV (720p), Component (720p) or HDMI (720p) mode, any of 16:9, 4:3 and Wide Fit can be selected. ● In Analog TV, AV, S-VIDEO, Component (480i, 480p), HDMI (480i, 480p), or DTV (480i, 480p) mode, any of 16:9, Zoom1, Zoom2, and 4:3 can be stored separately ... EXIT button to exit. 16:9: Sets the picture to 16:9 wide mode. Zoom1: Magnifies the size of the picture on the remote control to 16:9 wide mode. Picture Return Mode Dynamic Contrast 100 Brightness 45 Sharpness 75 Color 55 Tint G50 R50 Color Tone Cool1 Detailed Settings...
User Manual (ENGLISH)
Page 33
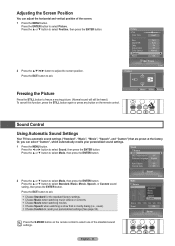
... (Normal sound will still be heard.) To cancel this function, press the STILL button again or press any button on the remote control to select Picture. Sound Enter Mode Return Mode Standard Music Movie Speech Custom Balance 100Hz 300Hz 1kHz 3kHz 10kHz Reset OK ...Sound Enter Press the S.MODE button on the remote control. ▼ Move Enter Return Sound Control Using Automatic Sound Settings Your TV has automatic sound settings ("Standard", "Music", "Movie", "Speech", and "Custom") that is mostly dialog ...
... (Normal sound will still be heard.) To cancel this function, press the STILL button again or press any button on the remote control to select Picture. Sound Enter Mode Return Mode Standard Music Movie Speech Custom Balance 100Hz 300Hz 1kHz 3kHz 10kHz Reset OK ...Sound Enter Press the S.MODE button on the remote control. ▼ Move Enter Return Sound Control Using Automatic Sound Settings Your TV has automatic sound settings ("Standard", "Music", "Movie", "Speech", and "Custom") that is mostly dialog ...

User Manual (ENGLISH)
Page 35
... SRS TruSurround XTOff Off Preferred LanguageOn English Multi-Track Sound Stereo Auto Volume Off Internal Mute Off Sound Enter Press the SRS button on the remote control to select SRS TruSurround XT, then press the ENTER button. Setting the TruSurround XT TruSurround XT is fully compatible with all multichannel formats. 1 Press...
... SRS TruSurround XTOff Off Preferred LanguageOn English Multi-Track Sound Stereo Auto Volume Off Internal Mute Off Sound Enter Press the SRS button on the remote control to select SRS TruSurround XT, then press the ENTER button. Setting the TruSurround XT TruSurround XT is fully compatible with all multichannel formats. 1 Press...

User Manual (ENGLISH)
Page 36
Digital The digital-TV transmission system is usually a foreign- Press the EXIT button to select ...Language EngElinsghlish Multi-Track Sound SpaSntiesrheo Auto Volume FrencOhff Internal Mute Off Press the MTS button on the remote control to listen in stereo. Choose SAP to listen to the Separate Audio Program, which... Choosing a Multi-Channel Sound (MTS) Track - Preferred Language 1 Press the MENU button. Analog Depending on the remote control repeatedly to select Multi-Track Sound, then press the ENTER button. The availability of the program into foreign languages...
Digital The digital-TV transmission system is usually a foreign- Press the EXIT button to select ...Language EngElinsghlish Multi-Track Sound SpaSntiesrheo Auto Volume FrencOhff Internal Mute Off Press the MTS button on the remote control to listen in stereo. Choose SAP to listen to the Separate Audio Program, which... Choosing a Multi-Channel Sound (MTS) Track - Preferred Language 1 Press the MENU button. Analog Depending on the remote control repeatedly to select Multi-Track Sound, then press the ENTER button. The availability of the program into foreign languages...

User Manual (ENGLISH)
Page 39
... will be added or deleted, then press the ENTER button. The " " symbol will be highlighted and the channel will be shown on the remote control. To cancel your Favorite channel selection, press the ENTER button until the " " symbol disappears. Channel Return Antenna Air Auto Program Clear Scrambled... press the ENTER button to the corresponding channel number. Press the EXIT button to return. ➢ All added channels will be shown on the remote control. Press the CH and CH button to display the next channel list page. 4 Press the ▲ or ▼ button to delete,...
... will be added or deleted, then press the ENTER button. The " " symbol will be highlighted and the channel will be shown on the remote control. To cancel your Favorite channel selection, press the ENTER button until the " " symbol disappears. Channel Return Antenna Air Auto Program Clear Scrambled... press the ENTER button to the corresponding channel number. Press the EXIT button to return. ➢ All added channels will be shown on the remote control. Press the CH and CH button to display the next channel list page. 4 Press the ▲ or ▼ button to delete,...
User Manual (ENGLISH)
Page 40
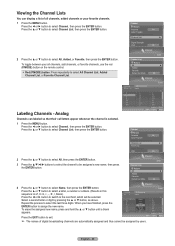
... Return ➢ The names of all channels, added channels or your all channels, add channels, or favorite channels, use the red (P.MODE) button on the remote control. Red (P.MODE) button: Press repeatedly to select All Channel List, Added Channel List, or Favorite Channel List.
... Return ➢ The names of all channels, added channels or your all channels, add channels, or favorite channels, use the red (P.MODE) button on the remote control. Red (P.MODE) button: Press repeatedly to select All Channel List, Added Channel List, or Favorite Channel List.

User Manual (ENGLISH)
Page 41
... Tuning Analog Channels - Enter Channel List Return All Added Favorite Default List Mode All Added FavoriAtell Channel Enter Press the CH LIST button on the remote control. Favorite: Shows Favorite channels when you press the CH LIST button. 1 Press the MENU button. Press the ◄ or ► ...button to adjust the fine tuning. 3 To store the fine tuning setting in the TV's memory, press the ENTER button. 4 To reset the fine tuning setting, press the ▲ or ▼ button to select OK or Cancel, then ...
... Tuning Analog Channels - Enter Channel List Return All Added Favorite Default List Mode All Added FavoriAtell Channel Enter Press the CH LIST button on the remote control. Favorite: Shows Favorite channels when you press the CH LIST button. 1 Press the MENU button. Press the ◄ or ► ...button to adjust the fine tuning. 3 To store the fine tuning setting in the TV's memory, press the ENTER button. 4 To reset the fine tuning setting, press the ▲ or ▼ button to select OK or Cancel, then ...


