User Manual (ENGLISH)
Page 7
... Messages) Analog 100 Viewing Closed Captions (On-Screen Text Messages) Digital 102 Setting the Port Selection Mode 104 Using the CableCARD 105 Using the CableCARD Setup Function 106 Using Game Mode 108 Using TV Guide On ScreenTM 109 Using the D-Net 112 How to ...Display 128 Adjusting the Picture Quality 131 Changing the Picture Position 132 Adjusting the Picture Quality and Position Automatically 133 Changing the Picture Size (PC Mode 134 Viewing the Current Resolution 135 Initializing the Picture Settings 136 Appendix 138 Replacing the Lamp 138 Troubleshooting 140 Cleaning...
... Messages) Analog 100 Viewing Closed Captions (On-Screen Text Messages) Digital 102 Setting the Port Selection Mode 104 Using the CableCARD 105 Using the CableCARD Setup Function 106 Using Game Mode 108 Using TV Guide On ScreenTM 109 Using the D-Net 112 How to ...Display 128 Adjusting the Picture Quality 131 Changing the Picture Position 132 Adjusting the Picture Quality and Position Automatically 133 Changing the Picture Size (PC Mode 134 Viewing the Current Resolution 135 Initializing the Picture Settings 136 Appendix 138 Replacing the Lamp 138 Troubleshooting 140 Cleaning...
User Manual (ENGLISH)
Page 11
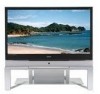
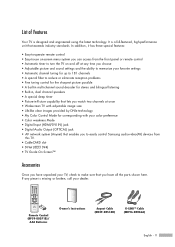
...8226; A special sleep timer • Picture-in-Picture capability that lets you watch two channels at once • Widescreen TV with adjustable image size • Life-like clear images provided by DNle technology • My Color Control Mode for corresponding with your color preference ...) jack • AV network system (Anynet) that enables you to easily control Samsung audio-video(AV) devices from this TV. • CableCARD slot • D-Net (IEEE1394) • TV Guide On Screen™ Accessories Once you have unpacked your TV, check to make sure that exceeds industry standards.
...8226; A special sleep timer • Picture-in-Picture capability that lets you watch two channels at once • Widescreen TV with adjustable image size • Life-like clear images provided by DNle technology • My Color Control Mode for corresponding with your color preference ...) jack • AV network system (Anynet) that enables you to easily control Samsung audio-video(AV) devices from this TV. • CableCARD slot • D-Net (IEEE1394) • TV Guide On Screen™ Accessories Once you have unpacked your TV, check to make sure that exceeds industry standards.
User Manual (ENGLISH)
Page 15
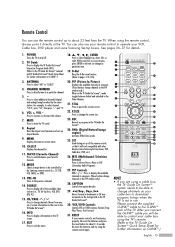
... G-LINKTM cable you are using the remote control again. ANTENNA Press to pause the current screen. 22. Press to select additional channels (digital and analog) being broadcast by the Samsung remote control (i.e., TV, STB, VCR, CABLE, or DVD). 13. Anynet Runs the Anynet view functions and sets...available channels in sequence. (These buttons change the screen size. 23. MENU Displays the main on and off. 2. TV Guide Press to display the TV Guide On ScreenTM lnteractive Program Guide (IPG). (Refer to the TV Guide On ScreenTM manual and TV Guide On ScreenTM Quick Setup Sheet for details. ...
... G-LINKTM cable you are using the remote control again. ANTENNA Press to pause the current screen. 22. Press to select additional channels (digital and analog) being broadcast by the Samsung remote control (i.e., TV, STB, VCR, CABLE, or DVD). 13. Anynet Runs the Anynet view functions and sets...available channels in sequence. (These buttons change the screen size. 23. MENU Displays the main on and off. 2. TV Guide Press to display the TV Guide On ScreenTM lnteractive Program Guide (IPG). (Refer to the TV Guide On ScreenTM manual and TV Guide On ScreenTM Quick Setup Sheet for details. ...
User Manual (ENGLISH)
Page 30
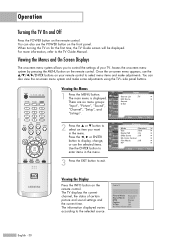
... appears, use the ENTER buttons on for the first time, the TV Guide screen will be displayed. or † button to exit. Picture Input Mode : Standard √ Picture Size Digital NR : 16:9 : On √ √ Sound DNIe Demo : Off √ My Color Control √ Channel Film Mode : Off √ ...and make adjustments. You can also view the on the front panel. When turning the TV on your TV. Viewing the Display Press the INFO button on the remote control. Access the on-screen menu system by pressing the MENU button on the remote control. You can also use...
... appears, use the ENTER buttons on for the first time, the TV Guide screen will be displayed. or † button to exit. Picture Input Mode : Standard √ Picture Size Digital NR : 16:9 : On √ √ Sound DNIe Demo : Off √ My Color Control √ Channel Film Mode : Off √ ...and make adjustments. You can also view the on the front panel. When turning the TV on your TV. Viewing the Display Press the INFO button on the remote control. Access the on-screen menu system by pressing the MENU button on the remote control. You can also use...
User Manual (ENGLISH)
Page 55
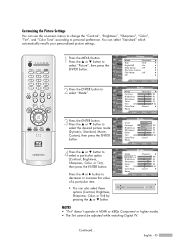
... 480p Component or higher modes. • The Tint cannot be adjusted while watching Digital TV. or † button to select "Mode". 3Press the ENTER button. Picture Input Mode : Standard √ Picture Size Digital NR : 16:9 : On √ √ Sound DNIe Demo : Off... ySntaamndicard Standard 100 Movie 45 Custom 75 55 R 50 : Cool1 Enter Return 4Press the ... Customizing the Picture Settings You can use the on-screen menus to change the "Contrast", "Brightness", "Sharpness", "Color", "Tint", and "Color Tone" according to select a particular option (Contrast,...
... 480p Component or higher modes. • The Tint cannot be adjusted while watching Digital TV. or † button to select "Mode". 3Press the ENTER button. Picture Input Mode : Standard √ Picture Size Digital NR : 16:9 : On √ √ Sound DNIe Demo : Off... ySntaamndicard Standard 100 Movie 45 Custom 75 55 R 50 : Cool1 Enter Return 4Press the ... Customizing the Picture Settings You can use the on-screen menus to change the "Contrast", "Brightness", "Sharpness", "Color", "Tint", and "Color Tone" according to select a particular option (Contrast,...
User Manual (ENGLISH)
Page 57
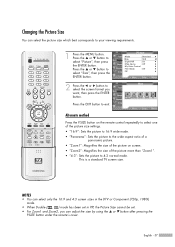
... exit. This is a standard TV screen size. Changing the Picture Size You can adjust the size by using the ... Press the ... Press the EXIT button to select "Picture", then press the ENTER button. Input Picture Sound Channel Setup Listings Size 16:9 Panorama Zoom1 Zoom2 4:3 Move Enter Return Alternate method Press the P.SIZE button on the remote control...
... exit. This is a standard TV screen size. Changing the Picture Size You can adjust the size by using the ... Press the ... Press the EXIT button to select "Picture", then press the ENTER button. Input Picture Sound Channel Setup Listings Size 16:9 Panorama Zoom1 Zoom2 4:3 Move Enter Return Alternate method Press the P.SIZE button on the remote control...

User Manual (ENGLISH)
Page 58
...: Off √ Setup PIP √ Listings Move Enter Return Picture Input Mode : Standard √ Picture Size Digital NR : 16:9 : On √ √ Sound DNIe Demo : Off √ My Color ...Setup PIP √ Listings Move Enter Return Picture Input Picture Sound Channel Setup Mode : Standard Size : 16:9 Digital NR : OOffn DNIe Demo : OOnff My Color Control Film Mode : ...3 Press the ... Picture Control Digital Noise Reduction If the broadcast signal received by your TV is weak, you can activate the Digital Noise Reduction feature to select "Picture", then ...
...: Off √ Setup PIP √ Listings Move Enter Return Picture Input Mode : Standard √ Picture Size Digital NR : 16:9 : On √ √ Sound DNIe Demo : Off √ My Color ...Setup PIP √ Listings Move Enter Return Picture Input Picture Sound Channel Setup Mode : Standard Size : 16:9 Digital NR : OOffn DNIe Demo : OOnff My Color Control Film Mode : ...3 Press the ... Picture Control Digital Noise Reduction If the broadcast signal received by your TV is weak, you can activate the Digital Noise Reduction feature to select "Picture", then ...
User Manual (ENGLISH)
Page 59
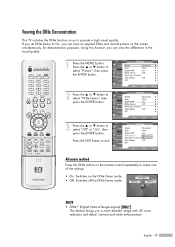
... Film Mode : Off √ Setup PIP √ Listings Move Enter Return Picture Input Mode : Standard √ Picture Size Digital NR : 16:9 : On √ √ Sound DNIe Demo : Off √ My Color Control √...Control On Film Mode : Off PIP Listings Move Enter Return Alternate method Press the DNIe button on the screen simultaneously, for demonstration purposes. or † button to select "Picture", then press the ENTER button..... Viewing the DNIe Demonstration This TV includes the DNIe function so as to select "Off" or "On", then press the ENTER button....
... Film Mode : Off √ Setup PIP √ Listings Move Enter Return Picture Input Mode : Standard √ Picture Size Digital NR : 16:9 : On √ √ Sound DNIe Demo : Off √ My Color Control √...Control On Film Mode : Off PIP Listings Move Enter Return Alternate method Press the DNIe button on the screen simultaneously, for demonstration purposes. or † button to select "Picture", then press the ENTER button..... Viewing the DNIe Demonstration This TV includes the DNIe function so as to select "Off" or "On", then press the ENTER button....

User Manual (ENGLISH)
Page 60
... button. Press the ... The original picture (before adjustment) is shown on the left side, while the selected mode is shown on the screen. NOTE • Changing the settings in the Easy Control Menu Skin, sky and grass tones are seven My Color Control modes: Red, ... √ My Color Control √ Channel Film Mode : Off √ Setup PIP √ Listings Move Enter Return Picture Input Mode : Standard √ Picture Size Digital NR : 16:9 : On √ √ Sound DNIe Demo : Off √ My Color Control √ Channel Film Mode : Off √ Setup...
... button. Press the ... The original picture (before adjustment) is shown on the left side, while the selected mode is shown on the screen. NOTE • Changing the settings in the Easy Control Menu Skin, sky and grass tones are seven My Color Control modes: Red, ... √ My Color Control √ Channel Film Mode : Off √ Setup PIP √ Listings Move Enter Return Picture Input Mode : Standard √ Picture Size Digital NR : 16:9 : On √ √ Sound DNIe Demo : Off √ My Color Control √ Channel Film Mode : Off √ Setup...

User Manual (ENGLISH)
Page 61
or † button to adjust the settings. Picture Input Mode : Standard √ Picture Size Digital NR : 16:9 : On √ √ Sound DNIe Demo : Off √ My Color Control √ Channel Film Mode : Off √ Setup PIP √ Listings Move ... the left side, while the picture after adjustment is shown on the right side, and an adjustment bar is shown on the bottom of the screen. Press the ... or † button to the factory defaults. or † button to choose other colors. 6 Press the ENTER or MENU button to confirm the...
or † button to adjust the settings. Picture Input Mode : Standard √ Picture Size Digital NR : 16:9 : On √ √ Sound DNIe Demo : Off √ My Color Control √ Channel Film Mode : Off √ Setup PIP √ Listings Move ... the left side, while the picture after adjustment is shown on the right side, and an adjustment bar is shown on the bottom of the screen. Press the ... or † button to the factory defaults. or † button to choose other colors. 6 Press the ENTER or MENU button to confirm the...

User Manual (ENGLISH)
Page 64
...Channel Film Mode : Off √ Setup PIP √ Listings Move Enter Return Picture Input Mode : Standard √ Picture Size Digital NR : 16:9 : On √ √ Sound DNIe Demo : Off √ My Color Control √... allows you to watch two different pictures at once, even if you turn the TV off while watching and turn it on again, then the mode will return to ...PIP) feature. Press the ... Picture Control Viewing Picture-In-Picture One of the best features of the screen. Press the ... Press the EXIT button to select "Picture", then press the ENTER button. 2 Press...
...Channel Film Mode : Off √ Setup PIP √ Listings Move Enter Return Picture Input Mode : Standard √ Picture Size Digital NR : 16:9 : On √ √ Sound DNIe Demo : Off √ My Color Control √... allows you to watch two different pictures at once, even if you turn the TV off while watching and turn it on again, then the mode will return to ...PIP) feature. Press the ... Picture Control Viewing Picture-In-Picture One of the best features of the screen. Press the ... Press the EXIT button to select "Picture", then press the ENTER button. 2 Press...

User Manual (ENGLISH)
Page 134
...select "PC". 2 Press the MENU button. PC Display Changing the Picture Size (PC Mode) You can select the picture size which best corresponds to your viewing requirements. 1 Press the SOURCE button to select the screen format you want, then press the ENTER button. English - 134 Press the... ... Input Picture Sound Channel Setup Listings Size WidePC 4:3 Adjust Enter Return NOTES • "4:3": Displays the picture as it is without changing the aspect ratio of input source. • "WidePC": Scales the picture to 92% of the TV screen, regardless of the aspect ratio of the input...
...select "PC". 2 Press the MENU button. PC Display Changing the Picture Size (PC Mode) You can select the picture size which best corresponds to your viewing requirements. 1 Press the SOURCE button to select the screen format you want, then press the ENTER button. English - 134 Press the... ... Input Picture Sound Channel Setup Listings Size WidePC 4:3 Adjust Enter Return NOTES • "4:3": Displays the picture as it is without changing the aspect ratio of input source. • "WidePC": Scales the picture to 92% of the TV screen, regardless of the aspect ratio of the input...


