User Manual (ENGLISH)
Page 6
... ...11 Front Panel LED Indicators 12 Right side buttons 13 Side Panel Jacks ...13 Rear Panel Jacks ...14 Remote Control...15 Connections 18 Connecting VHF and UHF Antennas 18 Antennas with 75-ohm Round Leads 18 Connecting Cable TV 19 Cable without a Cable Box 19 Cable with a Cable Box that Descrambles All Channels... External Input Mode 43 Channel Control 46 Selecting Your Favorite Channels 46 Viewing the Channel Lists 47 Labeling the Channels 49 LNA (Low Noise Amplifier 50 Fine Tuning Analog Channels Analog 51 Checking the Digital-Signal Strength Digital 52 English - 6
... ...11 Front Panel LED Indicators 12 Right side buttons 13 Side Panel Jacks ...13 Rear Panel Jacks ...14 Remote Control...15 Connections 18 Connecting VHF and UHF Antennas 18 Antennas with 75-ohm Round Leads 18 Connecting Cable TV 19 Cable without a Cable Box 19 Cable with a Cable Box that Descrambles All Channels... External Input Mode 43 Channel Control 46 Selecting Your Favorite Channels 46 Viewing the Channel Lists 47 Labeling the Channels 49 LNA (Low Noise Amplifier 50 Fine Tuning Analog Channels Analog 51 Checking the Digital-Signal Strength Digital 52 English - 6
User Manual (ENGLISH)
Page 11
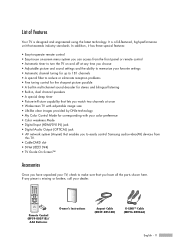
... • Easy-to-use on-screen menu system you can access from the front panel or remote control • Automatic timer to turn the TV on and off at any piece is designed and engineered using the latest technology. If any time you choose • Adjustable picture and...) jack • Digital Audio Output (OPTICAL) jack • AV network system (Anynet) that enables you to easily control Samsung audio-video(AV) devices from this TV. • CableCARD slot • D-Net (IEEE1394) • TV Guide On Screen™ Accessories Once you have all the parts shown here. List of Features Your...
... • Easy-to-use on-screen menu system you can access from the front panel or remote control • Automatic timer to turn the TV on and off at any piece is designed and engineered using the latest technology. If any time you choose • Adjustable picture and...) jack • Digital Audio Output (OPTICAL) jack • AV network system (Anynet) that enables you to easily control Samsung audio-video(AV) devices from this TV. • CableCARD slot • D-Net (IEEE1394) • TV Guide On Screen™ Accessories Once you have all the parts shown here. List of Features Your...
User Manual (ENGLISH)
Page 12
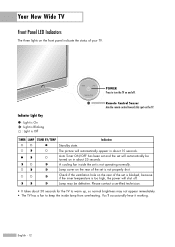
Please contact a certified technician. • It takes about 30 seconds for the TV to warm up, so normal brightness may be turned on the rear of the set will automatically appear in about 15 seconds. The picture will automatically be defective. Lamp cover on in about... On : Light is Blinking : Light is not operating normally. A cooling fan inside lamp from overheating. Your New Wide TV Front Panel LED Indicators The three lights on and off . Remote Control Sensor Aim the remote control towards this spot on the rear of your TV. You'll occasionally hear it working.
Please contact a certified technician. • It takes about 30 seconds for the TV to warm up, so normal brightness may be turned on the rear of the set will automatically appear in about 15 seconds. The picture will automatically be defective. Lamp cover on in about... On : Light is Blinking : Light is not operating normally. A cooling fan inside lamp from overheating. Your New Wide TV Front Panel LED Indicators The three lights on and off . Remote Control Sensor Aim the remote control towards this spot on the rear of your TV. You'll occasionally hear it working.
User Manual (ENGLISH)
Page 13
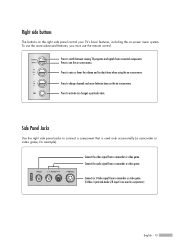
... that is used in conjunction.) English - 13 Side Panel Jacks Use the right side panel jacks to activate (or change channels and move between viewing TV programs and signals from a camcorder or video game. (S-Video 3 jack and Audio L/R input 3 are used only occasionally (a camcorder or video game, for example). Connect the... the volume and to switch between items on the on -screen menu system. Right side buttons The buttons on the right side panel control your TV's basic features, including the on -screen menu. To use the more advanced features, you must use the...
... that is used in conjunction.) English - 13 Side Panel Jacks Use the right side panel jacks to activate (or change channels and move between viewing TV programs and signals from a camcorder or video game. (S-Video 3 jack and Audio L/R input 3 are used only occasionally (a camcorder or video game, for example). Connect the... the volume and to switch between items on the on -screen menu system. Right side buttons The buttons on the right side panel control your TV's basic features, including the on -screen menu. To use the more advanced features, you must use the...
User Manual (ENGLISH)
Page 15
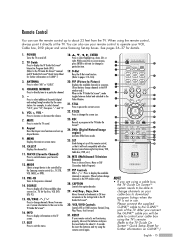
...additional channels (digital and analog) being broadcast by the Samsung remote control (i.e., TV, STB, VCR, CABLE, or DVD). 13. STILL Press to select "AIR" or "CABLE". 4. SET Used during set of this remote control, so that it directly at the TV. ANTENNA Press to pause the current screen. 22. ... up Anynet devices. 9. MUTE Press to operate your VCR, Cable box, DVD player and some Samsung Set-top boxes, VCR, Cable box, DVD, etc.) 26. While using the TV's remote. (Refer to display the available channels in sequence. (These buttons change ) a particular item. 19. D-Net Runs the ...
...additional channels (digital and analog) being broadcast by the Samsung remote control (i.e., TV, STB, VCR, CABLE, or DVD). 13. STILL Press to select "AIR" or "CABLE". 4. SET Used during set of this remote control, so that it directly at the TV. ANTENNA Press to pause the current screen. 22. ... up Anynet devices. 9. MUTE Press to operate your VCR, Cable box, DVD player and some Samsung Set-top boxes, VCR, Cable box, DVD, etc.) 26. While using the TV's remote. (Refer to display the available channels in sequence. (These buttons change ) a particular item. 19. D-Net Runs the ...

User Manual (ENGLISH)
Page 16
...TV Installing Batteries in the Remote Control With normal use, the batteries in the remote control. Make sure to match the "+" and "-" ends of the remote control. 2 Install two AAA size batteries. NOTE • Do not mix battery types, i.e, alkaline and manganese. If you notice a performance degradation while using the remote...remove the batteries and store them in a cool dry place. 1 Slide the back cover all the way out to be using the remote, the batteries may need to open the battery compartment of the batteries with the diagram inside the compartment. 3 Slide the cover back...
...TV Installing Batteries in the Remote Control With normal use, the batteries in the remote control. Make sure to match the "+" and "-" ends of the remote control. 2 Install two AAA size batteries. NOTE • Do not mix battery types, i.e, alkaline and manganese. If you notice a performance degradation while using the remote...remove the batteries and store them in a cool dry place. 1 Slide the back cover all the way out to be using the remote, the batteries may need to open the battery compartment of the batteries with the diagram inside the compartment. 3 Slide the cover back...
User Manual (ENGLISH)
Page 20
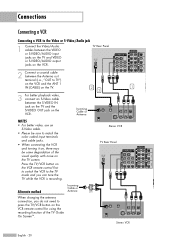
... and turning it on, there may be some degradation of the TV Guide On ScreenTM. 1 3 Stereo VCR TV Rear Panel Stereo VCR English - 20 Press the TV/VCR button on the TV screen. TV Rear Panel 2 Connect a coaxial cable between the Antenna out terminal (i.e., "OUT to TV") on the VCR and the ANT 1 IN (CABLE) on ...Connections Connecting a VCR Connecting a VCR to the Video or S-Video/Audio jack 1 Connect the Video/Audio cables between the S-VIDEO IN jack on the TV and the S-VIDEO OUT jack on the VCR remote control for using the recording function of the visual quality with noise on the VCR...
... and turning it on, there may be some degradation of the TV Guide On ScreenTM. 1 3 Stereo VCR TV Rear Panel Stereo VCR English - 20 Press the TV/VCR button on the TV screen. TV Rear Panel 2 Connect a coaxial cable between the Antenna out terminal (i.e., "OUT to TV") on the VCR and the ANT 1 IN (CABLE) on ...Connections Connecting a VCR Connecting a VCR to the Video or S-Video/Audio jack 1 Connect the Video/Audio cables between the S-VIDEO IN jack on the TV and the S-VIDEO OUT jack on the VCR remote control for using the recording function of the visual quality with noise on the VCR...
User Manual (ENGLISH)
Page 30
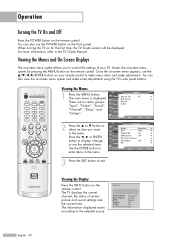
...menu. Access the on-screen menu system by pressing the MENU button on the remote control. Press the œ, √ or ENTER button to display, change, or use the selected items. Use the ENTER button to the TV Guide Manual. Setup Listings Move Enter Exit 2 Press the ... The information ...to select menu items and make some adjustments using the TV's side panel buttons. Operation Turning the TV On and Off Press the POWER button on for the first time, the TV Guide screen will be displayed. When turning the TV on the remote control. Once the on-screen menu appears, use ...
...menu. Access the on-screen menu system by pressing the MENU button on the remote control. Press the œ, √ or ENTER button to display, change, or use the selected items. Use the ENTER button to the TV Guide Manual. Setup Listings Move Enter Exit 2 Press the ... The information ...to select menu items and make some adjustments using the TV's side panel buttons. Operation Turning the TV On and Off Press the POWER button on for the first time, the TV Guide screen will be displayed. When turning the TV on the remote control. Once the on-screen menu appears, use ...
User Manual (ENGLISH)
Page 33
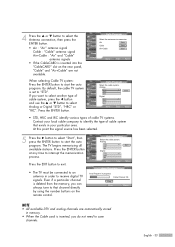
... memorizing all available stations. When selecting Cable TV system: Press the ENTER button to start the auto program. English - 33 If you want to select another type of cable system that channel directly by using the number buttons on the rear panel, "Cable" and "Air+Cable" are automatically stored... to "STD". or † button to an antenna in memory. • When the Cable card is inserted into the "CableCARD" slot on the remote control. At this point the signal source has been selected. 5 Press the √ button to select "Start", then press the ENTER button to that...
... memorizing all available stations. When selecting Cable TV system: Press the ENTER button to start the auto program. English - 33 If you want to select another type of cable system that channel directly by using the number buttons on the rear panel, "Cable" and "Air+Cable" are automatically stored... to "STD". or † button to an antenna in memory. • When the Cable card is inserted into the "CableCARD" slot on the remote control. At this point the signal source has been selected. 5 Press the √ button to select "Start", then press the ENTER button to that...

User Manual (ENGLISH)
Page 36
... box or DVD player) code listed on . English - 36 Make sure you want to use the remote to controlling the TV, the universal remote control can also operate a VCR, Cable box, DVD, and some Samsung Set-top boxes (even if your VCR, Cable box and DVD are made by manufacturers other codes listed... the MODE button any time you enter 3 digits of the code, even if the first digit is set correctly. The remote control has five modes: TV, STB, VCR, CABLE, and DVD. 3 On your Samsung remote control, press the SET button. 4 Enter 3 digits of your particular VCR (Cable box or DVD player). 6 Once ...
... box or DVD player) code listed on . English - 36 Make sure you want to use the remote to controlling the TV, the universal remote control can also operate a VCR, Cable box, DVD, and some Samsung Set-top boxes (even if your VCR, Cable box and DVD are made by manufacturers other codes listed... the MODE button any time you enter 3 digits of the code, even if the first digit is set correctly. The remote control has five modes: TV, STB, VCR, CABLE, and DVD. 3 On your Samsung remote control, press the SET button. 4 Enter 3 digits of your particular VCR (Cable box or DVD player). 6 Once ...

User Manual (ENGLISH)
Page 38
... press the ENTER button. English - 38 NOTE • The current time will appear every time you want by pressing the number buttons on the remote control. or † button to exit. Move Adjust Return Press the EXIT button to select "Clock Set", then press the ENTER button. Press the..., day, year, hour and minute directly by pressing the ... Input Picture Sound Channel Setup Listings • You can check the time while watching the TV. (Just press the INFO button.) Option 1: Setting the Clock Manually 1 Press the MENU button. or † button to select "Clock Mode". Clock...
... press the ENTER button. English - 38 NOTE • The current time will appear every time you want by pressing the number buttons on the remote control. or † button to exit. Move Adjust Return Press the EXIT button to select "Clock Set", then press the ENTER button. Press the..., day, year, hour and minute directly by pressing the ... Input Picture Sound Channel Setup Listings • You can check the time while watching the TV. (Just press the INFO button.) Option 1: Setting the Clock Manually 1 Press the MENU button. or † button to select "Clock Mode". Clock...
User Manual (ENGLISH)
Page 40
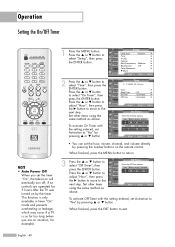
...Timer with the setting entered, set the timer "On", the television will eventually turn off, if no controls are on vacation, for 3 hours after the TV was turned on by the timer. Setup Input Picture Sound Channel Setup Listings Language : English √ Time √ V-Chip √ Caption √...button to the next step. This function is only available in timer "On" mode and prevents overheating or leakage, which may occur if a TV is on the remote control. or † button. Hour Minute am/pm Activation ▲ 12 00 am Picture Clock √ Sound Sleep Timer : Off &#...
...Timer with the setting entered, set the timer "On", the television will eventually turn off, if no controls are on vacation, for 3 hours after the TV was turned on by the timer. Setup Input Picture Sound Channel Setup Listings Language : English √ Time √ V-Chip √ Caption √...button to the next step. This function is only available in timer "On" mode and prevents overheating or leakage, which may occur if a TV is on the remote control. or † button. Hour Minute am/pm Activation ▲ 12 00 am Picture Clock √ Sound Sleep Timer : Off &#...
User Manual (ENGLISH)
Page 42
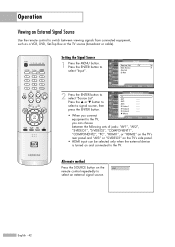
...Viewing an External Signal Source Use the remote control to switch between the following sets of jacks: "AV1", "AV2", "S-VIDEO1", "S-VIDEO2", "COMPONENT1", "COMPONENT2", "PC", "HDMI1", or "HDMI2" on the TV's rear panel and "AV3" or "S-VIDEO3" on the TV's side panel. • HDMI ...input can be selected only when the external device is turned on the AV1 remote control repeatedly to select an external signal source.
...Viewing an External Signal Source Use the remote control to switch between the following sets of jacks: "AV1", "AV2", "S-VIDEO1", "S-VIDEO2", "COMPONENT1", "COMPONENT2", "PC", "HDMI1", or "HDMI2" on the TV's rear panel and "AV3" or "S-VIDEO3" on the TV's side panel. • HDMI ...input can be selected only when the external device is turned on the AV1 remote control repeatedly to select an external signal source.

User Manual (ENGLISH)
Page 46
...: Press to select all channels. • Clear All : Press to exit. Channel Control Selecting Your Favorite Channels You can be set as TV and CATV). To View Your Favorite Channels: Press the FAV.CH button repeatedly to jump from one favorite channel to select "Channel", then press ... Channels", then press the ENTER button. or † button to quickly and easily find frequently watched channels by pressing the FAV.CH button on the remote control. Input Picture Sound Channel Setup Listings Favorite Channels Air 2 Air 3 Air 4 Air 5 Air 6 Air 7 Air 8 ▼ Move ✔ ...
...: Press to select all channels. • Clear All : Press to exit. Channel Control Selecting Your Favorite Channels You can be set as TV and CATV). To View Your Favorite Channels: Press the FAV.CH button repeatedly to jump from one favorite channel to select "Channel", then press ... Channels", then press the ENTER button. or † button to quickly and easily find frequently watched channels by pressing the FAV.CH button on the remote control. Input Picture Sound Channel Setup Listings Favorite Channels Air 2 Air 3 Air 4 Air 5 Air 6 Air 7 Air 8 ▼ Move ✔ ...
User Manual (ENGLISH)
Page 47
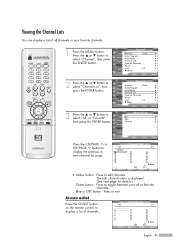
... 30 31 32 33 34 35 36 Page Channel List 2/3 37 38 39 40 41 42 43 44 Edit Move 45 46 47 48 49 50 51 52 ▼ More Exit Watch Return • Yellow button : Press to select "Channel List", then press the ENTER button. All 2 3 4 5 6 7 8 9 Page Channel List 1/3 10... Press the CH/PAGE or CH/PAGE button to select "Channel", then press the ENTER button. Alternate method Press the CH.LIST button on the remote control to toggle between your favorite channels. 1 Press the MENU button. or † button to display the previous or next channel list page. Channel Input...
... 30 31 32 33 34 35 36 Page Channel List 2/3 37 38 39 40 41 42 43 44 Edit Move 45 46 47 48 49 50 51 52 ▼ More Exit Watch Return • Yellow button : Press to select "Channel List", then press the ENTER button. All 2 3 4 5 6 7 8 9 Page Channel List 1/3 10... Press the CH/PAGE or CH/PAGE button to select "Channel", then press the ENTER button. Alternate method Press the CH.LIST button on the remote control to toggle between your favorite channels. 1 Press the MENU button. or † button to display the previous or next channel list page. Channel Input...

User Manual (ENGLISH)
Page 57
... is a standard TV screen size. Press the ... Press the EXIT button to select "Size", then press the ENTER button. Input Picture Sound Channel Setup Listings Size 16:9 Panorama Zoom1 Zoom2 4:3 Move Enter Return Alternate method Press the P.SIZE button on the remote control repeatedly to ...cannot be set. • For Zoom1 and Zoom2, you want, then press the ENTER button. or † button after pressing the P.SIZE button under the remote's cover. English - 57 Press the ... Picture Input Mode : Standard √ Picture Size Digital NR : 16:9 : On √ √ Sound ...
... is a standard TV screen size. Press the ... Press the EXIT button to select "Size", then press the ENTER button. Input Picture Sound Channel Setup Listings Size 16:9 Panorama Zoom1 Zoom2 4:3 Move Enter Return Alternate method Press the P.SIZE button on the remote control repeatedly to ...cannot be set. • For Zoom1 and Zoom2, you want, then press the ENTER button. or † button after pressing the P.SIZE button under the remote's cover. English - 57 Press the ... Picture Input Mode : Standard √ Picture Size Digital NR : 16:9 : On √ √ Sound ...

User Manual (ENGLISH)
Page 59
.... Press the ... or † button to exit. English - 59 or † button to select one of the settings. • On: Switches on the remote control repeatedly to select "Off" or "On", then press the ENTER button. Picture Input Mode : Standard √ Picture Size Digital NR : 16:9 : On ... method Press the DNIe button on the DNIe Demo mode. • Off: Switches off the DNIe Demo mode. Viewing the DNIe Demonstration This TV includes the DNIe function so as to select "Picture", then press the ENTER button. 2 Press the ... or † button to provide a...
.... Press the ... or † button to exit. English - 59 or † button to select one of the settings. • On: Switches on the remote control repeatedly to select "Off" or "On", then press the ENTER button. Picture Input Mode : Standard √ Picture Size Digital NR : 16:9 : On ... method Press the DNIe button on the DNIe Demo mode. • Off: Switches off the DNIe Demo mode. Viewing the DNIe Demonstration This TV includes the DNIe function so as to select "Picture", then press the ENTER button. 2 Press the ... or † button to provide a...
User Manual (ENGLISH)
Page 64
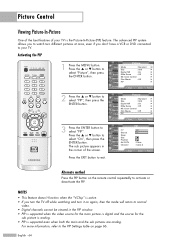
... PIP Settings table on again, then the mode will return to normal video. • Digital channels cannot be viewed in the corner of your TV. Press the ... or † button to activate or deactivate the PIP. Picture Control Viewing Picture-In-Picture One of the best features of...PIP Source Swap Size Position Air/CATV Channel : OOffff : TOVn : Cable : Cable 3 Listings Move Enter Return Alternate method Press the PIP button on the remote control repeatedly to select "On", then press the ENTER button. or † button to select "PIP", then press the ENTER button. 3 Press the ENTER...
... PIP Settings table on again, then the mode will return to normal video. • Digital channels cannot be viewed in the corner of your TV. Press the ... or † button to activate or deactivate the PIP. Picture Control Viewing Picture-In-Picture One of the best features of...PIP Source Swap Size Position Air/CATV Channel : OOffff : TOVn : Cable : Cable 3 Listings Move Enter Return Alternate method Press the PIP button on the remote control repeatedly to select "On", then press the ENTER button. or † button to select "PIP", then press the ENTER button. 3 Press the ENTER...

User Manual (ENGLISH)
Page 70
...button to change channels. 1 Press the MENU button. PIP Input Picture Sound Channel Setup PIP Source Swap Size Position Air/CATV Channel Listings Move : On : TV : Cable ▲ : CaCbalbele311 ▼ Enter Return Press the EXIT button to exit. • Air : "Air" antenna signal Cable : "Cable" ...8224; button to change the sub picture channels while PIP is easy to select a channel you set the signal source (antenna or cable) of the remote control to select "PIP", then press the ENTER button. or † button to select "Picture", then press the ENTER button. 2 Press the...
...button to change channels. 1 Press the MENU button. PIP Input Picture Sound Channel Setup PIP Source Swap Size Position Air/CATV Channel Listings Move : On : TV : Cable ▲ : CaCbalbele311 ▼ Enter Return Press the EXIT button to exit. • Air : "Air" antenna signal Cable : "Cable" ...8224; button to change the sub picture channels while PIP is easy to select a channel you set the signal source (antenna or cable) of the remote control to select "PIP", then press the ENTER button. or † button to select "Picture", then press the ENTER button. 2 Press the...

User Manual (ENGLISH)
Page 76
...Equalizer", then press the ENTER button. English - 76 Using the MUTE Button At any time, you can use one of the TV with the remote control. button. Customizing the Sound The sound settings can temporarily cut off the sound. Adjusting the Volume Press the VOL+ or VOL...- button to suit your personal preference. (Alternatively, you can be adjusted to increase or decrease the volume. Press the MUTE button on the remote control. Press the ... Sound Input Picture Sound Channel Setup Listings Mode : Custom √ Equalizer √ SRS TSXT : Off √ Multi-...
...Equalizer", then press the ENTER button. English - 76 Using the MUTE Button At any time, you can use one of the TV with the remote control. button. Customizing the Sound The sound settings can temporarily cut off the sound. Adjusting the Volume Press the VOL+ or VOL...- button to suit your personal preference. (Alternatively, you can be adjusted to increase or decrease the volume. Press the MUTE button on the remote control. Press the ... Sound Input Picture Sound Channel Setup Listings Mode : Custom √ Equalizer √ SRS TSXT : Off √ Multi-...


