User Manual (ENGLISH)
Page 5
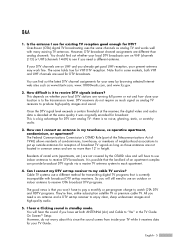
... system to receive DTV signals indoors? It is that the landlord of rental units (apartments, etc.) are no noise, ghosting, static, or scratchy audio. 3. Cable TV systems use indoor antennas to produce high-quality images and sound. All you already get good UHF reception, your local DTV broadcasts ...are on whether your local DTV stations are used for broadcast. However, do not require as much signal as analog TV receivers to receive DTV broadcasts. You can find out whether your present antenna may work fine. This depends on VHF (channels 2-13) or ...
... system to receive DTV signals indoors? It is that the landlord of rental units (apartments, etc.) are no noise, ghosting, static, or scratchy audio. 3. Cable TV systems use indoor antennas to produce high-quality images and sound. All you already get good UHF reception, your local DTV broadcasts ...are on whether your local DTV stations are used for broadcast. However, do not require as much signal as analog TV receivers to receive DTV broadcasts. You can find out whether your present antenna may work fine. This depends on VHF (channels 2-13) or ...
User Manual (ENGLISH)
Page 6
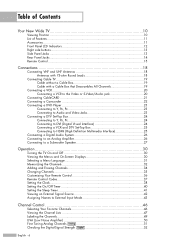
... ...11 Front Panel LED Indicators 12 Right side buttons 13 Side Panel Jacks ...13 Rear Panel Jacks ...14 Remote Control...15 Connections 18 Connecting VHF and UHF Antennas 18 Antennas with 75-ohm Round Leads 18 Connecting Cable TV 19 Cable without a Cable Box 19 Cable with a Cable Box that Descrambles All... Names to External Input Mode 43 Channel Control 46 Selecting Your Favorite Channels 46 Viewing the Channel Lists 47 Labeling the Channels 49 LNA (Low Noise Amplifier 50 Fine Tuning Analog Channels Analog 51 Checking the Digital-Signal Strength Digital 52 English - 6
... ...11 Front Panel LED Indicators 12 Right side buttons 13 Side Panel Jacks ...13 Rear Panel Jacks ...14 Remote Control...15 Connections 18 Connecting VHF and UHF Antennas 18 Antennas with 75-ohm Round Leads 18 Connecting Cable TV 19 Cable without a Cable Box 19 Cable with a Cable Box that Descrambles All... Names to External Input Mode 43 Channel Control 46 Selecting Your Favorite Channels 46 Viewing the Channel Lists 47 Labeling the Channels 49 LNA (Low Noise Amplifier 50 Fine Tuning Analog Channels Analog 51 Checking the Digital-Signal Strength Digital 52 English - 6

User Manual (ENGLISH)
Page 7
... 54 Picture Control...54 Changing the Picture Size 57 Digital Noise Reduction 58 Viewing the DNIe Demonstration 59 Setting the My ... Selection Mode 104 Using the CableCARD 105 Using the CableCARD Setup Function 106 Using Game Mode 108 Using TV Guide On ScreenTM 109 Using the D-Net 112 How to connect compatible IEEE1394 Devices 112 Connection Options 114... ...120 Recording Tips...122 Tips on stopping recording 122 Troubleshooting (D-Net 123 PC Display 128 Using Your TV as a Computer (PC) Display 128 Adjusting the Picture Quality 131 Changing the Picture Position 132 Adjusting the...
... 54 Picture Control...54 Changing the Picture Size 57 Digital Noise Reduction 58 Viewing the DNIe Demonstration 59 Setting the My ... Selection Mode 104 Using the CableCARD 105 Using the CableCARD Setup Function 106 Using Game Mode 108 Using TV Guide On ScreenTM 109 Using the D-Net 112 How to connect compatible IEEE1394 Devices 112 Connection Options 114... ...120 Recording Tips...122 Tips on stopping recording 122 Troubleshooting (D-Net 123 PC Display 128 Using Your TV as a Computer (PC) Display 128 Adjusting the Picture Quality 131 Changing the Picture Position 132 Adjusting the...
User Manual (ENGLISH)
Page 20
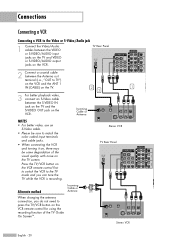
...VCR remote control first to switch the VCR to the TV mode and you do not need to press the TV/VCR button on the VCR remote control for using the recording function of the visual quality with noise on the TV screen. TV Rear Panel 2 Connect a coaxial cable between the Antenna out... terminal (i.e., "OUT to TV") on the VCR and the ANT 1 IN (CABLE) on the TV. 2 3 For better playback video, connect an S-Video cable between ...
...VCR remote control first to switch the VCR to the TV mode and you do not need to press the TV/VCR button on the VCR remote control for using the recording function of the visual quality with noise on the TV screen. TV Rear Panel 2 Connect a coaxial cable between the Antenna out... terminal (i.e., "OUT to TV") on the VCR and the ANT 1 IN (CABLE) on the TV. 2 3 For better playback video, connect an S-Video cable between ...
User Manual (ENGLISH)
Page 50
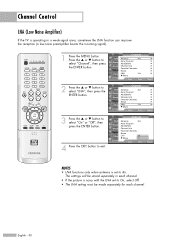
... antenna is noisy with the LNA set to Air. English - 50 or † button to exit. or † button to select "LNA", then press the ENTER button. 3 Press the ... Channel Control LNA (Low Noise Amplifier) If the TV is operating in each channel. • If the picture is ...set to On, select Off. • The LNA setting must be stored separately in a weak-signal area, sometimes the LNA function can improve the reception (a low-noise preamplifier boosts the incoming signal...
... antenna is noisy with the LNA set to Air. English - 50 or † button to exit. or † button to select "LNA", then press the ENTER button. 3 Press the ... Channel Control LNA (Low Noise Amplifier) If the TV is operating in each channel. • If the picture is ...set to On, select Off. • The LNA setting must be stored separately in a weak-signal area, sometimes the LNA function can improve the reception (a low-noise preamplifier boosts the incoming signal...

User Manual (ENGLISH)
Page 58
... select "Picture", then press the ENTER button. 2 Press the ... or † button to exit. Picture Control Digital Noise Reduction If the broadcast signal received by your TV is weak, you can activate the Digital Noise Reduction feature to help reduce any static and ghosting that may appear on the screen. 1 Press the MENU...
... select "Picture", then press the ENTER button. 2 Press the ... or † button to exit. Picture Control Digital Noise Reduction If the broadcast signal received by your TV is weak, you can activate the Digital Noise Reduction feature to help reduce any static and ghosting that may appear on the screen. 1 Press the MENU...

User Manual (ENGLISH)
Page 59
...", then press the ENTER button. 2 Press the ... or † button to select "Off" or "On", then press the ENTER button. Viewing the DNIe Demonstration This TV includes the DNIe function so as to select one of the settings. • On: Switches on the screen simultaneously, for demonstration purposes. Using this function...
...", then press the ENTER button. 2 Press the ... or † button to select "Off" or "On", then press the ENTER button. Viewing the DNIe Demonstration This TV includes the DNIe function so as to select one of the settings. • On: Switches on the screen simultaneously, for demonstration purposes. Using this function...

User Manual (ENGLISH)
Page 131
... You can also select these options (Coarse, or Fine) by pressing the ... After the noise has been reduced, re-adjust the picture so that it is to remove or reduce picture noise. or † button to the utmost and fine tune again. If necessary, adjust the position... Coarse Picture Fine Sound Channel Setup Listings Move Enter 800 0 Return ▲ Coarse 800 ▼ Press the EXIT button to remove the picture noise. PC Input Picture Sound Channel Image Lock √ Position √ Auto Adjustment Image Reset Resolution : 1024 x 768 @60Hz Setup Listings Move ...
... You can also select these options (Coarse, or Fine) by pressing the ... After the noise has been reduced, re-adjust the picture so that it is to remove or reduce picture noise. or † button to the utmost and fine tune again. If necessary, adjust the position... Coarse Picture Fine Sound Channel Setup Listings Move Enter 800 0 Return ▲ Coarse 800 ▼ Press the EXIT button to remove the picture noise. PC Input Picture Sound Channel Image Lock √ Position √ Auto Adjustment Image Reset Resolution : 1024 x 768 @60Hz Setup Listings Move ...

