
Instruction Manual
Page 1
DLPTV INSTRUCTION MANUAL HL-P4667W/HL-P5067W/HL-P5667W/HL-P6167W
DLPTV INSTRUCTION MANUAL HL-P4667W/HL-P5067W/HL-P5667W/HL-P6167W
Instruction Manual
Page 12
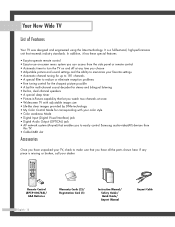
... Manual Anynet Cable If any time you choose • Adjustable picture and sound settings and the ability to make sure that you watch two channels at any piece is a full-featured, high-performance unit that enables you to easily control Samsung audio-video(AV) devices from this TV.... • CableCARD slot Accessories Once you have unpacked your TV, check to memorize your dealer. Your New Wide TV List of Features Your TV was designed and engineered using the latest technology. In...
... Manual Anynet Cable If any time you choose • Adjustable picture and sound settings and the ability to make sure that you watch two channels at any piece is a full-featured, high-performance unit that enables you to easily control Samsung audio-video(AV) devices from this TV.... • CableCARD slot Accessories Once you have unpacked your TV, check to memorize your dealer. Your New Wide TV List of Features Your TV was designed and engineered using the latest technology. In...
Instruction Manual
Page 26
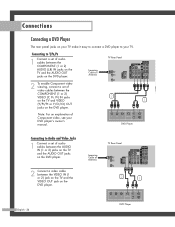
... audio cables between the AUDIO IN (1 or 2) jacks on the TV and the AUDIO OUT jacks on the DVD player. Connecting to your DVD player's owner's manual. Connections Connecting a DVD Player The rear panel jacks on your TV make it easy to connect a DVD player to Y,PB,PR 1... Connect a set of Component video, see your TV. Incoming Cable or Antenna TV Rear Panel 2 Connect a video cable between the COMPONENT...
... audio cables between the AUDIO IN (1 or 2) jacks on the TV and the AUDIO OUT jacks on the DVD player. Connecting to your DVD player's owner's manual. Connections Connecting a DVD Player The rear panel jacks on your TV make it easy to connect a DVD player to Y,PB,PR 1... Connect a set of Component video, see your TV. Incoming Cable or Antenna TV Rear Panel 2 Connect a video cable between the COMPONENT...
Instruction Manual
Page 27
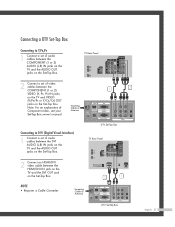
... the HDMI/DVI IN jack on the TV and the DVI OUT jack on the Set-Top Box. DTV Set-Top Box TV Rear Panel 2 Connect an HDMI/DVI video... cable between the COMPONENT (1 or 2) AUDIO (L,R) IN jacks on the TV and the AUDIO OUT jacks on the Set-Top Box. TV Rear... Panel 2 Connect a set of audio cables between the COMPONENT (1 or 2) VIDEO (Y, PB, PR) IN jacks on the TV... video cables between the DVI AUDIO (L,R) IN jacks on the TV and the AUDIO OUT jacks on the Set-Top Box. Note: For ...
... the HDMI/DVI IN jack on the TV and the DVI OUT jack on the Set-Top Box. DTV Set-Top Box TV Rear Panel 2 Connect an HDMI/DVI video... cable between the COMPONENT (1 or 2) AUDIO (L,R) IN jacks on the TV and the AUDIO OUT jacks on the Set-Top Box. TV Rear... Panel 2 Connect a set of audio cables between the COMPONENT (1 or 2) VIDEO (Y, PB, PR) IN jacks on the TV... video cables between the DVI AUDIO (L,R) IN jacks on the TV and the AUDIO OUT jacks on the Set-Top Box. Note: For ...
Instruction Manual
Page 29
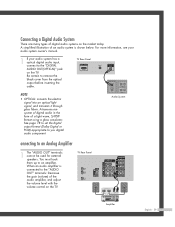
... systems on the market today. You must hook them up to remove the black cover from the optical output before inserting the cable. TV Rear Panel Amplifier English - 29 When an audio amplifier is shown below. A simplified illustration of the audio amplifier, and adjust the volume ...level with the volume control on the TV. For more information, see your audio system owner's manual. 1 If your audio system has a optical digital audio input, connect to the "AUDIO OUT" terminals: Decrease the ...
... systems on the market today. You must hook them up to remove the black cover from the optical output before inserting the cable. TV Rear Panel Amplifier English - 29 When an audio amplifier is shown below. A simplified illustration of the audio amplifier, and adjust the volume ...level with the volume control on the TV. For more information, see your audio system owner's manual. 1 If your audio system has a optical digital audio input, connect to the "AUDIO OUT" terminals: Decrease the ...
Instruction Manual
Page 34
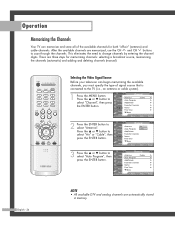
... Cable Add/Delete Favorite Channels Name Fine Tune ▼ More Move Enter Return 3 Press the ... Operation Memorizing the Channels Your TV can begin memorizing the available channels, you must specify the type of the available channels for memorizing channels: selecting a broadcast source,... memorizing the channels (automatic) and adding and deleting channels (manual). After the available channels are three steps for both "off-air" (antenna) and cable channels. Selecting the Video Signal Source ...
... Cable Add/Delete Favorite Channels Name Fine Tune ▼ More Move Enter Return 3 Press the ... Operation Memorizing the Channels Your TV can begin memorizing the available channels, you must specify the type of the available channels for memorizing channels: selecting a broadcast source,... memorizing the channels (automatic) and adding and deleting channels (manual). After the available channels are three steps for both "off-air" (antenna) and cable channels. Selecting the Video Signal Source ...

Instruction Manual
Page 40
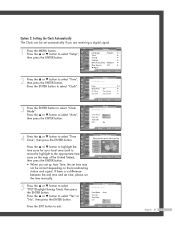
...select "Clock Mode". Move Adjust Return English - 40 Press the EXIT button to select "Manual", then press the ENTER button. or † button to use the various timer features of the TV. Set the clock you press the INFO button. • You can check the time while... watching the TV. (Just press the INFO button.) Option 1: Setting the Clock Manually 1 Press the MENU button. Clock Input Picture Sound Channel Setup Clock Mode Clock Set Time Zone DST : Manual : No Guide Move Enter Return Input Picture Sound Channel Setup...
...select "Clock Mode". Move Adjust Return English - 40 Press the EXIT button to select "Manual", then press the ENTER button. or † button to use the various timer features of the TV. Set the clock you press the INFO button. • You can check the time while... watching the TV. (Just press the INFO button.) Option 1: Setting the Clock Manually 1 Press the MENU button. Clock Input Picture Sound Channel Setup Clock Mode Clock Set Time Zone DST : Manual : No Guide Move Enter Return Input Picture Sound Channel Setup...
Instruction Manual
Page 41
... press the ENTER button. or † button to select "Clock". Sound Channel Setup Guide • When you set up Auto Time, the set the time manually. Press the ENTER button to select "Time", then press the ENTER button. Input Picture Press the ... or † button to select "Setup", then press the...
... press the ENTER button. or † button to select "Clock". Sound Channel Setup Guide • When you set up Auto Time, the set the time manually. Press the ENTER button to select "Time", then press the ENTER button. Input Picture Press the ... or † button to select "Setup", then press the...
Instruction Manual
Page 48
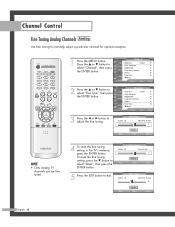
... reset the fine tuning setting, press the † button to select "Reset", then press the ENTER button. 5 Press the EXIT button to manually adjust a particular channel for optimal reception. 1 Press the MENU button. Channel Control Fine Tuning Analog Channels Analog Use fine tuning to exit. Press... ... Cable 26 Fine Tune Not Fine Tuned 3 Adjust Reset Save Return NOTE • Only analog TV channels can be fine tuned. 4 To store the fine tuning setting in the TV's memory, press the ENTER button. Channel Input Picture Sound Channel Setup Guide Antenna : Cable Auto Program...
... reset the fine tuning setting, press the † button to select "Reset", then press the ENTER button. 5 Press the EXIT button to manually adjust a particular channel for optimal reception. 1 Press the MENU button. Channel Control Fine Tuning Analog Channels Analog Use fine tuning to exit. Press... ... Cable 26 Fine Tune Not Fine Tuned 3 Adjust Reset Save Return NOTE • Only analog TV channels can be fine tuned. 4 To store the fine tuning setting in the TV's memory, press the ENTER button. Channel Input Picture Sound Channel Setup Guide Antenna : Cable Auto Program...
Instruction Manual
Page 78
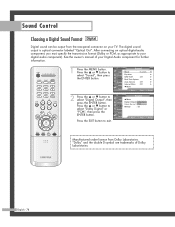
...; More Digital Output : DPoClbMy Digital Select Sound : PMCMain Melody : On Setup Guide Move Enter Return Manufactured under license from the rear-panel connector on your digital audio component). See the owner's manual of Dolby Laboratories. Press the ... or † button to select "Sound", then press the ENTER button. 2 Press the ... After connecting...
...; More Digital Output : DPoClbMy Digital Select Sound : PMCMain Melody : On Setup Guide Move Enter Return Manufactured under license from the rear-panel connector on your digital audio component). See the owner's manual of Dolby Laboratories. Press the ... or † button to select "Sound", then press the ENTER button. 2 Press the ... After connecting...

Instruction Manual
Page 94
Prior to accessing this manual. Displaying CableCARD related information To access information on page 24 ...Function Help : Off CableCARDTM CableCARDTM Reset Setup Guide Move Enter Return 3 Press the EXIT button to the rear panel of the CableCARD provided by a local cable service provider. For detailed connection instructions refer to the "...Connecting CableCARD" section on Status, Pairing, Network Setup of the TV. English - 94 Special Features Using the CableCARD This menu works with a CableCARD provided by the service provider ...
Prior to accessing this manual. Displaying CableCARD related information To access information on page 24 ...Function Help : Off CableCARDTM CableCARDTM Reset Setup Guide Move Enter Return 3 Press the EXIT button to the rear panel of the CableCARD provided by a local cable service provider. For detailed connection instructions refer to the "...Connecting CableCARD" section on Status, Pairing, Network Setup of the TV. English - 94 Special Features Using the CableCARD This menu works with a CableCARD provided by the service provider ...


