User Manual (ENGLISH)
Page 2
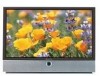
... Safety Information Always be connected to the grounding system of the building as close to protect it one of contact with any unauthorized recording in whole or in part may result in Digital Light Processing television technology. Move the TV and cart with the TV. It is present. Certain...in mind when installing, using your appliance dealer or local power company. • Use only a grounded or polarized outlet. Your new Samsung projection TV represents the latest in fire or electric shock, do not use liquid or aerosol cleaners. • Never add any part inside this ...
... Safety Information Always be connected to the grounding system of the building as close to protect it one of contact with any unauthorized recording in whole or in part may result in Digital Light Processing television technology. Move the TV and cart with the TV. It is present. Certain...in mind when installing, using your appliance dealer or local power company. • Use only a grounded or polarized outlet. Your new Samsung projection TV represents the latest in fire or electric shock, do not use liquid or aerosol cleaners. • Never add any part inside this ...
User Manual (ENGLISH)
Page 3
...the FCC Rules. If this equipment does cause harmful interference to correct the interference by objects placed on the TV. • Ground outdoor antennas. Before making the connection, make adjustments yourself, adjust only those that have fallen into an outlet on , the user is encouraged to...of the National Electrical Code, ANSI/NFPA No.70-1984, provides information about proper grounding of the mast and supporting structure, grounding of Samsung 3351 Michelson Drive, Suite #290, Irvine, CA92612 USA Warning User must accept any service or repairs to this monitor is subject to...
...the FCC Rules. If this equipment does cause harmful interference to correct the interference by objects placed on the TV. • Ground outdoor antennas. Before making the connection, make adjustments yourself, adjust only those that have fallen into an outlet on , the user is encouraged to...of the National Electrical Code, ANSI/NFPA No.70-1984, provides information about proper grounding of the mast and supporting structure, grounding of Samsung 3351 Michelson Drive, Suite #290, Irvine, CA92612 USA Warning User must accept any service or repairs to this monitor is subject to...
User Manual (ENGLISH)
Page 4
... Your New Wide TV 10 Replacing the Lamp 10 List of Features ...12 Checking Parts...12 Side Panel Buttons 13 Side Panel Jacks 13 Front Panel LED Indicators 14 Rear Panel Jacks 15 Remote Control ...16 Installing Batteries in the Remote Control 17 Connections ...20 Connecting VHF and UHF ...Favorite Channels 35 Scanning Channels 36 Labeling the Channels 37 Picture Control ...38 Sound Control ...40 Setting the Clock 42 Setting the Timers 43 Viewing an External Signal Source 46 6 Special Features 50 Setting Up Your Remote Control 50 Remote Control Codes 53 Fine Tuning Channels 54...
... Your New Wide TV 10 Replacing the Lamp 10 List of Features ...12 Checking Parts...12 Side Panel Buttons 13 Side Panel Jacks 13 Front Panel LED Indicators 14 Rear Panel Jacks 15 Remote Control ...16 Installing Batteries in the Remote Control 17 Connections ...20 Connecting VHF and UHF ...Favorite Channels 35 Scanning Channels 36 Labeling the Channels 37 Picture Control ...38 Sound Control ...40 Setting the Clock 42 Setting the Timers 43 Viewing an External Signal Source 46 6 Special Features 50 Setting Up Your Remote Control 50 Remote Control Codes 53 Fine Tuning Channels 54...
User Manual (ENGLISH)
Page 6
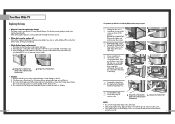
... lamp, align the lamp cover with your bare hands nor insert any foreign object inside the cover as shown in a projection TV has a limited lifespan. HLN437W1/HLN507W1 ... It should be connected to the body of the Lamp. 4 Separate the Lamp from the engine by holding the handle and pulling it out.... the replacement Lamp is not correctly closed (as this will be hot. 3. Replace with the correct code numbered lamp to avoid damage to a Samsung Service center. ... Turn the power off and wait for 30 minutes before lamp replacement 1. For the best screen quality it needs to be the...
... lamp, align the lamp cover with your bare hands nor insert any foreign object inside the cover as shown in a projection TV has a limited lifespan. HLN437W1/HLN507W1 ... It should be connected to the body of the Lamp. 4 Separate the Lamp from the engine by holding the handle and pulling it out.... the replacement Lamp is not correctly closed (as this will be hot. 3. Replace with the correct code numbered lamp to avoid damage to a Samsung Service center. ... Turn the power off and wait for 30 minutes before lamp replacement 1. For the best screen quality it needs to be the...
User Manual (ENGLISH)
Page 7
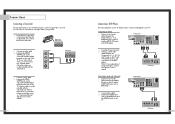
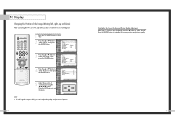
...capability that you can access from connected components. ´ MENU Press to see the on-screen menu. ˇ ▼ CH ▲ Press to change ) a particular item. Ø POWER Press to turn the TV on -screen menu system you have unpacked your TV, check to make sure that lets...using the onscreen menu. ˆ ENTER Press to activate (or change channels and move between viewing TV programs and signals from the side panel or remote control • Automatic timer to connect a component that is a full-featured, high-performance unit that exceeds industry standards. In addition, ...
...capability that you can access from connected components. ´ MENU Press to see the on-screen menu. ˇ ▼ CH ▲ Press to change ) a particular item. Ø POWER Press to turn the TV on -screen menu system you have unpacked your TV, check to make sure that lets...using the onscreen menu. ˆ ENTER Press to activate (or change channels and move between viewing TV programs and signals from the side panel or remote control • Automatic timer to connect a component that is a full-featured, high-performance unit that exceeds industry standards. In addition, ...
User Manual (ENGLISH)
Page 8
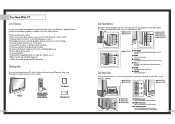
... VCR. The picture will automatically appear in about 30 seconds for repair and software upgrades. ' PC VIDEO INPUT jack Connect to receive a signal from VHF/UHF antennas or your TV. Lamp cover on rear of the set . Use ANT-A and ANT-B terminals to the video output port on your PC. 15 Note:... Monitor Out is available only in RF, Video and S-Video modes. ˆ Component1, 2, 3 jacks (Y, PB, PR, L, R) Use these jacks to connect the component video/...
... VCR. The picture will automatically appear in about 30 seconds for repair and software upgrades. ' PC VIDEO INPUT jack Connect to receive a signal from VHF/UHF antennas or your TV. Lamp cover on rear of the set . Use ANT-A and ANT-B terminals to the video output port on your PC. 15 Note:... Monitor Out is available only in RF, Video and S-Video modes. ˆ Component1, 2, 3 jacks (Y, PB, PR, L, R) Use these jacks to connect the component video/...
User Manual (ENGLISH)
Page 10
SAMSUNG Connections
SAMSUNG Connections

User Manual (ENGLISH)
Page 11
... UHF), you must combine the two antenna signals before connecting them to the TV. Use a screwdriver to tighten the screws. 2 Plug the adapter into the ANT-A terminal on the back panel of the TV. This requires a combiner attachment, which you will need to connect an antenna to the combiner. 2 Plug the combiner...-ohm round leads. 20 Separate VHF and UHF Antennas If you have a cable system, you can buy at an electronics store. 1 Connect both antenna leads to your TV. Antennas with 75-ohm Round Leads If your antenna looks like this : it has 300-ohm flat twin leads. 1 Place the wires...
... UHF), you must combine the two antenna signals before connecting them to the TV. Use a screwdriver to tighten the screws. 2 Plug the adapter into the ANT-A terminal on the back panel of the TV. This requires a combiner attachment, which you will need to connect an antenna to the combiner. 2 Plug the combiner...-ohm round leads. 20 Separate VHF and UHF Antennas If you have a cable system, you can buy at an electronics store. 1 Connect both antenna leads to your TV. Antennas with 75-ohm Round Leads If your antenna looks like this : it has 300-ohm flat twin leads. 1 Place the wires...

User Manual (ENGLISH)
Page 12
... all channels. If you have a S-VHS VCR, use the S-video connections and remove the video cable. Connections Connecting Cable TV and VCR You can connect different cable systems to your TV, including cable without a Cable Box If you want to record one audio cable. From Cable TV Rear Panel Caution: If you do not need two coaxial cables...
... all channels. If you have a S-VHS VCR, use the S-video connections and remove the video cable. Connections Connecting Cable TV and VCR You can connect different cable systems to your TV, including cable without a Cable Box If you want to record one audio cable. From Cable TV Rear Panel Caution: If you do not need two coaxial cables...
User Manual (ENGLISH)
Page 13
... The side panel jacks on "Viewing an External Signal Source" in this manual. If your TV. TV Side Panel Camcorder 24 Connecting a DVD Player The rear panel jacks on the TV. TV Rear Panel Incoming Cable or Antenna DVD Player 2 Connect video cables between the VIDEO OUT jack on the DVD player and the VIDEO IN jack on...
... The side panel jacks on "Viewing an External Signal Source" in this manual. If your TV. TV Side Panel Camcorder 24 Connecting a DVD Player The rear panel jacks on the TV. TV Rear Panel Incoming Cable or Antenna DVD Player 2 Connect video cables between the VIDEO OUT jack on the DVD player and the VIDEO IN jack on...

User Manual (ENGLISH)
Page 14
...Top Box. Incoming Cable or Antenna DTV Set Top Box TV Rear Panel 2 Connect video cables between the Component (1, 2 or 3) Y, PB and PR inputs on the TV and Y, PB and PR (or Y, CB, CR) outputs on the Set Top Box. Connecting to R,G,B 1 Connect a set of Component video, see your Set Top Box ...owner's manual. TV Rear Panel 2 Connect video cables between the DVI IN jack on the TV and the DVI OUT jack on the Set Top Box. TV Rear Panel Incoming Cable or Antenna DTV Set Top Box...
...Top Box. Incoming Cable or Antenna DTV Set Top Box TV Rear Panel 2 Connect video cables between the Component (1, 2 or 3) Y, PB and PR inputs on the TV and Y, PB and PR (or Y, CB, CR) outputs on the Set Top Box. Connecting to R,G,B 1 Connect a set of Component video, see your Set Top Box ...owner's manual. TV Rear Panel 2 Connect video cables between the DVI IN jack on the TV and the DVI OUT jack on the Set Top Box. TV Rear Panel Incoming Cable or Antenna DTV Set Top Box...
User Manual (ENGLISH)
Page 16
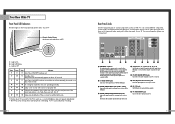
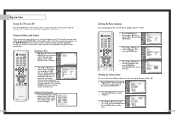
... Favorite Channel Channel Label Fine Tune Add/Delete Press the EXIT button to select "Setup", then press the ENTER button. You can connect to two different signal sources by pressing the MENU button on the remote control. Sound Channel Setup Move Enter Exit 2 Use the ...or "B", then press ENTER button. or † button to exit the menu. Note that audio on this product can press the EXIT button on your TV. Input Picture Sound Channel Setup Picture Picture Mode : Dynamic √ Custom Picture √ Color Tone : Normal √ Film Mode : Off √...
... Favorite Channel Channel Label Fine Tune Add/Delete Press the EXIT button to select "Setup", then press the ENTER button. You can connect to two different signal sources by pressing the MENU button on the remote control. Sound Channel Setup Move Enter Exit 2 Use the ...or "B", then press ENTER button. or † button to exit the menu. Note that audio on this product can press the EXIT button on your TV. Input Picture Sound Channel Setup Picture Picture Mode : Dynamic √ Custom Picture √ Color Tone : Normal √ Film Mode : Off √...
User Manual (ENGLISH)
Page 17
... 3 Press the CH / or number buttons to select the channel you can memorize and store all of cable system you are connected to Start Start Return Move Enter Exit Auto Program Channel Memory in Memory Automatically 1 First, select the broadcast source as described on...More Move Enter Return 2 Press the ... Press the ... With the Channel menu on the previous page. If you have, contact your TV is connected to add or delete the channel. Input Picture Sound Channel Setup Channel Antenna : A Air/CATV : Air Auto Program Favorite Channel Channel Label...
... 3 Press the CH / or number buttons to select the channel you can memorize and store all of cable system you are connected to Start Start Return Move Enter Exit Auto Program Channel Memory in Memory Automatically 1 First, select the broadcast source as described on...More Move Enter Return 2 Press the ... Press the ... With the Channel menu on the previous page. If you have, contact your TV is connected to add or delete the channel. Input Picture Sound Channel Setup Channel Antenna : A Air/CATV : Air Auto Program Favorite Channel Channel Label...
User Manual (ENGLISH)
Page 24
...sets of jacks: Video1, Video2, S-Video1, S-Video2, Component1, Component2, Component3, DVI or PC on the TV's rear panel, and Video3 or S-Video3 on the TV's side panel. 46 Assigning Names to exit the menu. 47 Press the MODE button and make sure that...illuminated. 2 Press the MENU button. Input Picture Sound Channel Setup Source List TV Video1 Video2 Video3 S-Video1 S-Video2 S-Video3 ▼ More Move Enter Return When you connect equipment to the TV, you can choose between viewing signals from connected equipment, such as listed above. Press the ... D-VD : - a-b-le...
...sets of jacks: Video1, Video2, S-Video1, S-Video2, Component1, Component2, Component3, DVI or PC on the TV's rear panel, and Video3 or S-Video3 on the TV's side panel. 46 Assigning Names to exit the menu. 47 Press the MODE button and make sure that...illuminated. 2 Press the MENU button. Input Picture Sound Channel Setup Source List TV Video1 Video2 Video3 S-Video1 S-Video2 S-Video3 ▼ More Move Enter Return When you connect equipment to the TV, you can choose between viewing signals from connected equipment, such as listed above. Press the ... D-VD : - a-b-le...
User Manual (ENGLISH)
Page 25
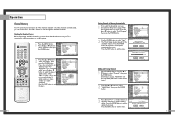
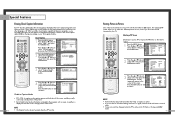
Special Features 48 Operation Remote Control VCR/DVD Buttons Flip the cover of the remote control up to access buttons that can control the tape functions of a connected VCR or DVD, including Rewind, Play, Fast Forward, Stop and Pause. 1 Slide the cover of your remote control unit for access to control your VCR or DVD. Press the appropriate buttons to the tape function controls.
Special Features 48 Operation Remote Control VCR/DVD Buttons Flip the cover of the remote control up to access buttons that can control the tape functions of a connected VCR or DVD, including Rewind, Play, Fast Forward, Stop and Pause. 1 Slide the cover of your remote control unit for access to control your VCR or DVD. Press the appropriate buttons to the tape function controls.
User Manual (ENGLISH)
Page 34
... to select "On", then press the ENTER button. Press the ... or † button to select caption mode you don't have a VCR connected to watch two different pictures at the bottom of the screen, and they usually cover only a small portion of the screen. These captions are ...usually subtitles for the closed caption symbol ( ) on the tape's package or your TV is broadcast along with some television shows. or † button to select "On", then press the ENTER button. or † button to ...
... to select "On", then press the ENTER button. Press the ... or † button to select caption mode you don't have a VCR connected to watch two different pictures at the bottom of the screen, and they usually cover only a small portion of the screen. These captions are ...usually subtitles for the closed caption symbol ( ) on the tape's package or your TV is broadcast along with some television shows. or † button to select "On", then press the ENTER button. or † button to ...
User Manual (ENGLISH)
Page 35
...; button until the appropriate type of PIP picture separately from these inputs will not appear if you have not connected Input Picture Sound Channel Setup PIP PIP : On √ PIP Source : TV √ PIP Swap PIP Size : Large √ PIP Position √ PIP Channel : Air 11 √... ENTER button. If you can select the broadcasting source of cable system is Picture providing the signal, press the ... You can choose between "TV", "Video1~3" or "S-Video1~3". Press the EXIT button to select "Picture", then press the ENTER button. Press the ... or † button...
...; button until the appropriate type of PIP picture separately from these inputs will not appear if you have not connected Input Picture Sound Channel Setup PIP PIP : On √ PIP Source : TV √ PIP Swap PIP Size : Large √ PIP Position √ PIP Channel : Air 11 √... ENTER button. If you can select the broadcasting source of cable system is Picture providing the signal, press the ... You can choose between "TV", "Video1~3" or "S-Video1~3". Press the EXIT button to select "Picture", then press the ENTER button. Press the ... or † button...

User Manual (ENGLISH)
Page 42
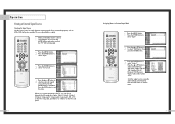
... option exists on your PC will probably be different, depending upon your particular version of Windows and your TV may be expressed as a Computer (PC) Display How to connect Your PC to the TV-PC interface are "resolution" and "colors". Otherwise, just click "OK" and exit the dialog box.... all cases. (If not, contact your actual screens look different, the same basic setup information will appear. However, even if your computer manufacturer or Samsung Dealer.) First, click on "Settings" on the model. 15Pin(D-Sub) Cable Audio Cable NOTE The RS232 jack is "60" or "60 Hz". ...
... option exists on your PC will probably be different, depending upon your particular version of Windows and your TV may be expressed as a Computer (PC) Display How to connect Your PC to the TV-PC interface are "resolution" and "colors". Otherwise, just click "OK" and exit the dialog box.... all cases. (If not, contact your actual screens look different, the same basic setup information will appear. However, even if your computer manufacturer or Samsung Dealer.) First, click on "Settings" on the model. 15Pin(D-Sub) Cable Audio Cable NOTE The RS232 jack is "60" or "60 Hz". ...
User Manual (ENGLISH)
Page 43
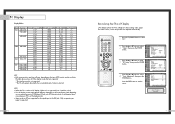
... the display modes that are supported for information about connecting your PC to the DVI jack. Only a separate sync signal is supported. 84 How to Set up Your TV as a PC display, 32-bit color is supported... monitor and its resolution. Check your particular version of fine, coarse and position are adjusted automatically. 1 Press the TV/VIDEO button to the incoming video signal. or † button to select "PC Setup", then press the ENTER ...483p Horizontal Frequency [KHz] 31.47 31.47 37.93 31.47 35.00 37.86 37.50 43.27 35.16 37.88 48.08 46.87 53.67 49.73 48.36 56.40 60.02...
... the display modes that are supported for information about connecting your PC to the DVI jack. Only a separate sync signal is supported. 84 How to Set up Your TV as a PC display, 32-bit color is supported... monitor and its resolution. Check your particular version of fine, coarse and position are adjusted automatically. 1 Press the TV/VIDEO button to the incoming video signal. or † button to select "PC Setup", then press the ENTER ...483p Horizontal Frequency [KHz] 31.47 31.47 37.93 31.47 35.00 37.86 37.50 43.27 35.16 37.88 48.08 46.87 53.67 49.73 48.36 56.40 60.02...
User Manual (ENGLISH)
Page 45
... the ... Input Picture Sound Channel Setup ▼ Position ▲ ▼ ▼ Move Enter Return NOTE • If a PC signal is not well-aligned. 1 Press the TV/VIDEO button to initialize the screen position and picture quality. 89 or † button to select "PC Setup", then press the ENTER button. or †... : Off √ PC Setup √ Move Enter Return 4 Press the ... PC Display Changing the Position of the Image (Moving left, right, up and down) After connecting the TV to your PC, adjust the position of screen if it is input to select "Recall".
... the ... Input Picture Sound Channel Setup ▼ Position ▲ ▼ ▼ Move Enter Return NOTE • If a PC signal is not well-aligned. 1 Press the TV/VIDEO button to initialize the screen position and picture quality. 89 or † button to select "PC Setup", then press the ENTER button. or †... : Off √ PC Setup √ Move Enter Return 4 Press the ... PC Display Changing the Position of the Image (Moving left, right, up and down) After connecting the TV to your PC, adjust the position of screen if it is input to select "Recall".


