User Manual (ENGLISH)
Page 2
... enjoyment for mounting. • Operate your TV. Important Safety Information Always be in television technology. We designed it . Use only with a cart, stand, tripod, bracket, or table recommended by the manufacturer. Do not block these laws. Your new Samsung projection TV represents the latest in violation of plug to protect it one way. Safety Instructions Warning! THERE ARE NO USER SERVICEABLE PARTS INSIDE.
... enjoyment for mounting. • Operate your TV. Important Safety Information Always be in television technology. We designed it . Use only with a cart, stand, tripod, bracket, or table recommended by the manufacturer. Do not block these laws. Your new Samsung projection TV represents the latest in violation of plug to protect it one way. Safety Instructions Warning! THERE ARE NO USER SERVICEABLE PARTS INSIDE.

User Manual (ENGLISH)
Page 3
... wall outlet and refer servicing to maintain FCC compliance for a Class B digital device, pursuant to Part 15 of any UL Listed personal computer with the limits for the product. An outside antenna system, be placed in a safe operating condition. This television receiver provides display of television closed captioning in additional damage to determine that have fallen into such power lines or circuits. Unplug the...
... wall outlet and refer servicing to maintain FCC compliance for a Class B digital device, pursuant to Part 15 of any UL Listed personal computer with the limits for the product. An outside antenna system, be placed in a safe operating condition. This television receiver provides display of television closed captioning in additional damage to determine that have fallen into such power lines or circuits. Unplug the...

User Manual (ENGLISH)
Page 4
... Sound Control ...40 Setting the Clock 42 Setting the Timers 43 Viewing an External Signal Source 45 6 Special Features 48 Setting Up Your Remote Control 48 Remote Control Codes 51 Fine Tuning Channels 52 Selecting the Color Tone 53 Setting the Film Mode 53 DNIeTM (Digital Natural Image engine) 54 Digital Noise Reduction 55 Setting the Blue Screen Mode 56 Changing the Screen Size 57 Special Audio Options 59 MTS Settings: Choosing a Soundtrack 59 Dolby Virtual 60 BBE ...61 Auto Volume 62 Viewing Closed Caption Information 63 Viewing Picture...
... Sound Control ...40 Setting the Clock 42 Setting the Timers 43 Viewing an External Signal Source 45 6 Special Features 48 Setting Up Your Remote Control 48 Remote Control Codes 51 Fine Tuning Channels 52 Selecting the Color Tone 53 Setting the Film Mode 53 DNIeTM (Digital Natural Image engine) 54 Digital Noise Reduction 55 Setting the Blue Screen Mode 56 Changing the Screen Size 57 Special Audio Options 59 MTS Settings: Choosing a Soundtrack 59 Dolby Virtual 60 BBE ...61 Auto Volume 62 Viewing Closed Caption Information 63 Viewing Picture...

User Manual (ENGLISH)
Page 6
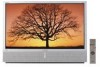
... Panel Buttons : HLM437W/HLM507W/HLM617W The buttons on and off at once • Widescreen TV with adjustable image size Checking Parts Once you have all the parts shown here. To use the remote control. Œ TV/VIDEO Press to switch between items on the on -screen menu system. If any time you choose • Adjustable picture and sound settings and the ability to change channels and move between viewing TV programs and signals from a camcorder or video game. (S-Video 3 jack and Audio L/R input 3 are used...
... Panel Buttons : HLM437W/HLM507W/HLM617W The buttons on and off at once • Widescreen TV with adjustable image size Checking Parts Once you have all the parts shown here. To use the remote control. Œ TV/VIDEO Press to switch between items on the on -screen menu system. If any time you choose • Adjustable picture and sound settings and the ability to change channels and move between viewing TV programs and signals from a camcorder or video game. (S-Video 3 jack and Audio L/R input 3 are used...

User Manual (ENGLISH)
Page 7
... set is too high, the power will shut off . To use the more advanced features, you must use the remote control. ΠTV/VIDEO Press to switch between viewing TV programs and signals from a camcorder or video game. (S-Video 3 jack and Audio L/R input 3 are used only occasionally (a camcorder, video game or PC, for the TV to warm up, so normal brightness may be turned on -screen menu system. Standby state. Your New Wide TV Side Panel Buttons : HLM4365W/HLM5065W The buttons...
... set is too high, the power will shut off . To use the more advanced features, you must use the remote control. ΠTV/VIDEO Press to switch between viewing TV programs and signals from a camcorder or video game. (S-Video 3 jack and Audio L/R input 3 are used only occasionally (a camcorder, video game or PC, for the TV to warm up, so normal brightness may be turned on -screen menu system. Standby state. Your New Wide TV Side Panel Buttons : HLM4365W/HLM5065W The buttons...

User Manual (ENGLISH)
Page 8
... a signal source is operating normally . You can connect two different components such as a VCR. A cooling fan inside lamp from overheating. Auto Timer ON/OFF has been set and the set top box or PC etc. ' RS-232C jack ˝ PC VIDEO INPUT jack Connect to the audio-output jacks on your cable system. " DVI (Digital Video Interface) jack Receives the digital signals from VHF/UHF antennas or your PC. 15 Your New Wide TV Front Panel LED Indicators...
... a signal source is operating normally . You can connect two different components such as a VCR. A cooling fan inside lamp from overheating. Auto Timer ON/OFF has been set and the set top box or PC etc. ' RS-232C jack ˝ PC VIDEO INPUT jack Connect to the audio-output jacks on your cable system. " DVI (Digital Video Interface) jack Receives the digital signals from VHF/UHF antennas or your PC. 15 Your New Wide TV Front Panel LED Indicators...

User Manual (ENGLISH)
Page 9
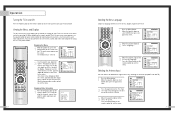
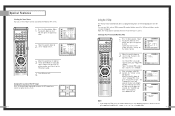
... to change menu values. 14. Aspect Press to display information on TV. 3. Surround Press to mute the TV sound. 6. MTS(Multichannel Television Stereo) Press to scan the memorized channels. DNIe Activates DNIe (Digital Natural Image engine). 15. P.Mode Adjust the TV picture by selecting one of the preset factory settings (or select your personal, customized picture settings.) 20. Press to switch between your VCR, cable box, and DVD player. 1. Press to choose stereo, mono or Separate Audio Program...
... to change menu values. 14. Aspect Press to display information on TV. 3. Surround Press to mute the TV sound. 6. MTS(Multichannel Television Stereo) Press to scan the memorized channels. DNIe Activates DNIe (Digital Natural Image engine). 15. P.Mode Adjust the TV picture by selecting one of the preset factory settings (or select your personal, customized picture settings.) 20. Press to switch between your VCR, cable box, and DVD player. 1. Press to choose stereo, mono or Separate Audio Program...
User Manual (ENGLISH)
Page 13
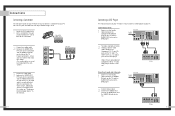
... camcorder. 2 Connect an audio cable between the AUDIO OUTPUT jack on the camcorder and the AUDIO terminals on the side of Component video, see your camcorder to audio and video jacks 1 Connect a set of the TV. (A video cable is usually included with the camcorder.) To watch a tape, follow your camera's instructions and the section on "Viewing an External Signal Source" in this manual. 24 Connecting a DVD Player The rear panel jacks on your TV make...
... camcorder. 2 Connect an audio cable between the AUDIO OUTPUT jack on the camcorder and the AUDIO terminals on the side of Component video, see your camcorder to audio and video jacks 1 Connect a set of the TV. (A video cable is usually included with the camcorder.) To watch a tape, follow your camera's instructions and the section on "Viewing an External Signal Source" in this manual. 24 Connecting a DVD Player The rear panel jacks on your TV make...
User Manual (ENGLISH)
Page 14
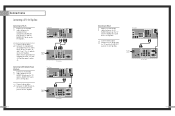
Connecting to DVI (Digital Visual Interface) 1 Connect a set of audio cables between the PC AUDIO IN jacks on the TV and the AUDIO OUT jacks on the Set Top Box. 2 Connect video cables between the DVI IN jack on the TV and the DVI OUT jack on the Set Top Box. 26 TV Rear Panel Component1 Component1/2 (480i/480p) (480p/720p/10801i) PC AUDIO Y ANT-A Pb ANT A-OUT MONITOR OUT Pr VIDEO 2 L L ANT-B S-VIDEO 1 S-VIDEO 2 VIDEO 1 R R V L R DVI PC RS-232C DTV...
Connecting to DVI (Digital Visual Interface) 1 Connect a set of audio cables between the PC AUDIO IN jacks on the TV and the AUDIO OUT jacks on the Set Top Box. 2 Connect video cables between the DVI IN jack on the TV and the DVI OUT jack on the Set Top Box. 26 TV Rear Panel Component1 Component1/2 (480i/480p) (480p/720p/10801i) PC AUDIO Y ANT-A Pb ANT A-OUT MONITOR OUT Pr VIDEO 2 L L ANT-B S-VIDEO 1 S-VIDEO 2 VIDEO 1 R R V L R DVI PC RS-232C DTV...
User Manual (ENGLISH)
Page 16
... Antenna Input You can connect to two different signal sources by pressing the Menu button on your remote control to exit the menu. The first line of your TV. You can press the Menu button on the remote control. The channel setup menu will display the channel, current time, and the audio signal you can also view the on the remote control. Operation Turning the TV On and Off Press the Power button on the remote control or on the side panel to turn your TV...
... Antenna Input You can connect to two different signal sources by pressing the Menu button on your remote control to exit the menu. The first line of your TV. You can press the Menu button on the remote control. The channel setup menu will display the channel, current time, and the audio signal you can also view the on the remote control. Operation Turning the TV On and Off Press the Power button on the remote control or on the side panel to turn your TV...
User Manual (ENGLISH)
Page 19
... or down), as above. Move Select Menu 36 4 Press the Menu button to select the last two digits. Setting The On/Off Melody You can hear clear melody sound when the TV is pressed, the channel label will appear next to the channel number. 1 Press the CH or CH button to tune to the channel that will be labeled. Repeat the process...
... or down), as above. Move Select Menu 36 4 Press the Menu button to select the last two digits. Setting The On/Off Melody You can hear clear melody sound when the TV is pressed, the channel label will appear next to the channel number. 1 Press the CH or CH button to tune to the channel that will be labeled. Repeat the process...

User Manual (ENGLISH)
Page 22
... use it to automatically turn the TV on or off automatically at specific times that will appear on screen when you choose. Setting the On/Off Timer 1 Press the Menu button. Move the joystick down to select SETUP, then press the joystick to enter. 2 Move the joystick down to select Time, then press the joystick to enter. 3 Move the joystick down to adjust...
... use it to automatically turn the TV on or off automatically at specific times that will appear on screen when you choose. Setting the On/Off Timer 1 Press the Menu button. Move the joystick down to select SETUP, then press the joystick to enter. 2 Move the joystick down to select Time, then press the joystick to enter. 3 Move the joystick down to adjust...

User Manual (ENGLISH)
Page 23
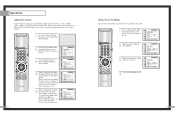
.... Remote Control VCR/DVD Buttons Flip the cover of the remote control up to access buttons that can choose between viewing signals from 10 to 360 minutes. 44 Viewing an External Signal Source Selecting the Signal Source Use the remote control to switch between the following on-screen menu will illuminate (front or side panel of jacks: Video 1, Video 2, S-video 1, S-video 2, Component 1, Component 2, Component 3, DVI or PC on the TV's rear panel, and Video 3 or S-Video 3 on the TV's side panel. When you connect equipment...
.... Remote Control VCR/DVD Buttons Flip the cover of the remote control up to access buttons that can choose between viewing signals from 10 to 360 minutes. 44 Viewing an External Signal Source Selecting the Signal Source Use the remote control to switch between the following on-screen menu will illuminate (front or side panel of jacks: Video 1, Video 2, S-video 1, S-video 2, Component 1, Component 2, Component 3, DVI or PC on the TV's rear panel, and Video 3 or S-Video 3 on the TV's side panel. When you connect equipment...

User Manual (ENGLISH)
Page 25
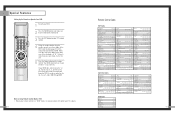
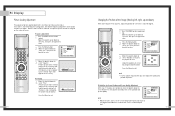
... the Power button on Using Remote Control Modes: VCR • When your remote control is in "VCR" mode, the volume buttons still control your TV's volume. 48 Setting Up the Remote to switch between these modes, and control whichever piece of VCR. Make sure you to Operate Your Cable Box 1 Turn off your VCR. 2 Press the MODE button and make sure that the VCR LED is more than one code listed, try one of the other codes listed for your...
... the Power button on Using Remote Control Modes: VCR • When your remote control is in "VCR" mode, the volume buttons still control your TV's volume. 48 Setting Up the Remote to switch between these modes, and control whichever piece of VCR. Make sure you to Operate Your Cable Box 1 Turn off your VCR. 2 Press the MODE button and make sure that the VCR LED is more than one code listed, try one of the other codes listed for your...
User Manual (ENGLISH)
Page 26
... remote control, enter three digits of the DVD code listed on Using Remote Control Modes: DVD • When your remote control is more than one code listed, try the first one of the other codes are listed, try one . 5 Press the Power button on the remote control. DVD Codes 50 51 If there is in "DVD" mode, the volume buttons still control your TV's volume. Special Features Setting Up the Remote to Operate Your DVD 1 Turn off your DVD. 2 Press the MODE button and make sure that the DVD LED...
... remote control, enter three digits of the DVD code listed on Using Remote Control Modes: DVD • When your remote control is more than one code listed, try the first one of the other codes are listed, try one . 5 Press the Power button on the remote control. DVD Codes 50 51 If there is in "DVD" mode, the volume buttons still control your TV's volume. Special Features Setting Up the Remote to Operate Your DVD 1 Turn off your DVD. 2 Press the MODE button and make sure that the DVD LED...
User Manual (ENGLISH)
Page 32
... before captions appear when you wish, use the joystick button to exit. 62 Viewing Closed Caption Information Your TV decodes and displays the closed caption transmissions, especially those of the picture. All VCRs record the closed caption signal from television programs, so prerecorded video tapes can also deliver closed captioning on the tape's package or your TV program-schedule. Then, press Menu to return to adjust the volume every time the channel is changed. Special Features Auto Volume Each...
... before captions appear when you wish, use the joystick button to exit. 62 Viewing Closed Caption Information Your TV decodes and displays the closed caption transmissions, especially those of the picture. All VCRs record the closed caption signal from television programs, so prerecorded video tapes can also deliver closed captioning on the tape's package or your TV program-schedule. Then, press Menu to return to adjust the volume every time the channel is changed. Special Features Auto Volume Each...
User Manual (ENGLISH)
Page 36
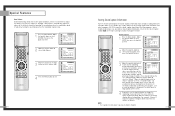
... forget the PIN, press the remote-control keys in -Picture is for your 4-digit PIN number. Choose any of the PIP image Press the Locate button repeatedly to move the PIP image from the Main or PIP screen. 1 Press the Menu button. Press MENU to 0-0-0-0: POWER OFF → Mute → 8 → 2 → 4 → POWER ON. 71 The "Enter PIN" screen will appear. Setting Up Your Personal ID Number (PIN) 1 Press the Menu button.
... forget the PIN, press the remote-control keys in -Picture is for your 4-digit PIN number. Choose any of the PIP image Press the Locate button repeatedly to move the PIP image from the Main or PIP screen. 1 Press the Menu button. Press MENU to 0-0-0-0: POWER OFF → Mute → 8 → 2 → 4 → POWER ON. 71 The "Enter PIN" screen will appear. Setting Up Your Personal ID Number (PIN) 1 Press the Menu button.
User Manual (ENGLISH)
Page 41
... NOTE Both screen position and size will operate abnormally if a non-standard video format is supported. 80 How to Set up or down to select "Auto Adjust". 3 Press the joystick to a TV display-monitor. • Same modes as a PC display, 32-bit color is not supported. * The TV will vary, depending on the type of PC monitor and its resolution. Only a separate sync signal is selected. PC Display Display Modes Mode Resolution Total Hor...
... NOTE Both screen position and size will operate abnormally if a non-standard video format is supported. 80 How to Set up or down to select "Auto Adjust". 3 Press the joystick to a TV display-monitor. • Same modes as a PC display, 32-bit color is not supported. * The TV will vary, depending on the type of PC monitor and its resolution. Only a separate sync signal is selected. PC Display Display Modes Mode Resolution Total Hor...
User Manual (ENGLISH)
Page 42
... Recall. Adjust the position of screen by fine tuning alone, then do the frequency adjustments to the original view about five seconds later. (This is a normal operation.) 83 Remove picture noise (vertical stripes) on the screen by moving the joystick right or left , right, up and down) After connecting the TV to enter. 2 Press the Menu button. NOTE • If a PC signal is input to initialize the screen...
... Recall. Adjust the position of screen by fine tuning alone, then do the frequency adjustments to the original view about five seconds later. (This is a normal operation.) 83 Remove picture noise (vertical stripes) on the screen by moving the joystick right or left , right, up and down) After connecting the TV to enter. 2 Press the Menu button. NOTE • If a PC signal is input to initialize the screen...
User Manual (ENGLISH)
Page 45
No color or wrong colors. Picture rolls vertically. Adjust the antenna. Adjust the antenna. Make sure the "Mute" button is composed of many years of the cabinet. • This DLP Projection TV projects the image onto a large screen by applying an optical system. Try another channel. Adjust the picture settings. Make sure the remote has batteries. • The display panel used for at least two hours so that moisture that are using a VCR, check the tracking. Placement •...
No color or wrong colors. Picture rolls vertically. Adjust the antenna. Adjust the antenna. Make sure the "Mute" button is composed of many years of the cabinet. • This DLP Projection TV projects the image onto a large screen by applying an optical system. Try another channel. Adjust the picture settings. Make sure the remote has batteries. • The display panel used for at least two hours so that moisture that are using a VCR, check the tracking. Placement •...


