
Open Source Guide (ENGLISH)
Page 1
... ever published by the Free Software Foundation. 10. they are not covered by this License; Whether that is true depends on what they , too, receive or can be on a medium customarily used for this service if you wish), that you receive source code or can change the software or use or not licensed at least the "copyright" line and a pointer to it...
... ever published by the Free Software Foundation. 10. they are not covered by this License; Whether that is true depends on what they , too, receive or can be on a medium customarily used for this service if you wish), that you receive source code or can change the software or use or not licensed at least the "copyright" line and a pointer to it...

Open Source Guide (ENGLISH)
Page 2
... INABILITY TO USE THE LIBRARY (INCLUDING BUT NOT LIMITED TO LOSS OF DATA OR DATA BEING RENDERED INACCURATE OR LOSSES SUSTAINED BY YOU OR THIRD PARTIES OR A FAILURE OF THE LIBRARY TO OPERATE WITH ANY OTHER SOFTWARE), EVEN IF SUCH HOLDER OR OTHER PARTY HAS BEEN ADVISED OF THE POSSIBILITY OF SUCH ...full notice is safest to attach them to the start of each file should have at least the "copyright" line and a pointer to the library. How to Apply These Terms to Your New Libraries If you develop a new library, and you want it free software that everyone can redistribute and change. It is found.
... INABILITY TO USE THE LIBRARY (INCLUDING BUT NOT LIMITED TO LOSS OF DATA OR DATA BEING RENDERED INACCURATE OR LOSSES SUSTAINED BY YOU OR THIRD PARTIES OR A FAILURE OF THE LIBRARY TO OPERATE WITH ANY OTHER SOFTWARE), EVEN IF SUCH HOLDER OR OTHER PARTY HAS BEEN ADVISED OF THE POSSIBILITY OF SUCH ...full notice is safest to attach them to the start of each file should have at least the "copyright" line and a pointer to the library. How to Apply These Terms to Your New Libraries If you develop a new library, and you want it free software that everyone can redistribute and change. It is found.
User Manual (ENGLISH)
Page 2
... can transmit high definition TV (HDTV) images, Dolby digital surround audio, and new services such as multicasting (transmitting more than SDTV. • Dolby Surround Sound With DTV, you can be combined into a single digital broadcast. Some 480p programs are broadcast in widescreen and are always broadcast in widescreen, and offer much higher picture quality than one program on the same TV channel) and datacasting...
... can transmit high definition TV (HDTV) images, Dolby digital surround audio, and new services such as multicasting (transmitting more than SDTV. • Dolby Surround Sound With DTV, you can be combined into a single digital broadcast. Some 480p programs are broadcast in widescreen and are always broadcast in widescreen, and offer much higher picture quality than one program on the same TV channel) and datacasting...

User Manual (ENGLISH)
Page 3
... produce high-quality images and sound. You should find out the latest DTV channel assignments for DTV broadcasts. The same holds true for DTV over analog TV - You can I connect my DTV set -top receiver to watch OTA DTV and HDTV programs. They're free, unlike subscription satellite TV or premium cable TV. Once the DTV signal level exceeds a certain threshold at the receiver, the digital video and audio...
... produce high-quality images and sound. You should find out the latest DTV channel assignments for DTV broadcasts. The same holds true for DTV over analog TV - You can I connect my DTV set -top receiver to watch OTA DTV and HDTV programs. They're free, unlike subscription satellite TV or premium cable TV. Once the DTV signal level exceeds a certain threshold at the receiver, the digital video and audio...
User Manual (ENGLISH)
Page 4
...; Adjusting the Melody Sound 54 ■ Setting the Function Help 54 ■ Upgrading the Software 55 APPENDIX ■ Identifying Problems 56 ■ Replacing the Lamp 57 ■ Cleaning and Maintaining Your TV 58 ■ Using Your TV in the Remote Control 10 CONNECTIONS ■ Connecting VHF and UHF Antennas 10 ■ Connecting Cable TV 11 ■ Connecting a VCR 12 ■ Connecting a Camcorder 13 ■ Connecting a DVD Player/Set-Top Box 13 ■ Connecting a DVD Player/Set-Top Box via HDMI ......13 ■ Connecting a DVD Player/Set-Top Box...
...; Adjusting the Melody Sound 54 ■ Setting the Function Help 54 ■ Upgrading the Software 55 APPENDIX ■ Identifying Problems 56 ■ Replacing the Lamp 57 ■ Cleaning and Maintaining Your TV 58 ■ Using Your TV in the Remote Control 10 CONNECTIONS ■ Connecting VHF and UHF Antennas 10 ■ Connecting Cable TV 11 ■ Connecting a VCR 12 ■ Connecting a Camcorder 13 ■ Connecting a DVD Player/Set-Top Box 13 ■ Connecting a DVD Player/Set-Top Box via HDMI ......13 ■ Connecting a DVD Player/Set-Top Box...
User Manual (ENGLISH)
Page 5
... channel speakers • A special sleep timer • Widescreen TV with adjustable image size • Life-like clear images provided by DNle technology • Color Weakness Enhancement Feature • Digital Input jack • Digital Audio Output (OPTICAL) jack • 3D Function • Theater Game Mode English - 5 If viewing for an extended period of Features Your TV was designed and engineered using the latest technology. List of time, sit as far back from the screen...
... channel speakers • A special sleep timer • Widescreen TV with adjustable image size • Life-like clear images provided by DNle technology • Color Weakness Enhancement Feature • Digital Input jack • Digital Audio Output (OPTICAL) jack • 3D Function • Theater Game Mode English - 5 If viewing for an extended period of Features Your TV was designed and engineered using the latest technology. List of time, sit as far back from the screen...

User Manual (ENGLISH)
Page 6
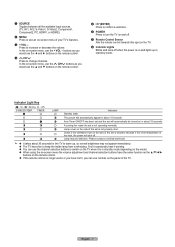
... - 6 Continued... Checking Parts Owner's Instructions Remote Control (BP59-00124)/ AAA Batteries Warranty Card/ Registration Card/ Safety Guide Manual/ Quick Guide Manual Sold Separately Power Cord (3903-000144) Cloth-Clean S-Video Cable Antenna Cable Component Cables Audio Cables Video Cables Replacement Lamp (BP96-01653A) For purchasing a replacement lamp, ask at a nearby service center. • Use authorized lamps only. The company cannot guarantee the quality of the Panel The buttons on the lower-right panel control your TV's basic features, including the on the model.
... - 6 Continued... Checking Parts Owner's Instructions Remote Control (BP59-00124)/ AAA Batteries Warranty Card/ Registration Card/ Safety Guide Manual/ Quick Guide Manual Sold Separately Power Cord (3903-000144) Cloth-Clean S-Video Cable Antenna Cable Component Cables Audio Cables Video Cables Replacement Lamp (BP96-01653A) For purchasing a replacement lamp, ask at a nearby service center. • Use authorized lamps only. The company cannot guarantee the quality of the Panel The buttons on the lower-right panel control your TV's basic features, including the on the model.
User Manual (ENGLISH)
Page 7
... shut off when the power is not operating normally. Lamp cover on the side of the TV. Lamp may not appear immediately. ◆ The TV has a fan to keep the inside the set is on and lights up , so normal brightness may be turned on in about 30 seconds for the TV to warm up in standby mode depending on the model. ◆ When using the on-screen menu the volume adjustment and channel selection buttons...
... shut off when the power is not operating normally. Lamp cover on the side of the TV. Lamp may not appear immediately. ◆ The TV has a fan to keep the inside the set is on and lights up , so normal brightness may be turned on in about 30 seconds for the TV to warm up in standby mode depending on the model. ◆ When using the on-screen menu the volume adjustment and channel selection buttons...

User Manual (ENGLISH)
Page 8
...software upgrade. @ SERVICE This jack is not avaiable RF(Digital)/Component/PC/HDMI. 5 COMPONENT IN 1, 2 Video (Y/PB/PR) and audio (L-AUDIO-R) Component inputs. 6 3D SYNC OUT Connect to 3D IR Emitter. 7 DIGITAL AUDIO OUT (OPTICAL) Connect to a Digital Audio component. 8 DVI IN (AUDIO-L/R) Connect to the DVI audio output jack of a device with HDMI output. (Not compatible with PC) % POWER IN Connect the supplied power cord. An optional HDMI/DVI cable will be connected continuously, such as a DVI connection with separate analog audio inputs. Viewing the Connection Panel Right Side Panel...
...software upgrade. @ SERVICE This jack is not avaiable RF(Digital)/Component/PC/HDMI. 5 COMPONENT IN 1, 2 Video (Y/PB/PR) and audio (L-AUDIO-R) Component inputs. 6 3D SYNC OUT Connect to 3D IR Emitter. 7 DIGITAL AUDIO OUT (OPTICAL) Connect to a Digital Audio component. 8 DVI IN (AUDIO-L/R) Connect to the DVI audio output jack of a device with HDMI output. (Not compatible with PC) % POWER IN Connect the supplied power cord. An optional HDMI/DVI cable will be connected continuously, such as a DVI connection with separate analog audio inputs. Viewing the Connection Panel Right Side Panel...
User Manual (ENGLISH)
Page 9
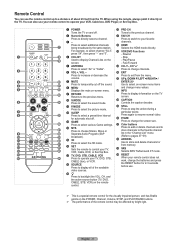
... 3D mode. ^ SET Sets the remote to control your TV, VCR, Cable, DVD, or Set-Top Box. & TV, DVD, STB, CABLE, VCR Press to operate your VCR, Cable box, DVD Player, or Set-Top Box. 1 POWER Turns the TV on and off the sound. 8 MENU Displays the main on -screen menu items and change channels. P.MODE Press to select the picture mode. @ SLEEP Press to select a preset time interval for the visually impaired person, and has Braille points on the POWER, Channel, Volume, STOP, and PLAY/PAUSE buttons...
... 3D mode. ^ SET Sets the remote to control your TV, VCR, Cable, DVD, or Set-Top Box. & TV, DVD, STB, CABLE, VCR Press to operate your VCR, Cable box, DVD Player, or Set-Top Box. 1 POWER Turns the TV on and off the sound. 8 MENU Displays the main on -screen menu items and change channels. P.MODE Press to select the picture mode. @ SLEEP Press to select a preset time interval for the visually impaired person, and has Braille points on the POWER, Channel, Volume, STOP, and PLAY/PAUSE buttons...

User Manual (ENGLISH)
Page 14
... adjust the volume level with the system's volume control. Connecting a Digital Audio System The side panel jacks on your TV. ➢ Each Digital Audio System has a different side panel configuration. 1 Connect an Optical Cable between the DVI IN [L-AUDIO-R] jack on the TV and the AUDIO OUT jacks on the Digital Audio System. DVD Player/Set-Top Box TV Side Panel 2 Audio Cable(Not supplied) 1 HDMI/DVI Cable(Not supplied) ➢ Each DVD Player/Set-Top box has a different side panel configuration. ➢ When connecting a DVD Player/Set-Top box, match the color of the connection...
... adjust the volume level with the system's volume control. Connecting a Digital Audio System The side panel jacks on your TV. ➢ Each Digital Audio System has a different side panel configuration. 1 Connect an Optical Cable between the DVI IN [L-AUDIO-R] jack on the TV and the AUDIO OUT jacks on the Digital Audio System. DVD Player/Set-Top Box TV Side Panel 2 Audio Cable(Not supplied) 1 HDMI/DVI Cable(Not supplied) ➢ Each DVD Player/Set-Top box has a different side panel configuration. ➢ When connecting a DVD Player/Set-Top box, match the color of the connection...
User Manual (ENGLISH)
Page 16
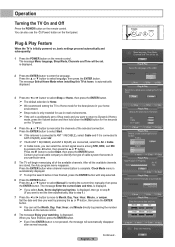
... displayed. 2 Press the ENTER button to select Manual for your watching. When you select Auto, Set to Dynamic (Home) mode, press the Volume button and then hold down the MENU button for the best picture in Progress. Air 16 15% Stop Enter Skip Plug & Play Sets the current time manually or automatically. Adjust Move Enter Skip Enjoy your particular area. 5 The TV will be set. You can also use...
... displayed. 2 Press the ENTER button to select Manual for your watching. When you select Auto, Set to Dynamic (Home) mode, press the Volume button and then hold down the MENU button for the best picture in Progress. Air 16 15% Stop Enter Skip Plug & Play Sets the current time manually or automatically. Adjust Move Enter Skip Enjoy your particular area. 5 The TV will be set. You can also use...
User Manual (ENGLISH)
Page 19
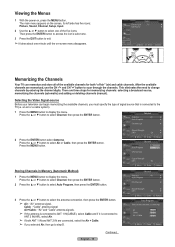
... the MENU button to change channels by entering the channel digits. Move Enter Return Channel Antenna : AAiirr Auto Program Cable Clear Scrambled Channel Channel List Name Fine Tune Signal Strength LNA : On Move Enter Return Storing Channels in Memory (Automatic Method) 1 Press the MENU button to select one minute until the on-screen menu disappears. Its left side has five icons: Picture, Sound, Channel, Setup, Input. 2 Use the ▲ or ▼ button to display the menu. Air+Cable : "Air" and "Cable" antenna signals...
... the MENU button to change channels by entering the channel digits. Move Enter Return Channel Antenna : AAiirr Auto Program Cable Clear Scrambled Channel Channel List Name Fine Tune Signal Strength LNA : On Move Enter Return Storing Channels in Memory (Automatic Method) 1 Press the MENU button to select one minute until the on-screen menu disappears. Its left side has five icons: Picture, Sound, Channel, Setup, Input. 2 Use the ▲ or ▼ button to display the menu. Air+Cable : "Air" and "Cable" antenna signals...

User Manual (ENGLISH)
Page 32
... HDMI Black Level Use this function, press the STILL button again or press any button on the remote control. Press the EXIT button to exit. • Normal : The screen gets brighter. • Low: The screen gets darker. ➢ This function is no signal is being received or the signal is too dim in the HDMI mode. (by HDMI input for the RGB limited range of the Blue Screen Setting. Setting the Blue Screen Mode...
... HDMI Black Level Use this function, press the STILL button again or press any button on the remote control. Press the EXIT button to exit. • Normal : The screen gets brighter. • Low: The screen gets darker. ➢ This function is no signal is being received or the signal is too dim in the HDMI mode. (by HDMI input for the RGB limited range of the Blue Screen Setting. Setting the Blue Screen Mode...

User Manual (ENGLISH)
Page 43
... SOURCE button on the remote control or side panel to exit. The function also automatically fine-tunes the settings and adjusts the frequency values and positions. ➢ This function does not work in DVI-Digital mode. ➢ Change to the PC mode first. 1 Press the MENU button to select PC, then press the ENTER button. Press the ▲ or ▼ button to display the menu. Setting up the TV with...
... SOURCE button on the remote control or side panel to exit. The function also automatically fine-tunes the settings and adjusts the frequency values and positions. ➢ This function does not work in DVI-Digital mode. ➢ Change to the PC mode first. 1 Press the MENU button to select PC, then press the ENTER button. Press the ▲ or ▼ button to display the menu. Setting up the TV with...
User Manual (ENGLISH)
Page 44
... ENTER button. Changing the Screen Position After connecting the TV to your PC, adjust the position of the screen if it is to remove or reduce picture noise. appears on the center of the screen. ➢ Change to the PC mode first. 1 Press the MENU button to display the menu. Move EEnnteterr Coarse Fine ImaPgicetuLroeck RReettuurrnn 50 57 Move EEnnteterr Image Lock Coarse Move Adjust RReettuurrnn 50 Return PiPcCture Image Lock Position Auto Adjustment Image Reset Resolution...
... ENTER button. Changing the Screen Position After connecting the TV to your PC, adjust the position of the screen if it is to remove or reduce picture noise. appears on the center of the screen. ➢ Change to the PC mode first. 1 Press the MENU button to display the menu. Move EEnnteterr Coarse Fine ImaPgicetuLroeck RReettuurrnn 50 57 Move EEnnteterr Image Lock Coarse Move Adjust RReettuurrnn 50 Return PiPcCture Image Lock Position Auto Adjustment Image Reset Resolution...
User Manual (ENGLISH)
Page 45
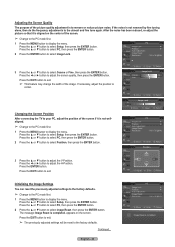
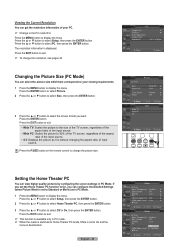
... Theater PC : Off HDMI Black Level : OLonw More Move EEnnteterr RReettuurrnn Press the ▲ or ▼ button to display the menu. Press the MENU button to select Setup, then press the ENTER button. PiPcCture Image Lock Position Auto Adjustment Image Reset Resolution ► ► : 1024 x 768 @60Hz Move Enter RReettuurrnn Picture ▲ More Detailed Settings ► Size : Wide PC ► Digital NR : Low ► DNIe : On ► Color Gamut : Normal ►...
... Theater PC : Off HDMI Black Level : OLonw More Move EEnnteterr RReettuurrnn Press the ▲ or ▼ button to display the menu. Press the MENU button to select Setup, then press the ENTER button. PiPcCture Image Lock Position Auto Adjustment Image Reset Resolution ► ► : 1024 x 768 @60Hz Move Enter RReettuurrnn Picture ▲ More Detailed Settings ► Size : Wide PC ► Digital NR : Low ► DNIe : On ► Color Gamut : Normal ►...

User Manual (ENGLISH)
Page 48
Reset function initializes the Equalizer settings to the factory default setting. ➢ Game Mode is not available in regular TV antenna/cable mode. ➢ If the picture is poor when external device is connected to www.samsung.com → 'PRODUCTS' → 'HDTV' → 'DLP TV' ➢ Click "3D Information" English - 48 Setup Plug & Play Language Time Game Mode 3D Game V-Chip Caption ▼ More ► : English ► ► : Off ► : ON-STD...
Reset function initializes the Equalizer settings to the factory default setting. ➢ Game Mode is not available in regular TV antenna/cable mode. ➢ If the picture is poor when external device is connected to www.samsung.com → 'PRODUCTS' → 'HDTV' → 'DLP TV' ➢ Click "3D Information" English - 48 Setup Plug & Play Language Time Game Mode 3D Game V-Chip Caption ▼ More ► : English ► ► : Off ► : ON-STD...
User Manual (ENGLISH)
Page 55
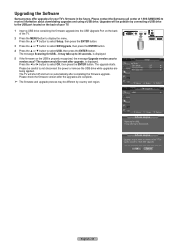
... display the menu. Please be different by connecting a USB drive to the USB port located on the back of the TV. 2 Press the MENU button to not disconnect the power or remove the USB drive while upgrades are complete. ➢ The firmware and upgrade process may take up to 30 seconds. The system would be reset after completing the firmware upgrade. PSiceturpe ▲ More Film Mode...
... display the menu. Please be different by connecting a USB drive to the USB port located on the back of the TV. 2 Press the MENU button to not disconnect the power or remove the USB drive while upgrades are complete. ➢ The firmware and upgrade process may take up to 30 seconds. The system would be reset after completing the firmware upgrade. PSiceturpe ▲ More Film Mode...
User Manual (ENGLISH)
Page 56
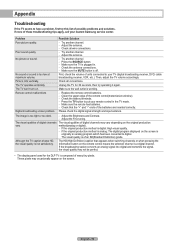
... Brightness and Contrast. - Replace the remote control batteries. - method(analog or digital). - Adjust the antenna. - The image is of many tiny pixels. Unplug the TV for the DLP TV is off. Make sure the TV is originally an analog program which has been converted to digital. Please check the digital signal strength and input antenna. Poor sound quality. Clean the upper edge of digital channels may occasionally appear on the screen is plugged in the TV mode. - Check...
... Brightness and Contrast. - Replace the remote control batteries. - method(analog or digital). - Adjust the antenna. - The image is of many tiny pixels. Unplug the TV for the DLP TV is off. Make sure the TV is originally an analog program which has been converted to digital. Please check the digital signal strength and input antenna. Poor sound quality. Clean the upper edge of digital channels may occasionally appear on the screen is plugged in the TV mode. - Check...


