

Open Source Guide (ENGLISH)
Page 1
... the "copyright" line and a pointer to your rights to work written entirely by offering access to copy from a designated place, then offering equivalent access to copy the source code from the Program or any part thereof, to be distributed under the terms of this license which are different, write to the author to time. The Free Software Foundation may be...
... the "copyright" line and a pointer to your rights to work written entirely by offering access to copy from a designated place, then offering equivalent access to copy the source code from the Program or any part thereof, to be distributed under the terms of this license which are different, write to the author to time. The Free Software Foundation may be...

Open Source Guide (ENGLISH)
Page 2
... free software that everyone can do so by permitting redistribution under these terms, attach the following notices to where the full notice is found. 16. You can redistribute and change. and each source file to most effectively convey the exclusion of each file should have at least the "copyright" line ...CONSEQUENTIAL DAMAGES ARISING OUT OF THE USE OR INABILITY TO USE THE LIBRARY (INCLUDING BUT NOT LIMITED TO LOSS OF DATA OR DATA BEING RENDERED INACCURATE OR LOSSES SUSTAINED BY YOU OR THIRD PARTIES OR A FAILURE OF THE LIBRARY TO OPERATE WITH ANY OTHER SOFTWARE), EVEN IF SUCH HOLDER OR ...
... free software that everyone can do so by permitting redistribution under these terms, attach the following notices to where the full notice is found. 16. You can redistribute and change. and each source file to most effectively convey the exclusion of each file should have at least the "copyright" line ...CONSEQUENTIAL DAMAGES ARISING OUT OF THE USE OR INABILITY TO USE THE LIBRARY (INCLUDING BUT NOT LIMITED TO LOSS OF DATA OR DATA BEING RENDERED INACCURATE OR LOSSES SUSTAINED BY YOU OR THIRD PARTIES OR A FAILURE OF THE LIBRARY TO OPERATE WITH ANY OTHER SOFTWARE), EVEN IF SUCH HOLDER OR ...
User Manual (user Manual) (ver.1.0) (English)
Page 3
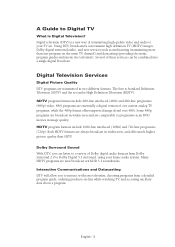
... image detail over 480i. Dolby Surround Sound With DTV, you to your television; Many HDTV programs are essentially a digital version of Dolby digital audio formats from a detailed program guide, ordering products on the same TV channel) and datacasting (providing electronic program guides and interactive television). SDTV program formats include 480-line interlaced (480i) and 480-line progressive (480p) video. 480i programs are now broadcast with your TV set. A Guide to progressive-scan DVD movies in image...
... image detail over 480i. Dolby Surround Sound With DTV, you to your television; Many HDTV programs are essentially a digital version of Dolby digital audio formats from a detailed program guide, ordering products on the same TV channel) and datacasting (providing electronic program guides and interactive television). SDTV program formats include 480-line interlaced (480i) and 480-line progressive (480p) video. 480i programs are now broadcast with your TV set. A Guide to progressive-scan DVD movies in image...
User Manual (user Manual) (ver.1.0) (English)
Page 5
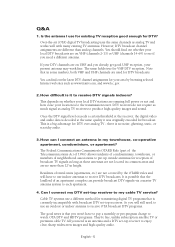
... close your local DTV stations are on VHF (channels 2-13) or UHF (channels 14-69) to receive DTV signals indoors? Once the DTV signal level exceeds a certain threshold at the receiver, the digital video and audio data is an antenna and a DTV set -top receiver to the transmission tower. Cable TV systems use indoor antennas to enjoy clear, sharp widescreen images and high-quality audio. This depends on whether your location...
... close your local DTV stations are on VHF (channels 2-13) or UHF (channels 14-69) to receive DTV signals indoors? Once the DTV signal level exceeds a certain threshold at the receiver, the digital video and audio data is an antenna and a DTV set -top receiver to the transmission tower. Cable TV systems use indoor antennas to enjoy clear, sharp widescreen images and high-quality audio. This depends on whether your location...

User Manual (user Manual) (ver.1.0) (English)
Page 6
... Regular Audio and Video Jacks 20 Connecting a Digital TV Set-Top Box 21 Connecting to DVI (Digital Visual Interface 21 Connecting a Digital Audio System 22 Connecting to an Analog Amplifier 22 Installing Batteries in the Remote Control 23 Chapter 3: Operation Turning the TV On and Off ...24 Plug & Play Feature ...24 Adjusting the Screen Automatically (Self Focus 26 Deactivating the Automatic Execution of the Self Focus 27 Removing the "Self Focus" Message from the Display 27 Adjusting Convergence Manually 28 Viewing...
... Regular Audio and Video Jacks 20 Connecting a Digital TV Set-Top Box 21 Connecting to DVI (Digital Visual Interface 21 Connecting a Digital Audio System 22 Connecting to an Analog Amplifier 22 Installing Batteries in the Remote Control 23 Chapter 3: Operation Turning the TV On and Off ...24 Plug & Play Feature ...24 Adjusting the Screen Automatically (Self Focus 26 Deactivating the Automatic Execution of the Self Focus 27 Removing the "Self Focus" Message from the Display 27 Adjusting Convergence Manually 28 Viewing...

User Manual (user Manual) (ver.1.0) (English)
Page 7
... Parental Locks 64 Viewing Closed Captions (On-Screen Text Messages) - Analog 65 Viewing Closed Captions (On-Screen Text Messages) - Digital 54 Choosing a Multi-Channel Sound (MTS) track - CONTENTS Chapter 3: Operation (continued) Sound Control ...43 Adjusting the Volume 44 Using the MUTE Button 44 Customizing the Sound 44 Using Automatic Sound Settings 45 Setting the Clock ...45 Option 1: Setting the Clock Manually 45 Option 2: Setting the Clock Automatically 46 Viewing an External Signal Source 47 Setting the Signal Source 47 Assigning Names to External input mode...
... Parental Locks 64 Viewing Closed Captions (On-Screen Text Messages) - Analog 65 Viewing Closed Captions (On-Screen Text Messages) - Digital 54 Choosing a Multi-Channel Sound (MTS) track - CONTENTS Chapter 3: Operation (continued) Sound Control ...43 Adjusting the Volume 44 Using the MUTE Button 44 Customizing the Sound 44 Using Automatic Sound Settings 45 Setting the Clock ...45 Option 1: Setting the Clock Manually 45 Option 2: Setting the Clock Automatically 46 Viewing an External Signal Source 47 Setting the Signal Source 47 Assigning Names to External input mode...
User Manual (user Manual) (ver.1.0) (English)
Page 8
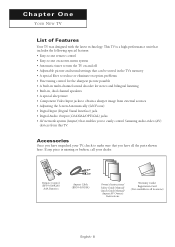
... control Samsung audio-video (AV) devices from external sources • Adjusting the Screen Automatically (Self Focus) • Digital Input (Digital Visual Interface) jack • Digital Audio Output (COAXIAL/OPTICAL) jacks • AV network system (Anynet) that enables you have unpacked your dealer. If any piece is a high-performance unit that includes the following special features: • Easy-to-use remote control • Easy-to-use on-screen menu system • Automatic timer to turn...
... control Samsung audio-video (AV) devices from external sources • Adjusting the Screen Automatically (Self Focus) • Digital Input (Digital Visual Interface) jack • Digital Audio Output (COAXIAL/OPTICAL) jacks • AV network system (Anynet) that enables you have unpacked your dealer. If any piece is a high-performance unit that includes the following special features: • Easy-to-use remote control • Easy-to-use on-screen menu system • Automatic timer to turn...

User Manual (user Manual) (ver.1.0) (English)
Page 11
..., DVD players and similar devices. ' DVI Audio Input jacks Connect to the audio output jacks of a device with DVI output. ˇ Anynet Please refer to the Anynet Owner's Instructions. ¨ OPTICAL Output jack Connect to a Digital Audio component. ˆ COAXIAL Output jack Connect to a Digital Audio component. Ø Audio/Video Output jacks Connect to the audio/video input jacks of a recording VCR. ∏ Video Input jacks Connect to the video output jacks of DVD or DTV Set-Top Box. 480i/480p/720p/1080i Y, PB and PR video signal inputs...
..., DVD players and similar devices. ' DVI Audio Input jacks Connect to the audio output jacks of a device with DVI output. ˇ Anynet Please refer to the Anynet Owner's Instructions. ¨ OPTICAL Output jack Connect to a Digital Audio component. ˆ COAXIAL Output jack Connect to a Digital Audio component. Ø Audio/Video Output jacks Connect to the audio/video input jacks of a recording VCR. ∏ Video Input jacks Connect to the video output jacks of DVD or DTV Set-Top Box. 480i/480p/720p/1080i Y, PB and PR video signal inputs...

User Manual (user Manual) (ver.1.0) (English)
Page 12
... details. Œ POWER Turns the TV on and off the sound. " Anynet Please refer to operate your remote control to the Anynet Owner's Instructions. ' MENU Displays the main on-screen menu. When using the on-screen menus, press ENTER to select additional channels (digital and analog) being broadcast by this remote control (i.e., TV, Samsung STB, VCR, Cable box or DVD). Ò PRE-CH Tunes to the previous channel. Ú CH , CH Press to change ) a particular item...
... details. Œ POWER Turns the TV on and off the sound. " Anynet Please refer to operate your remote control to the Anynet Owner's Instructions. ' MENU Displays the main on-screen menu. When using the on-screen menus, press ENTER to select additional channels (digital and analog) being broadcast by this remote control (i.e., TV, Samsung STB, VCR, Cable box or DVD). Ò PRE-CH Tunes to the previous channel. Ú CH , CH Press to change ) a particular item...

User Manual (user Manual) (ver.1.0) (English)
Page 13
... Television Sound) Press to choose "Stereo", "Mono" or "SAP (Secondary Audio Program)". µ RESET If your personal, customized sound settings). ± SET Used during set up of this remote control, so that it will work compatibly with other devices (VCR, Samsung Set-Top box, Cable box, DVD, etc.) English - 13 ≠ ADD/DEL Press to change the picture size. ◊ S.MODE Adjust the TV sound by selecting one of the preset factory settings (or select your personal, customized picture settings...
... Television Sound) Press to choose "Stereo", "Mono" or "SAP (Secondary Audio Program)". µ RESET If your personal, customized sound settings). ± SET Used during set up of this remote control, so that it will work compatibly with other devices (VCR, Samsung Set-Top box, Cable box, DVD, etc.) English - 13 ≠ ADD/DEL Press to change the picture size. ◊ S.MODE Adjust the TV sound by selecting one of the preset factory settings (or select your personal, customized picture settings...
User Manual (user Manual) (ver.1.0) (English)
Page 19
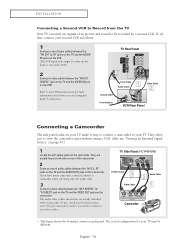
... kind of connection. INSTALLATION Connecting a Second VCR to Record from the TV Your TV can send out signals of its picture and sound to your second VCR as follows: 1 Connect a set of audio cables between the "AV OUT (L, R)" jacks on the TV and the AUDIO IN jacks on the camcorder. From Cable 1 Audio Cable Coaxial Cable Video Cable 2 From Antenna VCR Rear Panel Connecting a Camcorder The side panel jacks on the camcorder. The audio-video cables shown here...
... kind of connection. INSTALLATION Connecting a Second VCR to Record from the TV Your TV can send out signals of its picture and sound to your second VCR as follows: 1 Connect a set of audio cables between the "AV OUT (L, R)" jacks on the TV and the AUDIO IN jacks on the camcorder. From Cable 1 Audio Cable Coaxial Cable Video Cable 2 From Antenna VCR Rear Panel Connecting a Camcorder The side panel jacks on the camcorder. The audio-video cables shown here...
User Manual (user Manual) (ver.1.0) (English)
Page 20
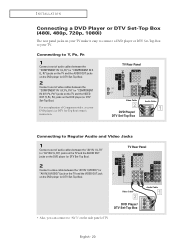
INSTALLATION Connecting a DVD Player or DTV Set-Top Box (480i, 480p, 720p, 1080i) The rear panel jacks on your TV make it easy to connect a DVD player or DTV Set-Top Box to your DVD player's (or DTV Set-Top Box) owner's instruction. Connecting to Y, PB, PR 1 Connect a set of audio cables between the "COMPONENT IN 1 (L, R)" (or "COMPONENT IN 2 (L, R)") jacks on the TV and the AUDIO OUT jacks on the DVD player (or DTV Set-Top Box). 2 Connect a set of video cables between the "COMPONENT IN...
INSTALLATION Connecting a DVD Player or DTV Set-Top Box (480i, 480p, 720p, 1080i) The rear panel jacks on your TV make it easy to connect a DVD player or DTV Set-Top Box to your DVD player's (or DTV Set-Top Box) owner's instruction. Connecting to Y, PB, PR 1 Connect a set of audio cables between the "COMPONENT IN 1 (L, R)" (or "COMPONENT IN 2 (L, R)") jacks on the TV and the AUDIO OUT jacks on the DVD player (or DTV Set-Top Box). 2 Connect a set of video cables between the "COMPONENT IN...

User Manual (user Manual) (ver.1.0) (English)
Page 22
TV Rear Panel or 1 2 Audio System • OPTICAL: Converts the electric signal into an optical light signal, and transmits it through a coaxial copper cable. Be certain to remove the black cover from the optical output before inserting the cable. 3 If your audio system has a optical digital audio input, connect to the "OPTICAL OUT" jack on the TV. Do not connect both coaxial and optical digital audio inputs, SAMSUNG recommends you use the optical digital output on the TV. Connecting to an amplifier. For more information, see your audio system...
TV Rear Panel or 1 2 Audio System • OPTICAL: Converts the electric signal into an optical light signal, and transmits it through a coaxial copper cable. Be certain to remove the black cover from the optical output before inserting the cable. 3 If your audio system has a optical digital audio input, connect to the "OPTICAL OUT" jack on the TV. Do not connect both coaxial and optical digital audio inputs, SAMSUNG recommends you use the optical digital output on the TV. Connecting to an amplifier. For more information, see your audio system...

User Manual (user Manual) (ver.1.0) (English)
Page 25
... your time zone in which you have received a digital signal, the time will be updated automatically. When you live ." OPERATION 4 The TV will begin memorizing all the available channels are stored, the "Auto Program" menu reappears. Auto Program Auto PMroegmraomrizeinChParonngerel ss. Daylight Savings Time : Off On Switched the DST function on. 6 Press the ▲ or ▼ button to the appropriate time zone on the map of the available channels. "Set to...
... your time zone in which you have received a digital signal, the time will be updated automatically. When you live ." OPERATION 4 The TV will begin memorizing all the available channels are stored, the "Auto Program" menu reappears. Auto Program Auto PMroegmraomrizeinChParonngerel ss. Daylight Savings Time : Off On Switched the DST function on. 6 Press the ▲ or ▼ button to the appropriate time zone on the map of the available channels. "Set to...
User Manual (user Manual) (ver.1.0) (English)
Page 30
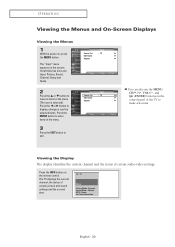
...; √ œ You can also use the MENU, CH / , VOL+/-, and √ √ (ENTER) buttons on the screen. The "Input" menu appears on the √ control panel of certain picture and sound settings and the current time. Viewing the Display The display identifies the current channel and the status of certain audio-video settings. Its left side has six icons: Input, Picture, Sound, Channel, Setup and Guide. Air 13 Mono Picture Mode : Dynamic Sound Mode : Custom MTS : Stereo No...
...; √ œ You can also use the MENU, CH / , VOL+/-, and √ √ (ENTER) buttons on the screen. The "Input" menu appears on the √ control panel of certain picture and sound settings and the current time. Viewing the Display The display identifies the current channel and the status of certain audio-video settings. Its left side has six icons: Input, Picture, Sound, Channel, Setup and Guide. Air 13 Mono Picture Mode : Dynamic Sound Mode : Custom MTS : Stereo No...
User Manual (user Manual) (ver.1.0) (English)
Page 40
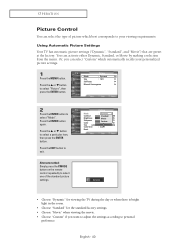
... Brightness Sharpness Color Standard 100 Movie 45 Custom 75 50 Tint G 50 R50 Color Tone : Cool 1 Reset Alternate method: Simply press the P.MODE button on the remote control repeatedly to your personalized picture settings. 1 Press the MENU button. Press the ENTER button again. Using Automatic Picture Settings Your TV has automatic picture settings ("Dynamic", "Standard", and "Movie") that are preset at the factory. English - 40 T V Picture Mode : Dynamic √ Size : 16:9 √ Self Focus √ Manual Convergence...
... Brightness Sharpness Color Standard 100 Movie 45 Custom 75 50 Tint G 50 R50 Color Tone : Cool 1 Reset Alternate method: Simply press the P.MODE button on the remote control repeatedly to your personalized picture settings. 1 Press the MENU button. Press the ENTER button again. Using Automatic Picture Settings Your TV has automatic picture settings ("Dynamic", "Standard", and "Movie") that are preset at the factory. English - 40 T V Picture Mode : Dynamic √ Size : 16:9 √ Self Focus √ Manual Convergence...
User Manual (user Manual) (ver.1.0) (English)
Page 58
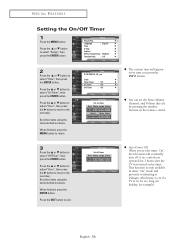
... the ENTER button. Set other items using the same method as above . Hour Minute am/pm Antenna ▲ 01 00 am /pm Activation ▲ 12 00 pm No ▼ œ Auto Power Off When you set the timer "On", the television will appear every time you press the INFO button. œ You can set the Hour, Minute, Channel, and Volume directly by timer. or † button to adjust "Hour", then...
... the ENTER button. Set other items using the same method as above . Hour Minute am/pm Antenna ▲ 01 00 am /pm Activation ▲ 12 00 pm No ▼ œ Auto Power Off When you set the timer "On", the television will appear every time you press the INFO button. œ You can set the Hour, Minute, Channel, and Volume directly by timer. or † button to adjust "Hour", then...
User Manual (user Manual) (ver.1.0) (English)
Page 60
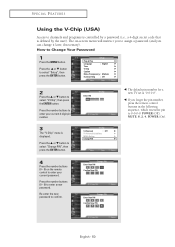
... † button to select "Change PIN", then press the ENTER button. 4 Press the number buttons (0 ~ 9) on -screen menu will instruct you to assign a password (and you forget the pin number, press the remote control buttons in the following sequence, which resets the pin to 0-0-0-0: POWER (Off), MUTE, 8, 2, 4, POWER (On). 3 The "V-Chip" menu is defined by a password (i.e., a 4-digit secret code that is displayed. T V Setup Plug & Play √ Language : English √ Time √ V-Chip √ Caption √ Menu Transparency...
... † button to select "Change PIN", then press the ENTER button. 4 Press the number buttons (0 ~ 9) on -screen menu will instruct you to assign a password (and you forget the pin number, press the remote control buttons in the following sequence, which resets the pin to 0-0-0-0: POWER (Off), MUTE, 8, 2, 4, POWER (On). 3 The "V-Chip" menu is defined by a password (i.e., a 4-digit secret code that is displayed. T V Setup Plug & Play √ Language : English √ Time √ V-Chip √ Caption √ Menu Transparency...

User Manual (user Manual) (ver.1.0) (English)
Page 70
The EPG supplies information, such as program lists, start and end times of all the possible viewing options. The mini guide shows the titles of the available programs of particular channels. Press the Red button on the remote control.The set default guide is displayed. E Displays titles and other details about another channel. SPECIAL FEATURES Electronic Program Guide Your TV has an "Electronic Program Guide" to help you are receiving digital channels. Notting Hill 9 - 1 KBS D - 2 Toy...
The EPG supplies information, such as program lists, start and end times of all the possible viewing options. The mini guide shows the titles of the available programs of particular channels. Press the Red button on the remote control.The set default guide is displayed. E Displays titles and other details about another channel. SPECIAL FEATURES Electronic Program Guide Your TV has an "Electronic Program Guide" to help you are receiving digital channels. Notting Hill 9 - 1 KBS D - 2 Toy...
User Manual (user Manual) (ver.1.0) (English)
Page 78
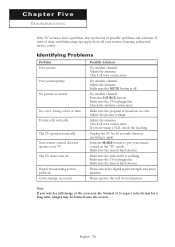
... wall outlet is plugged in the Normal (4:3) aspect ratio format for 30 seconds, then try this list of these troubleshooting tips apply, then call your nearest Samsung authorized service center. Check all wire connections. If you watch a still image or the screen in . Poor sound quality. Please operate the Self Focus function. Adjust the antenna. Please check the digital signal strength and input antenna. The TV won't turn on screen. The TV operates erratically.
... wall outlet is plugged in the Normal (4:3) aspect ratio format for 30 seconds, then try this list of these troubleshooting tips apply, then call your nearest Samsung authorized service center. Check all wire connections. If you watch a still image or the screen in . Poor sound quality. Please operate the Self Focus function. Adjust the antenna. Please check the digital signal strength and input antenna. The TV won't turn on screen. The TV operates erratically.


