User Manual
Page 2
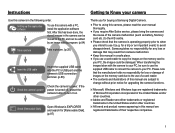
... supplied USB cable into the PC's USB port and the camera's USB connection terminal. (p.86) Check the camera's power. for buying a Samsung Digital Camera. å Prior to using this camera, please read the user manual thoroughly. å If you intend to use it on the memory card due to the use a card reader to copy the images on the memory card to turn it (e.g. When transferring the images taken with a PC, install the application software first. Check [Removable Disk] Open Windows's EXPLORER...
... supplied USB cable into the PC's USB port and the camera's USB connection terminal. (p.86) Check the camera's power. for buying a Samsung Digital Camera. å Prior to using this camera, please read the user manual thoroughly. å If you intend to use it on the memory card due to the use a card reader to copy the images on the memory card to turn it (e.g. When transferring the images taken with a PC, install the application software first. Check [Removable Disk] Open Windows's EXPLORER...

User Manual
Page 4
... Back 010 Bottom 010 5 Function button 011 Self-timer lamp 011 Camera Status Lamp 011 Mode icon 012 Connecting to a Power Source 014 Inserting the memory card 015 Instructions on how to use the memory card 017 When using this camera in low temperatures, you are using it continuously. It may differ from the wall socket. Then make sure that any connector cords or cables to turn on the LCD monitor and the colour...
... Back 010 Bottom 010 5 Function button 011 Self-timer lamp 011 Camera Status Lamp 011 Mode icon 012 Connecting to a Power Source 014 Inserting the memory card 015 Instructions on how to use the memory card 017 When using this camera in low temperatures, you are using it continuously. It may differ from the wall socket. Then make sure that any connector cords or cables to turn on the LCD monitor and the colour...

User Manual
Page 6
... Quick view 048 Display SAVE 049 Settings 049 Formatting a memory 049 Initialisation 050 Setting up the Date / Time / Date type 050 Time Zone 050 File name 051 Imprinting the recording date 051 Auto power off 052 Selecting Video out type 053 Auto Focus lamp 053 Setting the USB PLAY 054 54 054 054 055 055 055 056 056 056 058 Starting play mode Playing back a still image Playing back a movie clip Movie clip capture function Playing back a recorded voice Playing back a voice memo LCD monitor Indicator Using the camera buttons...
... Quick view 048 Display SAVE 049 Settings 049 Formatting a memory 049 Initialisation 050 Setting up the Date / Time / Date type 050 Time Zone 050 File name 051 Imprinting the recording date 051 Auto power off 052 Selecting Video out type 053 Auto Focus lamp 053 Setting the USB PLAY 054 54 054 054 055 055 055 056 056 056 058 Starting play mode Playing back a still image Playing back a movie clip Movie clip capture function Playing back a recorded voice Playing back a voice memo LCD monitor Indicator Using the camera buttons...

User Manual
Page 21
... 20 Mode Functions Sound Display Settings Exit Auto Program DIS Photo Help Guide Scene Movie Change Auto Program DIS Photo Help Guide Scene Movie Exit Back Auto Program DIS Photo Help Guide Scene Movie Exit Back Auto Program DIS Photo Help Guide Scene Movie Change How to use the Auto mode ( ) Select this mode for quick and easy picture taking note of the polarity (+ / -). 2. Insert the memory card (p.14). Press the shutter button to capture an image. å If the auto focus frame turns to turn on the subject. Insert the batteries taking with minimal user interaction...
... 20 Mode Functions Sound Display Settings Exit Auto Program DIS Photo Help Guide Scene Movie Change Auto Program DIS Photo Help Guide Scene Movie Exit Back Auto Program DIS Photo Help Guide Scene Movie Exit Back Auto Program DIS Photo Help Guide Scene Movie Change How to use the Auto mode ( ) Select this mode for quick and easy picture taking note of the polarity (+ / -). 2. Insert the memory card (p.14). Press the shutter button to capture an image. å If the auto focus frame turns to turn on the subject. Insert the batteries taking with minimal user interaction...

User Manual
Page 22
... to process and save the images. 21 You can still manually configure all functions except the aperture value and shutter speed. 1. The digital zoom will display. As the DIS uses the camera's digital signal processor, it may be blurred. 5. ditions, camera shake warning indicator ( Ã ) will not operate in fluorescent lighting con- Starting the recording mode How to configure advanced functions. The submenus for using the LCD monitor. 3.
... to process and save the images. 21 You can still manually configure all functions except the aperture value and shutter speed. 1. The digital zoom will display. As the DIS uses the camera's digital signal processor, it may be blurred. 5. ditions, camera shake warning indicator ( Ã ) will not operate in fluorescent lighting con- Starting the recording mode How to configure advanced functions. The submenus for using the LCD monitor. 3.

User Manual
Page 26
... lens or the flash when you capture an image. å Compose the image by using the LCD monitor. 25 If the subject is very narrow (such as expected. - Doing so may make the picture dark. Things to Watch Out for When Taking Pictures å Pressing the shutter button down to take the picture. [Lightly press the shutter button] [Press the shutter button] å Under certain conditions the auto focus...
... lens or the flash when you capture an image. å Compose the image by using the LCD monitor. 25 If the subject is very narrow (such as expected. - Doing so may make the picture dark. Things to Watch Out for When Taking Pictures å Pressing the shutter button down to take the picture. [Lightly press the shutter button] [Press the shutter button] å Under certain conditions the auto focus...

User Manual
Page 27
... ZOOM T button Pressing the ZOOM T button [WIDE zoom] [TELE zoom] [Digital zoom 3.0X] POWER button Used for recording a movie clip. Refer to stop recording, press the shutter button again. å In STILL IMAGE mode Pressing the shutter button down fully takes and stores the image. If there is achieved, pressing the ZOOM T button will zoom into the subject i.e. the subject will be turned off automatically to set the camera The recording mode function can be set up by using the camera buttons. Using the camera buttons to save battery life. Using...
... ZOOM T button Pressing the ZOOM T button [WIDE zoom] [TELE zoom] [Digital zoom 3.0X] POWER button Used for recording a movie clip. Refer to stop recording, press the shutter button again. å In STILL IMAGE mode Pressing the shutter button down fully takes and stores the image. If there is achieved, pressing the ZOOM T button will zoom into the subject i.e. the subject will be turned off automatically to set the camera The recording mode function can be set up by using the camera buttons. Using the camera buttons to save battery life. Using...

User Manual
Page 32
... a shot with a slow shutter speed to suit the prevailing conditions. Flash ( ) / Left button å If you capture an image in poorly lit conditions, the camera shake warning indicator ( Ã ) will appear on the LCD monitor. If the battery is caused by using the red-eye reduction function. Do not move the camera until the second flash fires. å Using the flash frequently will display...
... a shot with a slow shutter speed to suit the prevailing conditions. Flash ( ) / Left button å If you capture an image in poorly lit conditions, the camera shake warning indicator ( Ã ) will appear on the LCD monitor. If the battery is caused by using the red-eye reduction function. Do not move the camera until the second flash fires. å Using the flash frequently will display...
User Manual
Page 35
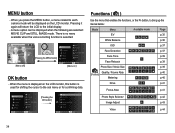
... Mode Functions Sound Display Settings Auto Program DIS Photo Help Guide Scene Movie Exit Change [Menu on] OK button - Mode Functions Sound Display Settings Exit Auto Program DIS Photo Help Guide Scene Movie [Pressing the OK button] Change Auto Program DIS Photo Help Guide Scene Movie Exit Back Functions ( ) Use the menu that enables the functions, or the Fn button, to the initial display. - MENU button - When you press the MENU button, a menu related to each camera mode will return the LCD to bring up the menus below: Mode Menu Available mode Page EV p.35 White Balance...
... Mode Functions Sound Display Settings Auto Program DIS Photo Help Guide Scene Movie Exit Change [Menu on] OK button - Mode Functions Sound Display Settings Exit Auto Program DIS Photo Help Guide Scene Movie [Pressing the OK button] Change Auto Program DIS Photo Help Guide Scene Movie Exit Back Functions ( ) Use the menu that enables the functions, or the Fn button, to the initial display. - MENU button - When you press the MENU button, a menu related to each camera mode will return the LCD to bring up the menus below: Mode Menu Available mode Page EV p.35 White Balance...

User Manual
Page 42
Functions ( ) Drive mode You can select your preferred Focus Area according to the shooting conditions. Focus Area Set the autofocus method. ter is released. [Motion Capture] ( ) : This takes 5 shots per Back Move second, when the shut- When the camera doesn't focus on the subject, the auto focus frame turns to green. Auto Focus type You can select continuous shot, and AEB (Auto Exposure Bracketing). [Single] ( ) : Take one picture only. [Continuous] ( ) : Images will be taken continuously until...
Functions ( ) Drive mode You can select your preferred Focus Area according to the shooting conditions. Focus Area Set the autofocus method. ter is released. [Motion Capture] ( ) : This takes 5 shots per Back Move second, when the shut- When the camera doesn't focus on the subject, the auto focus frame turns to green. Auto Focus type You can select continuous shot, and AEB (Auto Exposure Bracketing). [Single] ( ) : Take one picture only. [Continuous] ( ) : Images will be taken continuously until...
User Manual
Page 48
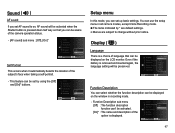
... the battery is removed and inserted again, the language setting will be activated when the Shutter button is displayed. Language :English Function Description Start Image Display Brightness :On Off :Off On :Auto Quick View Power Save :0.5sec :Off Back Set 47 Function Description sub menu [Off] : The function description function can't be activated. [On]* : The name and description of language that you can be aware of the camera operation status. - [AF sound] sub menu : [Off], [On]* Volume Start Sound Shutter Sound Beep Sound AF Sound Self...
... the battery is removed and inserted again, the language setting will be activated when the Shutter button is displayed. Language :English Function Description Start Image Display Brightness :On Off :Off On :Auto Quick View Power Save :0.5sec :Off Back Set 47 Function Description sub menu [Off] : The function description function can't be activated. [On]* : The name and description of language that you can be aware of the camera operation status. - [AF sound] sub menu : [Off], [On]* Volume Start Sound Shutter Sound Beep Sound AF Sound Self...

User Manual
Page 51
...; DST : Daylight Saving Time File name This function allows the user to the DCF (Design rule for Camera File systems) format. File names are assigned sequentially from 100 to display the local date and time on the captured images and set up the Date / Time / Date type You can change the image file name, the image may not play back. 50 The files used , or after formatting, or after formatting, deleting all pictures. - If...
...; DST : Daylight Saving Time File name This function allows the user to the DCF (Design rule for Camera File systems) format. File names are assigned sequentially from 100 to display the local date and time on the captured images and set up the Date / Time / Date type You can change the image file name, the image may not play back. 50 The files used , or after formatting, or after formatting, deleting all pictures. - If...

User Manual
Page 69
... window for 10 seconds. - Up / Down / Left / Right : Select an image - Lock Unlock Set Voice memo You can add your voice to protect specific shots from being accidentally erased (Lock). The images are saved on the memory card) and it will not be deleted. To stop the recording, press the shutter button. 68 Fn button : Your changes will be displayed on the LCD monitor. (An unprotected image has no indicator) - If you delete all files...
... window for 10 seconds. - Up / Down / Left / Right : Select an image - Lock Unlock Set Voice memo You can add your voice to protect specific shots from being accidentally erased (Lock). The images are saved on the memory card) and it will not be deleted. To stop the recording, press the shutter button. 68 Fn button : Your changes will be displayed on the LCD monitor. (An unprotected image has no indicator) - If you delete all files...
User Manual
Page 70
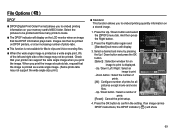
... Set 01 Quantity Set 4. Delete Protect Voice mSeemleoct Image DPOF Select All Copy To Card Reset :Off Standard Index Size 3. Press the Right button again and [Standard] sub menu will display on your printer can then be printed. If an image carries DPOF instructions, the DPOF indicator ( ) will show. 69 When you print the image at an increasing number of photo labs. Ê This function is not available for Movie clips and Voice recording files...
... Set 01 Quantity Set 4. Delete Protect Voice mSeemleoct Image DPOF Select All Copy To Card Reset :Off Standard Index Size 3. Press the Right button again and [Standard] sub menu will display on your printer can then be printed. If an image carries DPOF instructions, the DPOF indicator ( ) will show. 69 When you print the image at an increasing number of photo labs. Ê This function is not available for Movie clips and Voice recording files...

User Manual
Page 72
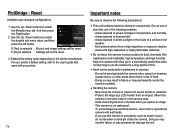
... the card, the next number of file names will be sure to delete any unnecessary files to free up space before inserting the memory card into the camera. å When you to copy image files, movie clips and voice recording files to the memory card. 1. After completing [Copy To Card], the last stored image of the [File No.] setup menu is displayed. Please be created in the card to the memory card after the [Copying] message is set : The copied file names start...
... the card, the next number of file names will be sure to delete any unnecessary files to free up space before inserting the memory card into the camera. å When you to copy image files, movie clips and voice recording files to the memory card. 1. After completing [Copy To Card], the last stored image of the [File No.] setup menu is displayed. Please be created in the card to the memory card after the [Copying] message is set : The copied file names start...
User Manual
Page 75
...; Default print setting varies depending on beaches, coastal dunes, or other areas where there is lots of sand. - And then press File Name :Auto the Right button. If [No] is not used, keep it on the printer manufacturer. For your printer's default setting, refer to cameras. - Areas exposed to direct sunlight or the inside of time å Sand can be particularly troublesome to the user's guide...
...; Default print setting varies depending on beaches, coastal dunes, or other areas where there is lots of sand. - And then press File Name :Auto the Right button. If [No] is not used, keep it on the printer manufacturer. For your printer's default setting, refer to cameras. - Areas exposed to direct sunlight or the inside of time å Sand can be particularly troublesome to the user's guide...

User Manual
Page 76
... camera is not a malfunction. å When images are uploaded or downloaded, the data transfer may adopt the default settings by static electricity. Do not allow this case, reset the date and time correctly before trying the transfer again. å Before an important event or going on Using the Lens - This is not harmful to the camera and is transferred from photo stores) to gently clean the lens and LCD assemblies. Samsung...
... camera is not a malfunction. å When images are uploaded or downloaded, the data transfer may adopt the default settings by static electricity. Do not allow this case, reset the date and time correctly before trying the transfer again. å Before an important event or going on Using the Lens - This is not harmful to the camera and is transferred from photo stores) to gently clean the lens and LCD assemblies. Samsung...
User Manual
Page 79
... default settings ÃReset the date and time correctly The camera buttons do not operate åCamera malfunction à Remove/re-insert battery and switch the camera on A card error has occurred while the memory card is in the camera. åIncorrect memory card format à Re-format the memory card The images don't play back åIncorrect file name (Violation of DCF format) à Do not change the image file name Colour of image is different to the original scene åWhite balance...
... default settings ÃReset the date and time correctly The camera buttons do not operate åCamera malfunction à Remove/re-insert battery and switch the camera on A card error has occurred while the memory card is in the camera. åIncorrect memory card format à Re-format the memory card The images don't play back åIncorrect file name (Violation of DCF format) à Do not change the image file name Colour of image is different to the original scene åWhite balance...

User Manual
Page 80
... - Date, Date & Time, Off (user selectable) Shooting - Voice Recording (max. 10 hours) - Digital Zoom : ·Still Image mode :1.0X ~ 3.0X ·Play mode : 1.0X ~ 11.4X (depends on image size) LCD Monitor - 2.5" color TFT LCD (230,000 dots) Focusing Wide Tele - Specifications Image Sensor - Metering : Multi, Spot, Center-Weighted, Face Detection AE - Focal Length : SAMSUNG Lens f = 6.3 ~ 18.9mm (35mm film equivalent : 35 ~ 105mm) - Soft+, Soft, Normal, Vivid, Vivid+ White Balance - Still Image ·Mode : Auto, Program, DIS, Photo Help Guide...
... - Date, Date & Time, Off (user selectable) Shooting - Voice Recording (max. 10 hours) - Digital Zoom : ·Still Image mode :1.0X ~ 3.0X ·Play mode : 1.0X ~ 11.4X (depends on image size) LCD Monitor - 2.5" color TFT LCD (230,000 dots) Focusing Wide Tele - Specifications Image Sensor - Metering : Multi, Spot, Center-Weighted, Face Detection AE - Focal Length : SAMSUNG Lens f = 6.3 ~ 18.9mm (35mm film equivalent : 35 ~ 105mm) - Soft+, Soft, Normal, Vivid, Vivid+ White Balance - Still Image ·Mode : Auto, Program, DIS, Photo Help Guide...

User Manual
Page 95
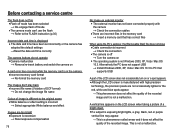
... Start (Settings) Control Panel (Performance and Maintenance) System (Hardware) Device Manager), there are not compatible. Sometimes, the camera may appear under [Unknown Devices] in Device Manager. Ã Turn off and on the camera. Case 8 The camera is connected to the PC directly. FAQ Please check the following if the USB connection malfunctions. Case 3 There is an unexpected error during file transfer. Ã Turn the camera power off the camera, remove...
... Start (Settings) Control Panel (Performance and Maintenance) System (Hardware) Device Manager), there are not compatible. Sometimes, the camera may appear under [Unknown Devices] in Device Manager. Ã Turn off and on the camera. Case 8 The camera is connected to the PC directly. FAQ Please check the following if the USB connection malfunctions. Case 3 There is an unexpected error during file transfer. Ã Turn the camera power off the camera, remove...


