User Manual
Page 2
... PC. Take a picture Take a picture. (p.22) Insert the USB cable Insert the supplied USB cable into the PC's USB port and the camera's USB connection terminal. (p.108) Check the camera's power. for buying a Samsung Digital Camera. å Prior to using this camera, please read the user manual thoroughly. å If you intend to use a card reader to copy the images on . Please note that the manufacturer holds no responsibility for upgrading the camera functions. Ä Microsoft, Windows and Windows logo...
... PC. Take a picture Take a picture. (p.22) Insert the USB cable Insert the supplied USB cable into the PC's USB port and the camera's USB connection terminal. (p.108) Check the camera's power. for buying a Samsung Digital Camera. å Prior to using this camera, please read the user manual thoroughly. å If you intend to use a card reader to copy the images on . Please note that the manufacturer holds no responsibility for upgrading the camera functions. Ä Microsoft, Windows and Windows logo...
User Manual
Page 4
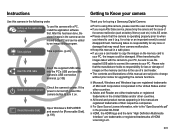
... 011 Smart dial 012 Self-timer lamp 012 Camera Status Lamp 012 Mode icon 013 Connecting to a Power Source 016 Inserting the memory card 017 Instructions on the LCD monitor and the color may experience the following. Do not insert the battery with the correct speci¿cation for a long period of a PC. After use the camera for the camera. - Caution Contents CAUTION indicates a potentially hazardous situation...
... 011 Smart dial 012 Self-timer lamp 012 Camera Status Lamp 012 Mode icon 013 Connecting to a Power Source 016 Inserting the memory card 017 Instructions on the LCD monitor and the color may experience the following. Do not insert the battery with the correct speci¿cation for a long period of a PC. After use the camera for the camera. - Caution Contents CAUTION indicates a potentially hazardous situation...

User Manual
Page 5
... When Taking Pictures 031 Focus lock 031 Using the camera buttons to set the camera 031 POWER button 032 SHUTTER button 032 Zoom W/T Lever 034 Diopter adjustment lever 034 AEL/Image protection button 034 Flash pop-up button 035 Exposure compensation button 035 EVF/LCD button 036 MENU button 037 OK/AF point button 037 Info (DISP) / Up button 038 Macro / Down button 041 Flash / Left button 043 Self-timer / Right button 044 Shooting 045 How to Enable Functions Using the MENU Button 046 White balance 048 Fine-tuning the white balance 048 ISO 049...
... When Taking Pictures 031 Focus lock 031 Using the camera buttons to set the camera 031 POWER button 032 SHUTTER button 032 Zoom W/T Lever 034 Diopter adjustment lever 034 AEL/Image protection button 034 Flash pop-up button 035 Exposure compensation button 035 EVF/LCD button 036 MENU button 037 OK/AF point button 037 Info (DISP) / Up button 038 Macro / Down button 041 Flash / Left button 043 Self-timer / Right button 044 Shooting 045 How to Enable Functions Using the MENU Button 046 White balance 048 Fine-tuning the white balance 048 ISO 049...

User Manual
Page 6
... Display Bright 067 Quick view 067 Display Save 068 Settings 068 Formatting a memory 068 Initialization 068 Language 069 Setting up the Date / Time / Date type 069 Time Zone 069 File name 070 Imprinting the recording date 070 Auto power off 071 Auto Focus lamp 071 Anynet+ (HDMI-CEC) 072 HDMI Size 073 Selecting Video out type 073 Setting the USB PLAY 074 Starting play mode 074 Playing back a still image 074 Playing back a movie clip 075 Movie clip capture function 075 On camera movie trimming 075 Playing back a recorded...
... Display Bright 067 Quick view 067 Display Save 068 Settings 068 Formatting a memory 068 Initialization 068 Language 069 Setting up the Date / Time / Date type 069 Time Zone 069 File name 070 Imprinting the recording date 070 Auto power off 071 Auto Focus lamp 071 Anynet+ (HDMI-CEC) 072 HDMI Size 073 Selecting Video out type 073 Setting the USB PLAY 074 Starting play mode 074 Playing back a still image 074 Playing back a movie clip 075 Movie clip capture function 075 On camera movie trimming 075 Playing back a recorded...

User Manual
Page 29
... movie shooting button once more, the function for recording high-quality videos.) - Movie clips will still be taken with the guide framing the sides of the memory capacity allows. 1. Take a picture from the recording menu during video recording to be recorded if the shutter button is disabled. Ä Movie clip size and type are listed below. - Cancel Frame : OK Cancel Frame : OK Cancel Frame : OK 028 How to use the [Frame Guide] mode Set [Frame Guide] mode...
... movie shooting button once more, the function for recording high-quality videos.) - Movie clips will still be taken with the guide framing the sides of the memory capacity allows. 1. Take a picture from the recording menu during video recording to be recorded if the shutter button is disabled. Ä Movie clip size and type are listed below. - Cancel Frame : OK Cancel Frame : OK Cancel Frame : OK 028 How to use the [Frame Guide] mode Set [Frame Guide] mode...

User Manual
Page 31
..., support the camera on a solid surface or change to Àash shot mode. å Shooting against the sun may make the picture come out dark. In this case, use the [Backlight] in scene shooting mode (see page 87) function. å Avoid obstructing the lens or the Àash when you capture an image. å Compose the image by using the LCD monitor. å Under certain conditions the auto focus...
..., support the camera on a solid surface or change to Àash shot mode. å Shooting against the sun may make the picture come out dark. In this case, use the [Backlight] in scene shooting mode (see page 87) function. å Avoid obstructing the lens or the Àash when you capture an image. å Compose the image by using the LCD monitor. å Under certain conditions the auto focus...

User Manual
Page 34
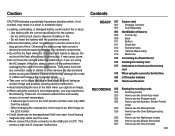
... fully turned, the zoom adjusts quickly. Stop moving lens parts as this to take place. å Zooming during video recording may record operation sound of the Zoom W/T lever. å Select [Zoom Mute] from the recording menu during video recording to disable the recording of zoom sound. å You may take care not to touch the camera's moving the Zoom W/T lever to enable digital zoom (software wide). Continue to move the Zoom W/T lever to the left to disable optical zoom. [TELE zoom] [Optical zoom 2X] [WIDE zoom] Digital zoom...
... fully turned, the zoom adjusts quickly. Stop moving lens parts as this to take place. å Zooming during video recording may record operation sound of the Zoom W/T lever. å Select [Zoom Mute] from the recording menu during video recording to disable the recording of zoom sound. å You may take care not to touch the camera's moving the Zoom W/T lever to enable digital zoom (software wide). Continue to move the Zoom W/T lever to the left to disable optical zoom. [TELE zoom] [Optical zoom 2X] [WIDE zoom] Digital zoom...

User Manual
Page 37
...) The electronic view¿nder shows the same display as the LCD monitor, and is used when it is available in the voice recording function. [Menu off or when the user selects another mode with the Mode Dial. When the electronic view¿nder is turned off ] [Pressing the MENU button] Shooting Sound Display Settings Exit White Balance WB Fine-tuning ISO Face Detection Smart FR Edit Photo Size Quality Change [Menu on the LCD monitor.
...) The electronic view¿nder shows the same display as the LCD monitor, and is used when it is available in the voice recording function. [Menu off or when the user selects another mode with the Mode Dial. When the electronic view¿nder is turned off ] [Pressing the MENU button] Shooting Sound Display Settings Exit White Balance WB Fine-tuning ISO Face Detection Smart FR Edit Photo Size Quality Change [Menu on the LCD monitor.
User Manual
Page 49
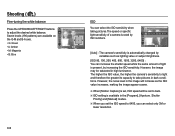
... higher the camera's sensitivity to light and therefore the greater its capacity to take pictures in high luminance. However, the image may be set the ISO speed to 6400, you set to adjust the desired white balance. Shutter Priority] and [Manual] modes. Ä When you can select only 3M or lower resolution. 048 However, the noise level in the image will increase as lighting value or subject...
... higher the camera's sensitivity to light and therefore the greater its capacity to take pictures in high luminance. However, the image may be set the ISO speed to 6400, you set to adjust the desired white balance. Shutter Priority] and [Manual] modes. Ä When you can select only 3M or lower resolution. 048 However, the noise level in the image will increase as lighting value or subject...
User Manual
Page 64
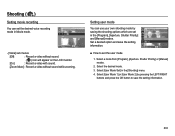
... are set in the [Shooting] menu. 4. Voice Back Move - [Voice] sub menus [Off] : Record a video without sound. ( ) icon will appear on the LCD monitor. [On] : Record a video with sound. [Zoom Mute] : Record a video without sound while zooming. Select the desired mode. 3. Back Move Ŷ How to save the setting information. Select a mode from [Program], [Aperture. Setting user mode You can set the desired voice recording mode in Movie mode. Shutter Priority] and [Manual] modes. Shooting ( ) Setting movie recording You can use your own shooting mode by pressing...
... are set in the [Shooting] menu. 4. Voice Back Move - [Voice] sub menus [Off] : Record a video without sound. ( ) icon will appear on the LCD monitor. [On] : Record a video with sound. [Zoom Mute] : Record a video without sound while zooming. Select the desired mode. 3. Back Move Ŷ How to save the setting information. Select a mode from [Program], [Aperture. Setting user mode You can set the desired voice recording mode in Movie mode. Shutter Priority] and [Manual] modes. Shooting ( ) Setting movie recording You can use your own shooting mode by pressing...

User Manual
Page 70
... assigned sequentially from Reset 0001 even after deleting all or inserting a new memory card. If you to display the local date and time on the captured images and set from 100 to the DCF (Design rule for Camera File systems) format. Language Date & Time Time Zone File No. Setting [Time Zone] enables you change the date and time that follow the previous sequence, even when a new memory card is used with the memory card conform to 999...
... assigned sequentially from Reset 0001 even after deleting all or inserting a new memory card. If you to display the local date and time on the captured images and set from 100 to the DCF (Design rule for Camera File systems) format. Language Date & Time Time Zone File No. Setting [Time Zone] enables you change the date and time that follow the previous sequence, even when a new memory card is used with the memory card conform to 999...

User Manual
Page 95
... displayed. - If an image carries DPOF instruction, the DPOF indicator ( ) will display on the LCD monitor when an image that has DPOF information plays back. Check that your memory card's MISC folder. Select a desired sub menu by pressing the Up / Down button and press the OK button. [Select] : Selection window for all pictures except movie and voice files. - Zoom W/T Lever : Select the number of prints. [All] : Configure number of prints for an image to print. - Delete Protect...
... displayed. - If an image carries DPOF instruction, the DPOF indicator ( ) will display on the LCD monitor when an image that has DPOF information plays back. Check that your memory card's MISC folder. Select a desired sub menu by pressing the Up / Down button and press the OK button. [Select] : Selection window for all pictures except movie and voice files. - Zoom W/T Lever : Select the number of prints. [All] : Configure number of prints for an image to print. - Delete Protect...

User Manual
Page 97
... copied folder is set : The copied file names start from after the last stored file name. - Delete Protect Face List Edit Voice memo DPOF Copy to Card Back :Off Yes No Set - [No] : Cancels "Copy to Card". - [Yes] : All images, movie clips and voice recording files saved in the memory card to copy saved images on the internal memory (About 8MB), the [Copy to Card], the last stored image of the [File No.] setup menu is displayed. Select the [Copy to the memory card after the [Copying] message...
... copied folder is set : The copied file names start from after the last stored file name. - Delete Protect Face List Edit Voice memo DPOF Copy to Card Back :Off Yes No Set - [No] : Cancels "Copy to Card". - [Yes] : All images, movie clips and voice recording files saved in the memory card to copy saved images on the internal memory (About 8MB), the [Copy to Card], the last stored image of the [File No.] setup menu is displayed. Select the [Copy to the memory card after the [Copying] message...

User Manual
Page 99
... L :Auto 2L :Auto Set Menu Function Sub menu Paper Set the size of the printing paper Auto, PostCard, Card, 4X6, L, 2L, Letter, A4, A3 Layout Set the number of pictures to Auto, Full, 1, 2, 4, 8, 9, 16, be printed on all printers. Back Set 3. After selecting another picture, select the number of prints for printed pictures. 1. Press the Menu button and the Paper :One Photo One Photo All :PAhuototos PictBridge menu will display. Press the play mode button ( Î ) and images will be printed Auto, Draft, Normal, Fine Date Set...
... L :Auto 2L :Auto Set Menu Function Sub menu Paper Set the size of the printing paper Auto, PostCard, Card, 4X6, L, 2L, Letter, A4, A3 Layout Set the number of pictures to Auto, Full, 1, 2, 4, 8, 9, 16, be printed on all printers. Back Set 3. After selecting another picture, select the number of prints for printed pictures. 1. Press the Menu button and the Paper :One Photo One Photo All :PAhuototos PictBridge menu will display. Press the play mode button ( Î ) and images will be printed Auto, Draft, Normal, Fine Date Set...
User Manual
Page 100
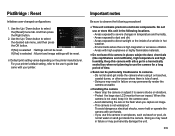
... hold or operate the camera with your printer's default setting, refer to cameras. - And then press File Name :Auto the Right button. 2. Areas exposed to observe the following locations. - Environments where there is selected : Settings will be reset. Never drop the camera or subject it on the printer manufacturer. If you capture an image. - Use the Up / Down button to select Date :Auto the [Reset] menu tab. Important notes Be sure...
... hold or operate the camera with your printer's default setting, refer to cameras. - And then press File Name :Auto the Right button. 2. Areas exposed to observe the following locations. - Environments where there is selected : Settings will be reset. Never drop the camera or subject it on the printer manufacturer. If you capture an image. - Use the Up / Down button to select Date :Auto the [Reset] menu tab. Important notes Be sure...

User Manual
Page 101
..., disconnect and re-connect the USB cable before the recording. 100 Do not allow this happens, turn off the camera and remove the memory card. In this case, reset the date and time correctly before trying the transfer again. å Before an important event or going on Using the Lens - Take a picture for at all moisture is not a malfunction. å When images are uploaded or downloaded, the data transfer may damage the body...
..., disconnect and re-connect the USB cable before the recording. 100 Do not allow this happens, turn off the camera and remove the memory card. In this case, reset the date and time correctly before trying the transfer again. å Before an important event or going on Using the Lens - Take a picture for at all moisture is not a malfunction. å When images are uploaded or downloaded, the data transfer may damage the body...

User Manual
Page 104
... the default settings ÃReset the date and time correctly The camera buttons do not operate åCamera malfunction à Remove/re-insert battery and switch the camera on A card error has occurred while the memory card is in the camera. åIncorrect memory card format à Re-format the memory card The images don't play back åIncorrect file name (Violation of DCF format) à Do not change the image file name Color of image is different to PC that supports USB A part of the LCD screen...
... the default settings ÃReset the date and time correctly The camera buttons do not operate åCamera malfunction à Remove/re-insert battery and switch the camera on A card error has occurred while the memory card is in the camera. åIncorrect memory card format à Re-format the memory card The images don't play back åIncorrect file name (Violation of DCF format) à Do not change the image file name Color of image is different to PC that supports USB A part of the LCD screen...
User Manual
Page 109
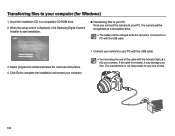
... setup screen is displayed, click Samsung Digital Camera Installer to start installation. Ê Transferring files to your PC Once you connect the camera to your PC, the camera will be recognized as a removable drive. å The battery will be charged while the camera is connected to install and follow the onscreen instructions. 4. Click Exit to your computer (for any loss of the cable with the USB cable. å You must plug the end of data...
... setup screen is displayed, click Samsung Digital Camera Installer to start installation. Ê Transferring files to your PC Once you connect the camera to your PC, the camera will be recognized as a removable drive. å The battery will be charged while the camera is connected to install and follow the onscreen instructions. 4. Click Exit to your computer (for any loss of the cable with the USB cable. å You must plug the end of data...

User Manual
Page 112
... your computer 14 Move to the previous or next folder 15 Print files, view files on a map, store files in My Folder, or register faces Transferring files to your computer (for Windows) Icon Description 1 Open menus 2 Display files in the selected folder 3 Change to the Photo edit mode 4 Change to the Video edit mode 5 Change to the Sharing mode (You can transfer files directly from the camera to a Macintosh computer, the computer will recognize the device automatically...
... your computer 14 Move to the previous or next folder 15 Print files, view files on a map, store files in My Folder, or register faces Transferring files to your computer (for Windows) Icon Description 1 Open menus 2 Display files in the selected folder 3 Change to the Photo edit mode 4 Change to the Video edit mode 5 Change to the Sharing mode (You can transfer files directly from the camera to a Macintosh computer, the computer will recognize the device automatically...
User Manual
Page 134
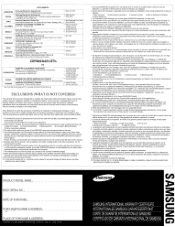
... under the terms of this warranty. 6. Customer adjustments which vary from the date of the SAMSUNG camera service agents listed on products purchased in workmanship and materials. When service is required, the one year warranty is provided. SAMSUNG assumes no responsibilities for herein is the sole warranty provided in the instruction manual are not covered under the terms of...
... under the terms of this warranty. 6. Customer adjustments which vary from the date of the SAMSUNG camera service agents listed on products purchased in workmanship and materials. When service is required, the one year warranty is provided. SAMSUNG assumes no responsibilities for herein is the sole warranty provided in the instruction manual are not covered under the terms of...


