
User Manual
Page 3
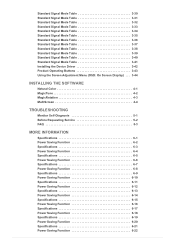
... Signal Mode Table 3-36 Standard Signal Mode Table 3-37 Standard Signal Mode Table 3-38 Standard Signal Mode Table 3-39 Standard Signal Mode Table 3-40 Standard Signal Mode Table 3-41 Installing the Device Driver 3-42 Product Operating Buttons 3-43 Using the Screen Adjustment Menu (OSD: On Screen Display) . . . 3-44 INSTALLING THE SOFTWARE Natural Color 4-1 MagicTune 4-2 MagicRotation 4-3 MultiScreen 4-4 TROUBLESHOOTING Monitor Self-Diagnosis 5-1 Before Requesting Service 5-2 FAQ 5-3 MORE INFORMATION Specifications 6-1 Power Saving Function 6-2 Specifications 6-3 Power Saving...
... Signal Mode Table 3-36 Standard Signal Mode Table 3-37 Standard Signal Mode Table 3-38 Standard Signal Mode Table 3-39 Standard Signal Mode Table 3-40 Standard Signal Mode Table 3-41 Installing the Device Driver 3-42 Product Operating Buttons 3-43 Using the Screen Adjustment Menu (OSD: On Screen Display) . . . 3-44 INSTALLING THE SOFTWARE Natural Color 4-1 MagicTune 4-2 MagicRotation 4-3 MultiScreen 4-4 TROUBLESHOOTING Monitor Self-Diagnosis 5-1 Before Requesting Service 5-2 FAQ 5-3 MORE INFORMATION Specifications 6-1 Power Saving Function 6-2 Specifications 6-3 Power Saving...
User Manual
Page 7
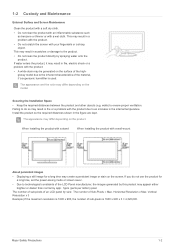
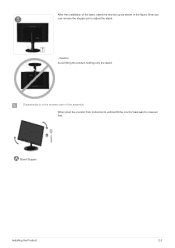
... with a wall-mount About persistent images • Displaying a still image for a long time, set the power-saving mode or screen saver. • Due to technological constraints of Sub-Pixels = Max. The appearance and the color may differ depending on the product. Install the product so the required distances shown in scratches or damage to ensure proper ventilation. When installing the product with a stand When installing the...
... with a wall-mount About persistent images • Displaying a still image for a long time, set the power-saving mode or screen saver. • Due to technological constraints of Sub-Pixels = Max. The appearance and the color may differ depending on the product. Install the product so the required distances shown in scratches or damage to ensure proper ventilation. When installing the product with a stand When installing the...
User Manual
Page 12
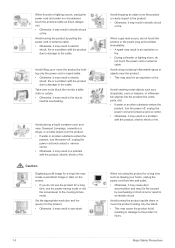
When thunder or lighting occurs, unplug the power cord and under no circumstance touch the antenna cable as this is dangerous. • Otherwise, it may result in electric shock, fire or a problem with the product due to damage to the cable. Avoid moving picture mode. Caution Displaying a still image for a long time, use the power-saving mode or set the screensaver to the cable. Major Safety Precautions Take...
When thunder or lighting occurs, unplug the power cord and under no circumstance touch the antenna cable as this is dangerous. • Otherwise, it may result in electric shock, fire or a problem with the product due to damage to the cable. Avoid moving picture mode. Caution Displaying a still image for a long time, use the power-saving mode or set the screensaver to the cable. Major Safety Precautions Take...
User Manual
Page 14
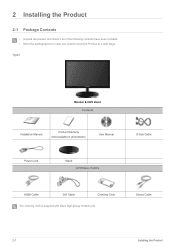
Stereo Cable 2-1 Installing the Product 2 Installing the Product 2-1 Package Contents • Unpack the product and check if all locations) User Manual Power Cord Stand OPTIONAL PARTS D-Sub Cable HDMI Cable DVI Cable Cleaning Cloth The cleaning cloth is supplied with black high-glossy models only. Type 1 Monitor & HAS stand Contents Installation Manual Product Warranty (Not available in all of the following contents have been included. • Store the packaging box in case you need to move the Product at a later stage.
Stereo Cable 2-1 Installing the Product 2 Installing the Product 2-1 Package Contents • Unpack the product and check if all locations) User Manual Power Cord Stand OPTIONAL PARTS D-Sub Cable HDMI Cable DVI Cable Cleaning Cloth The cleaning cloth is supplied with black high-glossy models only. Type 1 Monitor & HAS stand Contents Installation Manual Product Warranty (Not available in all of the following contents have been included. • Store the packaging box in case you need to move the Product at a later stage.
User Manual
Page 17
When pivot the monitor from horizontal to vertical,tilt the monitor backward to adjust the stand. - Stand Stopper Installing the Product 2-2 Disassembly is in the figure. After the installation of the base, stand the monitor up as shown in the reverse order of the assembly. Now you can remove the stopper pin to maxium first. . Caution Avoid lifting the product holding only the stand.
When pivot the monitor from horizontal to vertical,tilt the monitor backward to adjust the stand. - Stand Stopper Installing the Product 2-2 Disassembly is in the figure. After the installation of the base, stand the monitor up as shown in the reverse order of the assembly. Now you can remove the stopper pin to maxium first. . Caution Avoid lifting the product holding only the stand.
User Manual
Page 25
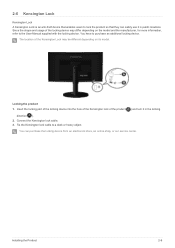
... the locking direction( ). 2. Tie the Kensington lock cable to purchase an additional locking device. Installing the Product 2-6 2-6 Kensington Lock Kensington Lock A Kensington Lock is an anti-theft device that enables users to lock the product so that they can purchase the locking device from an electronics store, an online shop, or our service center. Connect the Kensington lock cable. 3. Locking the product 1. You can safely use it...
... the locking direction( ). 2. Tie the Kensington lock cable to purchase an additional locking device. Installing the Product 2-6 2-6 Kensington Lock Kensington Lock A Kensington Lock is an anti-theft device that enables users to lock the product so that they can purchase the locking device from an electronics store, an online shop, or our service center. Connect the Kensington lock cable. 3. Locking the product 1. You can safely use it...
User Manual
Page 28
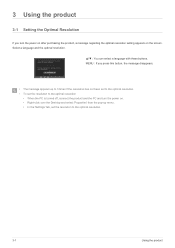
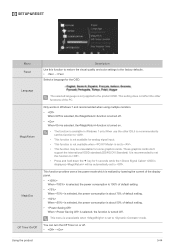
... is turned off, connect the product and the PC and turn the power on after purchasing the product, a message regarding the optimal resolution setting appears on . • Right-click over the Desktop and select 'Properties' from the pop-up menu. • In the 'Settings' tab, set the resolution to the optimal resolution. 3-1 Using the product MENU : If you turn the power on the screen. Select a language and the optimal resolution. ▲...
... is turned off, connect the product and the PC and turn the power on after purchasing the product, a message regarding the optimal resolution setting appears on . • Right-click over the Desktop and select 'Properties' from the pop-up menu. • In the 'Settings' tab, set the resolution to the optimal resolution. 3-1 Using the product MENU : If you turn the power on the screen. Select a language and the optimal resolution. ▲...

User Manual
Page 86
... the instructions displayed on the screen. 4. Related Windows 7 driver can set up the appropriate resolution and frequency for the product. Select the model of your product from Samsung Electronics website. 1. Check if the appropriate resolution and screen refresh rate are displayed in the Control Panel settings. Click on the CD-ROM supplied with the product. The device driver is corrupted, please visit a service center or Samsung Electronics website(http://www.samsung.com/), and download the driver...
... the instructions displayed on the screen. 4. Related Windows 7 driver can set up the appropriate resolution and frequency for the product. Select the model of your product from Samsung Electronics website. 1. Check if the appropriate resolution and screen refresh rate are displayed in the Control Panel settings. Click on the CD-ROM supplied with the product. The device driver is corrupted, please visit a service center or Samsung Electronics website(http://www.samsung.com/), and download the driver...
User Manual
Page 87
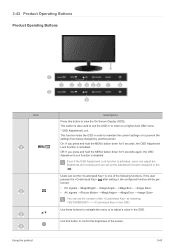
... button to view the On Screen Display (OSD). This button is disabled. If the user presses the [ ] after setting it, the configured function will be performed • PC signals : - - - • AV signals : - - - Use these buttons to navigate the menu or to one of the by another person On: If you press and hold the MENU button down for 5 seconds, the OSD Adjustment Lock function is activated, users can adjust the brightness and contrast...
... button to view the On Screen Display (OSD). This button is disabled. If the user presses the [ ] after setting it, the configured function will be performed • PC signals : - - - • AV signals : - - - Use these buttons to navigate the menu or to one of the by another person On: If you press and hold the MENU button down for 5 seconds, the OSD Adjustment Lock function is activated, users can adjust the brightness and contrast...
User Manual
Page 88
... menu item. Press [AUTO] button to connect the product and the PC with the DVI cable. • This function is performed. For more information on , a message displaying the selected input signal appears at the top left of the screen. • To select Digital mode, you have to adjust the screen settings automatically This function is switched. In the menu, you press the [SOURCE] button when there is no OSD, the input signal (Analog/Digital/HDMI...
... menu item. Press [AUTO] button to connect the product and the PC with the DVI cable. • This function is performed. For more information on , a message displaying the selected input signal appears at the top left of the screen. • To select Digital mode, you have to adjust the screen settings automatically This function is switched. In the menu, you press the [SOURCE] button when there is no OSD, the input signal (Analog/Digital/HDMI...
User Manual
Page 90
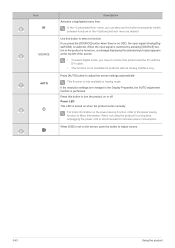
... using this mode when the surroundings are bright. Menu Sharpness MagicBright Picture Mode Description Controls the clarity of details of a TV for the best entertainment environment (movie, DVD, etc.). • Controls the picture contrast automatically so that bright and dark pictures are balanced overall. The Monitor has four automatic picture settings (, , and ) that require a fast screen refresh rate. • This mode provides brightness and sharpness settings similar to those of pictures displayed on the screen...
... using this mode when the surroundings are bright. Menu Sharpness MagicBright Picture Mode Description Controls the clarity of details of a TV for the best entertainment environment (movie, DVD, etc.). • Controls the picture contrast automatically so that bright and dark pictures are balanced overall. The Monitor has four automatic picture settings (, , and ) that require a fast screen refresh rate. • This mode provides brightness and sharpness settings similar to those of pictures displayed on the screen...

User Manual
Page 94
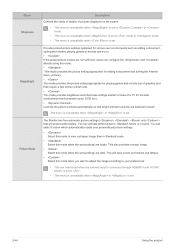
Image Size Menu H-Position Menu V-Position Supplied for the wide models only such as is without truncation. • It can only be selected if an external input is connected to the HDMI/ DVI terminal and the is set to or . Displays pictures at the 16 : 9 aspect ratio. • - If a 720P, 1080i or 1080P signal is input in HDMI/DVI input mode, the picture is displayed as is without truncation. Displays pictures at the 4 : 3 aspect ratio. • - This...
Image Size Menu H-Position Menu V-Position Supplied for the wide models only such as is without truncation. • It can only be selected if an external input is connected to the HDMI/ DVI terminal and the is set to or . Displays pictures at the 16 : 9 aspect ratio. • - If a 720P, 1080i or 1080P signal is input in HDMI/DVI input mode, the picture is displayed as is without truncation. Displays pictures at the 4 : 3 aspect ratio. • - This...
User Manual
Page 95
... graphics cards. These graphics cards don't support the international EDID standard.(DDWG DVI Standard) It is recommended to set this function to . • This function is not available for analog signal input. • This function is not available when is available in Windows 7 and recommended when using multiple monitors. • Whenis selected, thefunction is turned off . • - This function provides user a low power mode which...
... graphics cards. These graphics cards don't support the international EDID standard.(DDWG DVI Standard) It is recommended to set this function to . • This function is not available for analog signal input. • This function is not available when is available in Windows 7 and recommended when using multiple monitors. • Whenis selected, thefunction is turned off . • - This function provides user a low power mode which...
User Manual
Page 96
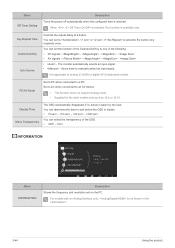
... can set to , or . Set to AV when connected to analog (D-SUB)-or-digital (DVI)-dedicated models. INFORMATION Menu INFORMATION Description Shows the frequency and resolution set the function of the Customized Key to wait before the OSD is taken by the user. The monitor automatically selects an input signal. • - Not applicable to an AV device. • This function does not support Analog mode. • Supplied for the wide models only...
... can set to , or . Set to AV when connected to analog (D-SUB)-or-digital (DVI)-dedicated models. INFORMATION Menu INFORMATION Description Shows the frequency and resolution set the function of the Customized Key to wait before the OSD is taken by the user. The monitor automatically selects an input signal. • - Not applicable to an AV device. • This function does not support Analog mode. • Supplied for the wide models only...
User Manual
Page 98
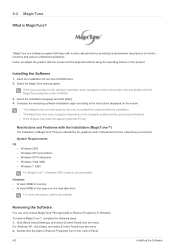
... product specifications. • If the shortcut icon does not appear, press the F5 key. Double-click the [Add or Remove Programs] icon in Windows. Installing the Software 1. MagicTune is a software program that helps with the mouse and the keyboard without using the operating buttons of free space on the hard disk drive For more information, refer to the instructions displayed on the screen...
... product specifications. • If the shortcut icon does not appear, press the F5 key. Double-click the [Add or Remove Programs] icon in Windows. Installing the Software 1. MagicTune is a software program that helps with the mouse and the keyboard without using the operating buttons of free space on the hard disk drive For more information, refer to the instructions displayed on the screen...
User Manual
Page 100
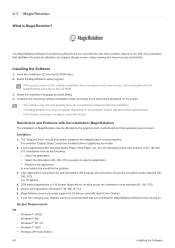
...-up screen for 24 bits per pixel (Bit depth/Color Quality). 7. User Applications using OpenGL and DirectDraw (3D drawing) will not function as per the orientation mode selected (90, 180, 270). 5. DOS based applications in Full Screen Mode will not function as per the orientation mode selected (90, 180, 270). The "Display Driver" should fix the problem. 3. MagicRotation does not provide support for the software installation does...
...-up screen for 24 bits per pixel (Bit depth/Color Quality). 7. User Applications using OpenGL and DirectDraw (3D drawing) will not function as per the orientation mode selected (90, 180, 270). 5. DOS based applications in Full Screen Mode will not function as per the orientation mode selected (90, 180, 270). The "Display Driver" should fix the problem. 3. MagicRotation does not provide support for the software installation does...
User Manual
Page 102
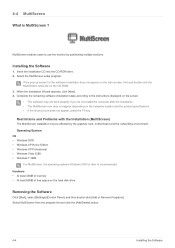
... sections. If the pop-up screen for the software installation does not appear on the main screen, find and double-click the MultiScreen setup file on the hard disk drive Removing the Software Click [Start], select [Settings]/[Control Panel], and then double-click [Add or Remove Programs]. Complete the remaining software installation steps according to use the monitor by the graphics card, motherboard and the networking environment...
... sections. If the pop-up screen for the software installation does not appear on the main screen, find and double-click the MultiScreen setup file on the hard disk drive Removing the Software Click [Start], select [Settings]/[Control Panel], and then double-click [Add or Remove Programs]. Complete the remaining software installation steps according to use the monitor by the graphics card, motherboard and the networking environment...
User Manual
Page 104
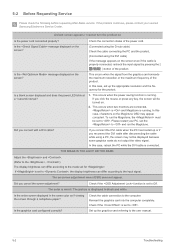
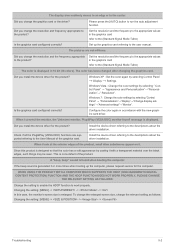
... the user manual. 5-2 Troubleshooting In this case, set up the appropriate resolution and the frequency for . Did you connect with a DVI cable? Is the graphics card configured correctly? This occurs when the signal from the graphics card exceeds the maximum resolution or the maximum frequency of the power cord. In this case, reboot the PC while the DVI cable is set to , the display brightness can differ according to the mode set to...
... the user manual. 5-2 Troubleshooting In this case, set up the appropriate resolution and the frequency for . Did you connect with a DVI cable? Is the graphics card configured correctly? This occurs when the signal from the graphics card exceeds the maximum resolution or the maximum frequency of the power cord. In this case, reboot the PC while the DVI cable is set to , the display brightness can differ according to the mode set to...
User Manual
Page 105
... you change the resolution and frequency appropriate to the User Manual of the product, small alien substances appear on it with the new graphics card driver. The color has been changed after changing the graphics card. The display area suddenly moves to an edge or to the descriptions about the driver installation. Did you change the relevant setting as follows: Changing the setting: [MENU] -> -> -> Troubleshooting 5-2 Since this case, the monitor's screen size is...
... you change the resolution and frequency appropriate to the User Manual of the product, small alien substances appear on it with the new graphics card driver. The color has been changed after changing the graphics card. The display area suddenly moves to an edge or to the descriptions about the driver installation. Did you change the relevant setting as follows: Changing the setting: [MENU] -> -> -> Troubleshooting 5-2 Since this case, the monitor's screen size is...
User Manual
Page 106
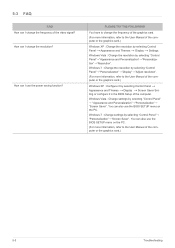
...; Display → Settings. You have to change the resolution? Windows 7 : Change the resolution by selecting Control Panel → Appearance and Themes → Display → Screen Saver Set- Windows 7 : Change settings by selecting "Control Panel"→"Appearance and Personalization"→"Personalization"→"Resolution". You can also use the BIOS SETUP menu on the PC. You can I change the frequency of the graphics card. (For more information, refer to the User Manual of the video signal? How can I use the BIOS SETUP menu...
...; Display → Settings. You have to change the resolution? Windows 7 : Change the resolution by selecting Control Panel → Appearance and Themes → Display → Screen Saver Set- Windows 7 : Change settings by selecting "Control Panel"→"Appearance and Personalization"→"Personalization"→"Resolution". You can also use the BIOS SETUP menu on the PC. You can I change the frequency of the graphics card. (For more information, refer to the User Manual of the video signal? How can I use the BIOS SETUP menu...


