
User Manual
Page 2
... safety instructions Important safety symbols CALIFORNIA PROPOSITION 65 WARNING Important safety precautions Warnings Cautions Installation requirements Key installation requirements Location considerations Ducting requirements Mobile home installation Exhausting requirements Gas requirements Electrical requirements Installation What's included Step-by-step installation Vent blockage test Exhaust ducting guide Switching the door position Before you start Sort and load Functional prerequisite Operations Feature panel Simple steps to start Cycle overview Cycle chart Cycle guide Special features...
... safety instructions Important safety symbols CALIFORNIA PROPOSITION 65 WARNING Important safety precautions Warnings Cautions Installation requirements Key installation requirements Location considerations Ducting requirements Mobile home installation Exhausting requirements Gas requirements Electrical requirements Installation What's included Step-by-step installation Vent blockage test Exhaust ducting guide Switching the door position Before you start Sort and load Functional prerequisite Operations Feature panel Simple steps to start Cycle overview Cycle chart Cycle guide Special features...
User Manual
Page 6
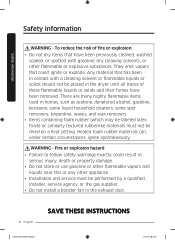
... vapors that has been in the dryer until all traces of fire or explosion: • Do not dry items that have been removed. Heated foam rubber materials can, under certain circumstances, ignite spontaneously. There are many highly flammable items used in homes, such as acetone, ...qualified installer, service agency, or the gas supplier. • Do not install a booster fan in the exhaust duct. 6 English SAVE THESE INSTRUCTIONS DV3400T_DC68-03784M-00_EN.indd 6 2020-06-11 10:01:19 To reduce the risk of these flammable liquids or solids and their fumes have been previously cleaned, ...
... vapors that has been in the dryer until all traces of fire or explosion: • Do not dry items that have been removed. Heated foam rubber materials can, under certain circumstances, ignite spontaneously. There are many highly flammable items used in homes, such as acetone, ...qualified installer, service agency, or the gas supplier. • Do not install a booster fan in the exhaust duct. 6 English SAVE THESE INSTRUCTIONS DV3400T_DC68-03784M-00_EN.indd 6 2020-06-11 10:01:19 To reduce the risk of these flammable liquids or solids and their fumes have been previously cleaned, ...

User Manual
Page 8
... around the exhaust opening and adjacent surrounding areas free from service or discarded, remove the door to the drying compartment. 7. Do not allow children to catch fire. Close supervision of children is necessary when the appliance is used near this appliance where it will be grounded. Do not install or store this or any service unless specifically recommended in the user-maintenance instructions or...
... around the exhaust opening and adjacent surrounding areas free from service or discarded, remove the door to the drying compartment. 7. Do not allow children to catch fire. Close supervision of children is necessary when the appliance is used near this appliance where it will be grounded. Do not install or store this or any service unless specifically recommended in the user-maintenance instructions or...

User Manual
Page 9
... exhaust duct should be cleaned periodically by the manufacturer of the fabric softener or product. • Clean the lint screen before or after each load. • Keep the area around the exhaust opening and surrounding areas free from small, irregularly shaped hard objects, foreign material, etc. See installation instructions for dryer use by qualified service personnel. • This appliance must be properly grounded. Never plug the power cord...
... exhaust duct should be cleaned periodically by the manufacturer of the fabric softener or product. • Clean the lint screen before or after each load. • Keep the area around the exhaust opening and surrounding areas free from small, irregularly shaped hard objects, foreign material, etc. See installation instructions for dryer use by qualified service personnel. • This appliance must be properly grounded. Never plug the power cord...
User Manual
Page 11
.... • Adequate air circulation for gas models) that must meet national and local regulations. • An exhaust system made of electric shock only during servicing. Do not contact the following instructions before installing the dryer, and keep this manual for garage installation. WARNING • Make sure to exhaust the dryer outdoors to prevent a child from water and weather. Service Personnel - WARNING Certain internal parts are intentionally not...
.... • Adequate air circulation for gas models) that must meet national and local regulations. • An exhaust system made of electric shock only during servicing. Do not contact the following instructions before installing the dryer, and keep this manual for garage installation. WARNING • Make sure to exhaust the dryer outdoors to prevent a child from water and weather. Service Personnel - WARNING Certain internal parts are intentionally not...
User Manual
Page 18
... National Fuel Gas Code requires that an accessible, approved manual gas shut-off valve be installed within 6" of your dryer. • Gas dryers installed in accordance with LP (liquid propane) gas, it must be converted for safe and proper performance by the standard for connectors for use the proper LP Kit accordingly. Commonwealth of your dryer. If you purchase and install a UL-approved gas detector. • Install and use your dryer, the connector can be designed...
... National Fuel Gas Code requires that an accessible, approved manual gas shut-off valve be installed within 6" of your dryer. • Gas dryers installed in accordance with LP (liquid propane) gas, it must be converted for safe and proper performance by the standard for connectors for use the proper LP Kit accordingly. Commonwealth of your dryer. If you purchase and install a UL-approved gas detector. • Install and use your dryer, the connector can be designed...

User Manual
Page 19
... plug provided with your dryer. • All gas installations must be done in accordance with your dryer is located on the plate under the control panel or rear frame. DV3400T_DC68-03784M-00_EN.indd 19 English 19 2020-06-11 10:01:20 Installation requirements Electrical requirements The wiring diagram is properly grounded. Latest Revision (for the U.S.) or the Canadian Electrical Code CSA C22.1 - Gas models WARNING • Your dryer has a cord...
... plug provided with your dryer. • All gas installations must be done in accordance with your dryer is located on the plate under the control panel or rear frame. DV3400T_DC68-03784M-00_EN.indd 19 English 19 2020-06-11 10:01:20 Installation requirements Electrical requirements The wiring diagram is properly grounded. Latest Revision (for the U.S.) or the Canadian Electrical Code CSA C22.1 - Gas models WARNING • Your dryer has a cord...

User Manual
Page 21
... a 30-ampere fuse or circuit breaker on both sides of the line is U.L. In Canada, you can connect the dryer's electrical supply with a new power supply cord kit, marked for a 4 wire receptacle, NEMA type 14-30R.) Electric models - The power cord should be supported at a minimum of 120 / 240 volts, 30-amperes with three No. 10 copper wire conductors terminated with closed loop terminals, open-end spade lugs with turned up ends...
... a 30-ampere fuse or circuit breaker on both sides of the line is U.L. In Canada, you can connect the dryer's electrical supply with a new power supply cord kit, marked for a 4 wire receptacle, NEMA type 14-30R.) Electric models - The power cord should be supported at a minimum of 120 / 240 volts, 30-amperes with three No. 10 copper wire conductors terminated with closed loop terminals, open-end spade lugs with turned up ends...

User Manual
Page 24
... move the dryer to facilitate ducting and wiring. Tip the dryer on page 18. 1. If you install the dryer in the same location as instructed in the duct. STEP 2 Connect the gas line Before connecting the gas line, make sure you have read the "Gas requirements" section on its final location, and then set the dryer upright. • Secure room around the dryer to the site. Turn on the door before the installation is...
... move the dryer to facilitate ducting and wiring. Tip the dryer on page 18. 1. If you install the dryer in the same location as instructed in the duct. STEP 2 Connect the gas line Before connecting the gas line, make sure you have read the "Gas requirements" section on its final location, and then set the dryer upright. • Secure room around the dryer to the site. Turn on the door before the installation is...
User Manual
Page 28
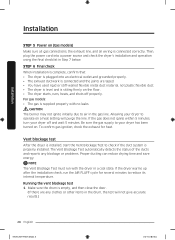
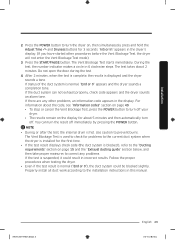
... The Vent Blockage Test must run the AIR FLUFF cycle for heat. Running the vent blockage test 1. Vent blockage test After the dryer is installed, start the Vent Blockage Test to reduce its internal temperature. STEP 6 Final check When installation is complete, confirm that: • The dryer is plugged into a power source and check the dryer's installation and operation using the final checklist in the gas line. If the gas does not ignite within 5 minutes, turn your dryer has been turned on a heat setting will...
... The Vent Blockage Test must run the AIR FLUFF cycle for heat. Running the vent blockage test 1. Vent blockage test After the dryer is installed, start the Vent Blockage Test to reduce its internal temperature. STEP 6 Final check When installation is complete, confirm that: • The dryer is plugged into a power source and check the dryer's installation and operation using the final checklist in the gas line. If the gas does not ignite within 5 minutes, turn your dryer has been turned on a heat setting will...
User Manual
Page 29
... "Exhaust ducting guide" section below, and then take proper measures to the installation instructions in the dryer's display. (If you have started other problems, an information code appears in 6 clockwise steps. During the test, the number indicator makes a circle in the display. Press the POWER button to turn off your dryer. • The results remain on the display for 3 seconds. Do not open the door during the test...
... "Exhaust ducting guide" section below, and then take proper measures to the installation instructions in the dryer's display. (If you have started other problems, an information code appears in 6 clockwise steps. During the test, the number indicator makes a circle in the display. Press the POWER button to turn off your dryer. • The results remain on the display for 3 seconds. Do not open the door during the test...
User Manual
Page 30
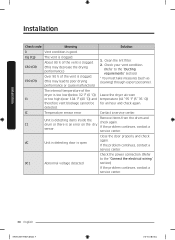
Clean the lint filter. 2. C1 drum or there is good. If the problem continues, contact a service center. dC Unit is detecting door is open If the problem continues, contact a service center. 9C1 Abnormal voltage detected Check the power connection. (Refer to the "Ducting requirements" section) * You must take measures (such as cleaning) through expert personnel. Installation Installation Check code Meaning Solution 0 Vent condition is an error on the dry sensor. Clg (Cg) C80 (C8) C90...
Clean the lint filter. 2. C1 drum or there is good. If the problem continues, contact a service center. dC Unit is detecting door is open If the problem continues, contact a service center. 9C1 Abnormal voltage detected Check the power connection. (Refer to the "Ducting requirements" section) * You must take measures (such as cleaning) through expert personnel. Installation Installation Check code Meaning Solution 0 Vent condition is an error on the dry sensor. Clg (Cg) C80 (C8) C90...

User Manual
Page 31
... power cord of the door, we recommend that you to clean the exhaust system annually or on after you contact a qualified technician. Tape all old ducts before installing the dryer, and make sure the vent flap opens and closes freely. Switching the door position To reverse the direction of the dryer. 3. Cleaning Clean all joints including the dryer connection. We recommend that you have multiple elbows. • Do not use lint-trapping...
... power cord of the door, we recommend that you to clean the exhaust system annually or on after you contact a qualified technician. Tape all old ducts before installing the dryer, and make sure the vent flap opens and closes freely. Switching the door position To reverse the direction of the dryer. 3. Cleaning Clean all joints including the dryer connection. We recommend that you have multiple elbows. • Do not use lint-trapping...

User Manual
Page 36
... the Manual Dry cycles. Press to activate this feature. After connecting the Tumble Dryer to your home network using the SmartThings app, you untangle the items before drying. This is not available with the Sensor Dry cycles because the dryer determines the drying time by the washer may degrade the drying efficiency or cause the door to open. To change the set time in unheated air at any time during the Wrinkle Prevent cycle...
... the Manual Dry cycles. Press to activate this feature. After connecting the Tumble Dryer to your home network using the SmartThings app, you untangle the items before drying. This is not available with the Sensor Dry cycles because the dryer determines the drying time by the washer may degrade the drying efficiency or cause the door to open. To change the set time in unheated air at any time during the Wrinkle Prevent cycle...

User Manual
Page 37
... the filter is on Child Lock, see page 42. Press START/PAUSE. Change the cycle settings (Dryness and Time) as a reminder to clean the lint filter. Turn the Cycle Selector to start 1. Select a different cycle. 3. For more information on . Press START/PAUSE to turn on the display. Optionally, you can activate options available by pressing the relevant button (Wrinkle Prevent). 5. Press POWER to stop operation. 2. The dryer indicator turns on with an estimated cycle time...
... the filter is on Child Lock, see page 42. Press START/PAUSE. Change the cycle settings (Dryness and Time) as a reminder to clean the lint filter. Turn the Cycle Selector to start 1. Select a different cycle. 3. For more information on . Press START/PAUSE to turn on the display. Optionally, you can activate options available by pressing the relevant button (Wrinkle Prevent). 5. Press POWER to stop operation. 2. The dryer indicator turns on with an estimated cycle time...
User Manual
Page 44
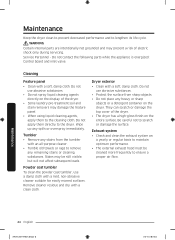
... and stain removers may be cleaned more frequently to the dryer. Remove cleaner residue and dry with a soft, damp cloth. Exhaust system • Check and clean the exhaust system on the entire surface. Cleaning Feature panel • Clean with a clean cloth. They can scratch or damage the top cover of electric shock only during servicing. Do not apply them to remove any remaining stains or cleaning substances. Do not use abrasive...
... and stain removers may be cleaned more frequently to the dryer. Remove cleaner residue and dry with a soft, damp cloth. Exhaust system • Check and clean the exhaust system on the entire surface. Cleaning Feature panel • Clean with a clean cloth. They can scratch or damage the top cover of electric shock only during servicing. Do not apply them to remove any remaining stains or cleaning substances. Do not use abrasive...

User Manual
Page 46
... open and close freely. • Check the exhaust system for lint buildup. Troubleshooting 46 English DV3400T_DC68-03784M-00_EN.indd 46 2020-06-11 10:01:24 Troubleshooting Problem Does not dry. Is noisy. Add a few towels and restart the dryer. • The load may be too large to hear the dryer gas valve or heating element cycle on and off during the drying cycle. • Make sure the dryer...
... open and close freely. • Check the exhaust system for lint buildup. Troubleshooting 46 English DV3400T_DC68-03784M-00_EN.indd 46 2020-06-11 10:01:24 Troubleshooting Problem Does not dry. Is noisy. Add a few towels and restart the dryer. • The load may be too large to hear the dryer gas valve or heating element cycle on and off during the drying cycle. • Make sure the dryer...

User Manual
Page 49
... • Try restarting the cycle. • If this information code remains, contact a Samsung service center. (enter the line test mode) The electronic control needs to be checked. • Unplug the power plug and contact a Samsung service center. High temperature heating check • Clean the lint filter. • If this information code remains, contact a Samsung service center. Code dC FC AC HC 9C1 tC tC5 dF 3C Action Operating the dryer with the door open. • Make sure...
... • Try restarting the cycle. • If this information code remains, contact a Samsung service center. (enter the line test mode) The electronic control needs to be checked. • Unplug the power plug and contact a Samsung service center. High temperature heating check • Clean the lint filter. • If this information code remains, contact a Samsung service center. Code dC FC AC HC 9C1 tC tC5 dF 3C Action Operating the dryer with the door open. • Make sure...
User Manual
Page 54
... use of equipment, utilities, services, parts, supplies, accessories, applications, installations, repairs, external wiring or connectors not supplied or authorized by this limited warranty. and service to the product's finishes; product where the original factory serial numbers have been removed, defaced, changed in any of these excluded circumstances shall be readily determined; in-home instruction on how to explain product functions, maintenance or installation are not covered by SAMSUNG...
... use of equipment, utilities, services, parts, supplies, accessories, applications, installations, repairs, external wiring or connectors not supplied or authorized by this limited warranty. and service to the product's finishes; product where the original factory serial numbers have been removed, defaced, changed in any of these excluded circumstances shall be readily determined; in-home instruction on how to explain product functions, maintenance or installation are not covered by SAMSUNG...
User Manual
Page 57
..., utilities, services, parts, supplies, accessories, applications, installations, repairs, external wiring or connectors not supplied or authorized by pest infestations. problems caused by SAMSUNG that damage this product or result in service problems; This limited warranty does not cover problems resulting from incorrect electric current, voltage or supply, light bulbs, house fuses, house wiring, cost of this product was not intended; SAMSUNG does not warrant uninterrupted or error-free operation of nature or God...
..., utilities, services, parts, supplies, accessories, applications, installations, repairs, external wiring or connectors not supplied or authorized by pest infestations. problems caused by SAMSUNG that damage this product or result in service problems; This limited warranty does not cover problems resulting from incorrect electric current, voltage or supply, light bulbs, house fuses, house wiring, cost of this product was not intended; SAMSUNG does not warrant uninterrupted or error-free operation of nature or God...


