

User Manual (user Manual) (ver.1.0) (English)
Page 4
...17 Connection to an Audio System (Dolby digital, MPEG2 or DTS Amplifier 18 Connecting a Power Cord & Auto Setup ...19 Chapter 3: Initial Setup Selecting a Menu Language ...20 Setting the Clock ...21 Setting the Clock Automatically...21 Setting the Clock Manually ...23 Memorizing the Channel ...24 Selecting the Video Signal-source ...24 Storing Channels in Memory (Automatic Method 25 Adding and Erasing Channels (Manual Method 25 Selecting the RF Output Channel ...26 Setting the Front Panel Display ...27 Setting the Power Off Automatically ...28 Chapter 4: DVD Operations Playing a Disc ...29...
...17 Connection to an Audio System (Dolby digital, MPEG2 or DTS Amplifier 18 Connecting a Power Cord & Auto Setup ...19 Chapter 3: Initial Setup Selecting a Menu Language ...20 Setting the Clock ...21 Setting the Clock Automatically...21 Setting the Clock Manually ...23 Memorizing the Channel ...24 Selecting the Video Signal-source ...24 Storing Channels in Memory (Automatic Method 25 Adding and Erasing Channels (Manual Method 25 Selecting the RF Output Channel ...26 Setting the Front Panel Display ...27 Setting the Power Off Automatically ...28 Chapter 4: DVD Operations Playing a Disc ...29...

User Manual (user Manual) (ver.1.0) (English)
Page 5
... Playback ...51 Using the Setup Menu ...53 Setting Up the Language Features ...54 Setting Up the Audio Options ...56 Setting Up the Display Options ...58 Setting Up the Parental Control ...60 Chapter 5: VCR Operations Inserting and Ejecting a Video Cassette Tape 63 Playing a Pre-Recorded Video Cassette Tape 64 Special VCR Playback Features ...65 Using Automatic Tracking ...66 Selecting the Cassette Type ...67 Setting the Auto Play ...68 Setting the Auto Repeat ...69 Using the Tape Counter ...70 Using the Assemble Edit Function ...71 Selecting the Audio Output Mode...
... Playback ...51 Using the Setup Menu ...53 Setting Up the Language Features ...54 Setting Up the Audio Options ...56 Setting Up the Display Options ...58 Setting Up the Parental Control ...60 Chapter 5: VCR Operations Inserting and Ejecting a Video Cassette Tape 63 Playing a Pre-Recorded Video Cassette Tape 64 Special VCR Playback Features ...65 Using Automatic Tracking ...66 Selecting the Cassette Type ...67 Setting the Auto Play ...68 Setting the Auto Repeat ...69 Using the Tape Counter ...70 Using the Assemble Edit Function ...71 Selecting the Audio Output Mode...

User Manual (user Manual) (ver.1.0) (English)
Page 6
... the VCR. ■ Auto Setup instantly finds the time and runs channel search. ■ RF inputs and outputs for home and other intellectual property rights. Use of TVs available. ■ Composite, S-Video, and Component Video outputs. ■ Remote control provides full operation on recording conditions. - Non-finalizing DVD-RW, -R, DVD+RW, and +R disc. ENG-6 Reverse engineering or disassembly is prohibited. Chapter 1 SETUP General Features DVD-VCR Features ■ Perfect compatibility to play back DVDs, audio CDs or VHS...
... the VCR. ■ Auto Setup instantly finds the time and runs channel search. ■ RF inputs and outputs for home and other intellectual property rights. Use of TVs available. ■ Composite, S-Video, and Component Video outputs. ■ Remote control provides full operation on recording conditions. - Non-finalizing DVD-RW, -R, DVD+RW, and +R disc. ENG-6 Reverse engineering or disassembly is prohibited. Chapter 1 SETUP General Features DVD-VCR Features ■ Perfect compatibility to play back DVDs, audio CDs or VHS...

User Manual (user Manual) (ver.1.0) (English)
Page 9
... coaxial digital audio cable to connect to a compatible Dolby Digital receiver. - If Component (Interlace Scan) Video Output is selected in jacks. Use these jacks if you have a TV with Component Video in the Alt Video Out menu or by using the P.SCAN button on how to use the Alt Video Out menu. SETUP Rear Panel Ø ∏ " 1 AUDIO OUT Connect to the Audio input jacks of your external device. 5 RF IN (FROM ANT.) Connect the RF Antenna cable to your DVD-VCR 6 S-VIDEO OUT Use the S-Video cable to connect this...
... coaxial digital audio cable to connect to a compatible Dolby Digital receiver. - If Component (Interlace Scan) Video Output is selected in jacks. Use these jacks if you have a TV with Component Video in the Alt Video Out menu or by using the P.SCAN button on how to use the Alt Video Out menu. SETUP Rear Panel Ø ∏ " 1 AUDIO OUT Connect to the Audio input jacks of your external device. 5 RF IN (FROM ANT.) Connect the RF Antenna cable to your DVD-VCR 6 S-VIDEO OUT Use the S-Video cable to connect this...

User Manual (user Manual) (ver.1.0) (English)
Page 10
... a time. (DVD and ¸ VCR) Use to fast forward a video tape. (VCR) Use to select a external signal source. ˛ 21 CH/TRK button Use to change channels. ◊ (TV) Use to play . button Use to advance play one ¿ frame at ı variable speeds. (VCR) 18 AUDIO/TV MUTE button Use this to access various audio functions on a disc.(DVD mode) ˜ This operates as a toggle switch. 12 REC button Use to begin recording. (VCR) Ò 13 CLEAR button Ú Use to remove menus or Æ status displays from...
... a time. (DVD and ¸ VCR) Use to fast forward a video tape. (VCR) Use to select a external signal source. ˛ 21 CH/TRK button Use to change channels. ◊ (TV) Use to play . button Use to advance play one ¿ frame at ı variable speeds. (VCR) 18 AUDIO/TV MUTE button Use this to access various audio functions on a disc.(DVD mode) ˜ This operates as a toggle switch. 12 REC button Use to begin recording. (VCR) Ò 13 CLEAR button Ú Use to remove menus or Æ status displays from...

User Manual (user Manual) (ver.1.0) (English)
Page 16
White Red Green Audio Cable Blue Red Component Cable (not included) Red Red White Blue Green 4 Press the input selector on your TV remote control until the Progressive Scan mode prompt screen appears. If Progressive Scan is "Progressive Scan"? Progressive scan has twice as many scanning lines as the interlace output method. CONNECTIONS Connection to a TV (Progressive) 1 Using component video cables (not included), connect the COMPONENT VIDEO OUT terminal on the rear of the DVD-VCR to the COMPONENT IN terminal of your TV. Note What is supported, follow...
White Red Green Audio Cable Blue Red Component Cable (not included) Red Red White Blue Green 4 Press the input selector on your TV remote control until the Progressive Scan mode prompt screen appears. If Progressive Scan is "Progressive Scan"? Progressive scan has twice as many scanning lines as the interlace output method. CONNECTIONS Connection to a TV (Progressive) 1 Using component video cables (not included), connect the COMPONENT VIDEO OUT terminal on the rear of the DVD-VCR to the COMPONENT IN terminal of your TV. Note What is supported, follow...

User Manual (user Manual) (ver.1.0) (English)
Page 26
ENG-26 INITIAL SETUP Selecting the RF Output Channel Use this feature if DVD-VCR is connected to TV using RF antenna cable. 1 Press the MENU button. 2 Press the .../† buttons to select Setup, then press the √ or ENTER button. 3 Press the .../† buttons to select Channel, then press the √ or ENTER button. 4 Press the .../† buttons to select RF Output CH, then press the √ or ENTER button to select 3CH or 4CH. 5 Press the MENU button to exit.
ENG-26 INITIAL SETUP Selecting the RF Output Channel Use this feature if DVD-VCR is connected to TV using RF antenna cable. 1 Press the MENU button. 2 Press the .../† buttons to select Setup, then press the √ or ENTER button. 3 Press the .../† buttons to select Channel, then press the √ or ENTER button. 4 Press the .../† buttons to select RF Output CH, then press the √ or ENTER button to select 3CH or 4CH. 5 Press the MENU button to exit.

User Manual (user Manual) (ver.1.0) (English)
Page 79
.... ENG-79 button. Power On your DVD-VCR. - No Ch 1 07 2 3 4 5 6 7 Start End Date Speed : / : / : / : / : / : / : / 4 Set Time/Date/Speed Repeat Step 3 above to select PROG, then press the √ or ENTER button. VCR OPERATIONS Using a Timer Recording Insert a blank videotape into the VCR deck. To Begin Setting the Timer Recording, - With the Timer Recording function, you can select external input directly (L1 or L2) using INPUT SEL. It can be displayed simply by pressing the TIMER button. 3 Select Channel Number Press the...
.... ENG-79 button. Power On your DVD-VCR. - No Ch 1 07 2 3 4 5 6 7 Start End Date Speed : / : / : / : / : / : / : / 4 Set Time/Date/Speed Repeat Step 3 above to select PROG, then press the √ or ENTER button. VCR OPERATIONS Using a Timer Recording Insert a blank videotape into the VCR deck. To Begin Setting the Timer Recording, - With the Timer Recording function, you can select external input directly (L1 or L2) using INPUT SEL. It can be displayed simply by pressing the TIMER button. 3 Select Channel Number Press the...

User Manual (user Manual) (ver.1.0) (English)
Page 80
... long enough for a timer recording in the SP mode. Then the DVD-VCR will automatically turn the power off. Recording will automatically change from SP mode to record TV programs on and begin recording at the same time every week. FR] : Use this to record TV programs on the same channel at the time you set the recording tape speed to finish setting the timer recording. To stop the timer recording, press the POWER button or press the (Stop) button twice.
... long enough for a timer recording in the SP mode. Then the DVD-VCR will automatically turn the power off. Recording will automatically change from SP mode to record TV programs on and begin recording at the same time every week. FR] : Use this to record TV programs on the same channel at the time you set the recording tape speed to finish setting the timer recording. To stop the timer recording, press the POWER button or press the (Stop) button twice.

User Manual (user Manual) (ver.1.0) (English)
Page 82
... available at this time because: 1. The screen ratio • The Screen Ratio is fixed on screen. No audio. • Make sure you are met.: 1) The DVD-VCR is connected with the proper Amplifier 2) The disc is recorded with the remote control. • Check the batteries in the remote control. A clear description of your DVDs. The icon appears on your DVD-VCR - The DVD's software doesn't support the feature (e.g., angles). 3. The model and serial number on the outside...
... available at this time because: 1. The screen ratio • The Screen Ratio is fixed on screen. No audio. • Make sure you are met.: 1) The DVD-VCR is connected with the proper Amplifier 2) The disc is recorded with the remote control. • Check the batteries in the remote control. A clear description of your DVDs. The icon appears on your DVD-VCR - The DVD's software doesn't support the feature (e.g., angles). 3. The model and serial number on the outside...

User Manual (user Manual) (ver.1.0) (English)
Page 3
... TO OPERATE PLAYER CORRECTLY AS INSTRUCTED. This product satisfies FCC regulations when shielded cables and connectors are designed to wide slot, fully insert. The user is connected. • Consult the dealer or an experienced radio/TV technician for help. To prevent electromagnetic interference with the instructions, may result in a residential installation. SAFETY INSTRUCTIONS Precautions RISK OF ELECTRIC SHOCK DO NOT OPEN...
... TO OPERATE PLAYER CORRECTLY AS INSTRUCTED. This product satisfies FCC regulations when shielded cables and connectors are designed to wide slot, fully insert. The user is connected. • Consult the dealer or an experienced radio/TV technician for help. To prevent electromagnetic interference with the instructions, may result in a residential installation. SAFETY INSTRUCTIONS Precautions RISK OF ELECTRIC SHOCK DO NOT OPEN...

User Manual (user Manual) (ver.1.0) (English)
Page 6
... Audio System ...19 Connection to an Audio System (2 Channel Amplifier 19 Connection to an Audio System (Dolby digital, MPEG2 or DTS Amplifier 20 Connecting a Power Cord & Auto Setup ...21 Chapter 3: Initial Setup Selecting a Menu Language ...22 Setting the Clock ...23 Setting the Clock Automatically...23 Setting the Clock Manually ...25 Memorizing the Channel ...26 Selecting the Video Signal-source ...26 Storing Channels in Memory (Automatic Method 27 Adding and Erasing Channels (Manual Method 27 Selecting the RF Output Channel ...28 Setting the Front Panel Display ...29 Setting the Power...
... Audio System ...19 Connection to an Audio System (2 Channel Amplifier 19 Connection to an Audio System (Dolby digital, MPEG2 or DTS Amplifier 20 Connecting a Power Cord & Auto Setup ...21 Chapter 3: Initial Setup Selecting a Menu Language ...22 Setting the Clock ...23 Setting the Clock Automatically...23 Setting the Clock Manually ...25 Memorizing the Channel ...26 Selecting the Video Signal-source ...26 Storing Channels in Memory (Automatic Method 27 Adding and Erasing Channels (Manual Method 27 Selecting the RF Output Channel ...28 Setting the Front Panel Display ...29 Setting the Power...

User Manual (user Manual) (ver.1.0) (English)
Page 7
... Playback ...53 Using the Setup Menu ...55 Setting Up the Language Features ...56 Setting Up the Audio Options ...58 Setting Up the Display Options ...60 Setting Up the Parental Control ...62 Chapter 5: VCR Operations Inserting and Ejecting a Video Cassette Tape 65 Playing a Pre-Recorded Video Cassette Tape 66 Special VCR Playback Features ...67 Using Automatic Tracking ...68 Selecting the Cassette Type ...69 Setting the Auto Play ...70 Setting the Auto Repeat ...71 Using the Tape Counter ...72 Using the Assemble Edit Function ...73 Selecting the Audio Output Mode...
... Playback ...53 Using the Setup Menu ...55 Setting Up the Language Features ...56 Setting Up the Audio Options ...58 Setting Up the Display Options ...60 Setting Up the Parental Control ...62 Chapter 5: VCR Operations Inserting and Ejecting a Video Cassette Tape 65 Playing a Pre-Recorded Video Cassette Tape 66 Special VCR Playback Features ...67 Using Automatic Tracking ...68 Selecting the Cassette Type ...69 Setting the Auto Play ...70 Setting the Auto Repeat ...71 Using the Tape Counter ...72 Using the Assemble Edit Function ...73 Selecting the Audio Output Mode...

User Manual (user Manual) (ver.1.0) (English)
Page 8
... standard resolution. Note I Playback of this , you should only connect your DVDVCR directly to your TV, not to play audio only, not graphics. - IF THERE ARE QUESTIONS REGARDING YOUR TV SET COMPATIBILITY WITH THIS MODEL 525p DVDVCR, PLEASE CONTACT SAMSUNG'S CUSTOMER SERVICE CENTER." - Non-finalizing DVD-RW, -R, DVD+RW, and +R disc. Chapter 1 SETUP General Features DVD-VCR Features I DTS digital output for DTS-enhanced DVDs. I Auto Setup instantly finds the time and runs channel search. I Enjoy a DVD...
... standard resolution. Note I Playback of this , you should only connect your DVDVCR directly to your TV, not to play audio only, not graphics. - IF THERE ARE QUESTIONS REGARDING YOUR TV SET COMPATIBILITY WITH THIS MODEL 525p DVDVCR, PLEASE CONTACT SAMSUNG'S CUSTOMER SERVICE CENTER." - Non-finalizing DVD-RW, -R, DVD+RW, and +R disc. Chapter 1 SETUP General Features DVD-VCR Features I DTS digital output for DTS-enhanced DVDs. I Auto Setup instantly finds the time and runs channel search. I Enjoy a DVD...
User Manual (user Manual) (ver.1.0) (English)
Page 12
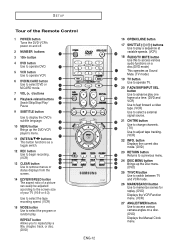
...DVD-VCR ˝ player's menu. Ô 11 ENTER buttons This button functions as Sound Mute. (TV mode) ¯ 19 TV button Use to select the program or random play a sequence at a time. (DVD and ¸ VCR) Use to fast forward a video tape. (VCR) Use to select a external signal source. ˛ 21 CH/TRK button Use to change channels. ◊ (TV) Use to a previous menu. ≠ 24 DISC MENU button - SETUP Tour of the Remote Control 1 POWER button Turns the DVD-VCR's power on and off. 2 NUMBER buttons Œ 3 100+ button 4 DVD button Use to operate DVD. ´ 5 VCR...
...DVD-VCR ˝ player's menu. Ô 11 ENTER buttons This button functions as Sound Mute. (TV mode) ¯ 19 TV button Use to select the program or random play a sequence at a time. (DVD and ¸ VCR) Use to fast forward a video tape. (VCR) Use to select a external signal source. ˛ 21 CH/TRK button Use to change channels. ◊ (TV) Use to a previous menu. ≠ 24 DISC MENU button - SETUP Tour of the Remote Control 1 POWER button Turns the DVD-VCR's power on and off. 2 NUMBER buttons Œ 3 100+ button 4 DVD button Use to operate DVD. ´ 5 VCR...

User Manual (user Manual) (ver.1.0) (English)
Page 18
... panel until the Component signal from the illustration above. Note What is supported, follow the TV User's Manual regarding Progressive Scan settings in the TV's menu system. - Turn on the DVD-VCR and TV. 3 With the unit in stop mode, set the Alt video output to the AUDIO (red and white) IN terminals of the DVD-VCR to Component: Progressive in the Display Setup menu (see the progressive video output, - Then press ENTER and progressive will be output. CONNECTIONS Connection to a TV (Progressive) 1 Using component video cables (not included), connect...
... panel until the Component signal from the illustration above. Note What is supported, follow the TV User's Manual regarding Progressive Scan settings in the TV's menu system. - Turn on the DVD-VCR and TV. 3 With the unit in stop mode, set the Alt video output to the AUDIO (red and white) IN terminals of the DVD-VCR to Component: Progressive in the Display Setup menu (see the progressive video output, - Then press ENTER and progressive will be output. CONNECTIONS Connection to a TV (Progressive) 1 Using component video cables (not included), connect...

User Manual (user Manual) (ver.1.0) (English)
Page 28
ENG-28 INITIAL SETUP Selecting the RF Output Channel Use this feature if DVD-VCR is connected to TV using RF antenna cable. 1 Press the MENU button. 2 Press the .../† buttons to select Setup, then press the √ or ENTER button. 3 Press the .../† buttons to select Channel, then press the √ or ENTER button. 4 Press the .../† buttons to select RF Output CH, then press the √ or ENTER button to select 3CH or 4CH. 5 Press the MENU button to exit.
ENG-28 INITIAL SETUP Selecting the RF Output Channel Use this feature if DVD-VCR is connected to TV using RF antenna cable. 1 Press the MENU button. 2 Press the .../† buttons to select Setup, then press the √ or ENTER button. 3 Press the .../† buttons to select Channel, then press the √ or ENTER button. 4 Press the .../† buttons to select RF Output CH, then press the √ or ENTER button to select 3CH or 4CH. 5 Press the MENU button to exit.

User Manual (user Manual) (ver.1.0) (English)
Page 81
... displayed simply by pressing the TIMER button. 3 Select Channel Number Press the √ button, then press the .../† buttons to leave the Record Safety Tab intact. VCR OPERATIONS Using a Timer Recording Insert a blank videotape into the VCR deck. Date can select external input directly (L1 or L2) using INPUT SEL. Power On your DVD-VCR. - Press the √ button to move to set for one time, daily or weekly recording. No Ch 1 07 2 3 4 5 6 7 Start End Date Speed : / : / : / : / : / : / : / 4 Set Time...
... displayed simply by pressing the TIMER button. 3 Select Channel Number Press the √ button, then press the .../† buttons to leave the Record Safety Tab intact. VCR OPERATIONS Using a Timer Recording Insert a blank videotape into the VCR deck. Date can select external input directly (L1 or L2) using INPUT SEL. Power On your DVD-VCR. - Press the √ button to move to set for one time, daily or weekly recording. No Ch 1 07 2 3 4 5 6 7 Start End Date Speed : / : / : / : / : / : / : / 4 Set Time...

User Manual (user Manual) (ver.1.0) (English)
Page 82
... SP mode, set . Recording will automatically turn the power off. FR] : Use this to record TV programs on the same channel at the same time every week. To stop the timer recording, press the POWER button or press the (Stop) button twice. Daily [MO - Stop the DVD-VCR or turn on and begin recording at the time you set the recording tape speed to "Auto". ENG-82 Daily/Weekly Date Programming Weekly [sun's~sat's]: Use this to record TV programs...
... SP mode, set . Recording will automatically turn the power off. FR] : Use this to record TV programs on the same channel at the same time every week. To stop the timer recording, press the POWER button or press the (Stop) button twice. Daily [MO - Stop the DVD-VCR or turn on and begin recording at the time you set the recording tape speed to "Auto". ENG-82 Daily/Weekly Date Programming Weekly [sun's~sat's]: Use this to record TV programs...

User Manual (user Manual) (ver.1.0) (English)
Page 84
... functions selected in the Setup Menu may need replacing. • Operate the remote control at this time because: 1. You've requested a title or chapter number or search time that the disc is installed with the label side facing up. • Check the region number of the DVD. 5.1 channel sound is not being played has the "5.1 ch" mark on the rear of the problem Then contact your audio system is connected and working properly. • In a DVD Setup Menu...
... functions selected in the Setup Menu may need replacing. • Operate the remote control at this time because: 1. You've requested a title or chapter number or search time that the disc is installed with the label side facing up. • Check the region number of the DVD. 5.1 channel sound is not being played has the "5.1 ch" mark on the rear of the problem Then contact your audio system is connected and working properly. • In a DVD Setup Menu...


