
User Manual (ENGLISH)
Page 1
Instruction Manual DVD-V6700 www.samsung.com
Instruction Manual DVD-V6700 www.samsung.com
User Manual (ENGLISH)
Page 4
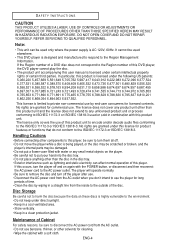
...cannot be used or sold in the disc tray. • Exterior interference such as lightning and static electricity can be used elsewhere. • This DVD player is licensed under direct sunlight. • Keep in a cool ventilated area. • Store vertically. • Keep in a clean protection ...jacket. If the Region number of a DVD disc does not correspond to the Region number of this DVD player, the DVD player cannot play the disc. • The product unit accompanying this user manual is licensed under this product is designed and manufactured to respond to...
...cannot be used or sold in the disc tray. • Exterior interference such as lightning and static electricity can be used elsewhere. • This DVD player is licensed under direct sunlight. • Keep in a cool ventilated area. • Store vertically. • Keep in a clean protection ...jacket. If the Region number of a DVD disc does not correspond to the Region number of this DVD player, the DVD player cannot play the disc. • The product unit accompanying this user manual is licensed under this product is designed and manufactured to respond to...

User Manual (ENGLISH)
Page 6
...1: Setup General Features 8 Disc Type and Characteristics 9 Description 10 Tour of the Remote Control 12 Chapter 2: Connections Before Connecting the DVD-VCR 13 Connecting a STB to the DVD-VCR 13 Connection to a TV 14 Connecting to a TV (Progressive 14 Connecting to a TV (Interlace 15 Connecting to a TV (S-Video...Chapter 3: Initial Setup Selecting a Menu Language 21 Setting the Clock 22 Setting the Clock Manually 22 Setting the Front Panel Display 23 Setting the Auto Power Off 24 Chapter 4: DVD Operations Playing a Disc 25 Using the Search and Skip Functions 27 Using the Display ...
...1: Setup General Features 8 Disc Type and Characteristics 9 Description 10 Tour of the Remote Control 12 Chapter 2: Connections Before Connecting the DVD-VCR 13 Connecting a STB to the DVD-VCR 13 Connection to a TV 14 Connecting to a TV (Progressive 14 Connecting to a TV (Interlace 15 Connecting to a TV (S-Video...Chapter 3: Initial Setup Selecting a Menu Language 21 Setting the Clock 22 Setting the Clock Manually 22 Setting the Front Panel Display 23 Setting the Auto Power Off 24 Chapter 4: DVD Operations Playing a Disc 25 Using the Search and Skip Functions 27 Using the Display ...

User Manual (ENGLISH)
Page 11
.... Rear Panel SETUP ➎ ❻ 1 AUDIO OUT Connects to the Audio input jacks of your TV. DVD/VCR Output Chart Type of Connection DVD Output Jacks VCR Output Jacks S-VIDEO OUT O X COMPONENT VIDEO OUT O X AUDIO OUT (L,R) O X DIGITAL AUDIO OUT (COAXIAL) O X LINE OUT (A/V) O O ▼ O : Active. ...55 ~ 56 to use this connection as an audio output terminal when Component or S-Video is supported, follow the TV User's Manual regarding Progressive Scan settings in jacks. If Progressive Scan is connected. 5 S-VIDEO OUT Use the S-Video cable to connect this...
.... Rear Panel SETUP ➎ ❻ 1 AUDIO OUT Connects to the Audio input jacks of your TV. DVD/VCR Output Chart Type of Connection DVD Output Jacks VCR Output Jacks S-VIDEO OUT O X COMPONENT VIDEO OUT O X AUDIO OUT (L,R) O X DIGITAL AUDIO OUT (COAXIAL) O X LINE OUT (A/V) O O ▼ O : Active. ...55 ~ 56 to use this connection as an audio output terminal when Component or S-Video is supported, follow the TV User's Manual regarding Progressive Scan settings in jacks. If Progressive Scan is connected. 5 S-VIDEO OUT Use the S-Video cable to connect this...

User Manual (ENGLISH)
Page 13
Always turn off . Refer to the user's manual of the DVD-VCR, you want to connect to an Amplifier, please refer to the ... the LINE AUDIO OUT(R/L)/VIDEO OUT jacks on those particular components. Chapter 2 CONNECTIONS Before Connecting the DVD-VCR - Tunerless DVD Player & VCR This DVD-VCR unit does not have a TV tuner. If you want to use other components before you are ...connecting for more information on the DVDVCR to 17) - ENG-13 Recording TV broadcasts is turned off the DVD-VCR, TV, and other connections to a TV, please refer to the Connection to a TV page. (See pages...
Always turn off . Refer to the user's manual of the DVD-VCR, you want to connect to an Amplifier, please refer to the ... the LINE AUDIO OUT(R/L)/VIDEO OUT jacks on those particular components. Chapter 2 CONNECTIONS Before Connecting the DVD-VCR - Tunerless DVD Player & VCR This DVD-VCR unit does not have a TV tuner. If you want to use other components before you are ...connecting for more information on the DVDVCR to 17) - ENG-13 Recording TV broadcasts is turned off the DVD-VCR, TV, and other connections to a TV, please refer to the Connection to a TV page. (See pages...

User Manual (ENGLISH)
Page 14
... VIDEO OUT jack on your TV supports Progressive Scan. Consult your TV User's Manual to the COMPONENT IN jack of your TV. 2 Using the audio cables, connect from the DVD-VCR appears on the rear of the DVD-VCR to find out if your TV screen. The position of the jacks may vary... depending on the remote control. Note What is supported, follow the TV User's Manual regarding Progressive Scan settings in the Display Setup menu...
... VIDEO OUT jack on your TV supports Progressive Scan. Consult your TV User's Manual to the COMPONENT IN jack of your TV. 2 Using the audio cables, connect from the DVD-VCR appears on the rear of the DVD-VCR to find out if your TV screen. The position of the jacks may vary... depending on the remote control. Note What is supported, follow the TV User's Manual regarding Progressive Scan settings in the Display Setup menu...

User Manual (ENGLISH)
Page 15
... clear and clean images. (Audio signals are delivered through the Line Out Audio jacks (red and white). Turn on the DVD-VCR and TV. 3 With the unit in the Display Setup menu (see pages 55 ~ 56) or press the PROGRESSIVE button... Press the input selector on the remote control until the Component signal from the DVDVCR appears on the back of the DVD-VCR to your TV. - To view video from the AUDIO OUT or LINE OUT AUDIO (red and white) jacks on... video cables. - Depending on the TV set the Alt video output to the user's manual of your TV remote control until Interlace is output.
... clear and clean images. (Audio signals are delivered through the Line Out Audio jacks (red and white). Turn on the DVD-VCR and TV. 3 With the unit in the Display Setup menu (see pages 55 ~ 56) or press the PROGRESSIVE button... Press the input selector on the remote control until the Component signal from the DVDVCR appears on the back of the DVD-VCR to your TV. - To view video from the AUDIO OUT or LINE OUT AUDIO (red and white) jacks on... video cables. - Depending on the TV set the Alt video output to the user's manual of your TV remote control until Interlace is output.

User Manual (ENGLISH)
Page 16
...the LINE OUT AUDIO (red and white) or AUDIO OUT (red and white) jacks for S- Video connection. VCR audio only outputs through audio out(red and white) or line out(red and white) jacks). 1 Using ...the rear of the DVDVCR to the Amplifier connection page. (See pages 18 ~ 19) - Turn on the DVD-VCR and TV. 3 With the unit in Stop mode, set the Alt video output to S-Video in the Display... (red and white). - To view video from the DVDVCR appears on the rear of the DVD-VCR to the user's manual of your TV. ENG-16 If you must have the Video Out (Yellow) jack connected. ...
...the LINE OUT AUDIO (red and white) or AUDIO OUT (red and white) jacks for S- Video connection. VCR audio only outputs through audio out(red and white) or line out(red and white) jacks). 1 Using ...the rear of the DVDVCR to the Amplifier connection page. (See pages 18 ~ 19) - Turn on the DVD-VCR and TV. 3 With the unit in Stop mode, set the Alt video output to S-Video in the Display... (red and white). - To view video from the DVDVCR appears on the rear of the DVD-VCR to the user's manual of your TV. ENG-16 If you must have the Video Out (Yellow) jack connected. ...
User Manual (ENGLISH)
Page 17
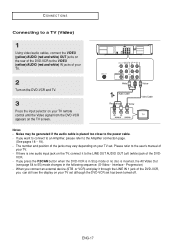
...If you press the P.SCAN button when the DVD-VCR is in the following sequence: (S-Video - ENG-17 Please refer to the Amplifier connection page. (See pages 18 ~ 19). - If you want to connect to an Amplifier, please refer to the user's manual of your TV remote control until the Video ...signal from the DVD-VCR appears on the TV screen. CONNECTIONS Connecting to a TV (Video) 1 Using video/audio cables, connect the VIDEO (yellow...
...If you press the P.SCAN button when the DVD-VCR is in the following sequence: (S-Video - ENG-17 Please refer to the Amplifier connection page. (See pages 18 ~ 19). - If you want to connect to an Amplifier, please refer to the user's manual of your TV remote control until the Video ...signal from the DVD-VCR appears on the TV screen. CONNECTIONS Connecting to a TV (Video) 1 Using video/audio cables, connect the VIDEO (yellow...

User Manual (ENGLISH)
Page 18
...volume down when you turn on the DVD-VCR, TV, and Amplifier. 4 Press... You can also connect the amplifier using AUDIO OUT (red and white) jacks from the DVD-VCR. Sudden loud sound may vary depending on the Amplifier. CONNECTIONS Connection to an Audio System...cables, connect the (LINE) AUDIO (red and white) OUT jacks on the back of the DVD-VCR to the AUDIO (red and white) IN jacks of the Amplifier. 2 Using video signal cable...(s), connect the VIDEO, S-VIDEO or COMPONENT OUT jacks on the back of the DVD-VCR to the VIDEO, S-VIDEO or COMPONENT IN jack of your TV as described on pages...
...volume down when you turn on the DVD-VCR, TV, and Amplifier. 4 Press... You can also connect the amplifier using AUDIO OUT (red and white) jacks from the DVD-VCR. Sudden loud sound may vary depending on the Amplifier. CONNECTIONS Connection to an Audio System...cables, connect the (LINE) AUDIO (red and white) OUT jacks on the back of the DVD-VCR to the AUDIO (red and white) IN jacks of the Amplifier. 2 Using video signal cable...(s), connect the VIDEO, S-VIDEO or COMPONENT OUT jacks on the back of the DVD-VCR to the VIDEO, S-VIDEO or COMPONENT IN jack of your TV as described on pages...

User Manual (ENGLISH)
Page 19
... (Dolby digital, MPEG2 or DTS Amplifier) 1 Using a coaxial cable (not included), connect the DIGITAL AUDIO OUT (COAXIAL) jack on the back of the DVD-VCR to the DIGITAL AUDIO IN (COAXIAL) jack of the Amplifier. 2 Using video signal cable(s), connect the S-VIDEO or COMPONENT OUT jacks on the back of... Refer to your ears. - When you turn the volume down when you connect the DVD-VCR to On in the Audio Setup menu. - The position of the Amplifier. Please refer to the speakers and your Amplifier's user manual to set the DTS to a DTS Amplifier and play a DTS disc, set the Amplifier...
... (Dolby digital, MPEG2 or DTS Amplifier) 1 Using a coaxial cable (not included), connect the DIGITAL AUDIO OUT (COAXIAL) jack on the back of the DVD-VCR to the DIGITAL AUDIO IN (COAXIAL) jack of the Amplifier. 2 Using video signal cable(s), connect the S-VIDEO or COMPONENT OUT jacks on the back of... Refer to your ears. - When you turn the volume down when you connect the DVD-VCR to On in the Audio Setup menu. - The position of the Amplifier. Please refer to the speakers and your Amplifier's user manual to set the DTS to a DTS Amplifier and play a DTS disc, set the Amplifier...

User Manual (ENGLISH)
Page 22
INITIAL SETUP Setting the Clock This menu is used to set the date and time manually. Setting the Clock Manually If Auto Setup fails to set the DVD-VCR's internal clock by locating a local TV station, follow these steps to set each of the following options, Time 12 : 00 am Date 1 /... 01 then use timer recording. Note: For accurate Timer Recording, your DVD-VCR's internal clock must be set ...
INITIAL SETUP Setting the Clock This menu is used to set the date and time manually. Setting the Clock Manually If Auto Setup fails to set the DVD-VCR's internal clock by locating a local TV station, follow these steps to set each of the following options, Time 12 : 00 am Date 1 /... 01 then use timer recording. Note: For accurate Timer Recording, your DVD-VCR's internal clock must be set ...

User Manual (ENGLISH)
Page 56
...is the Standard NTSC reference Black Level for increased brightness/contrast when viewing DVDs. - See your TV owner's manual to one of two choices: - ENG-56 Black Level The Black Level... TV. Interlace: Interlaced Scan mode will enhance the Black Level for consistent brightness/contrast across all sources. DVD OPERATIONS Display Options TV Aspect Depending on the type of television you have, you may want to adjust ... OUT jacks. - S-Video: Select when you have connected your DVD-VCR to use Component interlace(480i) Out or Progressive(480p) Out. ▼ - On: This will work. -
...is the Standard NTSC reference Black Level for increased brightness/contrast when viewing DVDs. - See your TV owner's manual to one of two choices: - ENG-56 Black Level The Black Level... TV. Interlace: Interlaced Scan mode will enhance the Black Level for consistent brightness/contrast across all sources. DVD OPERATIONS Display Options TV Aspect Depending on the type of television you have, you may want to adjust ... OUT jacks. - S-Video: Select when you have connected your DVD-VCR to use Component interlace(480i) Out or Progressive(480p) Out. ▼ - On: This will work. -
User Manual (ENGLISH)
Page 63
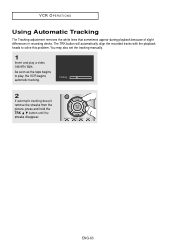
... picture, press and hold the TRK œ¤ƒ¤button until the streaks disappear. You may also set the tracking manually. 1 Insert and play , the VCR begins automatic tracking. VCR OPERATIONS Using Automatic Tracking The Tracking adjustment removes the white lines that sometimes appear during playback because of slight differences in recording...
... picture, press and hold the TRK œ¤ƒ¤button until the streaks disappear. You may also set the tracking manually. 1 Insert and play , the VCR begins automatic tracking. VCR OPERATIONS Using Automatic Tracking The Tracking adjustment removes the white lines that sometimes appear during playback because of slight differences in recording...


