User Manual (user Manual) (ver.1.0) (English, French)
Page 94
...Connecting the Antenna Cable ...13 Method1: Antenna + DVD-VCR + TV: No Cable box 13 Method2: Antenna + DVD-VCR + TV: Cable box with many scrambled channels 14 Method3: Antenna + DVD-VCR + TV: Cable box with a few scrambled channels 14 Before Connecting the DVD-VCR ...15 Connection to a TV ...15 Connection to ... Initial Setup Selecting a Menu Language ...22 Setting the Clock ...23 Setting the Clock Automatically...23 Setting the Clock Manually ...24 Memorizing the Channels ...26 Selecting the Video Signal-source ...26 Storing Channels in Memory (Automatic Method 27 Adding and Erasing Channels...
...Connecting the Antenna Cable ...13 Method1: Antenna + DVD-VCR + TV: No Cable box 13 Method2: Antenna + DVD-VCR + TV: Cable box with many scrambled channels 14 Method3: Antenna + DVD-VCR + TV: Cable box with a few scrambled channels 14 Before Connecting the DVD-VCR ...15 Connection to a TV ...15 Connection to ... Initial Setup Selecting a Menu Language ...22 Setting the Clock ...23 Setting the Clock Automatically...23 Setting the Clock Manually ...24 Memorizing the Channels ...26 Selecting the Video Signal-source ...26 Storing Channels in Memory (Automatic Method 27 Adding and Erasing Channels...
User Manual (user Manual) (ver.1.0) (English, French)
Page 99
...A/V Amplifier that contains a Dolby Digital, MPEG2 or DTS decoder. 8 RF OUT (TO TV) Connect your DVD-VCR to a compatible Dolby Digital receiver. - Notes ■ Consult your TV User's Manual to use as audio output terminal when Component or S-Video is selected in the TV's menu system. ■...You can use as audio output terminal when Component or S-Video is supported, follow the TV User's Manual regarding Progressive Scan settings in the Alt Video Out menu or by using the P.SCAN button on your television. DVD/VCR Output Chart Type of your television for higher picture quality.
...A/V Amplifier that contains a Dolby Digital, MPEG2 or DTS decoder. 8 RF OUT (TO TV) Connect your DVD-VCR to a compatible Dolby Digital receiver. - Notes ■ Consult your TV User's Manual to use as audio output terminal when Component or S-Video is selected in the TV's menu system. ■...You can use as audio output terminal when Component or S-Video is supported, follow the TV User's Manual regarding Progressive Scan settings in the Alt Video Out menu or by using the P.SCAN button on your television. DVD/VCR Output Chart Type of your television for higher picture quality.

User Manual (user Manual) (ver.1.0) (English, French)
Page 103
... the audio cable is placed too close to connect the DVD-VCR with a TV and other components before you want to connect to an Amplifier, please refer to the Amplifier connection page. (See pages 19 to the user's manual of connections commonly used to the power cable. - If...)/AUDIO (red and white) OUT terminals on those particular components. CONNECTIONS Before Connecting the DVD-VCR - Refer to the user's manual of the DVD-VCR. - If you are connecting for more information on the rear of the DVD-VCR to the LINE OUT AUDIO OUT Left (white) terminal of the additional components (such ...
... the audio cable is placed too close to connect the DVD-VCR with a TV and other components before you want to connect to an Amplifier, please refer to the Amplifier connection page. (See pages 19 to the user's manual of connections commonly used to the power cable. - If...)/AUDIO (red and white) OUT terminals on those particular components. CONNECTIONS Before Connecting the DVD-VCR - Refer to the user's manual of the DVD-VCR. - If you are connecting for more information on the rear of the DVD-VCR to the LINE OUT AUDIO OUT Left (white) terminal of the additional components (such ...
User Manual (user Manual) (ver.1.0) (English, French)
Page 104
... outputs through the audio out or line out audio). 1 Using an S-Video cable (not included), connect the S-VIDEO OUT terminal on the rear of the DVD-VCR to the S-VIDEO IN terminal of your TV. 2 Using the audio cables, connect from the DVDVCR appears on your TV remote control until S-Video is... Cable (not included) 4 Press the input selector on your TV screen. The number and position of terminals may vary depending on the rear of the DVD-VCR to the user's manual of your TV. CONNECTIONS Connection to your TV using an S-Video cable. -
... outputs through the audio out or line out audio). 1 Using an S-Video cable (not included), connect the S-VIDEO OUT terminal on the rear of the DVD-VCR to the S-VIDEO IN terminal of your TV. 2 Using the audio cables, connect from the DVDVCR appears on your TV remote control until S-Video is... Cable (not included) 4 Press the input selector on your TV screen. The number and position of terminals may vary depending on the rear of the DVD-VCR to the user's manual of your TV. CONNECTIONS Connection to your TV using an S-Video cable. -
User Manual (user Manual) (ver.1.0) (English, French)
Page 105
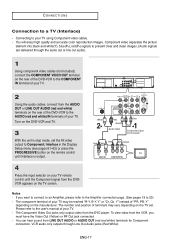
Component video separates the picture element into black and white(Y), blue(PB), red(PR) signals to the user's manual of your TV. The component terminal of your TV using Component video cables. - Notes - Please refer to present clear and clean images. (Audio signals... and white) terminals for Component connection. To view video from the DVDVCR appears on your TV remote control until Interlace is output. Turn on the DVD-VCR and TV. 3 With the unit in stop mode, set . CONNECTIONS Connection to 20) - ENG-17 You will enjoy high quality and accurate color ...
Component video separates the picture element into black and white(Y), blue(PB), red(PR) signals to the user's manual of your TV. The component terminal of your TV using Component video cables. - Notes - Please refer to present clear and clean images. (Audio signals... and white) terminals for Component connection. To view video from the DVDVCR appears on your TV remote control until Interlace is output. Turn on the DVD-VCR and TV. 3 With the unit in stop mode, set . CONNECTIONS Connection to 20) - ENG-17 You will enjoy high quality and accurate color ...

User Manual (user Manual) (ver.1.0) (English, French)
Page 106
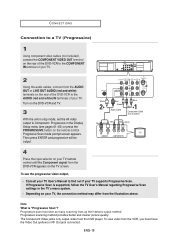
CONNECTIONS Connection to a TV (Progressive) 1 Using component video cables (not included), connect the COMPONENT VIDEO OUT terminal on the rear of the DVD-VCR to the COMPONENT IN terminal of your TV. 2 Using the audio cables, connect from the AUDIO OUT or LINE OUT AUDIO (red and white) ... (red and white) IN terminals of your TV. Note What is supported, follow the TV User's Manual regarding Progressive Scan settings in the Display Setup menu (see the progressive video output, - Turn on the DVD-VCR and TV. 3 With the unit in stop mode, set the Alt video output to Component: Progressive...
CONNECTIONS Connection to a TV (Progressive) 1 Using component video cables (not included), connect the COMPONENT VIDEO OUT terminal on the rear of the DVD-VCR to the COMPONENT IN terminal of your TV. 2 Using the audio cables, connect from the AUDIO OUT or LINE OUT AUDIO (red and white) ... (red and white) IN terminals of your TV. Note What is supported, follow the TV User's Manual regarding Progressive Scan settings in the Display Setup menu (see the progressive video output, - Turn on the DVD-VCR and TV. 3 With the unit in stop mode, set the Alt video output to Component: Progressive...

User Manual (user Manual) (ver.1.0) (English, French)
Page 107
... on pages 15 to 18. 3 Turn on the DVD-VCR, TV, and Amplifier. 4 Press the input select button of terminals may cause damage to the speakers and your Amplifier's user manual to set the audio in order to hear sound from the DVD-VCR. Notes - You can also connect the amplifier using ...AUDIO OUT (red and white) terminals from the DVD-VCR. Red Audio Cable White Red White 2-channel Stereo Amp. The...
... on pages 15 to 18. 3 Turn on the DVD-VCR, TV, and Amplifier. 4 Press the input select button of terminals may cause damage to the speakers and your Amplifier's user manual to set the audio in order to hear sound from the DVD-VCR. Notes - You can also connect the amplifier using ...AUDIO OUT (red and white) terminals from the DVD-VCR. Red Audio Cable White Red White 2-channel Stereo Amp. The...

User Manual (user Manual) (ver.1.0) (English, French)
Page 108
... a coaxial cable (not included), connect the DIGITAL AUDIO OUT (COAXIAL) terminal on the rear of the DVD-VCR to the DIGITAL AUDIO IN (COAXIAL) terminal of the Amplifier. 2 Using the video signal cable(s), connect ...turn the volume down when you connect the DVD-VCR to DTS Amplifier and play a DTS disc, set to 60) - The position of your Amplifier's user manual to set the audio in the menu screen ...-20 Please set the Amplifier's audio input. Please refer to the user's manual of the Amplifier to hear sound from the DVD-VCR. If it is set the DTS to On in order to select external ...
... a coaxial cable (not included), connect the DIGITAL AUDIO OUT (COAXIAL) terminal on the rear of the DVD-VCR to the DIGITAL AUDIO IN (COAXIAL) terminal of the Amplifier. 2 Using the video signal cable(s), connect ...turn the volume down when you connect the DVD-VCR to DTS Amplifier and play a DTS disc, set to 60) - The position of your Amplifier's user manual to set the audio in the menu screen ...-20 Please set the Amplifier's audio input. Please refer to the user's manual of the Amplifier to hear sound from the DVD-VCR. If it is set the DTS to On in order to select external ...
User Manual (user Manual) (ver.1.0) (English, French)
Page 109
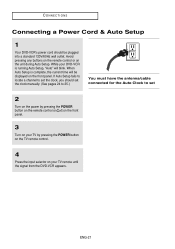
... a channel to set the clock, you should be displayed on your TV remote until the signal from the DVD-VCR appears. CONNECTIONS Connecting a Power Cord & Auto Setup 1 Your DVD-VCR's power cord should set the clock manually. (See pages 24 to 25.) You must have the antenna/cable connected for the Auto Clock to set... panel. 3 Turn on your TV by pressing the POWER button on the TV remote control. 4 Press the input selector on the front panel. While your DVD-VCR is complete, the current time will blink. Avoid pressing any buttons on the remote control or on the unit during Auto Setup.
... a channel to set the clock, you should be displayed on your TV remote until the signal from the DVD-VCR appears. CONNECTIONS Connecting a Power Cord & Auto Setup 1 Your DVD-VCR's power cord should set the clock manually. (See pages 24 to 25.) You must have the antenna/cable connected for the Auto Clock to set... panel. 3 Turn on your TV by pressing the POWER button on the TV remote control. 4 Press the input selector on the front panel. While your DVD-VCR is complete, the current time will blink. Avoid pressing any buttons on the remote control or on the unit during Auto Setup.

User Manual (user Manual) (ver.1.0) (English, French)
Page 112
... Yes, No or Auto. 8 Press the MENU button to select Time Zone, then press the % or ENTER button. Select Automatic to set the DVD-VCR's internal clock by using the "&#,$&% buttons, then press the ENTER button. Select the time zone of your area by locating a local TV station, ...follow these settings without turning off the Auto Clock Set function. Setting the Clock Manually If Auto Setup fails to set correctly. 1 Press the MENU button. ENG-24 Note If your DVD-VCR's internal clock must be set the data and time manually. INITIAL SETUP 6 Press the "&# buttons to exit.
... Yes, No or Auto. 8 Press the MENU button to select Time Zone, then press the % or ENTER button. Select Automatic to set the DVD-VCR's internal clock by using the "&#,$&% buttons, then press the ENTER button. Select the time zone of your area by locating a local TV station, ...follow these settings without turning off the Auto Clock Set function. Setting the Clock Manually If Auto Setup fails to set correctly. 1 Press the MENU button. ENG-24 Note If your DVD-VCR's internal clock must be set the data and time manually. INITIAL SETUP 6 Press the "&# buttons to exit.

User Manual (user Manual) (ver.1.0) (English, French)
Page 114
... connected to an indoor or outdoor VHF/UHF antenna. Antenna: Select this if the DVD-VCR is connected to Cable TV. - channels are coming in on the wrong channel numbers. 1 Press the MENU button. 2 Press the "&# buttons to select Setup, then ... button to the Antenna In jack during initial setup. INITIAL SETUP Memorizing the Channels Selecting the Video Signal-source This feature allows you to manually set the DVD-VCR's tuner band to Antenna or Cable, whichever you connected to select Cable TV or Antenna. ▼ - Use this setting only if Auto Setup detected...
... connected to an indoor or outdoor VHF/UHF antenna. Antenna: Select this if the DVD-VCR is connected to Cable TV. - channels are coming in on the wrong channel numbers. 1 Press the MENU button. 2 Press the "&# buttons to select Setup, then ... button to the Antenna In jack during initial setup. INITIAL SETUP Memorizing the Channels Selecting the Video Signal-source This feature allows you to manually set the DVD-VCR's tuner band to Antenna or Cable, whichever you connected to select Cable TV or Antenna. ▼ - Use this setting only if Auto Setup detected...
User Manual (user Manual) (ver.1.0) (English, French)
Page 115
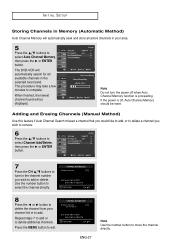
...power off , Auto Channel Memory should be displayed. If the power is off when Auto Channel Memory function is proceeding. Adding and Erasing Channels (Manual Method) Use this feature if Auto Channel Search missed a channel that you would like to add, or to delete a channel you wish to ..."&# buttons to add. When finished, the lowest channel found will be reset. Repeat steps 7 to add or to select the channel directly. The DVD-VCR will automatically search for all active channels in your channel list or to select Auto Channel Memory, then press the % or ENTER button. INITIAL SETUP...
...power off , Auto Channel Memory should be displayed. If the power is off when Auto Channel Memory function is proceeding. Adding and Erasing Channels (Manual Method) Use this feature if Auto Channel Search missed a channel that you would like to add, or to delete a channel you wish to ..."&# buttons to add. When finished, the lowest channel found will be reset. Repeat steps 7 to add or to select the channel directly. The DVD-VCR will automatically search for all active channels in your channel list or to select Auto Channel Memory, then press the % or ENTER button. INITIAL SETUP...

User Manual (user Manual) (ver.1.0) (English, French)
Page 150
... P-SCAN button on the front panel or PROGRESSIVE button on the remote control in the on-screen menu if you have connected your TV owner's manual to set to a TV using the S-VIDEO OUT or COMPONENT VIDEO OUT jacks. - ENG-62 Black Level The Black Level feature adjusts black ... signal to use Component interlace(525i) Out or Progressive(525p) Out. ▼ - S-Video: Select when you want to one of two choices: - See your DVD-VCR to Progressive. Be sure to determine what type of TV you have. - Off: This is set the correct Video output for the proper picture. Component...
... P-SCAN button on the front panel or PROGRESSIVE button on the remote control in the on-screen menu if you have connected your TV owner's manual to set to a TV using the S-VIDEO OUT or COMPONENT VIDEO OUT jacks. - ENG-62 Black Level The Black Level feature adjusts black ... signal to use Component interlace(525i) Out or Progressive(525p) Out. ▼ - S-Video: Select when you want to one of two choices: - See your DVD-VCR to Progressive. Be sure to determine what type of TV you have. - Off: This is set the correct Video output for the proper picture. Component...
User Manual (user Manual) (ver.1.0) (English)
Page 6
...Connecting the Antenna Cable ...13 Method1: Antenna + DVD-VCR + TV: No Cable box 13 Method2: Antenna + DVD-VCR + TV: Cable box with many scrambled channels 14 Method3: Antenna + DVD-VCR + TV: Cable box with a few scrambled channels 14 Before Connecting the DVD-VCR ...15 Connection to a TV ...15 Connection to ... Initial Setup Selecting a Menu Language ...22 Setting the Clock ...23 Setting the Clock Automatically...23 Setting the Clock Manually ...24 Memorizing the Channels ...26 Selecting the Video Signal-source ...26 Storing Channels in Memory (Automatic Method 27 Adding and Erasing Channels...
...Connecting the Antenna Cable ...13 Method1: Antenna + DVD-VCR + TV: No Cable box 13 Method2: Antenna + DVD-VCR + TV: Cable box with many scrambled channels 14 Method3: Antenna + DVD-VCR + TV: Cable box with a few scrambled channels 14 Before Connecting the DVD-VCR ...15 Connection to a TV ...15 Connection to ... Initial Setup Selecting a Menu Language ...22 Setting the Clock ...23 Setting the Clock Automatically...23 Setting the Clock Manually ...24 Memorizing the Channels ...26 Selecting the Video Signal-source ...26 Storing Channels in Memory (Automatic Method 27 Adding and Erasing Channels...
User Manual (user Manual) (ver.1.0) (English)
Page 11
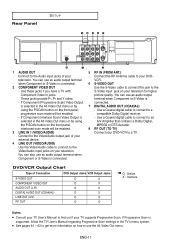
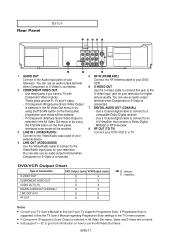
... get more information on your television. If Component (Interlace Scan) Video Output is connected. 7 DIGITAL AUDIO OUT (COAXIAL) - ENG-11 DVD/VCR Output Chart Type of your television. Rear Panel SETUP ❻ ❼ ❽ 1 AUDIO OUT Connect to the Audio input jacks of Connection...television for higher picture quality. Use a Coaxial digital cable to connect to a TV. Notes ■ Consult your TV User's Manual to find out if your DVD-VCR to a compatible Dolby Digital receiver. - You can also use as audio output terminal when Component or S-Video is selected in ...
... get more information on your television. If Component (Interlace Scan) Video Output is connected. 7 DIGITAL AUDIO OUT (COAXIAL) - ENG-11 DVD/VCR Output Chart Type of your television. Rear Panel SETUP ❻ ❼ ❽ 1 AUDIO OUT Connect to the Audio input jacks of Connection...television for higher picture quality. Use a Coaxial digital cable to connect to a TV. Notes ■ Consult your TV User's Manual to find out if your DVD-VCR to a compatible Dolby Digital receiver. - You can also use as audio output terminal when Component or S-Video is selected in ...
User Manual (user Manual) (ver.1.0) (English)
Page 15
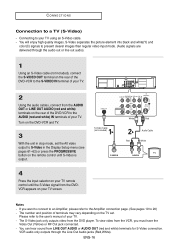
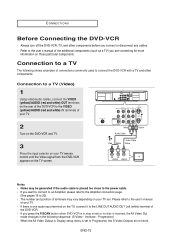
Refer to the user's manual of your TV. 2 Turn on the DVD-VCR and TV. 3 Press the input selector on your TV remote control until the Video signal from the DVD-VCR appears on your TV. - If there is placed too close to connect the DVD-VCR with a TV and other components...terminals may be generated if the audio cable is one audio input terminal on those particular components. The number and position of the DVD-VCR. - Always turn off the DVD-VCR, TV, and other components. Connection to a TV The following sequence: (S-Video - White Yellow Audio Cable Red Video Cable ...
Refer to the user's manual of your TV. 2 Turn on the DVD-VCR and TV. 3 Press the input selector on your TV remote control until the Video signal from the DVD-VCR appears on your TV. - If there is placed too close to connect the DVD-VCR with a TV and other components...terminals may be generated if the audio cable is one audio input terminal on those particular components. The number and position of the DVD-VCR. - Always turn off the DVD-VCR, TV, and other components. Connection to a TV The following sequence: (S-Video - White Yellow Audio Cable Red Video Cable ...
User Manual (user Manual) (ver.1.0) (English)
Page 16
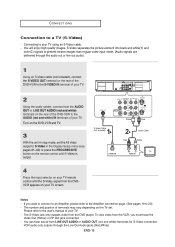
... the rear of your TV screen. S-Video Cable (not included) 4 Press the input selector on the TV set the Alt video output to the user's manual of your TV using an S-Video cable. - The number and position of terminals may vary depending on your TV remote control until S-Video is output... refer to the Amplifier connection page. (See pages 19 to a TV (S-Video) - ENG-16 Connecting to the AUDIO (red and white) IN terminals of the DVD-VCR to your TV. - White Red Audio Cable Red White Notes - The S-Video jack only outputs video from LINE OUT AUDIO or AUDIO OUT (red and...
... the rear of your TV screen. S-Video Cable (not included) 4 Press the input selector on the TV set the Alt video output to the user's manual of your TV using an S-Video cable. - The number and position of terminals may vary depending on your TV remote control until S-Video is output... refer to the Amplifier connection page. (See pages 19 to a TV (S-Video) - ENG-16 Connecting to the AUDIO (red and white) IN terminals of the DVD-VCR to your TV. - White Red Audio Cable Red White Notes - The S-Video jack only outputs video from LINE OUT AUDIO or AUDIO OUT (red and...
User Manual (user Manual) (ver.1.0) (English)
Page 17
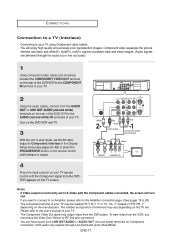
..., PB, Y" depending on the rear of the DVD-VCR to S-Video with the Component cables connected, the screen will enjoy high quality and accurate color reproduction images. Please refer to the user's manual of your TV. 2 Using the audio cables, connect from the VCR, you want to connect to an Amplifier, please ...the audio out or line out audio). 1 Using component video cables (not included), connect the COMPONENT VIDEO OUT terminal on the rear of the DVD-VCR to 20) - To view video from the AUDIO OUT or LINE OUT AUDIO (red and white) terminals on the manufacturer. White Red Green Audio...
..., PB, Y" depending on the rear of the DVD-VCR to S-Video with the Component cables connected, the screen will enjoy high quality and accurate color reproduction images. Please refer to the user's manual of your TV. 2 Using the audio cables, connect from the VCR, you want to connect to an Amplifier, please ...the audio out or line out audio). 1 Using component video cables (not included), connect the COMPONENT VIDEO OUT terminal on the rear of the DVD-VCR to 20) - To view video from the AUDIO OUT or LINE OUT AUDIO (red and white) terminals on the manufacturer. White Red Green Audio...
User Manual (user Manual) (ver.1.0) (English)
Page 18
...provides better and clearer picture quality. ENG-18 Consult your TV User's Manual to find out if your TV supports Progressive Scan. To view video from the DVD-VCR appears on your TV remote control until the Component signal from the VCR, you must have the Video Out (yellow) or RF Out jack ... 4 Press the input selector on the TV screen. The Component Video jacks only output video from the illustration above. Depending on the rear of the DVD-VCR to the AUDIO (red and white) IN terminals of your TV. 2 Using the audio cables, connect from the AUDIO OUT or LINE OUT AUDIO ...
...provides better and clearer picture quality. ENG-18 Consult your TV User's Manual to find out if your TV supports Progressive Scan. To view video from the DVD-VCR appears on your TV remote control until the Component signal from the VCR, you must have the Video Out (yellow) or RF Out jack ... 4 Press the input selector on the TV screen. The Component Video jacks only output video from the illustration above. Depending on the rear of the DVD-VCR to the AUDIO (red and white) IN terminals of your TV. 2 Using the audio cables, connect from the AUDIO OUT or LINE OUT AUDIO ...

User Manual (user Manual) (ver.1.0) (English)
Page 19
... Amplifier's audio input. Please set the audio in order to hear sound from the DVD-VCR. You can also connect the amplifier using AUDIO OUT (red and white) terminals from the DVD-VCR. Refer to your Amplifier's user manual to 60) - Sudden loud sound may vary depending on the Amplifier. ENG-19 ...an Audio System (2 Channel Amplifier) 1 Using the audio cables, connect the (LINE) AUDIO (red and white) OUT terminals on the rear of the DVD-VCR to the AUDIO (red and white) IN terminals of the Amplifier. 2 Using the video signal cable(s), connect the VIDEO, S-VIDEO or COMPONENT OUT ...
... Amplifier's audio input. Please set the audio in order to hear sound from the DVD-VCR. You can also connect the amplifier using AUDIO OUT (red and white) terminals from the DVD-VCR. Refer to your Amplifier's user manual to 60) - Sudden loud sound may vary depending on the Amplifier. ENG-19 ...an Audio System (2 Channel Amplifier) 1 Using the audio cables, connect the (LINE) AUDIO (red and white) OUT terminals on the rear of the DVD-VCR to the AUDIO (red and white) IN terminals of the Amplifier. 2 Using the video signal cable(s), connect the VIDEO, S-VIDEO or COMPONENT OUT ...


