
Quick Guide (easy Manual) (ver.1.0) (English)
Page 2
... shock hazard, do not expose this DVD Recorder, the DVD Recorder cannot play the disc. ■ This device is connected. • Consult the dealer or an experienced radio/TV technician for connections. CAUTION : DVD RECORDERS USE AN INVISIBLE LASER BEAM WHICH CAN... CAUSE HAZARDOUS RADIATION EXPOSURE IF DIRECTED. This symbol indicates that is designed and manufactured to respond to provide reasonable protection against harmful interference in a particular installation. DO NOT OPEN...
... shock hazard, do not expose this DVD Recorder, the DVD Recorder cannot play the disc. ■ This device is connected. • Consult the dealer or an experienced radio/TV technician for connections. CAUTION : DVD RECORDERS USE AN INVISIBLE LASER BEAM WHICH CAN... CAUSE HAZARDOUS RADIATION EXPOSURE IF DIRECTED. This symbol indicates that is designed and manufactured to respond to provide reasonable protection against harmful interference in a particular installation. DO NOT OPEN...

Quick Guide (easy Manual) (ver.1.0) (English)
Page 3
.... 4) Follow all instructions. 5) Do not use this apparatus near water. 6) Clean only with a dry cloth. 7) Do not block any ventilation openings, Install in accordance with the manufacturer's instructions. 8) Do not install near any heat sources such as radiators, heat registers, stoves, or other apparatus ...▌Maintenance of the polarized or grounding- DVD-RAM, DVD-RW and DVD-R • Clean with the POWER button, or disconnect and then reconnect the AC power cord to clean DVDRAM/ DVD-RW/DVD-R discs. DVD-Video, Audio CD • Wipe off the recorder after use. • Disconnect the AC...
.... 4) Follow all instructions. 5) Do not use this apparatus near water. 6) Clean only with a dry cloth. 7) Do not block any ventilation openings, Install in accordance with the manufacturer's instructions. 8) Do not install near any heat sources such as radiators, heat registers, stoves, or other apparatus ...▌Maintenance of the polarized or grounding- DVD-RAM, DVD-RW and DVD-R • Clean with the POWER button, or disconnect and then reconnect the AC power cord to clean DVDRAM/ DVD-RW/DVD-R discs. DVD-Video, Audio CD • Wipe off the recorder after use. • Disconnect the AC...
Quick Guide (easy Manual) (ver.1.0) (English)
Page 10
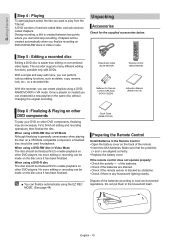
...00061B) Batteries for playback. During recording, a title is any fluorescent lighting nearby. The recorder supports many different editing functions, possible only with DVDs. When using a DVD-RW disc in Video mode. With this recorder, you finalize recording on DVD-R/DVD-RW discs in VR Mode ... page 44) Quick Guide (AK68-01319A) ▌Preparing the Remote Control Install Batteries in the Remote Control • Open the battery cover on a recorded title. Make sure that the polarities (+ and -) are drained. • Check if the remote sensor is blocked by...
...00061B) Batteries for playback. During recording, a title is any fluorescent lighting nearby. The recorder supports many different editing functions, possible only with DVDs. When using a DVD-RW disc in Video mode. With this recorder, you finalize recording on DVD-R/DVD-RW discs in VR Mode ... page 44) Quick Guide (AK68-01319A) ▌Preparing the Remote Control Install Batteries in the Remote Control • Open the battery cover on a recorded title. Make sure that the polarities (+ and -) are drained. • Check if the remote sensor is blocked by...
Quick Guide (easy Manual) (ver.1.0) (English)
Page 12
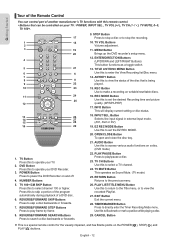
...be controlled on your DVD Recoder. 3. Press this to select channel 100 or higher. ENTER/DIRECTION Buttons (UP/DOWN and LEFT/RIGHT Buttons) This button functions as Sound Mute. (TV mode) 25. REC Button Use to make a recording on and off. 4. OPEN/CLOSE Button To open and close the disc... tray. 21. TIMER/MARKER Button Press to the previous menu. 26. POWER Button Press to power the DVD Recorder on writable/rewritable discs. 16. REVERSE...
...be controlled on your DVD Recoder. 3. Press this to select channel 100 or higher. ENTER/DIRECTION Buttons (UP/DOWN and LEFT/RIGHT Buttons) This button functions as Sound Mute. (TV mode) 25. REC Button Use to make a recording on and off. 4. OPEN/CLOSE Button To open and close the disc... tray. 21. TIMER/MARKER Button Press to the previous menu. 26. POWER Button Press to power the DVD Recorder on writable/rewritable discs. 16. REVERSE...
Quick Guide (easy Manual) (ver.1.0) (English)
Page 13
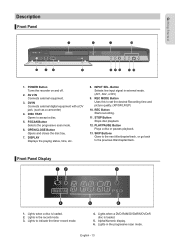
...Opens to indicate the timer record mode. 4. OPEN/CLOSE Button Opens... and closes the disc tray. 7. DISPLAY Displays the playing status, time, etc. 8. STOP Button Stops disc playback. 12. Lights in external mode. (AV1, AV2, or DV) 9. P.SCAN Button Selects the progressive scan mode. 6. Button Selects line input signal in the progressive scan mode. Lights in the record... mode. 3. INPUT SEL. REC Button Starts recording. 11. POWER Button Turns the recorder ...Recording time and picture quality. (XP/SP/LP/EP) 10. Lights ...
...Opens to indicate the timer record mode. 4. OPEN/CLOSE Button Opens... and closes the disc tray. 7. DISPLAY Displays the playing status, time, etc. 8. STOP Button Stops disc playback. 12. Lights in external mode. (AV1, AV2, or DV) 9. P.SCAN Button Selects the progressive scan mode. 6. Button Selects line input signal in the progressive scan mode. Lights in the record... mode. 3. INPUT SEL. REC Button Starts recording. 11. POWER Button Turns the recorder ...Recording time and picture quality. (XP/SP/LP/EP) 10. Lights ...

Quick Guide (easy Manual) (ver.1.0) (English)
Page 38
... image is no antenna), you cannot watch a different cable TV program from the one you are sold unformatted. ■ Do not use DVD-R authoring discs with this unit. Press the OPEN/CLOSE button to pause recording in the following sequence: AV1 AV2 DV 4. To pause recording Press the PLAY/PAUSE ( ) button to close disc tray...
... image is no antenna), you cannot watch a different cable TV program from the one you are sold unformatted. ■ Do not use DVD-R authoring discs with this unit. Press the OPEN/CLOSE button to pause recording in the following sequence: AV1 AV2 DV 4. To pause recording Press the PLAY/PAUSE ( ) button to close disc tray...

Quick Guide (easy Manual) (ver.1.0) (English)
Page 39
.... See page 24 to see how to connect the camcorder to close the disc tray. Press the OPEN/CLOSE button to your DVD recorder. 1. To stop recording Press the STOP ( ) button to stop automatically if there is no Video), the screen may control a Digital Camcorder using the IEEE1394 (DV...camcorder and find the starting to 99 titles can not change the record mode and input source while recording. ■ Recording will stop or finish recording in the top side of the screen using DVD-RAM/DVD-RW/DVD-R discs, the message 'Updating the information of the tape is displayed. &#...
.... See page 24 to see how to connect the camcorder to close the disc tray. Press the OPEN/CLOSE button to your DVD recorder. 1. To stop recording Press the STOP ( ) button to stop automatically if there is no Video), the screen may control a Digital Camcorder using the IEEE1394 (DV...camcorder and find the starting to 99 titles can not change the record mode and input source while recording. ■ Recording will stop or finish recording in the top side of the screen using DVD-RAM/DVD-RW/DVD-R discs, the message 'Updating the information of the tape is displayed. &#...

Quick Guide (easy Manual) (ver.1.0) (English)
Page 41
...-FRI), press the ▲▼ buttons until "LOAD" disappears from the front panel display. Press the OPEN/CLOSE button, and place a recordable disc on the front panel display. Setup MOVE ENTER RETURN EXIT DVD-Recorder DVD-RW(VR) Scheduled Record List Current Time 12:03 AM No. Clock Set) before proceeding with a lot of . • Date...
...-FRI), press the ▲▼ buttons until "LOAD" disappears from the front panel display. Press the OPEN/CLOSE button, and place a recordable disc on the front panel display. Setup MOVE ENTER RETURN EXIT DVD-Recorder DVD-RW(VR) Scheduled Record List Current Time 12:03 AM No. Clock Set) before proceeding with a lot of . • Date...

Quick Guide (easy Manual) (ver.1.0) (English)
Page 44
...buttons to confirm EZ REC mode. When you make a timer recording and it will finalize automatically and the Recorder will open after auto initializing. ■ If you select off . When you press the OPEN/CLOSE button on your DVD Recorder after recording on the remote control. 2. When the disc is full,... it occupies at least 30% of the disc, the disc will finalize automatically and the Recorder will be formatted in the Disc Manager ...
...buttons to confirm EZ REC mode. When you make a timer recording and it will finalize automatically and the Recorder will open after auto initializing. ■ If you select off . When you press the OPEN/CLOSE button on your DVD Recorder after recording on the remote control. 2. When the disc is full,... it occupies at least 30% of the disc, the disc will finalize automatically and the Recorder will be formatted in the Disc Manager ...

Quick Guide (easy Manual) (ver.1.0) (English)
Page 46
... to the disc. ■ Make sure to press the OPEN/CLOSE button to open or close the disc tray. • Your DVD Recorder closes the disc tray and loads the disc automatically. • When the recorder is powered on the disc type. The tray opens. 2. When you press the PLAY button again, it closes... to use the disc for Authoring. • A DVD±R/DVD-RW(V) disc which has been recorded and not finalized in detail on using this if necessary. ■ Do not allow playback and may cause damage to the DVD player. Press the OPEN/CLOSE button. Inserting two or more discs will power...
... to the disc. ■ Make sure to press the OPEN/CLOSE button to open or close the disc tray. • Your DVD Recorder closes the disc tray and loads the disc automatically. • When the recorder is powered on the disc type. The tray opens. 2. When you press the PLAY button again, it closes... to use the disc for Authoring. • A DVD±R/DVD-RW(V) disc which has been recorded and not finalized in detail on using this if necessary. ■ Do not allow playback and may cause damage to the DVD player. Press the OPEN/CLOSE button. Inserting two or more discs will power...

Quick Guide (easy Manual) (ver.1.0) (English)
Page 51
Press the MARKER button during playback. 2. The number 1 is displayed and the scene is opened and then closed, bookmarks will be displayed. 3. Playing Back a Bookmark 1. Press the MARKER button during playback. 2. Press the buttons to move to...size Playback Bookmark 1 2 MOVE PLAY CANCEL RETURN Bookmark 1 2 MOVE PLAY CANCEL RETURN Using Bookmarks (V mode) This feature lets you bookmark sections of a DVD or DVD-R/-RW (V mode), so you want to the next position. 4. Setting Bookmarks 1. English - 51 Press the ANYKEY button during playback. Press the MARKER button...
Press the MARKER button during playback. 2. The number 1 is displayed and the scene is opened and then closed, bookmarks will be displayed. 3. Playing Back a Bookmark 1. Press the MARKER button during playback. 2. Press the buttons to move to...size Playback Bookmark 1 2 MOVE PLAY CANCEL RETURN Bookmark 1 2 MOVE PLAY CANCEL RETURN Using Bookmarks (V mode) This feature lets you bookmark sections of a DVD or DVD-R/-RW (V mode), so you want to the next position. 4. Setting Bookmarks 1. English - 51 Press the ANYKEY button during playback. Press the MARKER button...
Quick Guide (easy Manual) (ver.1.0) (English)
Page 71
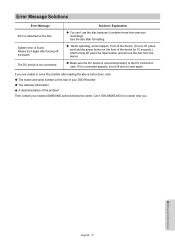
... and on the front of the problem Then contact your nearest SAMSUNG authorized service center. Call 1-800-SAMSUNG for 10 seconds.) After turning off, press the Open button and remove the disc from previous recordings. System error is detected on the rear of your DVD Recorder The warranty information A clear description of the device for a center...
... and on the front of the problem Then contact your nearest SAMSUNG authorized service center. Call 1-800-SAMSUNG for 10 seconds.) After turning off, press the Open button and remove the disc from previous recordings. System error is detected on the rear of your DVD Recorder The warranty information A clear description of the device for a center...
User Manual
Page 2
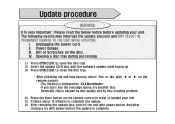
... vveerryy IImmppoorrttaanntt ;; II.. IIII.. UUnnpplluuggggiinngg tthhee ppoowweerr ccoorrdd.. IIIIII.. OOppeenniinngg aa ddiisscc ttrraayy dduurriinngg pprroocceessssiinngg.. 1) Press OPEN/CLOSE to open the disc tray. 2) Insert the update CD-R disc with the software update, label facing up 3) Press OPEN/CLOSE to complete the update. 6) After removing the update disc, turn off the unit with "◀...
... vveerryy IImmppoorrttaanntt ;; II.. IIII.. UUnnpplluuggggiinngg tthhee ppoowweerr ccoorrdd.. IIIIII.. OOppeenniinngg aa ddiisscc ttrraayy dduurriinngg pprroocceessssiinngg.. 1) Press OPEN/CLOSE to open the disc tray. 2) Insert the update CD-R disc with the software update, label facing up 3) Press OPEN/CLOSE to complete the update. 6) After removing the update disc, turn off the unit with "◀...
