Quick Guide (easy Manual) (ver.1.0) (English)
Page 2
.... BE SURE TO OPERATE RECORDER CORRECTLY AS INSTRUCTED. If this DVD Recorder, the DVD Recorder cannot play the disc. NOTE s This unit can be used only where the power supply is encouraged to try to radio or television reception, which the receiver is protected by one or more of a DVD disc does not correspond to wide slot, fully insert. If the Region number of the following...
.... BE SURE TO OPERATE RECORDER CORRECTLY AS INSTRUCTED. If this DVD Recorder, the DVD Recorder cannot play the disc. NOTE s This unit can be used only where the power supply is encouraged to try to radio or television reception, which the receiver is protected by one or more of a DVD disc does not correspond to wide slot, fully insert. If the Region number of the following...

Quick Guide (easy Manual) (ver.1.0) (English)
Page 4
... be played. : .avi, .divx, .AVI, .DIVX • MPEG4 Codec format : DivX 3.11 DivX 4.x DivX 5.x • Available Audio Format : "MP3", "MPEG", "PCM","AC3", "DTS" • Supported subtitle file formats: .smi, .srt, .sub, .psb,.txt Using CD-R/-RW • Use a 700MB(80 minutes) CD-R/-RW disc. JPEG CD-R/-RW • Only JPEG files with following extensions can handle a maximum of 1000 files and folders. • Maximum size of a double-layered DVD Video disc, there...
... be played. : .avi, .divx, .AVI, .DIVX • MPEG4 Codec format : DivX 3.11 DivX 4.x DivX 5.x • Available Audio Format : "MP3", "MPEG", "PCM","AC3", "DTS" • Supported subtitle file formats: .smi, .srt, .sub, .psb,.txt Using CD-R/-RW • Use a 700MB(80 minutes) CD-R/-RW disc. JPEG CD-R/-RW • Only JPEG files with following extensions can handle a maximum of 1000 files and folders. • Maximum size of a double-layered DVD Video disc, there...
Quick Guide (easy Manual) (ver.1.0) (English)
Page 5
... Disc Playback and Recording • For cartridge type DVD-RAM discs, remove the cartridge and use the following unexpected problems including, without limitation, recording failure, loss of your recorder, contact the Call Center at 1-800SAMSUNG. A disc that the recording mode is recorded in most DVD players due to the recorder. Do not use the disc only. • Ensure that is set to play some DVD±R discs depending on a DVD-RW disc. To determine compatibility with the DVD-VIDEO format...
... Disc Playback and Recording • For cartridge type DVD-RAM discs, remove the cartridge and use the following unexpected problems including, without limitation, recording failure, loss of your recorder, contact the Call Center at 1-800SAMSUNG. A disc that the recording mode is recorded in most DVD players due to the recorder. Do not use the disc only. • Ensure that is set to play some DVD±R discs depending on a DVD-RW disc. To determine compatibility with the DVD-VIDEO format...
Quick Guide (easy Manual) (ver.1.0) (English)
Page 6
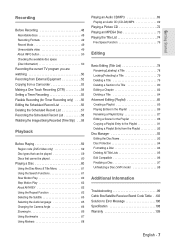
...2. Channel Set 34 4. Setting Up the TV Aspect 37 System Setting 38 Set Top Box Control 38 CM Skip Time Setting 40 EP Mode Time Setting 41 Automatic Chapter Creation 41 Quick Recording Setting 42 Language Setting 43 Video (Display) Setting 44 Parental Control 46 6 - English Clock Set 32 3. Getting Started Contents Getting Started Warning 2 Precaution 3 Important Safety Instructions 3 Handling Cautions 3 Maintenance of Cabinet 3 Disc Handling 3 Disc Storage 4 Disc Specifications 4 General Features 8 Before Reading the Instruction Manual 9 How to use the DVD Recorder...
...2. Channel Set 34 4. Setting Up the TV Aspect 37 System Setting 38 Set Top Box Control 38 CM Skip Time Setting 40 EP Mode Time Setting 41 Automatic Chapter Creation 41 Quick Recording Setting 42 Language Setting 43 Video (Display) Setting 44 Parental Control 46 6 - English Clock Set 32 3. Getting Started Contents Getting Started Warning 2 Precaution 3 Important Safety Instructions 3 Handling Cautions 3 Maintenance of Cabinet 3 Disc Handling 3 Disc Storage 4 Disc Specifications 4 General Features 8 Before Reading the Instruction Manual 9 How to use the DVD Recorder...
Quick Guide (easy Manual) (ver.1.0) (English)
Page 7
... Scheduled Record List 56 Deleting the Scheduled Record List 57 Recording the Scheduled Record List 58 Watching the Images Being Recorded (Time Slip) . . .58 Playback Before Playing 59 Region code (DVD-Video only 59 Disc types that can be played 59 Discs that cannot be played 60 Playing a Disc 60 Using the Disc Menu & Title Menu 61 Using the Search Functions 61 Slow Motion Play 62 Step Motion Play 62 About ANYKEY 62 Using the Repeat Function 63 Selecting the Subtitle 65 Selecting the Audio language 65 Changing the...
... Scheduled Record List 56 Deleting the Scheduled Record List 57 Recording the Scheduled Record List 58 Watching the Images Being Recorded (Time Slip) . . .58 Playback Before Playing 59 Region code (DVD-Video only 59 Disc types that can be played 59 Discs that cannot be played 60 Playing a Disc 60 Using the Disc Menu & Title Menu 61 Using the Search Functions 61 Slow Motion Play 62 Step Motion Play 62 About ANYKEY 62 Using the Repeat Function 63 Selecting the Subtitle 65 Selecting the Audio language 65 Changing the...
Quick Guide (easy Manual) (ver.1.0) (English)
Page 9
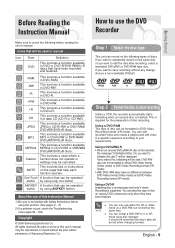
... operate or settings may be displayed. About the use of this Instruction Manual 1) Be sure to be familiar with Safety Instructions before reading the user's manual. No part or whole of Samsung Electronics Co. Do you want to repeatedly record on the same disc or you select Yes, initializing will be reproduced or copied without any change, choose a non-rewritable DVD±R. NOTE s You can only use the DVD Recorder Step 1 Select the disc type...
... operate or settings may be displayed. About the use of this Instruction Manual 1) Be sure to be familiar with Safety Instructions before reading the user's manual. No part or whole of Samsung Electronics Co. Do you want to repeatedly record on the same disc or you select Yes, initializing will be reproduced or copied without any change, choose a non-rewritable DVD±R. NOTE s You can only use the DVD Recorder Step 1 Select the disc type...

Quick Guide (easy Manual) (ver.1.0) (English)
Page 13
... box brands) 4. DVD Button Press this to view the recorded Playlist. 23. Button Selects line input signal in external input mode. (Tuner, AV1, AV2 or DV) ❋ This is being played. 13. POWER Button 2. Press this to return to the Title menu, or to operate your DVD Recoder. 28. REPEAT Button Allows you to stop the recording. 8. OPEN/CLOSE Button To open and close the disc tray. 17. PLAY/PAUSE Button Press to skip a portion of the program automatically during playback of a DVD disc. PLAY LIST/TITLE MENU Button Use...
... box brands) 4. DVD Button Press this to view the recorded Playlist. 23. Button Selects line input signal in external input mode. (Tuner, AV1, AV2 or DV) ❋ This is being played. 13. POWER Button 2. Press this to return to the Title menu, or to operate your DVD Recoder. 28. REPEAT Button Allows you to stop the recording. 8. OPEN/CLOSE Button To open and close the disc tray. 17. PLAY/PAUSE Button Press to skip a portion of the program automatically during playback of a DVD disc. PLAY LIST/TITLE MENU Button Use...

Quick Guide (easy Manual) (ver.1.0) (English)
Page 25
... the DVD recorder uses a HDMI cable, the DVD recorder outputs only a pure digital signal to noise and signal loss. HDMI OUT Connecting & Setting Up NOTE s To change HDMI output resolution, see page 45. Analog TVs require an analog video/audio signal. During this conversion, the picture quality is the HDCP? etc). etc) and a display device (TV, projector. Using the audio cables, connect the AUDIO (red and white) OUT terminals on the rear of the DVD Recorder to your TV. Turn on a TV having anHDMI input...
... the DVD recorder uses a HDMI cable, the DVD recorder outputs only a pure digital signal to noise and signal loss. HDMI OUT Connecting & Setting Up NOTE s To change HDMI output resolution, see page 45. Analog TVs require an analog video/audio signal. During this conversion, the picture quality is the HDCP? etc). etc) and a display device (TV, projector. Using the audio cables, connect the AUDIO (red and white) OUT terminals on the rear of the DVD Recorder to your TV. Turn on a TV having anHDMI input...

Quick Guide (easy Manual) (ver.1.0) (English)
Page 31
... MENU button on the disc type. Digital Output , DTS, Dynamic Compression • Video Setup of the General Options. - DVD-Recorder No Disc Timer Rec. DVD-Recorder No Disc Timer Record Timer Rec. Password, Rating Level,Change Password English - 31 Set Top Box Control, CM Skip Time, EP Mode Time, Chapter Creator, Quick Recording • Clock Set - Menu items differ depending on the remote control. Auto Clock Set, Manual Clock Set • Channel Set - Setup menu will be displayed. System Setup Clock Set Channel Set Language Audio Video Parental Control Setup...
... MENU button on the disc type. Digital Output , DTS, Dynamic Compression • Video Setup of the General Options. - DVD-Recorder No Disc Timer Rec. DVD-Recorder No Disc Timer Record Timer Rec. Password, Rating Level,Change Password English - 31 Set Top Box Control, CM Skip Time, EP Mode Time, Chapter Creator, Quick Recording • Clock Set - Menu items differ depending on the remote control. Auto Clock Set, Manual Clock Set • Channel Set - Setup menu will be displayed. System Setup Clock Set Channel Set Language Audio Video Parental Control Setup...

Quick Guide (easy Manual) (ver.1.0) (English)
Page 32
... as the disc type and whether the disc has been inserted or not. 1. The OSD (On-Screen Display) displayed on the screen may change whenever you connected an external Audio System, turn the power on or off. Auto Clock Set Setup Manual Clock Set Clock Set √ √ MOVE ENTER RETURN EXIT 4 Select Auto Clock Set using the ...† buttons, then press the ENTER or √ button. Clock Set This menu is not set the current time. Initial Setup Auto Clock Set If you turn on your time zone...
... as the disc type and whether the disc has been inserted or not. 1. The OSD (On-Screen Display) displayed on the screen may change whenever you connected an external Audio System, turn the power on or off. Auto Clock Set Setup Manual Clock Set Clock Set √ √ MOVE ENTER RETURN EXIT 4 Select Auto Clock Set using the ...† buttons, then press the ENTER or √ button. Clock Set This menu is not set the current time. Initial Setup Auto Clock Set If you turn on your time zone...

Quick Guide (easy Manual) (ver.1.0) (English)
Page 33
... panel display. DVD-Recorder No Disc Timer Rec. DVD-Recorder Manual Clock Set No Disc Timer Rec. Setup Month Day Year Hour Minute AM/PM ... 01 01 2006 12 00 AM † SUN MOVE ENTER RETURN EXIT ...† : Sets the value You can set the value using the ...† buttons, then press the ENTER or √ button. • Select Automatic to set the clock data channel automatically. Setup Select channel : Clock Data CH ... DVD-Recorder No Disc Timer Rec. Setup Clock Data CH Time...
... panel display. DVD-Recorder No Disc Timer Rec. DVD-Recorder Manual Clock Set No Disc Timer Rec. Setup Month Day Year Hour Minute AM/PM ... 01 01 2006 12 00 AM † SUN MOVE ENTER RETURN EXIT ...† : Sets the value You can set the value using the ...† buttons, then press the ENTER or √ button. • Select Automatic to set the clock data channel automatically. Setup Select channel : Clock Data CH ... DVD-Recorder No Disc Timer Rec. Setup Clock Data CH Time...
Quick Guide (easy Manual) (ver.1.0) (English)
Page 35
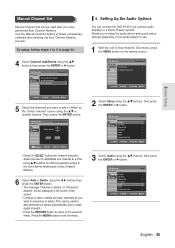
... 0~9 NUMBER ENTER RETURN EXIT • Using CH ( ) buttons for channel selection allows the user to add/delete one channel at a time. • Using ...† buttons for channel selection jumps to exit the menu. 2 Select Setup using the ...† buttons, then press the ENTER or √ button. Press the MENU button to the next channel memorized in Stop mode/No Disc mode, press the MENU button on the "Select channel" screen using the ...† buttons, then press the ENTER or √ button. Setup System Clock Set Channel Set Language Audio Video Parental Control Setup...
... 0~9 NUMBER ENTER RETURN EXIT • Using CH ( ) buttons for channel selection allows the user to add/delete one channel at a time. • Using ...† buttons for channel selection jumps to exit the menu. 2 Select Setup using the ...† buttons, then press the ENTER or √ button. Press the MENU button to the next channel memorized in Stop mode/No Disc mode, press the MENU button on the "Select channel" screen using the ...† buttons, then press the ENTER or √ button. Setup System Clock Set Channel Set Language Audio Video Parental Control Setup...

Quick Guide (easy Manual) (ver.1.0) (English)
Page 37
... be cut off.) If you have a TV with a wide-screen mode • 16:9 Wide : You can view the full 16:9 picture on your widescreen TV. Timer Record √ Setup Scheduled Record List √ MOVE ENTER RETURN EXIT 2 Select Setup using the ...† buttons. DVD-Recorder No Disc Timer Rec. TV Aspect Setup Input Level Black Level 3D Noise Reduction HDMI/DVI Resolution DivX(R) Registration Video : 16:9 Wide √ : Darker √ : 7.5 IRE √ : Off √ : 480P...
... be cut off.) If you have a TV with a wide-screen mode • 16:9 Wide : You can view the full 16:9 picture on your widescreen TV. Timer Record √ Setup Scheduled Record List √ MOVE ENTER RETURN EXIT 2 Select Setup using the ...† buttons. DVD-Recorder No Disc Timer Rec. TV Aspect Setup Input Level Black Level 3D Noise Reduction HDMI/DVI Resolution DivX(R) Registration Video : 16:9 Wide √ : Darker √ : 7.5 IRE √ : Off √ : 480P...

Quick Guide (easy Manual) (ver.1.0) (English)
Page 38
... Setup 2 Select Setup using the number buttons, then press the ENTER button. (See "Cable Box/Satellite Receiver Brand Code Table" on pages 103~105.) DVD-Recorder Set Top Box Control No Disc Timer Rec. NOTE s See the instruction supplied with your cable box to confirm the cable box's antenna output channel. DVD-Recorder No Disc Timer Rec. Set Top Box Control menu will be displayed. DVD-Recorder No Disc Timer Rec. DVD-Recorder Set Top Box Control No Disc Timer Rec. Brand Code : 0000 √ Setup Connection : CH3 √ CH Digit Lock : Off √ Mode for SET button...
... Setup 2 Select Setup using the number buttons, then press the ENTER button. (See "Cable Box/Satellite Receiver Brand Code Table" on pages 103~105.) DVD-Recorder Set Top Box Control No Disc Timer Rec. NOTE s See the instruction supplied with your cable box to confirm the cable box's antenna output channel. DVD-Recorder No Disc Timer Rec. Set Top Box Control menu will be displayed. DVD-Recorder No Disc Timer Rec. DVD-Recorder Set Top Box Control No Disc Timer Rec. Brand Code : 0000 √ Setup Connection : CH3 √ CH Digit Lock : Off √ Mode for SET button...

Quick Guide (easy Manual) (ver.1.0) (English)
Page 39
... : Select this when your cable box or satellite receiver only accepts a two digit channel number. DVD-Recorder Set Top Box Control No Disc Timer Rec. DVD-Recorder Set Top Box Control No Disc Timer Rec. English - 39 Brand Code : 0000 √ Setup Connection : CH3 √ CH Digit Lock : OOffff √ Mode for SET button : LOofcf k to use the supplied set top box controller. • On : Turns on the cable box or satellite receiver control function. Normally select this. • Lock to two digits : Select this if you cannot get the recorder to control your Set Top Box now...
... : Select this when your cable box or satellite receiver only accepts a two digit channel number. DVD-Recorder Set Top Box Control No Disc Timer Rec. DVD-Recorder Set Top Box Control No Disc Timer Rec. English - 39 Brand Code : 0000 √ Setup Connection : CH3 √ CH Digit Lock : OOffff √ Mode for SET button : LOofcf k to use the supplied set top box controller. • On : Turns on the cable box or satellite receiver control function. Normally select this. • Lock to two digits : Select this if you cannot get the recorder to control your Set Top Box now...

Quick Guide (easy Manual) (ver.1.0) (English)
Page 43
...Setup Clock Set Channel Set Language Audio Video Parental Control MOVE ENTER RETURN Setup EXIT DVD-Recorder Language No Disc Timer Rec. Timer Record √ Setup Scheduled Record List √ MOVE ENTER RETURN EXIT 2 Select Setup using the ...† buttons, then press the ENTER or √ button. English - 43 Quick Recording Setup : 15 Sec : 6 Hours : Off : OOfnf On System MOVE ENTER RETURN EXIT s The Quick Recording is set the On-Screen menu, Disc menu, Audio and Subtitle language in Stop mode/No Disc mode, press the MENU button on the disc. Audio...
...Setup Clock Set Channel Set Language Audio Video Parental Control MOVE ENTER RETURN Setup EXIT DVD-Recorder Language No Disc Timer Rec. Timer Record √ Setup Scheduled Record List √ MOVE ENTER RETURN EXIT 2 Select Setup using the ...† buttons, then press the ENTER or √ button. English - 43 Quick Recording Setup : 15 Sec : 6 Hours : Off : OOfnf On System MOVE ENTER RETURN EXIT s The Quick Recording is set the On-Screen menu, Disc menu, Audio and Subtitle language in Stop mode/No Disc mode, press the MENU button on the disc. Audio...

Quick Guide (easy Manual) (ver.1.0) (English)
Page 45
... the component connection outputs only 480p irrespective of Radio Engineers. DivX(R) Registration Please use the Registration code to select the output resolution. - Set your TV's input to your DVD Recorder with Display devices (TV, projector, etc). DVD-Recorder Video No Disc Timer Rec. s Even if HDMI/DVI cable is connected to HDMI or DVI. • Press the P.SCAN button while the unit is connected by HDMI or DVI with the DivX(R) Video On Demand format. If your TV via HDMI or DVI. English...
... the component connection outputs only 480p irrespective of Radio Engineers. DivX(R) Registration Please use the Registration code to select the output resolution. - Set your TV's input to your DVD Recorder with Display devices (TV, projector, etc). DVD-Recorder Video No Disc Timer Rec. s Even if HDMI/DVI cable is connected to HDMI or DVI. • Press the P.SCAN button while the unit is connected by HDMI or DVI with the DivX(R) Video On Demand format. If your TV via HDMI or DVI. English...
Quick Guide (easy Manual) (ver.1.0) (English)
Page 50
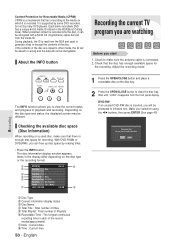
... and used disc, make sure the antenna cable is connected. 2. Each blank recordable DVD has a unique 64-bit media ID etched in the display differ depending on the disc type or the recording format. ! Check that ties a recording to the media on a used to generate a key to decrypt the contents of the disc are watching Before you want to close the disc tray. Adjust the recording mode. Recording 1 Press the OPEN/CLOSE button and place a recordable disc...
... and used disc, make sure the antenna cable is connected. 2. Each blank recordable DVD has a unique 64-bit media ID etched in the display differ depending on the disc type or the recording format. ! Check that ties a recording to the media on a used to generate a key to decrypt the contents of the disc are watching Before you want to close the disc tray. Adjust the recording mode. Recording 1 Press the OPEN/CLOSE button and place a recordable disc...
Quick Guide (easy Manual) (ver.1.0) (English)
Page 60
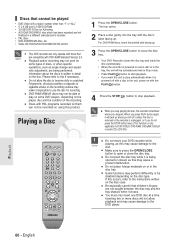
... functions may cause damage to use the disc for some DVD players, depending on the player, disc and the condition of cigarette smoke on them can only operate with the PLAY( ) button. 4 Press the STOP( ) button to DVD-VIDEO, DVD-RAM, DVD±RW, DVD±R or audio CDs (CD-DA). s Do not allow the disc to open or close the disc tray. • Your DVD Recorder closes the disc tray and loads the disc automatically. • When the recorder is powered...
... functions may cause damage to use the disc for some DVD players, depending on the player, disc and the condition of cigarette smoke on them can only operate with the PLAY( ) button. 4 Press the STOP( ) button to DVD-VIDEO, DVD-RAM, DVD±RW, DVD±R or audio CDs (CD-DA). s Do not allow the disc to open or close the disc tray. • Your DVD Recorder closes the disc tray and loads the disc automatically. • When the recorder is powered...

Quick Guide (easy Manual) (ver.1.0) (English)
Page 102
... the power is converted from 50Hz to change a subtitle and an audio signal on . Do not use this unless absolutely necessary. (Note that this function is possible only when no disc is played with only the subtitle and the audio signal which were selected during recording. Checkpoint 1 Checkpoint 2 Point the remote control at the remote control sensor on . If the problem still persists, contact a nearby Samsung service center. English Turn your DVD recorder and the remote control. Screen...
... the power is converted from 50Hz to change a subtitle and an audio signal on . Do not use this unless absolutely necessary. (Note that this function is possible only when no disc is played with only the subtitle and the audio signal which were selected during recording. Checkpoint 1 Checkpoint 2 Point the remote control at the remote control sensor on . If the problem still persists, contact a nearby Samsung service center. English Turn your DVD recorder and the remote control. Screen...


