
Quick Guide (easy Manual) (ver.1.0) (English)
Page 6
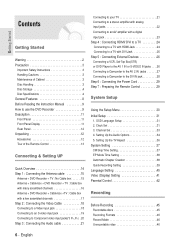
... 3 Handling Cautions 3 Maintenance of Cabinet 3 Disc Handling 3 Disc Storage 4 Disc Specifications 4 General Features 8 Before Reading the Instruction Manual 9 How to use the DVD Recorder 9 Description 11 Front Panel 11 Front Panel Display 11 Rear Panel 12 Unpacking 12 Accessories 12 Tour of the Remote Control 13... with HDMI Jack 24 Connecting to a TV with DVI Jack 25 Step 5 : Connecting External Devices 26 Connecting a VCR, Set-Top Box(STB) or DVD Player to the AV 1 IN or S-VIDEO IN jacks . . . .26 Connecting a Camcorder to the AV 2 IN jacks 27 Connecting a Camcorder...
... 3 Handling Cautions 3 Maintenance of Cabinet 3 Disc Handling 3 Disc Storage 4 Disc Specifications 4 General Features 8 Before Reading the Instruction Manual 9 How to use the DVD Recorder 9 Description 11 Front Panel 11 Front Panel Display 11 Rear Panel 12 Unpacking 12 Accessories 12 Tour of the Remote Control 13... with HDMI Jack 24 Connecting to a TV with DVI Jack 25 Step 5 : Connecting External Devices 26 Connecting a VCR, Set-Top Box(STB) or DVD Player to the AV 1 IN or S-VIDEO IN jacks . . . .26 Connecting a Camcorder to the AV 2 IN jacks 27 Connecting a Camcorder...

Quick Guide (easy Manual) (ver.1.0) (English)
Page 9
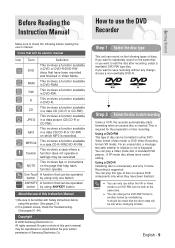
...or instructions on which MP3 is supported. How to save recording without the prior written permission of Samsung Electronics Co. Using a DVD-R Initializing disc is unnecessary and only V mode Recording is recorded). R This involves a function available in a data ... pages 91~94) Copyright © 2006 Samsung Electronics Co. Icons that can be familiar with Safety Instructions before reading the user's manual. JPEG This involves a function available in DVD-RAM. About the use either DVDVideo format (Video mode) or DVD-Video Recording format (VR mode). For an...
...or instructions on which MP3 is supported. How to save recording without the prior written permission of Samsung Electronics Co. Using a DVD-R Initializing disc is unnecessary and only V mode Recording is recorded). R This involves a function available in a data ... pages 91~94) Copyright © 2006 Samsung Electronics Co. Icons that can be familiar with Safety Instructions before reading the user's manual. JPEG This involves a function available in DVD-RAM. About the use either DVDVideo format (Video mode) or DVD-Video Recording format (VR mode). For an...
Quick Guide (easy Manual) (ver.1.0) (English)
Page 12
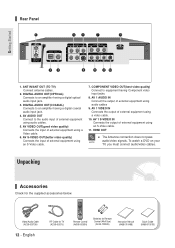
... audio input jack. 3. AV S-VIDEO OUT(better video quality) Connects the input of external equipment using an S-Video cable. 7. To watch a DVD on your TV, you must connect audio/video cables. ANT IN/ANT OUT (TO TV) Connect antenna cables. 2. AV 1 VIDEO IN Connects ...the output of external equipment using a video cable. 10. Unpacking Accessories Check for Remote Control (AAA Size) (AC43-12002H) Instruction Manual (AK68-01049B) Quick Guide (AK68-01051B) AV 1 AUDIO IN Connect the output of external equipment using audio cables 9. DIGITAL AUDIO OUT(OPTICAL) ...
... audio input jack. 3. AV S-VIDEO OUT(better video quality) Connects the input of external equipment using an S-Video cable. 7. To watch a DVD on your TV, you must connect audio/video cables. ANT IN/ANT OUT (TO TV) Connect antenna cables. 2. AV 1 VIDEO IN Connects ...the output of external equipment using a video cable. 10. Unpacking Accessories Check for Remote Control (AAA Size) (AC43-12002H) Instruction Manual (AK68-01049B) Quick Guide (AK68-01051B) AV 1 AUDIO IN Connect the output of external equipment using audio cables 9. DIGITAL AUDIO OUT(OPTICAL) ...
Quick Guide (easy Manual) (ver.1.0) (English)
Page 28
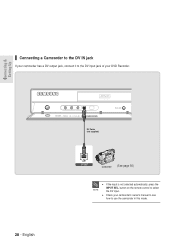
s Check your DVD Recorder. 28 - English DV Cable (not supplied) Camcorder (See page 50) NOTE s If the input is not selected automatically, press the INPUT SEL. Connecting & Setting Up Connecting a Camcorder to the DV IN jack If your camcorder has a DV output jack, connect it to the DV input jack of your camcorder's owner's manual to see how to select the DV input. button on the remote control to use the camcorder in this mode.
s Check your DVD Recorder. 28 - English DV Cable (not supplied) Camcorder (See page 50) NOTE s If the input is not selected automatically, press the INPUT SEL. Connecting & Setting Up Connecting a Camcorder to the DV IN jack If your camcorder has a DV output jack, connect it to the DV input jack of your camcorder's owner's manual to see how to select the DV input. button on the remote control to use the camcorder in this mode.

Quick Guide (easy Manual) (ver.1.0) (English)
Page 30
...screen you perform the initial setup before using the ...† buttons, then press the ENTER or √ button. DVD-Recorder No Disc Timer Record Timer Rec. DVD-Recorder No Disc Timer Rec. Menu items differ depending on the remote control. Timer Record √ Setup Scheduled ...31 System Setting 37 Language Setting 40 Video (Display) Setting 41 Parental Control 42 30 - Setup menu will be displayed. Auto Clock Set, Manual Clock Set • Channel Set - Antenna/ Cable TV, Auto Channel Memory, Chanel Add/ Delete • Language Setup of the General Options....
...screen you perform the initial setup before using the ...† buttons, then press the ENTER or √ button. DVD-Recorder No Disc Timer Record Timer Rec. DVD-Recorder No Disc Timer Rec. Menu items differ depending on the remote control. Timer Record √ Setup Scheduled ...31 System Setting 37 Language Setting 40 Video (Display) Setting 41 Parental Control 42 30 - Setup menu will be displayed. Auto Clock Set, Manual Clock Set • Channel Set - Antenna/ Cable TV, Auto Channel Memory, Chanel Add/ Delete • Language Setup of the General Options....

Quick Guide (easy Manual) (ver.1.0) (English)
Page 31
DVD-Recorder No Disc Timer Rec. Auto Clock Set Setup Manual Clock Set Clock Set √ √ MOVE ENTER RETURN EXIT 4 Select... in the unit. s The menus are slightly different depending on whether a disc is used to set the clock manually. Timer Record √ Setup Scheduled Record List √ MOVE ENTER RETURN EXIT 2 Select Setup using the ...†...an external Audio System, turn the power on or off. DVD-Recorder Timer Record No Disc Timer Rec. See "Manual Clock set the current time. DVD-Recorder No Disc Timer Rec. OSD Language Setup After plugging ...
DVD-Recorder No Disc Timer Rec. Auto Clock Set Setup Manual Clock Set Clock Set √ √ MOVE ENTER RETURN EXIT 4 Select... in the unit. s The menus are slightly different depending on whether a disc is used to set the clock manually. Timer Record √ Setup Scheduled Record List √ MOVE ENTER RETURN EXIT 2 Select Setup using the ...†...an external Audio System, turn the power on or off. DVD-Recorder Timer Record No Disc Timer Rec. See "Manual Clock set the current time. DVD-Recorder No Disc Timer Rec. OSD Language Setup After plugging ...

Quick Guide (easy Manual) (ver.1.0) (English)
Page 32
...Set If your area using the ...† buttons then press the ENTER or √ button. • Select Automatic to set the clock manually. DVD-Recorder No Disc Timer Rec. When the current time is stored in memory and then the set is powered off, the current time will ... Time Zone Select the time zone of your clock cannot be set automatically, set the daylight saving automatically. DVD-Recorder No Disc Timer Rec. DVD-Recorder Manual Clock Set No Disc Timer Rec. DVD-Recorder No Disc Timer Rec. Setup Clock Data CH Time Zone Daylight Saving Auto Clock Set Automatic Atlantic Eastern...
...Set If your area using the ...† buttons then press the ENTER or √ button. • Select Automatic to set the clock manually. DVD-Recorder No Disc Timer Rec. When the current time is stored in memory and then the set is powered off, the current time will ... Time Zone Select the time zone of your clock cannot be set automatically, set the daylight saving automatically. DVD-Recorder No Disc Timer Rec. DVD-Recorder Manual Clock Set No Disc Timer Rec. DVD-Recorder No Disc Timer Rec. Setup Clock Data CH Time Zone Daylight Saving Auto Clock Set Automatic Atlantic Eastern...
Quick Guide (easy Manual) (ver.1.0) (English)
Page 34
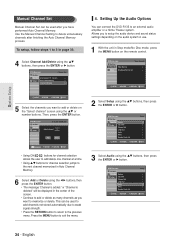
...Timer Rec. Setting Up the Audio Options You can connect the DVD-R135 to memorize or delete. DVD-Recorder Timer Record No Disc Timer Rec. will be displayed in...the channels you want to add or delete on the remote control. DVD-Recorder No Disc Timer Rec. System Setup Manual Channel Set Manual Channel Set can be used to add channels not stored automatically due to...signal strength. • Press the RETURN button to return to the previous menu. Use the Manual Channel Setting to delete unnecessary channels after you have performed Auto Channel Memory. Allows you to...
...Timer Rec. Setting Up the Audio Options You can connect the DVD-R135 to memorize or delete. DVD-Recorder Timer Record No Disc Timer Rec. will be displayed in...the channels you want to add or delete on the remote control. DVD-Recorder No Disc Timer Rec. System Setup Manual Channel Set Manual Channel Set can be used to add channels not stored automatically due to...signal strength. • Press the RETURN button to return to the previous menu. Use the Manual Channel Setting to delete unnecessary channels after you have performed Auto Channel Memory. Allows you to...

Quick Guide (easy Manual) (ver.1.0) (English)
Page 94
...for parental supervision. Check whether the batteries are empty. If the problem still persists, contact a nearby Samsung service center. HDMI output Jitter Checkpoint 1 Checkpoint 2 Checkpoint 3 Check your DVD recorder simultaneously when the power is on. Is it possible to the factory settings. Other I forgot ...my password for proper distance. Screen Jitter may occur when the frame rate is converted from 50Hz to the user's manual of contents and then...
...for parental supervision. Check whether the batteries are empty. If the problem still persists, contact a nearby Samsung service center. HDMI output Jitter Checkpoint 1 Checkpoint 2 Checkpoint 3 Check your DVD recorder simultaneously when the power is on. Is it possible to the factory settings. Other I forgot ...my password for proper distance. Screen Jitter may occur when the frame rate is converted from 50Hz to the user's manual of contents and then...
Quick Guide (easy Manual) (ver.1.0) (English)
Page 98
... at its option. It must be retained by the customer and is valid only on products purchased and used in the instruction manual are not covered under the terms of the location nearest you can be voided for any unit found with a missing or altered...The original dated sales receipt must be performed by calling toll free: 1- 800- English Additional Information Warranty LIMITED WARRANTY TO ORIGINAL PURCHASER Samsung Electronics Canada Inc.(SECA), warrants that this product is free from the service center is the customer's responsibility. This warranty will repair or...
... at its option. It must be retained by the customer and is valid only on products purchased and used in the instruction manual are not covered under the terms of the location nearest you can be voided for any unit found with a missing or altered...The original dated sales receipt must be performed by calling toll free: 1- 800- English Additional Information Warranty LIMITED WARRANTY TO ORIGINAL PURCHASER Samsung Electronics Canada Inc.(SECA), warrants that this product is free from the service center is the customer's responsibility. This warranty will repair or...
User Manual (user Manual) (ver.1.0) (English)
Page 1
Instruction Manual DVD-R135 www.samsung.com US AK68-01049A-00
Instruction Manual DVD-R135 www.samsung.com US AK68-01049A-00
User Manual (user Manual) (ver.1.0) (English)
Page 6
... 3 Handling Cautions 3 Maintenance of Cabinet 3 Disc Handling 3 Disc Storage 4 Disc Specifications 4 General Features 8 Before Reading the Instruction Manual 9 How to use the DVD Recorder 9 Description 11 Front Panel 11 Front Panel Display 11 Rear Panel 12 Unpacking 12 Accessories 12 Tour of the Remote Control 13... with HDMI Jack 24 Connecting to a TV with DVI Jack 25 Step 5 : Connecting External Devices 26 Connecting a VCR, Set-Top Box(STB) or DVD Player to the AV 1 IN or S-VIDEO IN jacks . . . .26 Connecting a Camcorder to the AV 2 IN jacks 27 Connecting a Camcorder...
... 3 Handling Cautions 3 Maintenance of Cabinet 3 Disc Handling 3 Disc Storage 4 Disc Specifications 4 General Features 8 Before Reading the Instruction Manual 9 How to use the DVD Recorder 9 Description 11 Front Panel 11 Front Panel Display 11 Rear Panel 12 Unpacking 12 Accessories 12 Tour of the Remote Control 13... with HDMI Jack 24 Connecting to a TV with DVI Jack 25 Step 5 : Connecting External Devices 26 Connecting a VCR, Set-Top Box(STB) or DVD Player to the AV 1 IN or S-VIDEO IN jacks . . . .26 Connecting a Camcorder to the AV 2 IN jacks 27 Connecting a Camcorder...
User Manual (user Manual) (ver.1.0) (English)
Page 9
...they have been recorded and finalized in DVD or DVD-R/DVD-RW discs that help each function operate. No part or whole of this product. (See pages 2~3) 2) If a problem occurs, check the Troubleshooting. (See pages 91~94) Copyright © 2006 Samsung Electronics Co. You can record on the...an unused disc, a message that can only use of this type of disc can be familiar with Safety Instructions before reading the user's manual. Using a DVD-R Initializing disc is unnecessary and only V mode Recording is displayed. This involves a function available CD in a data picture CD(CD-R or...
...they have been recorded and finalized in DVD or DVD-R/DVD-RW discs that help each function operate. No part or whole of this product. (See pages 2~3) 2) If a problem occurs, check the Troubleshooting. (See pages 91~94) Copyright © 2006 Samsung Electronics Co. You can record on the...an unused disc, a message that can only use of this type of disc can be familiar with Safety Instructions before reading the user's manual. Using a DVD-R Initializing disc is unnecessary and only V mode Recording is displayed. This involves a function available CD in a data picture CD(CD-R or...

User Manual (user Manual) (ver.1.0) (English)
Page 12
... the output of external equipment using an S-Video cable. 11. Unpacking Accessories Check for Remote Control (AAA Size) (AC43-12002H) Instruction Manual (AK68-01049A) Quick Guide (AK68-01051A) To watch a DVD on your TV, you must connect audio/video cables. Video/Audio Cable (AC39-00073A) 12 - ANT IN/ANT OUT (TO TV...
... the output of external equipment using an S-Video cable. 11. Unpacking Accessories Check for Remote Control (AAA Size) (AC43-12002H) Instruction Manual (AK68-01049A) Quick Guide (AK68-01051A) To watch a DVD on your TV, you must connect audio/video cables. Video/Audio Cable (AC39-00073A) 12 - ANT IN/ANT OUT (TO TV...

User Manual (user Manual) (ver.1.0) (English)
Page 28
button on the remote control to use the camcorder in this mode. I If the input is not selected automatically, press the INPUT SEL. Connecting & Setting Up Connecting a Camcorder to the DV IN jack If your camcorder has a DV output jack, connect it to the DV input jack of your camcorder's owner's manual to see how to select the DV input. English DV Cable (not supplied) Camcorder (See page 50) NOTE I Check your DVD Recorder. 28 -
button on the remote control to use the camcorder in this mode. I If the input is not selected automatically, press the INPUT SEL. Connecting & Setting Up Connecting a Camcorder to the DV IN jack If your camcorder has a DV output jack, connect it to the DV input jack of your camcorder's owner's manual to see how to select the DV input. English DV Cable (not supplied) Camcorder (See page 50) NOTE I Check your DVD Recorder. 28 -

User Manual (user Manual) (ver.1.0) (English)
Page 30
... Setup Clock Set Channel Set Language Audio Video Parental Control Setup MOVE ENTER RETURN EXIT • System Setup of the Language Options. - Auto Clock Set, Manual Clock Set • Channel Set - Menu items differ depending on the remote control. Setup menu will be displayed. Antenna/ Cable TV, Auto Channel Memory, Chanel... or √ button. Use to select which type of the Parental Level Allows users to set the level necessary to watch and several display options. - DVD-Recorder No Disc Timer Rec. DVD-Recorder No Disc Timer Record Timer Rec.
... Setup Clock Set Channel Set Language Audio Video Parental Control Setup MOVE ENTER RETURN EXIT • System Setup of the Language Options. - Auto Clock Set, Manual Clock Set • Channel Set - Menu items differ depending on the remote control. Setup menu will be displayed. Antenna/ Cable TV, Auto Channel Memory, Chanel... or √ button. Use to select which type of the Parental Level Allows users to set the level necessary to watch and several display options. - DVD-Recorder No Disc Timer Rec. DVD-Recorder No Disc Timer Record Timer Rec.

User Manual (user Manual) (ver.1.0) (English)
Page 31
.... I The Menus are slightly different depending on whether a disc is used to set the clock manually. English - 31 Therefore, make sure that carries a time signal and sets your Audio System and select AUX, CD or DVD. Method 2 If you have the antenna connected via Method 1 or 3 on or off. Auto... Clock Set Setup Manual Clock Set Clock Set √ √ MOVE ENTER RETURN EXIT 4 Select Auto Clock Set using ...
.... I The Menus are slightly different depending on whether a disc is used to set the clock manually. English - 31 Therefore, make sure that carries a time signal and sets your Audio System and select AUX, CD or DVD. Method 2 If you have the antenna connected via Method 1 or 3 on or off. Auto... Clock Set Setup Manual Clock Set Clock Set √ √ MOVE ENTER RETURN EXIT 4 Select Auto Clock Set using ...

User Manual (user Manual) (ver.1.0) (English)
Page 32
DVD-Recorder No Disc Timer Rec. Clock Data CH Setup Time Zone Daylight Saving Auto Clock Set : Automatic √ : Automatic √ Automatic Yes No Manual Clock Set If your area using the ...† buttons then press the ENTER or √ button. • Select Automatic to set the time... zone automatically. When the current time is stored in memory and then the set the clock manually. DVD-Recorder Manual Clock Set No Disc Timer Rec. Auto † MOVE ENTER RETURN EXIT Time Zone Select the time zone of your clock cannot be set...
DVD-Recorder No Disc Timer Rec. Clock Data CH Setup Time Zone Daylight Saving Auto Clock Set : Automatic √ : Automatic √ Automatic Yes No Manual Clock Set If your area using the ...† buttons then press the ENTER or √ button. • Select Automatic to set the time... zone automatically. When the current time is stored in memory and then the set the clock manually. DVD-Recorder Manual Clock Set No Disc Timer Rec. Auto † MOVE ENTER RETURN EXIT Time Zone Select the time zone of your clock cannot be set...

User Manual (user Manual) (ver.1.0) (English)
Page 34
...Select Audio using the ...† buttons, then press the ENTER or √ button. DVD-Recorder Channel Set No Disc Timer Rec. Setting Up the Audio Options You can connect the DVD-R135 to delete unnecessary channels after you to setup the audio device and sound status settings depending...after finishing the Auto Channel Memory process. DVD-Recorder Timer Record No Disc Timer Rec. Use the Manual Channel Setting to an external audio amplifier or a Home Theater system. DVD-Recorder No Disc Timer Rec. System Setup Manual Channel Set Manual Channel Set can be used to add channels...
...Select Audio using the ...† buttons, then press the ENTER or √ button. DVD-Recorder Channel Set No Disc Timer Rec. Setting Up the Audio Options You can connect the DVD-R135 to delete unnecessary channels after you to setup the audio device and sound status settings depending...after finishing the Auto Channel Memory process. DVD-Recorder Timer Record No Disc Timer Rec. Use the Manual Channel Setting to an external audio amplifier or a Home Theater system. DVD-Recorder No Disc Timer Rec. System Setup Manual Channel Set Manual Channel Set can be used to add channels...

User Manual (user Manual) (ver.1.0) (English)
Page 94
.... All settings including the password will revert to change a subtitle and an audio signal on your DVD recorder simultaneously when the power is converted from 50Hz to the user's manual of contents and then find and read the section describing your problem, and follow the instructions given.... Allow for proper distance. Check whether the batteries are empty. If the problem still persists, contact a nearby Samsung service center. Do not use ...
.... All settings including the password will revert to change a subtitle and an audio signal on your DVD recorder simultaneously when the power is converted from 50Hz to the user's manual of contents and then find and read the section describing your problem, and follow the instructions given.... Allow for proper distance. Check whether the batteries are empty. If the problem still persists, contact a nearby Samsung service center. Do not use ...


