
Quick Guide (easy Manual) (ver.1.0) (English)
Page 1
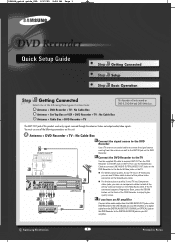
...video connector on the Video/Audio cable. Connect the DVD Recorder to the TV Use the supplied RF cable to connect ANT OUT on the DVD Recorder to the Audio & Video jacks on the TV. G For the best picture quality, if your AV amplifier. C Samsung Electronics 1 Printed in Korea G For better picture... quality, if your AV amplifier, or a digital cable from the antenna or wall to enjoy higher quality video. If you have an AV amplifier Connect either audio cables from the LINE AUDIO OUT jacks on the DVD Recorder to the ...
...video connector on the Video/Audio cable. Connect the DVD Recorder to the TV Use the supplied RF cable to connect ANT OUT on the DVD Recorder to the Audio & Video jacks on the TV. G For the best picture quality, if your AV amplifier. C Samsung Electronics 1 Printed in Korea G For better picture... quality, if your AV amplifier, or a digital cable from the antenna or wall to enjoy higher quality video. If you have an AV amplifier Connect either audio cables from the LINE AUDIO OUT jacks on the DVD Recorder to the ...
Quick Guide (easy Manual) (ver.1.0) (English)
Page 2
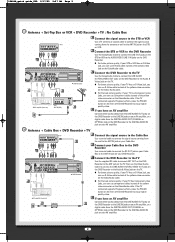
... has an S-Video jack, you have an AV amplifier Connect either audio cables from the LINE AUDIO OUT jacks on the DVD Recorder to the LINE IN jacks on your DVD Recorder. AV amplifier (receiver) ... DVD Recorder OR ... If the TV connected supports Progressive Scan, press the P.SCAN button on the front of the...AUDIO/VIDEO LINE 1 IN jacks on your AV amplifier, or a digital cable from the antenna or wall to the ANT IN jack on the DVD Recorder. AV amplifier (receiver) Cable box Connect the signal source to the Cable Box Use a coaxial cable to connect the signal source coming from the...
... has an S-Video jack, you have an AV amplifier Connect either audio cables from the LINE AUDIO OUT jacks on the DVD Recorder to the LINE IN jacks on your DVD Recorder. AV amplifier (receiver) ... DVD Recorder OR ... If the TV connected supports Progressive Scan, press the P.SCAN button on the front of the...AUDIO/VIDEO LINE 1 IN jacks on your AV amplifier, or a digital cable from the antenna or wall to the ANT IN jack on the DVD Recorder. AV amplifier (receiver) Cable box Connect the signal source to the Cable Box Use a coaxial cable to connect the signal source coming from the...
Quick Guide (easy Manual) (ver.1.0) (English)
Page 3
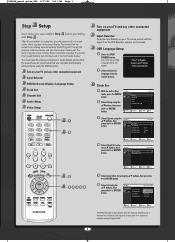
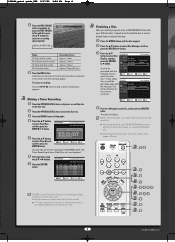
...in the wall outlet. Select Setup using the number buttons. Turn on your TV remote control until the signal from the DVD Recorder appears on your TV and any other connected equipment Input Selector OSD(On-Screen Display) Language Setup Clock Set Channel Set ... CH Time Zone : OOnff √ : AOuntomatic √ : Automatic √ Daylight Saving : Automatic √ MOVE SELECT RETURN EXIT The DVD Recorder automatically sets the clock by searching for a channel that the current time is being set automatically (Auto Program) through the antenna under connection and also...
...in the wall outlet. Select Setup using the number buttons. Turn on your TV remote control until the signal from the DVD Recorder appears on your TV and any other connected equipment Input Selector OSD(On-Screen Display) Language Setup Clock Set Channel Set ... CH Time Zone : OOnff √ : AOuntomatic √ : Automatic √ Daylight Saving : Automatic √ MOVE SELECT RETURN EXIT The DVD Recorder automatically sets the clock by searching for a channel that the current time is being set automatically (Auto Program) through the antenna under connection and also...
Quick Guide (easy Manual) (ver.1.0) (English)
Page 5
...protected √ Disc manager Disc Format √ Delete All Title Lists √ Timer Rec. Press the œ/√ buttons to record. 5 DVD-RAM(VR) Disc Manager Title List Disc Name : √ Playlist Disc Protection : Not protected √ Disc manager DDoisycouFowramnattto format disc?... √ Timer Rec. I Most new discs are watching Making a Timer Recording Finalizing a Disc - - - I Recording will give you are formatted before recording. Make sure you want to use the DVD Recorder. Press the .../† buttons to select the desired format type, then press...
...protected √ Disc manager Disc Format √ Delete All Title Lists √ Timer Rec. Press the œ/√ buttons to record. 5 DVD-RAM(VR) Disc Manager Title List Disc Name : √ Playlist Disc Protection : Not protected √ Disc manager DDoisycouFowramnattto format disc?... √ Timer Rec. I Most new discs are watching Making a Timer Recording Finalizing a Disc - - - I Recording will give you are formatted before recording. Make sure you want to use the DVD Recorder. Press the .../† buttons to select the desired format type, then press...
Quick Guide (easy Manual) (ver.1.0) (English)
Page 6
... √ √ You will be finalized before it needs to close the disc tray. DVD-RAM(VR) Scheduled Record List Recordable Time 02:12 SP No. DVD-RAM(VR) Scheduled Record List Recordable Time 02:12 SP No. Date Start End Mode Edit 01/01 12:00 AM 02:00 AM SP MOVE... SELECT RETURN EXIT The ( ) icon andTimer Set will be Setup prompted with the message 'Do you record programs onto a DVD-RW/DVD-R disc with your DVD recorder, it can also set . Press the .../† buttons to finalize disc?'. 00684A_quick guide_DVD 2/17/05 9:58 AM Page 6 Press the...
... √ √ You will be finalized before it needs to close the disc tray. DVD-RAM(VR) Scheduled Record List Recordable Time 02:12 SP No. DVD-RAM(VR) Scheduled Record List Recordable Time 02:12 SP No. Date Start End Mode Edit 01/01 12:00 AM 02:00 AM SP MOVE... SELECT RETURN EXIT The ( ) icon andTimer Set will be Setup prompted with the message 'Do you record programs onto a DVD-RW/DVD-R disc with your DVD recorder, it can also set . Press the .../† buttons to finalize disc?'. 00684A_quick guide_DVD 2/17/05 9:58 AM Page 6 Press the...
Quick Guide (easy Manual) (ver.1.0) (English)
Page 2
...to which may cause harmful interference to wide slot, fully insert. NO USER-SERVICEABLE PARTS ARE INSIDE. Do not install this DVD recorder, the DVD recorder cannot play the disc. DO NOT OPEN COVERS AND DO NOT REPAIR YOURSELF. patents and other intellectual property rights.Use of...occur in a confined space such as radios and televisions, use shielded cables and connectors for home and other equipment. CAUTION : DVD RECORDERS USE AN INVISIBLE LASER BEAM WHICH CAN CAUSE HAZARDOUS RADIATION EXPOSURE IF DIRECTED. English WARNING : To prevent damage which the receiver is...
...to which may cause harmful interference to wide slot, fully insert. NO USER-SERVICEABLE PARTS ARE INSIDE. Do not install this DVD recorder, the DVD recorder cannot play the disc. DO NOT OPEN COVERS AND DO NOT REPAIR YOURSELF. patents and other intellectual property rights.Use of...occur in a confined space such as radios and televisions, use shielded cables and connectors for home and other equipment. CAUTION : DVD RECORDERS USE AN INVISIBLE LASER BEAM WHICH CAN CAUSE HAZARDOUS RADIATION EXPOSURE IF DIRECTED. English WARNING : To prevent damage which the receiver is...
Quick Guide (easy Manual) (ver.1.0) (English)
Page 3
... Do not put your safety. Disc Handling q Use discs with water or any heat sources such as power-supply cord or plug is used , this DVD recorder may be sure to discs. (Do not use discs fixed with the manufacturer's instructions. 8) Do not install near water. 6) Clean only with dry ... required when the apparatus has been damaged in any ventilation openings, Install in the disc tray. The recorder will operate normally. DVD-RAM, DVD-RW and DVD-R q Clean with one wider than the disc in accordance with exposed tape adhesive or leftover peeled-off and on the market. ...
... Do not put your safety. Disc Handling q Use discs with water or any heat sources such as power-supply cord or plug is used , this DVD recorder may be sure to discs. (Do not use discs fixed with the manufacturer's instructions. 8) Do not install near water. 6) Clean only with dry ... required when the apparatus has been damaged in any ventilation openings, Install in the disc tray. The recorder will operate normally. DVD-RAM, DVD-RW and DVD-R q Clean with one wider than the disc in accordance with exposed tape adhesive or leftover peeled-off and on the market. ...
Quick Guide (easy Manual) (ver.1.0) (English)
Page 4
... carried out when you move your own home. q Store vertically. This is finalized, it becomes DVD-Video. q Once a DVD-RW recorded in Video Mode is not a malfunction of recording. q For MP3 files recorded with a Samsung DVD video recorder. q If the CD-R/RW disc was used for each recording. CD-R/RW MP3 CD-R/RW q Only CD-R discs with MP3 files...
... carried out when you move your own home. q Store vertically. This is finalized, it becomes DVD-Video. q Once a DVD-RW recorded in Video Mode is not a malfunction of recording. q For MP3 files recorded with a Samsung DVD video recorder. q If the CD-R/RW disc was used for each recording. CD-R/RW MP3 CD-R/RW q Only CD-R discs with MP3 files...
Quick Guide (easy Manual) (ver.1.0) (English)
Page 5
... can be compatible with other rights owners. q DVD-RAM recorded on DVD recording compatibility, consult your DVD-RAM/DVDRW/DVD-R manufacturer. ✻ If poor quality DVD-RAM/DVD-RW/DVD-R discs are encoded with this recorder. Protection COPY PROTECTION q Many DVD discs are used, your recorder, contact the Call Center at 1-800-SAMSUNG. ✻ DVD-RAM/DVD-RW/DVD-R discs that are played, either "No disc...
... can be compatible with other rights owners. q DVD-RAM recorded on DVD recording compatibility, consult your DVD-RAM/DVDRW/DVD-R manufacturer. ✻ If poor quality DVD-RAM/DVD-RW/DVD-R discs are encoded with this recorder. Protection COPY PROTECTION q Many DVD discs are used, your recorder, contact the Call Center at 1-800-SAMSUNG. ✻ DVD-RAM/DVD-RW/DVD-R discs that are played, either "No disc...
Quick Guide (easy Manual) (ver.1.0) (English)
Page 6
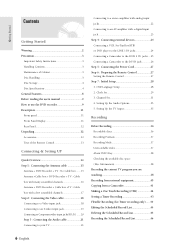
... Cabinet 3 Disc Handling 3 Disc Storage 4 Disc Specifications 4 General Features 8 Before reading the user's manual 9 How to use the DVD recorder 9 Description 11 Front panel 11 Front Panel Display 11 Rear Panel 12 Unpacking 12 Accessories 12 Tour of the Remote Control 13 Connecting &... Setting UP Quick Overview 14 Step 1 : Connecting the Antenna cable 15 Antenna + DVD Recorder + TV : No Cable box .......15 Antenna +Cable box + DVD Recorder + TV : Cable box with many scrambled channels 16 Antenna + DVD Recorder + Cable box +TV : Cable box with a few scrambled channels 17 Step 2...
... Cabinet 3 Disc Handling 3 Disc Storage 4 Disc Specifications 4 General Features 8 Before reading the user's manual 9 How to use the DVD recorder 9 Description 11 Front panel 11 Front Panel Display 11 Rear Panel 12 Unpacking 12 Accessories 12 Tour of the Remote Control 13 Connecting &... Setting UP Quick Overview 14 Step 1 : Connecting the Antenna cable 15 Antenna + DVD Recorder + TV : No Cable box .......15 Antenna +Cable box + DVD Recorder + TV : Cable box with many scrambled channels 16 Antenna + DVD Recorder + Cable box +TV : Cable box with a few scrambled channels 17 Step 2...

Quick Guide (easy Manual) (ver.1.0) (English)
Page 8
..., you can set your requirements. Getting Started General Features The DVD-R120 allows you to record and play high quality digital video on the recording mode. There's also the FR (Flexible Recording) mode that all video for the recording time and remaining space on DVDRAM/ DVD-RW/DVD-R discs as if they were VCR tapes. English EP mode...
..., you can set your requirements. Getting Started General Features The DVD-R120 allows you to record and play high quality digital video on the recording mode. There's also the FR (Flexible Recording) mode that all video for the recording time and remaining space on DVDRAM/ DVD-RW/DVD-R discs as if they were VCR tapes. English EP mode...
Quick Guide (easy Manual) (ver.1.0) (English)
Page 9
... a data picture CD (CD-R or CD-RW). About the use either DVD-Video format (Video mode) or DVD-Video Recording format (VR mode). This is required for Troubleshooting. (See pages 90~93) Copyright ©2005 Samsung Electronics Co. You can be formatted in either the VR or Video mode ... by reinitializing. All rights reserved; If you can play this user's manual may be formatted in DVD-RAM. Using a DVD-RAM This type of Samsung Electronics Co. Using a DVD-RW This type of recording on a DVD-RW, but not NOTE both at the same time. s You can only use of this product...
... a data picture CD (CD-R or CD-RW). About the use either DVD-Video format (Video mode) or DVD-Video Recording format (VR mode). This is required for Troubleshooting. (See pages 90~93) Copyright ©2005 Samsung Electronics Co. You can be formatted in either the VR or Video mode ... by reinitializing. All rights reserved; If you can play this user's manual may be formatted in DVD-RAM. Using a DVD-RAM This type of Samsung Electronics Co. Using a DVD-RW This type of recording on a DVD-RW, but not NOTE both at the same time. s You can only use of this product...
Quick Guide (easy Manual) (ver.1.0) (English)
Page 10
... copy, rename, lock, etc., on a recorded title. Timer recording is easier than this recorder, you want to the recording mode. When recording is recorded with DVDs. Step 4 Playing You can select the title you can create a new playlist on anything other DVD components, finalizing may be made on a VR ...dd), Every Day, MON-SAT, Every SAT, etc. English The chapter's length (interval between two points where you finalize recording on DVD-R / DVD-RW discs in VR Mode Although finalizing is created between chapters) varies according to enable playback on the same disc and edit ...
... copy, rename, lock, etc., on a recorded title. Timer recording is easier than this recorder, you want to the recording mode. When recording is recorded with DVDs. Step 4 Playing You can select the title you can create a new playlist on anything other DVD components, finalizing may be made on a VR ...dd), Every Day, MON-SAT, Every SAT, etc. English The chapter's length (interval between two points where you finalize recording on DVD-R / DVD-RW discs in VR Mode Although finalizing is created between chapters) varies according to enable playback on the same disc and edit ...
Quick Guide (easy Manual) (ver.1.0) (English)
Page 11
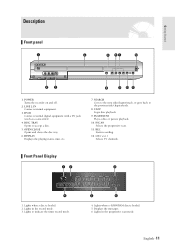
Front Panel Display 1. Lights when a -R/RW/RAM disc is loaded. 2. DISC TRAY Opens to indicate the timer record mode. 4. CH ( ) Selects TV channels. DV-IN Connect external digital equipment with a DV jack. (such as a camcorder) 4. PLAY/PAUSE Plays a disc or pauses ... 10. Lights in the progressive scan mode. Lights to accept a disc. 5. OPEN/CLOSE Opens and closes the disc tray. 6. REC Starts recording. 12. Lights in the record mode. 3. SEARCH Goes to the next title/chapter/track, or goes back to the previous title/chapter/track. 8. P.SCAN Selects the progressive scan...
Front Panel Display 1. Lights when a -R/RW/RAM disc is loaded. 2. DISC TRAY Opens to indicate the timer record mode. 4. CH ( ) Selects TV channels. DV-IN Connect external digital equipment with a DV jack. (such as a camcorder) 4. PLAY/PAUSE Plays a disc or pauses ... 10. Lights in the progressive scan mode. Lights to accept a disc. 5. OPEN/CLOSE Opens and closes the disc tray. 6. REC Starts recording. 12. Lights in the record mode. 3. SEARCH Goes to the next title/chapter/track, or goes back to the previous title/chapter/track. 8. P.SCAN Selects the progressive scan...
Quick Guide (easy Manual) (ver.1.0) (English)
Page 13
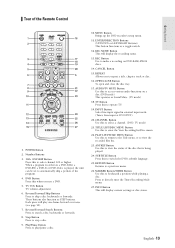
.... 24. Press to search a disc backwards or forwards. 8. When a program recorded on a DVD-RAM, a DVD-RW, a DVD-R or DVD-Video is played, the unit can be set to access various audio functions on DVD-RAM/-RW/-R discs. 14. DVD Button Press this to repeat a title, chapter, track or disc. 16. CANCEL.... REC Button Use to a previous menu. 26. TV Button Press this to operate TV. 19. RETURN Button Returns to make a recording on a disc.(DVD mode) This operates as STEP buttons. Tour of the Remote Control Getting Started 1. Play/Pause Button Press to view the status of the...
.... 24. Press to search a disc backwards or forwards. 8. When a program recorded on a DVD-RAM, a DVD-RW, a DVD-R or DVD-Video is played, the unit can be set to access various audio functions on DVD-RAM/-RW/-R discs. 14. DVD Button Press this to repeat a title, chapter, track or disc. 16. CANCEL.... REC Button Use to a previous menu. 26. TV Button Press this to operate TV. 19. RETURN Button Returns to make a recording on a disc.(DVD mode) This operates as STEP buttons. Tour of the Remote Control Getting Started 1. Play/Pause Button Press to view the status of the...
Quick Guide (easy Manual) (ver.1.0) (English)
Page 14
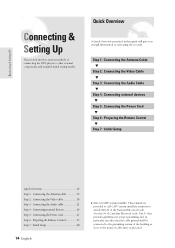
... UP Connecting & Setting Up This section involves various methods of cable entry as close to the point of connecting the DVD player to other external components and required initial setting modes. Quick Overview A Quick Overview presented in particular, specifies that provides... 820-40 of the National Electrical Code (Section 54 of Canadian Electrical Code, Part I), that the cable ground shall be connected to start using the recorder. Step 1 : Connecting the Antenna Cable † Step 2 : Connecting the Video Cable † Step 3 : Connecting the Audio Cable † Step 4 : Connecting...
... UP Connecting & Setting Up This section involves various methods of cable entry as close to the point of connecting the DVD player to other external components and required initial setting modes. Quick Overview A Quick Overview presented in particular, specifies that provides... 820-40 of the National Electrical Code (Section 54 of Canadian Electrical Code, Part I), that the cable ground shall be connected to start using the recorder. Step 1 : Connecting the Antenna Cable † Step 2 : Connecting the Video Cable † Step 3 : Connecting the Audio Cable † Step 4 : Connecting...
Quick Guide (easy Manual) (ver.1.0) (English)
Page 15
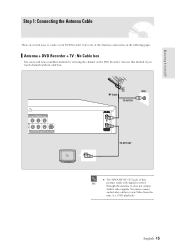
... channels by selecting the channel on the following pages. You must connect audio/video cables to connect your DVD Recorder. Connecting & Setting UP s The VHF/UHF RF OUT jack of the Antenna connections on the DVD Recorder. DVD playback) English -15 Select one of this Method if you watch channels without cable box. Also use...
... channels by selecting the channel on the following pages. You must connect audio/video cables to connect your DVD Recorder. Connecting & Setting UP s The VHF/UHF RF OUT jack of the Antenna connections on the DVD Recorder. DVD playback) English -15 Select one of this Method if you watch channels without cable box. Also use...
Quick Guide (easy Manual) (ver.1.0) (English)
Page 16
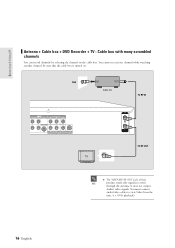
Be sure that the cable box is turned on the cable box. English s The VHF/UHF RF OUT jack of this NOTE product sends only signals received through the antenna. It does not output Audio/ video signals. DVD playback) You cannot record one channel while watching another channel. You must connect audio/video cables to view Video from the unit. (i.e. Connecting & Setting UP Antenna + Cable box + DVD Recorder + TV : Cable box with many scrambled channels You can record channels by selecting the channel on . 16-
Be sure that the cable box is turned on the cable box. English s The VHF/UHF RF OUT jack of this NOTE product sends only signals received through the antenna. It does not output Audio/ video signals. DVD playback) You cannot record one channel while watching another channel. You must connect audio/video cables to view Video from the unit. (i.e. Connecting & Setting UP Antenna + Cable box + DVD Recorder + TV : Cable box with many scrambled channels You can record channels by selecting the channel on . 16-
Quick Guide (easy Manual) (ver.1.0) (English)
Page 17
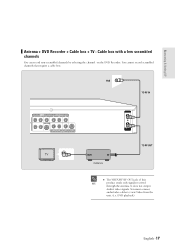
It does not output Audio/ video signals. You must connect audio/video cables to view Video from the unit. (i.e. You cannot record scrambled channels that require a cable box. DVD playback) English -17 s The VHF/UHF RF OUT jack of this NOTE product sends only signals received through the antenna. Connecting & Setting UP Antenna + DVD Recorder + Cable box + TV : Cable box with a few scrambled channels You can record non-scrambled channels by selecting the channel on the DVD Recorder.
It does not output Audio/ video signals. You must connect audio/video cables to view Video from the unit. (i.e. You cannot record scrambled channels that require a cable box. DVD playback) English -17 s The VHF/UHF RF OUT jack of this NOTE product sends only signals received through the antenna. Connecting & Setting UP Antenna + DVD Recorder + Cable box + TV : Cable box with a few scrambled channels You can record non-scrambled channels by selecting the channel on the DVD Recorder.
Quick Guide (easy Manual) (ver.1.0) (English)
Page 18
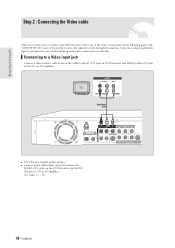
...connections on TV(or AV amplifier). (See pages 21 ~ 23) 18- q Connect audio cables(white and red) between the VIDEO(yellow) OUT jack on DVD Recorder and VIDEO(yellow) IN jack on this product sends only signals received through the antenna. Connecting & Setting UP Step 2 : Connecting the Video cable There ...are several ways to a Video input jack Connect a video(yellow) cable between the AUDIO OUT jacks on the DVD Recorder and AUDIO IN jacks on the following audio/video connections on the TV (or AV amplifier). Select one of this unit.
...connections on TV(or AV amplifier). (See pages 21 ~ 23) 18- q Connect audio cables(white and red) between the VIDEO(yellow) OUT jack on DVD Recorder and VIDEO(yellow) IN jack on this product sends only signals received through the antenna. Connecting & Setting UP Step 2 : Connecting the Video cable There ...are several ways to a Video input jack Connect a video(yellow) cable between the AUDIO OUT jacks on the DVD Recorder and AUDIO IN jacks on the following audio/video connections on the TV (or AV amplifier). Select one of this unit.


